这是一篇学习帖
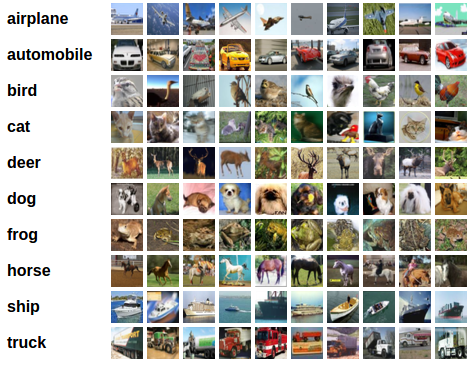
对于视觉数据,PyTorch 创建了一个叫做 totchvision 的包,该包含有支持加载类似Imagenet,CIFAR10,MNIST 等公共数据集的数据加载模块 torchvision.datasets 和支持加载图像数据数据转换模块 torch.utils.data.DataLoader。 下面将使用CIFAR10数据集,它包含十个类别:‘airplane’, ‘automobile’, ‘bird’, ‘cat’, ‘deer’, ‘dog’, ‘frog’, ‘horse’, ‘ship’, ‘truck’。CIFAR-10 中的图像尺寸为3x32x32,也就是RGB的3层颜色通道,每层通道内的尺寸为32*32。  首先,加载并归一化 CIFAR10 使用 torchvision 。torchvision 数据集的输出是范围在[0,1]之间的 PILImage,我们将他们转换成归一化范围为[-1,1]之间的张量 Tensors。 大家肯定好奇,下面代码中说的是 0.5,怎么就变化到[-1,1]之间了?PyTorch源码中是这么写的: ``input[channel] = (input[channel] - mean[channel]) / std[channel]`` 这样就是:((0,1)-0.5)/0.5=(-1,1)。 import torch import torchvision import torchvision.transforms as transforms import matplotlib.pyplot as plt import numpy as np import torch.nn as nn import torch.nn.functional as F import torch.optim as optim # 使用GPU训练,可以在菜单 "代码执行工具" -> "更改运行时类型" 里进行设置 device = torch.device("cuda:0" if torch.cuda.is_available() else "cpu") transform = transforms.Compose( [transforms.ToTensor(), transforms.Normalize((0.5, 0.5, 0.5), (0.5, 0.5, 0.5))]) # 注意下面代码中:训练的 shuffle 是 True,测试的 shuffle 是 false # 训练时可以打乱顺序增加多样性,测试是没有必要 trainset = torchvision.datasets.CIFAR10(root='./data', train=True, download=True, transform=transform) trainloader = torch.utils.data.DataLoader(trainset, batch_size=64, shuffle=True, num_workers=2) testset = torchvision.datasets.CIFAR10(root='./data', train=False, download=True, transform=transform) testloader = torch.utils.data.DataLoader(testset, batch_size=8, shuffle=False, num_workers=2) classes = ('plane', 'car', 'bird', 'cat', 'deer', 'dog', 'frog', 'horse', 'ship', 'truck') 下面展示 CIFAR10 里面的一些图片: def imshow(img): plt.figure(figsize=(8,8)) img = img / 2 + 0.5 # 转换到 [0,1] 之间 npimg = img.numpy() plt.imshow(np.transpose(npimg, (1, 2, 0))) plt.show() # 得到一组图像 images, labels = iter(trainloader).next() # 展示图像 imshow(torchvision.utils.make_grid(images)) # 展示第一行图像的标签 for j in range(8): print(classes[labels[j]]) 接下来定义网络,损失函数和优化器: class Net(nn.Module): def __init__(self): super(Net, self).__init__() self.conv1 = nn.Conv2d(3, 6, 5) self.pool = nn.MaxPool2d(2, 2) self.conv2 = nn.Conv2d(6, 16, 5) self.conv3 = nn.Conv2d(16, 32, 5) self.fc1 = nn.Linear(32 * 5 * 5, 120) self.fc2 = nn.Linear(120, 84) self.fc3 = nn.Linear(84, 10) def forward(self, x): x = self.pool(F.relu(self.conv1(x))) x = self.pool(F.relu(self.conv2(x))) x = F.relu(self.conv3(x)) x = x.view(-1, 20 * 5 * 5) x = F.relu(self.fc1(x)) x = F.relu(self.fc2(x)) x = self.fc3(x) return x # 网络放到GPU上 net = Net().to(device) criterion = nn.CrossEntropyLoss() optimizer = optim.Adam(net.parameters(), lr=0.001) 训练网络: for epoch in range(10): # 重复多轮训练 for i, (inputs, labels) in enumerate(trainloader): inputs = inputs.to(device) labels = labels.to(device) # 优化器梯度归零 optimizer.zero_grad() # 正向传播 + 反向传播 + 优化 outputs = net(inputs) loss = criterion(outputs, labels) loss.backward() optimizer.step() # 输出统计信息 if i % 100 == 0: print('Epoch: %d Minibatch: %5d loss: %.3f' %(epoch + 1, i + 1, loss.item())) print('Finished Training') 现在我们从测试集中取出8张图片: # 得到一组图像 images, labels = iter(testloader).next() # 展示图像 imshow(torchvision.utils.make_grid(images)) # 展示图像的标签 for j in range(8): print(classes[labels[j]]) 我们把图片输入模型,看看CNN把这些图片识别成什么: outputs = net(images.to(device)) _, predicted = torch.max(outputs, 1) # 展示预测的结果 for j in range(8): print(classes[predicted[j]]) 可以看到,有几个都识别错了~~~ 让我们看看网络在整个数据集上的表现: correct = 0 total = 0 for data in testloader: images, labels = data images, labels = images.to(device), labels.to(device) outputs = net(images) _, predicted = torch.max(outputs.data, 1) total += labels.size(0) correct += (predicted == labels).sum().item() print('Accuracy of the network on the 10000 test images: %d %%' % ( 100 * correct / total)) 准确率还可以,通过改进网络结构,性能还可以进一步提升。在 Kaggle 的LeaderBoard上,准确率高的达到95%以上。  感兴趣的同学可以看看别人的解决方案,思考如何提升分类性能。