本地虚拟机配置记录
记录一次虚拟机创建部署流程
1、虚拟机安装步骤
virtualBox 安装虚拟机
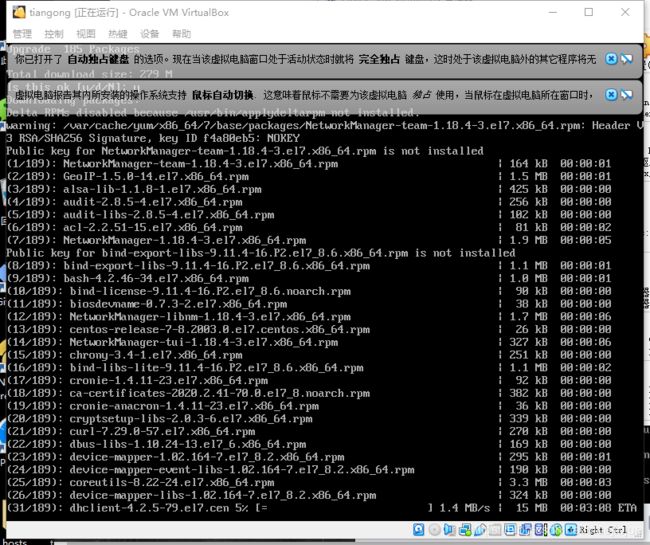
先进行基本内存选择
指定本地iso镜像路径启动
进度条结束后设置root密码(我曾在进度条读完前设置密码报错失败了)
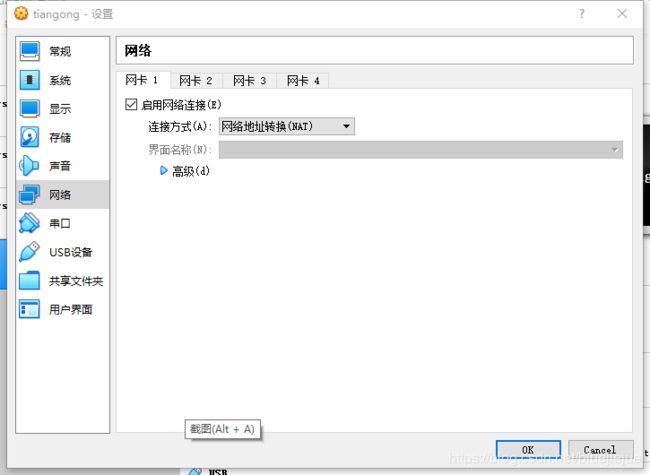
2、网络设置
参考 [xshell本地虚拟机网络设置](https://blog.csdn.net/elie_yang/article/details/81369136)
在虚拟机窗口中输入:
-
cd /etc/sysconfig/network-scripts/
编辑 ifcfg-enp0s3文件
vi ifcfg-enp0s3
(按Tab键自动补充完成),
设置onboot=yes; esc + :wq 保存修改退出
关机

设置网络123


启动
3、常用命令安装
yum
yum update
ifconfig
yum search ifconfig
yum install net-tools.x86_64
此时可以使用ifconfig 命令
ifconfig

然后就可以使用xshell链接了
后期操作都在xshell中
上传下载 nzsz
yum install -y lrzsz
java
yum list java*
yum install java-1.8.0-openjdk.x86_64

vi /etc/profile.d/java.sh
JAVA_HOME=/usr/lib/jvm/java-1.8.0-openjdk-1.8.0.252.b09-2.el7_8.x86_64
JRE_HOME=$JAVA_HOME/jre
CLASS_PATH=.:$JAVA_HOME/lib/dt.jar:$JAVA_HOME/lib/tools.jar:$JRE_HOME/lib
PATH=$PATH:$JAVA_HOME/bin:$JRE_HOME/bin
export JAVA_HOME JRE_HOME CLASS_PATH PATH
chmod 755 /etc/profile.d/java.sh
echo $JAVA_HOME

java -version
wget
yum search wget
yum -y install wget.x86_64
maven
wget http://repos.fedorapeople.org/repos/dchen/apache-maven/epel-apache-maven.repo -O /etc/yum.repos.d/epel-apache-maven.repo

yum -y install apache-maven

mvn -version
docker
yum install -y docker
docker 加速镜像
注册获取 镜像地址
https://www.daocloud.io/mirror
阿里注册地址
https://dev.aliyun.com/search.html
curl -sSL https://get.daocloud.io/daotools/set_mirror.sh | sh -s http://f1361xxxx.m.daocloud.io
vi /etc/docker/daemon.json #去掉数组后逗号
{
“registry-mirrors”: [“http://f1361xxxx.m.daocloud.io“]
}
安装dig命令
yum install bind-utils
运行
dig @114.114.114.114 registry-1.docker.io

根据返回配置host
vi /etc/hosts

34.195.246.183 registry-1.docker.io
34.202.247.184    registry-1.docker.io
重启Docker
配置完之后执行下面的命令,以使docker的配置文件生效
systemctl daemon-reload
systemctl restart docker
逗号去掉
在/etc/resolv.conf文件中新增一个参数
vi /etc/resolv.conf
# Generated by NetworkManager
nameserver 103.44.168.6
nameserver 103.44.168.7
nameserver 172.21.40.1
#添加
nameserver 8.8.8.8
设置dockers自动启动
systemctl enable docker
systemctl start docker
重启docker
service docker restart
git
yum -y install git
python-pip
yum -y install epel-release
yum -y install python-pip
使用命令安装其他程序报错
![]()
pip install --upgrade pip
重新执行
docker-compose
pip install docker-compose
killall
yum install -y psmisc
vsftpd
yum -y install vsftpd
openresty
方法1
yum install pcre-devel openssl-devel gcc curl wget
wget https://openresty.org/download/openresty-1.15.8.3.tar.gz
tar -xzvf openresty-1.15.8.3.tar.gz
cd openresty-1.15.8.3
./configure
gmake
gmake install
方法2
yum install -y wget
wget -O /etc/yum.repos.d/openresty.repo https://openresty.org/package/centos/openresty.repo
yum install -y openresty openresty-resty
虚拟站点配置
#虚拟站点配置文件
cat /usr/local/openresty/nginx/test/index.php
echo hellowld
<h1>yayayayayale</h1>
```、

```bash
cat /usr/local/openresty/nginx/conf.d/php.conf
server {

  #监听端口
  listen 801;

  #网站根目录
  root /usr/local/openresty/nginx/test;

  #虚拟主机名称
  server_name 192.168.168.21;

  #网站主页排序
  index index.php index.html index.htm default.php default.htm default.html;

  #网站访问、错误日志
  access_log /usr/local/openresty/nginx/test/test.access.log;
  error_log /usr/local/openresty/nginx/logs/test/test.error.log;

  #流量限制(网站最大并发数500|单IP访问最大并发数50|每个请求流量上限1024KB)
  #limit_conn perserver 500;
  #limit_conn perip 50;
  #limit_rate 1024k;

  #配置错误页面
  #error_page 404 /404.html;
  #error_page 500 502 503 504 /50x.html;

  #禁止访问文件和目录
  location ~ ^/(\.user.ini|\.htaccess|\.git|\.svn|\.project|LICENSE|README.md) {
    return 404;
  }

  #配置资源防盗链
  location ~ .*\.(jpg|jpeg|gif|png|js|css)$ {
    expires 30d;
    access_log /dev/null;
    valid_referers none blocked 192.168.168.21;
    if ($invalid_referer) {
      return 404;
    }
  }

  #配置图片资源缓存时间
  location ~ .*\.(gif|jpg|jpeg|png|bmp|swf)$ {
    expires 30d;
    error_log off;
    access_log /dev/null;
  }

  #设置样式资源缓存时间
  location ~ .*\.(js|css)?$ {
    expires 12h;
    error_log off;
    access_log /dev/null;
  }

  #解析PHP
  location ~* \.php$ {
    fastcgi_index index.php;
    fastcgi_pass 127.0.0.1:9000;
    include fastcgi_params;
    fastcgi_param SCRIPT_FILENAME $document_root$fastcgi_script_name;
    fastcgi_param SCRIPT_NAME $fastcgi_script_name;
  }
}
#主配置文件
[root@localhost conf]# cat /usr/local/openresty/nginx/conf/nginx.conf

#user  nobody;
worker_processes  1;

error_log  logs/error.log;
#error_log  logs/error.log  notice;
#error_log  logs/error.log  info;

#pid        logs/nginx.pid;


events {
    worker_connections  1024;
}


http {
    #加载虚拟主机配置文件
    include /usr/local/openresty/nginx/conf.d/*.conf;
    include       mime.types;
    default_type  application/octet-stream;

    #log_format  main  '$remote_addr - $remote_user [$time_local] "$request" '
    #                 '$status $body_bytes_sent "$http_referer" '
    #                '"$http_user_agent" "$http_x_forwarded_for"';

    #access_log  logs/access.log  main;
    log_format  json  '{"@timestamp":"$time_iso8601",'
                      '"@version":"1",'
                      '"client":"$remote_addr",'
                      '"url":"$uri",'
                      '"status":"$status",'
                      '"domain":"$host",'
                      '"host":"$server_addr",'
                      '"size":"$body_bytes_sent",'
                      '"responsentime":"$request_time",'
                      '"referer":"$http_referer",'
                      '"useragent":"$http_user_agent",'
                      '"upstreampstatus":"$upstream_status",'
                      '"upstreamaddr":"$upstream_addr",'
                      '"upstreamresponsetime":"$upstream_response_time"'
                       '}';

    access_log  logs/access_json.log  json;
    sendfile        on;
    #tcp_nopush     on;

    #keepalive_timeout  0;
    keepalive_timeout  65;

    #gzip  on;

    server {
        listen       80;
        server_name  localhost;

        #charset koi8-r;

        #access_log  logs/host.access.log  main;

        location / {
            root   html;
            index  index1.html index.htm;
        }

        #error_page  404              /404.html;

        # redirect server error pages to the static page /50x.html
        #
        error_page   500 502 503 504  /50x.html;
        location = /50x.html {
            root   html;
        }

        # proxy the PHP scripts to Apache listening on 127.0.0.1:80
        #
        #location ~ \.php$ {
        #    proxy_pass   http://127.0.0.1;
        #}

        # pass the PHP scripts to FastCGI server listening on 127.0.0.1:9000
        #
        #location ~ \.php$ {
        #    root           html;
        #    fastcgi_pass   127.0.0.1:9000;
        #    fastcgi_index  index.php;
        #    fastcgi_param  SCRIPT_FILENAME  /scripts$fastcgi_script_name;
        #    include        fastcgi_params;
        #}

        # deny access to .htaccess files, if Apache's document root
        # concurs with nginx's one
        #
        #location ~ /\.ht {
        #    deny  all;
        #}
    }


    # another virtual host using mix of IP-, name-, and port-based configuration
    #
    #server {
    #    listen       8000;
    #    listen       somename:8080;
    #    server_name  somename  alias  another.alias;

    #    location / {
    #        root   html;
    #        index  index.html index.htm;
    #    }
    #}


    # HTTPS server
    #
    #server {
    #    listen       443 ssl;
    #    server_name  localhost;

    #    ssl_certificate      cert.pem;
    #    ssl_certificate_key  cert.key;

    #    ssl_session_cache    shared:SSL:1m;
    #    ssl_session_timeout  5m;

    #    ssl_ciphers  HIGH:!aNULL:!MD5;
    #    ssl_prefer_server_ciphers  on;

    #    location / {
    #        root   html;
    #        index  index.html index.htm;
    #    }
    #}

}
PHP
yum install php-fpm php-mysql php-xml php -y
systemctl enable php-fpm.service --now
lua5.3
curl -R -O http://www.lua.org/ftp/lua-5.3.5.tar.gz
yum install readline-devel gcc -y
tar zxvf lua-5.3.5.tar.gz
cd lua-5.3.5
make linux
make INSTALL_TOP=/usr/local/lua install
yum install systemd-devel wget openssl openssl-devel -y
export PATH=$PATH:/usr/local/openresty/luajit/bin
haproxy
部署
wget https://www.haproxy.org/download/2.0/src/haproxy-2.0.1.tar.gz
tar zxvf haproxy-2.0.1.tar.gz
cd haproxy-2.0.1
make -j $(nproc) TARGET=linux-glibc USE_OPENSSL=1 USE_ZLIB=1 USE_LUA=1 LUA_LIB=/usr/local/lua/lib/ LUA_INC=/usr/local/lua/include/ USE_PCRE=1 USE_SYSTEMD=1
make install PREFIX=/usr/local/haproxycd
运行权限设置
useradd haproxy -s /sbin/nologin
配置
创建配置文件haproxy.cfg。在安装目录/usr/local/hadproxy下新建haproxy.cfg
global  #全局设置
  daemon  #以后台进程运行
  maxconn 256  #每个进程的最大连接数
  nbproc 1  #进程数,该值可以设置小于或等于cpu核心数
  balance roundrobin #默认的负载均衡的方式,轮询方式
  #balance source #默认的负载均衡的方式,类似nginx的ip_hash
  #balance leastconn #默认的负载均衡的方式,最小连接
defaults  #默认设置
  mode http  #设置http(七层模式),也可设置为tcp(四层模式),另外还有一个Health健康监测模式。对mysql进行负载均衡的话,这里记得修改为tcp
  timeout connect 5000ms
  timeout client 50000ms
  timeout server 50000ms


listen admin_stats #配置haproxy管理页面
  bind *:9999  #访问端口为9999
  mode http
  option httplog
  stats refresh 30s  #自动刷新时间
  stats uri /stats  #项目名为status,ip+端口+项目名即可访问
  stats auth admin:admin  #配置管理用户账号密码
  stats admin if TRUE
  stats hide-version

frontend http-in  #配置前端访问端口
  bind *:1080  #通过该端口进行负载均衡
  default_backend servers  #指定后端服务器

backend servers
  server server1 172.16.1.230:80 check inter 2000 rise 3 fall 3 weight 1 maxconn 32

  #建议加上check,否则后台服务器A宕机了,负载均衡还会把请求发送到该宕机服务器上,inter 2000指check检测时间为2000毫秒,rise 3检测3次均正常则表示后天服务器正常,fall 3检测3次失败,则会把该后天服务器标志宕机,不再玩该后台服务器发送请求,weight 1指权重,取消weight改为backup,则是所有后台服务器宕机后才会启用该backup后台服务器
  server server2 172.16.1.227:80 check inter 2000 rise 3 fall 3 weight 1 maxconn 32
#参考yum 安装的配置文件
cat /etc/haproxy/haproxy.cfg |grep -v "^#"
global
    # to have these messages end up in /var/log/haproxy.log you will
    # need to:
    #
    # 1) configure syslog to accept network log events.  This is done
    #    by adding the '-r' option to the SYSLOGD_OPTIONS in
    #    /etc/sysconfig/syslog
    #
    # 2) configure local2 events to go to the /var/log/haproxy.log
    #   file. A line like the following can be added to
    #   /etc/sysconfig/syslog
    #
    #    local2.*                       /var/log/haproxy.log
    #
    log         127.0.0.1 local2

    chroot      /var/lib/haproxy
    pidfile     /var/run/haproxy.pid
    maxconn     4000
    user        haproxy
    group       haproxy
    daemon

    # turn on stats unix socket
    stats socket /var/lib/haproxy/stats

defaults
    mode                    http
    log                     global
    option                  httplog
    option                  dontlognull
    option http-server-close
    option forwardfor       except 127.0.0.0/8
    option                  redispatch
    retries                 3
    timeout http-request    10s
    timeout queue           1m
    timeout connect         10s
    timeout client          1m
    timeout server          1m
    timeout http-keep-alive 10s
    timeout check           10s
    maxconn                 3000

frontend  main *:5000
    acl url_static       path_beg       -i /static /images /javascript /stylesheets
    acl url_static       path_end       -i .jpg .gif .png .css .js

    use_backend static          if url_static
    default_backend             app

backend static
    balance     roundrobin
    server      static 127.0.0.1:4331 check

backend app
    balance     roundrobin
    server  app1 127.0.0.1:5001 check
    server  app2 127.0.0.1:5002 check
    server  app3 127.0.0.1:5003 check
    server  app4 127.0.0.1:5004 check
使用指定配置文件运行haproxy。建议都haproxy和hadproxy.cfg都使用绝对路径
/usr/local/haproxycd/sbin/haproxy -f /usr/local/haproxycd/haproxy.cfg
验证版本
/usr/local/haproxycd/sbin/haproxy -v
重新设置配置文件
global
    # to have these messages end up in /var/log/haproxy.log you will
    # need to:
    #
    # 1) configure syslog to accept network log events.  This is done
    #    by adding the '-r' option to the SYSLOGD_OPTIONS in
    #    /etc/sysconfig/syslog
    #
    # 2) configure local2 events to go to the /var/log/haproxy.log
    #   file. A line like the following can be added to
    #   /etc/sysconfig/syslog
    #
    #    local2.*                       /var/log/haproxy.log
    #
    log         127.0.0.1 local2

    chroot      /usr/local/haproxycd
    pidfile     /usr/local/haproxycd/haproxy.pid
    maxconn     4000
    user        haproxy
    group       haproxy
    daemon

    # turn on stats unix socket
    stats socket /usr/local/haproxycd/socket

defaults
    mode                    http
    log                     global
    option                  httplog
    option                  dontlognull
    option http-server-close
    option forwardfor       except 127.0.0.0/8
    option                  redispatch
    retries                 3
    timeout http-request    10s
    timeout queue           1m
    timeout connect         10s
    timeout client          1m
    timeout server          1m
    timeout http-keep-alive 10s
    timeout check           10s
    maxconn                 3000

frontend  main
    bind 0.0.0.0:8000
    acl url_static       path_beg       -i /static /images /javascript /stylesheets
    acl url_static       path_end       -i .jpg .gif .png .css .js

    use_backend static          if url_static
    default_backend             app

backend static
    balance     roundrobin
    server      static 127.0.0.1:4331 check

backend app
    balance     roundrobin
    server  app1 127.0.0.1:80 check
    server  app2 127.0.0.1:801 check
    #server  app3 127.0.0.1:5003 check
    #server  app4 127.0.0.1:5004 check
设置开机自启动
vi /usr/lib/systemd/system/haproxy.service
[Unit]
Description=haporxy load bulancer
After=syslog.target network.target

[Service]
ExecStartPre=/usr/local/haproxy/sbin/haproxy -f /usr/local/haproxy/haproxy.cfg -c -q
ExecStart=/usr/local/haproxy/sbin/haproxy -Ws -f /usr/local/haproxy/haproxy.cfg -p /usr/local/haproxy/haproxy.pid
ExecReload=/bin/kill -USER2 $MAINPID

[Install]
WantedBy=multi-user.target
systemctl enable haproxy --now
关闭防火墙
systemctl stop firewalld.service
luarocks
yum install -y luarocks
httpd
docker pull httpd:2.4.37-alpine
kong(未完)
安装 PostgreSQL 9.5+
yum install postgresql-server

service postgresql initdb

chkconfig postgresql on

systemctl enable postgresql
systemctl start postgresql
passwd postgres
********
sudo -s -u postgres
psql
CREATE USER kong;
CREATE DATABASE kong OWNER kong
alter user kong with encrypted password '123456';
kong migrations up

vi /var/lib/pgsql/data/pg_hba.conf
host    kong            kong            127.0.0.1/32            md5
host    kong            kong            172.21.40.169/32          md5
systemctl restart   postgresql
Job for postgresql.service failed because the control process exited with error code. See "systemctl status postgresql.service" and "journalctl -xe" for details.
#上面是提示数据库还没有初始化,所以我们先初始化一下
service postgresql initdb
Data directory is not empty!
cd /var/lib/pgsql
mv data datatemp
systemctl start postgresql.service
git clone git://github.com/luarocks/luarocks.git
./configure --lua-suffix=jit --with-lua=/usr/local/openresty/luajit --with-lua-include=/usr/local/openresty/luajit/include/luajit-2.1
make install
ls bin/
busted  kong
cp kong.conf.default kong.conf
在数据库部分莫名无法用kong用户名密码登录 后续配置智慧不了 继而暂时舍弃
安装kong链接如下
参考链接
先停止服务避免端口冲突
systemctl start postgresql.service
尝试docker kong一键安装
docker network create kong-net
报错
Error response from daemon: Failed to Setup IP tables: Unable to enable SKIP DNAT rule: (iptables failed: iptables --wait -t nat -I DOCKER -i br-c5f2fd9d221c -j RETURN: iptables: No chain/target/match by that name.
(exit status 1))
brctl 安装
yum install -y bridge-utils
pkill docker
iptables -t nat -F
ifconfig docker0 down
brctl delbr docker0
docker -d
systemctl restart docker
vi docker-compose.yml
version: "3.7"

volumes:
  kong_data: {}

networks:
 kong-net:

services:

  #######################################
  # Postgres: The database used by Kong
  #######################################
  kong-database:
    image: postgres:9.6
    container_name: kong-postgres
    restart: on-failure
    networks:
      - kong-net
    volumes:
      - kong_data:/var/lib/postgresql/data
    environment:
      POSTGRES_USER: kong
      POSTGRES_PASSWORD: ${KONG_PG_PASSWORD:-kong}
      POSTGRES_DB: kong
    ports:
      - "5432:5432"
    healthcheck:
      test: ["CMD", "pg_isready", "-U", "kong"]
      interval: 30s
      timeout: 30s
      retries: 3

  #######################################
  # Kong database migration
  #######################################
  kong-migration:
    image: ${KONG_DOCKER_TAG:-kong:latest}
    command: kong migrations bootstrap
    networks:
      - kong-net
    restart: on-failure
    environment:
      KONG_DATABASE: postgres
      KONG_PG_HOST: kong-database
      KONG_PG_DATABASE: kong
      KONG_PG_USER: kong
      KONG_PG_PASSWORD: ${KONG_PG_PASSWORD:-kong}
    depends_on:
      - kong-database

  #######################################
  # Kong: The API Gateway
  #######################################
  kong:
    image: ${KONG_DOCKER_TAG:-kong:latest}
    restart: on-failure
    networks:
      - kong-net
    environment:
      KONG_DATABASE: postgres
      KONG_PG_HOST: kong-database
      KONG_PG_DATABASE: kong
      KONG_PG_USER: kong
      KONG_PG_PASSWORD: ${KONG_PG_PASSWORD:-kong}
      KONG_PROXY_LISTEN: 0.0.0.0:8000
      KONG_PROXY_LISTEN_SSL: 0.0.0.0:8443
      KONG_ADMIN_LISTEN: 0.0.0.0:8001
    depends_on:
      - kong-database
    healthcheck:
      test: ["CMD", "kong", "health"]
      interval: 10s
      timeout: 10s
      retries: 10
    ports:
      - "8000:8000"
      - "8001:8001"
      - "8443:8443"
      - "8444:8444"

  #######################################
  # Konga database prepare
  #######################################
  konga-prepare:
    image: pantsel/konga:latest
    command: "-c prepare -a postgres -u postgresql://kong:${KONG_PG_PASSWORD:-kong}@kong-database:5432/konga"
    networks:
      - kong-net
    restart: on-failure
    depends_on:
      - kong-database

  #######################################
  # Konga: Kong GUI
  #######################################
  konga:
    image: pantsel/konga:latest
    restart: always
    networks:
        - kong-net
    environment:
      DB_ADAPTER: postgres
      DB_URI: postgresql://kong:${KONG_PG_PASSWORD:-kong}@kong-database:5432/konga
      NODE_ENV: production
    depends_on:
      - kong-database
    ports:
      - "1337:1337"
docker-compose up -d
curl -i http://localhost:8001/