罗大柚OpenGL ES教程系列_LessonTwo(Part 1)_使用VBO画一个立方体
看这篇文章前,请先通过baidu或google了解VBO在“OpenGL ES 程序”中的应用的原理和好处,当然如果你已经对VA , VBO, VAO等知识理解的很好了就完全可以直接看教程了。这篇文章我还是会和以前一样采用贴代码的形式,如果你发现某一个函数中的参数你不熟悉,请baidu或google。
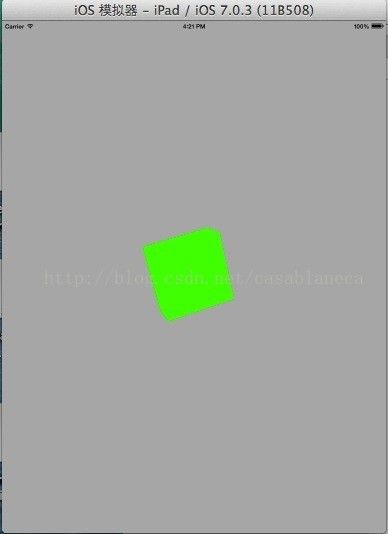
我们这次是在GLKit框架下绘制一个立方体,如下图所示:
下面简单的叙述一下整个项目的创建过程:
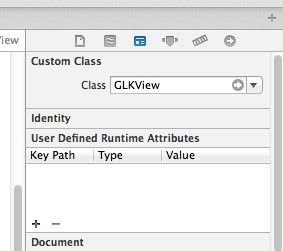
1. 打开Xcode创建一个Single View Application , 然后打开storyboard将当前ViewControllor上绑定的视图设置为GLKView,这一步很重要,否则系统将不知道如何加载View
2. 在ViewController的头文件中,导入
3. 在ViewController的实现文件中,我们写入如下的代码:
#import "ViewController.h"
@interface ViewController ()
{
float _rotation;
GLuint vertexBufferID;
GLuint indexBufferID;
}
@property (strong,nonatomic) EAGLContext*context;
@property (strong,nonatomic) GLKBaseEffect*baseEffect;
- (void)setupGL;
- (void)tearDownGL;
@end
@implementationViewController
typedef struct {
float Position[3];
}Vertex;
const VertexVertices[] = {
{{ 0.5f, -0.5f, 0.0f}},
{{ 0.5f, 0.5f, 0.0f}},
{{-0.5f, 0.5f, 0.0f}},
{{-0.5f, -0.5f, 0.0f}},
{{ 0.5f, -0.5f, -0.5f}},
{{ 0.5f, 0.5f, -0.5f}},
{{-0.5f, 0.5f, -0.5f}},
{{-0.5f, -0.5f, -0.5f}}
};
const GLubyteIndices[] = {
// Front
0, 1, 2,
2, 3, 0,
// Back
4, 6, 5,
4, 7, 6,
// Left
2, 7, 3,
7, 6, 2,
// Right
0, 4, 1,
4, 1, 5,
// Top
6, 2, 1,
1, 6, 5,
// Bottom
0, 3, 7,
0, 7, 4
};
- (void)viewDidLoad
{
[super viewDidLoad];
//创建context
self.context = [[EAGLContextalloc] initWithAPI:kEAGLRenderingAPIOpenGLES2];
if (!self.context) {
NSLog(@"Failed to create ES context");
}
//设定当前的View为GLKView
GLKView *view = (GLKView *)self.view;
//设定当前View对象的context为前面创建的context
view.context = self.context;
//设置深度buffer的格式
view.drawableDepthFormat = GLKViewDrawableDepthFormat24;
[self setupGL];
}
- (void)setupGL
{
//设定当前的context
[EAGLContext setCurrentContext:self.context];
//创建baseEffect
self.baseEffect = [[GLKBaseEffectalloc] init];
self.baseEffect.useConstantColor =GL_TRUE;
self.baseEffect.constantColor =GLKVector4Make(0.0f, 1.0f, 0.0f, 1.0f);
//设置VBO
glGenBuffers(1, // STEP 1
&vertexBufferID);
glBindBuffer(GL_ARRAY_BUFFER, // STEP 2
vertexBufferID);
glBufferData( // STEP 3
GL_ARRAY_BUFFER, //Initialize buffer contents
sizeof(Vertices),//Number of bytes to copy
Vertices, // Address of bytes to copy
GL_STATIC_DRAW); // Hint:cache in GPU memory
//索引
glGenBuffers(1, &indexBufferID);
glBindBuffer(GL_ELEMENT_ARRAY_BUFFER,indexBufferID);
glBufferData(GL_ELEMENT_ARRAY_BUFFER,sizeof(Indices),Indices, GL_STATIC_DRAW);
}
- (void)tearDownGL
{
[EAGLContext setCurrentContext:self.context];
glDeleteBuffers(1, &vertexBufferID);
glDeleteBuffers(1, &indexBufferID);
self.baseEffect =nil;
}
#pragma mark - GLKView and GLKViewControllerdelegate methods
- (void)update
{
//投影变换
float aspect= fabsf(self.view.bounds.size.width /self.view.bounds.size.height);
GLKMatrix4 projectionMatrix =GLKMatrix4MakePerspective(GLKMathDegreesToRadians(65.0f), aspect, 0.1f, 100.0f);
self.baseEffect.transform.projectionMatrix = projectionMatrix;
//模型视图变换
//平移变换
GLKMatrix4 modelViewMatrix =GLKMatrix4MakeTranslation(0.0f, 0.0f, -5.5f);
//旋转变换
modelViewMatrix = GLKMatrix4Rotate(modelViewMatrix,_rotation, 1.0f, 1.0f, 1.0f);
self.baseEffect.transform.modelviewMatrix = modelViewMatrix;
_rotation += self.timeSinceLastUpdate * 0.5f;
}
- (void)glkView:(GLKView *)view drawInRect:(CGRect)rect
{
glClearColor(0.65f, 0.65f, 0.65f, 1.0f);
glClear(GL_COLOR_BUFFER_BIT |GL_DEPTH_BUFFER_BIT);
//启动深度测试
glEnable(GL_DEPTH_TEST);
[self.baseEffectprepareToDraw];
glBindBuffer(GL_ARRAY_BUFFER,vertexBufferID);
glVertexAttribPointer( // STEP 5
GLKVertexAttribPosition,
3, // three components per vertex
GL_FLOAT, // data is floating point
GL_FALSE, // no fixed point scaling
sizeof(Vertex), // no gaps in data
NULL); // NULL tells GPU to start at
glEnableVertexAttribArray( // STEP 4
GLKVertexAttribPosition);
glBindBuffer(GL_ELEMENT_ARRAY_BUFFER,indexBufferID);
glDrawElements(GL_TRIANGLE_STRIP,sizeof(Indices)/sizeof(Indices[0]),
GL_UNSIGNED_BYTE, (void *)0);
}
- (void)didReceiveMemoryWarning
{
[super didReceiveMemoryWarning];
if ([selfisViewLoaded] && ([[selfview] window] ==nil)) {
self.view =nil;
[self tearDownGL];
if ([EAGLContextcurrentContext] == self.context) {
[EAGLContext setCurrentContext:nil];
}
self.context =nil;
}
}
@end
如果你是从头开始看我的教程的话,上面的代码其实是很简单的,这比我们自己去写shader,然后再动态编译的那种不用GLKit框架的写法看上去要简洁的多。
源码下载: http://download.csdn.net/detail/luozhonglan/6987097

