微信公众号:一个优秀的废人
如有问题或建议,请后台留言,我会尽力解决你的问题。
前言
许久不见,我是阿狗。我的主业是 java web 开发,学 Python 只是单纯地认为这是一个风口,我不是猪,也想飞起来。所以,我选择在业余时间先学为敬。今天给你们带来的是今日头条街拍美图的爬取:分析 Ajax 爬取今日头条街拍美图。
环境
这次实战采取的是 wi10 + python3.6 + PyCharm 的开发环境。另外,还用到了 requests 、urllib、hashlib、multiprocessing 这几个库。其中,requests 用于网络请求;urllib 的 urlencode 模块用于构造请求参数;hashlib 的 md5 模块用于构建一个唯一的图片名,防止重复,造成出错;multiprocessing 的 pool 模块用于开启多线程,加快爬取速度。
思路
爬虫之前,第一就是明确我们的爬取对象,也就是我的目的是爬取这个网站的什么东西,那么这里我们爬取的是搜索结果前二十页,每一页每一项的组图以及对应每组的标题。
首先是打开今日头条网页版首页 https://www.toutiao.com/。在搜索框输入街拍,之后打开开发者工具(在浏览器当前页面按F12)分析网页请求参数。
在开发者工具可以看见,在 Network 下的 All 选项卡中的请求是非常多的,我们无法分辨哪一个是真正的网页 Ajax 请求。这时切换到 XHR 选项卡,这个选项卡里面出现的就是 Ajax 请求。那我们尝试打开请求的参数以及返回的内容是否与页面匹配。
点击该请求,切换到 preview 选项下,这里就是 chrome 开发者工具 json 格式化的该请求的返回结果。结果中有一个 data 字段,这个字段包含了当前页面的所有美图,展开第一个之后发现它的 title 字段内容就跟我们页面上渲染出来的内容相匹配。而每一项都有一个 image_list 字段,这个字段包含了这一项的所有图片。 如上图所示,title 表示第一项的标题,image_list 表示这一项的组图。继续展开 image_list 分析。
如上图,看见 image_list 展开后的 url 就是我们要爬取的图片所在。也就是说我们打开搜索页面之后,还要获取 image_list 里面包含的 url ,再次访问这些 url 才能得到我们想要的图片,image_list 里面的每一个 url 就代表该组内的每一张图片。那请求参数是什么呢?
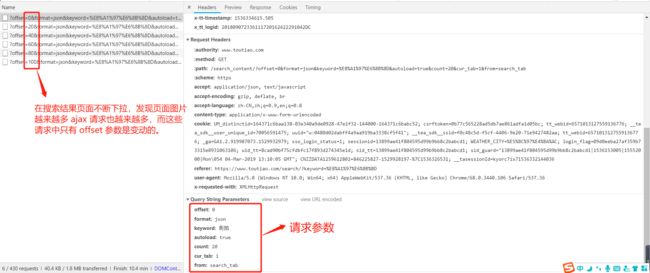
点击该请求 https://www.toutiao.com/search_content/?offset=0&format=json&keyword=%E8%A1%97%E6%8B%8D&autoload=true&count=20&cur_tab=1&from=search_tab,切换到 header 选项下,发现请求参数如图,这是一个 get 请求,请求参数有 offset、 format、keyword、autoload、count、cur_tab、from;而每次下拉加载只有 offset 是变化的。每次请求 +20。也就是每次下拉请求当前页面就会多加载出 20 组图片。至此真相大白,我们要爬取的内容找到了,请求参数的规律也有了。下面就进入实战演练。
加载单个 Ajax 请求
实现 get_page 方法用于加载单个 Ajax 请求,其中 offset 是变化的。所以把它当做参数传递进来。代码如下:
def get_page(offset):
    #构造参数
    params = {
        'offset': offset,
        'format': 'json',
        'keyword': '街拍',
        'autoload': 'true',
        'count': '20',
        'cur_tab': '1',
        'from': 'search_tab',
    }
    # headers, 伪装成浏览器
    headers = {
      'User-Agent': 'Mozilla/5.0 (Windows NT 10.0; Win64; x64) '
                    'AppleWebKit/537.36 (KHTML, like Gecko) '
                    'Chrome/68.0.3440.106 Safari/537.36'
    }
    url = 'https://www.toutiao.com/search_content/?' + urlencode(params)
    try:
        response = requests.get(url, headers=headers)
        if response.status_code == 200:
            return response.json()
    except requests.ConnectionError:
        return None
其中要注意的就是,header 参数一定要加上。否则的话,浏览器会认为你是非法请求从而报错。header 在你当前请求的 header 窗口可以直接复制,不懂直接网上搜就懂了。
解析方法
实现一个解析方法,用于提取每条数据的 image_list 字段的每一张图片链接,将图片链接以及图片所属标题一并返回,此时可以构造一个生成器(不懂的,看前面的 Python 基础文章,或者看菜鸟教程)。代码如下:
def get_images(json):
    if json.get('data'):
        for item in json.get('data'):
            title = item.get('title', "nasus")
            images = item.get('image_list', [])
            for image in images:
                yield{
                  'image': 'http:'+image.get('url'),
                  'title': title
                }
这里需要提一下的是第五行后面的 [ ]。这里加上是防止某些 image_list 为空类型,造成无法生成迭代器而报错。
保存图片
实现一个保存图片的方法,其中 item 就是前面 get_images 方法返回的一个字典,在该方法中以该 item 的 title 来创建文件夹,然后请求该图片链接,获取其二进制数据并写入文件。图片名称使用其内容的 md5 值防止重复。代码如下:
def save_image(item):
    if not os.path.exists(item.get('title')):
        os.mkdir(item.get('title'))
    try:
        # headers, 伪装成浏览器
        headers = {
            'User-Agent': 'Mozilla/5.0 (Windows NT 10.0; Win64; x64) '
                          'AppleWebKit/537.36 (KHTML, like Gecko) '
                          'Chrome/68.0.3440.106 Safari/537.36'
        }
        response = requests.get(item.get('image'), headers=headers)
        if response.status_code == 200:
            file_path = '{0}/{1}.{2}'.format(item.get('title'), md5(response.content).hexdigest(), 'jpg')
            if not os.path.exists(file_path):
                with open(file_path, 'wb') as f:
                    f.write(response.content)
            else:
                print('Already Download', file_path)
    except requests.ConnectionError:
        print('Fail to Save Image')
启动函数
只需要构造一个 offset 数组,开启多线程遍历 offset ,提取图片链接,访问并将其下载即可。
代码如下:
def main(offset):
    json = get_page(offset)
    for item in get_images(json):
        print(item)
        save_image(item)


GROUP_START = 1
GROUP_END = 20

if __name__ == '__main__':
    pool = Pool()
    groups = ([x * 20 for x in range(GROUP_START, GROUP_END + 1)])
    pool.map(main, groups)
    pool.close()
    pool.join()
    # for i in range(GROUP_END):
    #     main(i*GROUP_END)
这样整个程序就完成了。运行之后发现每组街拍美图都按标题分文件夹保存下来了。
最后附上完整代码:
import requests
import os
from urllib.parse import urlencode
from hashlib import md5
from multiprocessing.pool import Pool

def get_page(offset):
    #构造参数
    params = {
        'offset': offset,
        'format': 'json',
        'keyword': '街拍',
        'autoload': 'true',
        'count': '20',
        'cur_tab': '1',
        'from': 'search_tab',
    }
    # headers, 伪装成浏览器
    headers = {
      'User-Agent': 'Mozilla/5.0 (Windows NT 10.0; Win64; x64) '
                    'AppleWebKit/537.36 (KHTML, like Gecko) '
                    'Chrome/68.0.3440.106 Safari/537.36'
    }
    url = 'https://www.toutiao.com/search_content/?' + urlencode(params)
    try:
        response = requests.get(url, headers=headers)
        if response.status_code == 200:
            return response.json()
    except requests.ConnectionError:
        return None

def get_images(json):
    if json.get('data'):
        for item in json.get('data'):
            title = item.get('title', "nasus")
            images = item.get('image_list', [])
            for image in images:
                yield{
                  'image': 'http:'+image.get('url'),
                  'title': title
                }

def save_image(item):
    if not os.path.exists(item.get('title')):
        os.mkdir(item.get('title'))
    try:
        # headers, 伪装成浏览器
        headers = {
            'User-Agent': 'Mozilla/5.0 (Windows NT 10.0; Win64; x64) '
                          'AppleWebKit/537.36 (KHTML, like Gecko) '
                          'Chrome/68.0.3440.106 Safari/537.36'
        }
        response = requests.get(item.get('image'), headers=headers)
        if response.status_code == 200:
            file_path = '{0}/{1}.{2}'.format(item.get('title'), md5(response.content).hexdigest(), 'jpg')
            if not os.path.exists(file_path):
                with open(file_path, 'wb') as f:
                    f.write(response.content)
            else:
                print('Already Download', file_path)
    except requests.ConnectionError:
        print('Fail to Save Image')

def main(offset):
    json = get_page(offset)
    for item in get_images(json):
        print(item)
        save_image(item)

GROUP_START = 1
GROUP_END = 20

if __name__ == '__main__':
    pool = Pool()
    groups = ([x * 20 for x in range(GROUP_START, GROUP_END + 1)])
    pool.map(main, groups)
    pool.close()
    pool.join()
    # for i in range(GROUP_END):
    #     main(i*GROUP_END)
通过这篇文章,初步了解了 Ajax 的分析过程,以及 Ajax 的分页模拟和图片下载过程,代码非常的简单,但是也建议初学者自己动手实践一下,虽然很简单,但千万不能有所见即所得的想法,有时你可能会遇到意想不到的坑,所谓大神也是踩坑、填坑不断循环这个过程锻炼而来的。
最后,如果对 Python 、Java 感兴趣请长按二维码关注一波,我会努力带给你们价值,赞赏就不必了,能力没到,受之有愧。我会告诉你关注之后回复 爬虫 可以领取一份最新的爬虫教学视频吗?


