Cs231n作业:SVM
参考博客:https://blog.csdn.net/qq_37041483/article/details/99082602
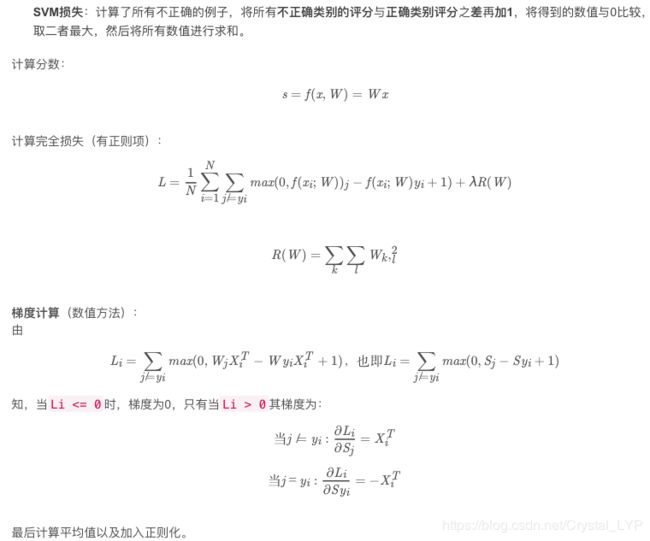
Cs231n——SVM作业
import random
import numpy as np
from cs231n.data_utils import load_CIFAR10
import matplotlib.pyplot as plt

#可以使matplotlib图形以内联方式显示在笔记本中而不是显示在新窗口中。
%matplotlib inline
plt.rcParams['figure.figsize'] = (10.0, 8.0) # set default size of plots
plt.rcParams['image.interpolation'] = 'nearest'
plt.rcParams['image.cmap'] = 'gray'

# 更神奇的是,笔记本将重新加载扩展python模块
# see http://stackoverflow.com/questions/1907993/autoreload-of-modules-in-ipython
%load_ext autoreload
%autoreload
CIFAR-10 Data Loading and Preprocessing
# 下载原生CIFAR-10数据.
cifar10_dir = 'cs231n/datasets/cifar-10-batches-py'

# 清除变量以防多次下载数据导致存储问题
try:
   del X_train, y_train
   del X_test, y_test
   print('Clear previously loaded data.')
except:
   pass

X_train, y_train, X_test, y_test = load_CIFAR10(cifar10_dir)

#检查训练数据和测试数据的size
print('Training data shape: ', X_train.shape)
print('Training labels shape: ', y_train.shape)
print('Test data shape: ', X_test.shape)
print('Test labels shape: ', y_test.shape)
输出:
Training data shape:  (50000, 32, 32, 3)
Training labels shape:  (50000,)
Test data shape:  (10000, 32, 32, 3)
Test labels shape:  (10000,)
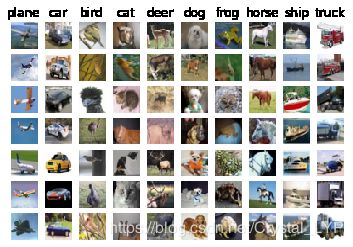
# 可视化数据集中的一些例子
# 我们展示每一类的训练图像的一些例子
classes = ['plane', 'car', 'bird', 'cat', 'deer', 'dog', 'frog', 'horse', 'ship', 'truck']
num_classes = len(classes)
samples_per_class = 7
for y, cls in enumerate(classes):
    idxs = np.flatnonzero(y_train == y)
    idxs = np.random.choice(idxs, samples_per_class, replace=False)
    for i, idx in enumerate(idxs):
        plt_idx = i * num_classes + y + 1
        plt.subplot(samples_per_class, num_classes, plt_idx)
        plt.imshow(X_train[idx].astype('uint8'))
        plt.axis('off')
        if i == 0:
            plt.title(cls)
plt.show()
# 将数据划分为训练、验证和测试集
# 创建一个小的发展子集作为训练数据的子集,以使得我们的代码运行更快一些
num_training = 49000
num_validation = 1000
num_test = 1000
num_dev = 500

#取原始训练集的后num_validation=1000个点作为验证集
mask = range(num_training, num_training + num_validation)
X_val = X_train[mask]
y_val = y_train[mask]

# 取原始训练集的前num_train=49000个点作为训练集
mask = range(num_training)
X_train = X_train[mask]
y_train = y_train[mask]

# 构造一个小的发展子集X_dev,y_dev,
#来源于训练数据的一个数目为num_dev=500的小子集
mask = np.random.choice(num_training, num_dev, replace=False)
X_dev = X_train[mask]
y_dev = y_train[mask]

# 取原始测试集的前num_test=1000个点作为测试集
mask = range(num_test)
X_test = X_test[mask]
y_test = y_test[mask]

print('Train data shape: ', X_train.shape)
print('Train labels shape: ', y_train.shape)
print('Validation data shape: ', X_val.shape)
print('Validation labels shape: ', y_val.shape)
print('Test data shape: ', X_test.shape)
print('Test labels shape: ', y_test.shape)
Train data shape:  (49000, 32, 32, 3)
Train labels shape:  (49000,)
Validation data shape:  (1000, 32, 32, 3)
Validation labels shape:  (1000,)
Test data shape:  (1000, 32, 32, 3)
Test labels shape:  (1000,)
# 预处理:将图像数据重塑为行
X_train = np.reshape(X_train, (X_train.shape[0], -1))
X_val = np.reshape(X_val, (X_val.shape[0], -1))
X_test = np.reshape(X_test, (X_test.shape[0], -1))
X_dev = np.reshape(X_dev, (X_dev.shape[0], -1))

# 检查重塑后数据的shape
print('Training data shape: ', X_train.shape)
print('Validation data shape: ', X_val.shape)
print('Test data shape: ', X_test.shape)
print('dev data shape: ', X_dev.shape)
Training data shape:  (49000, 3072)
Validation data shape:  (1000, 3072)
Test data shape:  (1000, 3072)
dev data shape:  (500, 3072)
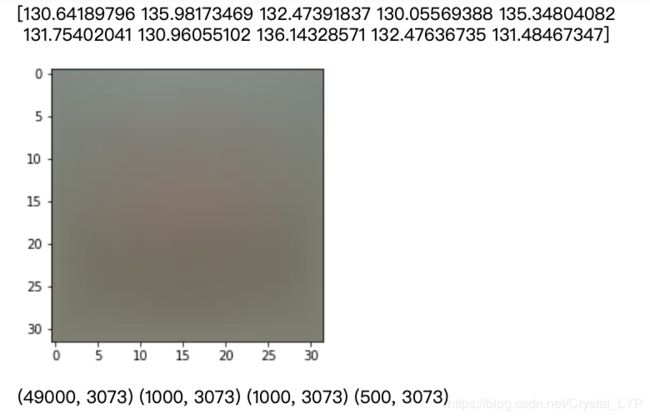
# 预处理:减去图像的均值
# 第一步:根据训练数据计算图像的均值
mean_image = np.mean(X_train, axis=0)#对各列求均值
print(mean_image[:10]) # 打印出前10列
plt.figure(figsize=(4,4))
plt.imshow(mean_image.reshape((32,32,3)).astype('uint8')) # 可视化均值图像
plt.show()

# 第二步:从训练和测试数据中减去平均图像
X_train -= mean_image
X_val -= mean_image
X_test -= mean_image
X_dev -= mean_image

# 第三步:增加一维偏置(即,偏置技巧)使得SVM只需要优化一个权值矩阵W
#水平堆叠序列中的数组(列方向),
#即在最后一列后面增加一列np.ones((X_train.shape[0], 1))(作为偏置)
X_train = np.hstack([X_train, np.ones((X_train.shape[0], 1))])
X_val = np.hstack([X_val, np.ones((X_val.shape[0], 1))])
X_test = np.hstack([X_test, np.ones((X_test.shape[0], 1))])
X_dev = np.hstack([X_dev, np.ones((X_dev.shape[0], 1))])

print(X_train.shape, X_val.shape, X_test.shape, X_dev.shape)
本节的代码将全部在cs231n/classifier /linear_svm.py中编写。
实现简单(带循环)的结构化SVM损失函数。
from builtins import range
import numpy as np
from random import shuffle
from past.builtins import xrange

def svm_loss_naive(W, X, y, reg):
    """
    Structured SVM loss function, naive implementation (with loops).
    构造SVM损失函数,简单实现(带循环)

    Inputs have dimension D, there are C classes, and we operate on minibatches
    of N examples.
    输入有D维,C类。我们在N个样本的minibatches上操作

    Inputs:
    - W: A numpy array of shape (D, C) containing weights.
    - X: A numpy array of shape (N, D) containing a minibatch of data.
    - y: A numpy array of shape (N,) containing training labels; y[i] = c means
      that X[i] has label c, where 0 <= c < C.
    - reg: (float) regularization strength

    Returns a tuple of:
    - loss:  as single float
    - dW: gradient with respect to weights W; an array of same shape as W
    """
    dW = np.zeros(W.shape) #初始化梯度为0,(D,C)

    # 计算损失和梯度
    num_classes = W.shape[1]#类别为C
    num_train = X.shape[0]#样本数N
    loss = 0.0#single float
    for i in range(num_train):遍历样本N
        scores = X[i].dot(W)#分别计算分数向量1*C,scores vecotr: s = f(xi,W)
        correct_class_score = scores[y[i]]# 该样本真正标签所对应的分数(1X1)
        for j in range(num_classes):# 遍历类别C
            if j == y[i]: # 如果当前类别即为本样本标签,则跳过
                continue
            # 否则计算该类别SVM损失,注意 delta = 1
            #j≠y_i时,通过S_j - S_yi + 1 分别进行计算。
            margin = scores[j] - correct_class_score + 1 #获取对应一个实数
            if margin > 0:#≤0时,梯度肯定为0(初始化的值),只需考虑>0
                loss += margin# 该样本的损失等于该样本所得到的实数
                # 计算梯度:对W求偏导
                # (X_iW_j - X_iW_yi + 1)对W_yi这列,需要减X_i
                # 所以从dW中取该类真正标签类别的所有特征[:,y[i]](此时全为0)
                #使其减去该类别所有特征值
                dW[:,y[i]]-=X[i,:]
                # (X_iW_j - X_iW_yi + 1)对W_j这列,需要加X_i
                 # 所以从dW中分别取出非真正标签类别的所有特征[:,j](此时也全为0)
                 #使其加上该类别所有特征值。
                dW[:,j]+=X[i,:]

    # 此时损失loss是所有训练样本的求和
    # 但我们想得到平均值,因此需要除以num_train
    loss /= num_train
    dW /= num_train

    loss += reg * np.sum(W * W)# 加入正则化,得到完整的损失函数
    dW += reg*W#正则化

    #############################################################################
    # TODO:                                                                     #
    # 计算损失函数的梯度,并存储为dW 。#
    # 更方便的做法是,计算损失的同时计算导数。#
    # 因此你需要修改上述代码来计算梯度。    #

    #############################################################################
    # *****START OF YOUR CODE (DO NOT DELETE/MODIFY THIS LINE)*****
    # *****END OF YOUR CODE (DO NOT DELETE/MODIFY THIS LINE)*****

    return loss, dW
不太清楚scores的值是什么,print出来结果如下:
[ 0.29790376 -0.38611799  0.18702295 -0.11746853  0.23090874 -0.07640677
 -0.18496296  0.00378827  0.20764424 -0.31726816]
[-0.01728627  0.13121702  0.17664047  0.20230841  0.06240182 -0.19469335
  0.19789776  0.15326769  0.30312934 -0.1347357 ]
......
# 评估我们为您提供的损失的简单实现
from cs231n.classifiers.linear_svm import svm_loss_naive
import time

# 生成一个随机数小的SVM权值矩阵
W = np.random.randn(3073, 10) * 0.0001

loss, grad = svm_loss_naive(W, X_dev, y_dev, 0.000005)
print('loss: %f' % (loss, ))
loss: 8.939562
推导并实现SVM代价函数的梯度,并在函数svm_loss_naive中内联实现梯度。您会发现在现有函数中插入新代码很有帮助。
要检查是否正确地实现了梯度,可以用数值方法估计损失函数的梯度,并将数值估计与计算的梯度进行比较。我们已经为您提供了这样做的代码:
# 实现梯度之后,使用下面的代码重新计算梯度
# 用我们提供的函数来检查梯度

# 计算损失及其在W处的梯度.
loss, grad = svm_loss_naive(W, X_dev, y_dev, 0.0)

# 沿随机选择的几个维度数值计算梯度
# 将它们与分析计算的梯度进行比较。
# 数字应该匹配几乎沿着所有的维度。
from cs231n.gradient_check import grad_check_sparse
f = lambda w: svm_loss_naive(w, X_dev, y_dev, 0.0)[0]
grad_numerical = grad_check_sparse(f, W, grad)

# 当正则化打开时,是否再次检查梯度
loss, grad = svm_loss_naive(W, X_dev, y_dev, 5e1)
f = lambda w: svm_loss_naive(w, X_dev, y_dev, 5e1)[0]
grad_numerical = grad_check_sparse(f, W, grad)
检查numeric gradient和analytic gradient是否相同:
numerical: 17.224937 analytic: 17.224937, relative error: 7.435769e-12
numerical: -4.067332 analytic: -4.067332, relative error: 3.124202e-12
numerical: 21.113976 analytic: 21.113976, relative error: 2.571707e-11
numerical: 6.543104 analytic: 6.599369, relative error: 4.281133e-03
numerical: -5.509170 analytic: -5.509170, relative error: 4.232534e-11
numerical: -38.299934 analytic: -38.299934, relative error: 1.314414e-12
numerical: -1.844074 analytic: -1.844074, relative error: 4.700072e-11
numerical: -9.734670 analytic: -9.734670, relative error: 1.010952e-11
numerical: 18.248313 analytic: 18.248313, relative error: 1.906095e-11
numerical: 12.573315 analytic: 12.573315, relative error: 4.581072e-12
numerical: -14.709370 analytic: -14.778553, relative error: 2.346168e-03
numerical: 50.100189 analytic: 50.098142, relative error: 2.043265e-05
numerical: 17.368555 analytic: 17.299602, relative error: 1.988940e-03
numerical: 19.536992 analytic: 19.538064, relative error: 2.743077e-05
numerical: 3.551856 analytic: 3.550533, relative error: 1.862979e-04
numerical: -7.258059 analytic: -7.260155, relative error: 1.443601e-04
numerical: -53.092359 analytic: -53.095429, relative error: 2.891660e-05
numerical: -4.669034 analytic: -4.657064, relative error: 1.283530e-03
numerical: -7.596913 analytic: -7.604372, relative error: 4.906343e-04
numerical: -3.225250 analytic: -3.216258, relative error: 1.395827e-03
有时,gradcheck中的维度可能并不完全匹配。造成这种差异的原因是什么呢?这是担忧的原因吗?在一维中,梯度检查可能失败的简单例子是什么?如何改变这种情况发生频率的边际效应?提示:SVM的损失函数严格来说不是可微的
Your Answer: 因为SVM的损失函数严格来说不是可微的。
接下来实现svm_loss_vectorized函数;现在只计算损失;我们稍后将实现梯度。
def svm_loss_vectorized(W, X, y, reg):
    """
    Structured SVM loss function, vectorized implementation.
    构造SVM损失函数,矢量化实现

    Inputs and outputs are the same as svm_loss_naive.
    """
    loss = 0.0
    dW = np.zeros(W.shape) #初始化梯度为0
    scores = X.dot(W)  # N*C的矩阵
    num_train = X.shape[0]

    #############################################################################
    # TODO:                                                                     #
    # 实现构造SVM损失的向量化版本,将结果存储在loss  #

#############################################################################
    # *****START OF YOUR CODE (DO NOT DELETE/MODIFY THIS LINE)*****

    #第一个参数表示取行的范围,np.arange(num_train)=500,即取所有行(总共行为500)
    #第二个参数表示取列。
    # 所以就是取0行的多少列,1行的多少列,2行的多少列, 最终得到每张图片,正确标签对应的分数。
    correct_scores = scores[np.arange(num_train),y]  # 1xN
    correct_scores = correct_scores.reshape((num_train, -1))  # Nx1
    margins = np.maximum(0,scores - correct_scores + 1)  # 计算误差 NxC
    margins[range(num_train), y] = 0  # 将label值所在的位置误差置零
    loss+=np.sum(margins)
    loss/=num_train  # 取所有损失记录结果平均值
    loss+=reg*np.sum(W*W)  # 加上正则化
    # *****END OF YOUR CODE (DO NOT DELETE/MODIFY THIS LINE)*****

    #############################################################################
    # TODO:                                                                     #
    # 实现构造SVM损失函数的梯度的向量化版本 #
    # 存储在dW中                                          #
    # 提示: 与其从头开始计算梯度,不如重用一些计算损失的中间值。#
    #############################################################################
    # *****START OF YOUR CODE (DO NOT DELETE/MODIFY THIS LINE)*****

    # 将margins>0的项(有误差的项)置为1,没误差的项为0
    margins[margins > 0] = 1  # NxC

    #没误差的项中有一项为标记项,计算标记项的权重分量对误差也有共享,也需要更新对应的权重分量
    # margins中这个参数就是当前样本结果错误分类的数量
    row_num = -np.sum(margins,1)#按行求和
    margins[np.arange(num_train), y] = row_num

    # X: 200x3073    margins:200x10
    dW += np.dot(X.T, margins)  # 3073x10
    dW /= num_train  # 平均权重
    dW += reg * W  # 正则化

    # *****END OF YOUR CODE (DO NOT DELETE/MODIFY THIS LINE)*****

    return loss, dW
# 接下来实现函数svm_loss_vectorized;现在只计算损失;
# 稍后将计算梯度
tic = time.time()
loss_naive, grad_naive = svm_loss_naive(W, X_dev, y_dev, 0.000005)
toc = time.time()
print('Naive loss: %e computed in %fs' % (loss_naive, toc - tic))

from cs231n.classifiers.linear_svm import svm_loss_vectorized
tic = time.time()
loss_vectorized, _ = svm_loss_vectorized(W, X_dev, y_dev, 0.000005)
toc = time.time()
print('Vectorized loss: %e computed in %fs' % (loss_vectorized, toc - tic))

# The losses should match but your vectorized implementation should be much faster.
print('difference: %f' % (loss_naive - loss_vectorized))
Naive loss: 8.939562e+00 computed in 0.227349s
Vectorized loss: 8.939562e+00 computed in 0.013232s
difference: -0.000000
不太清楚margins的值,输出了一下结果
原margins [[0.91065178 0.         1.48888089 ... 1.01807974 0.76371647 0.84387167]
 [0.62565268 0.60401908 0.85878551 ... 0.84575226 1.34636039 0.        ]
 [1.05124218 1.07529663 0.93069154 ... 1.59519528 1.05371086 1.54168756]
 ...
 [0.70711971 1.4967787  1.92001849 ... 0.         1.51612008 0.6053006 ]
 [1.11430245 1.37845813 1.11902944 ... 1.220586   1.2081389  1.28135198]
 [1.04908211 1.38184122 1.00908218 ... 1.12186658 1.46409178 1.16612562]]
重置后 [[1. 0. 1. ... 1. 1. 1.]
 [1. 1. 1. ... 1. 1. 0.]
 [1. 1. 1. ... 1. 1. 1.]
 ...
 [1. 1. 1. ... 0. 1. 1.]
 [1. 1. 1. ... 1. 1. 1.]
 [1. 1. 1. ... 1. 1. 1.]]
# 完成svm_loss_vectorized的实现,并计算梯度的损失函数,以矢量化的方式。

# 初始(naive)实现和向量化实现应该匹配,
# 但是矢量化的版本应该会更快。
tic = time.time()
_, grad_naive = svm_loss_naive(W, X_dev, y_dev, 0.000005)
toc = time.time()
print('Naive loss and gradient: computed in %fs' % (toc - tic))

tic = time.time()
_, grad_vectorized = svm_loss_vectorized(W, X_dev, y_dev, 0.000005)
toc = time.time()
print('Vectorized loss and gradient: computed in %fs' % (toc - tic))

# The loss is a single number, so it is easy to compare the values computed
# by the two implementations. The gradient on the other hand is a matrix, so
# we use the Frobenius norm to compare them.
difference = np.linalg.norm(grad_naive - grad_vectorized, ord='fro')
print('difference: %f' % difference)
输出:
Naive loss and gradient: computed in 0.171279s
Vectorized loss and gradient: computed in 0.000440s
difference: 3071.713541
Stochastic Gradient Descent(随机梯度下降)
我们现在有了矢量化的有效的损失表达式,梯度和我们的梯度匹配的数值梯度。因此,我们准备做SGD以减少损失:
在文件linear_classifier中,在函数中实现SGD:
def train(self, X, y, learning_rate=1e-3, reg=1e-5, num_iters=100,
              batch_size=200, verbose=False):
        """
        训练这个线性分类器使用随机梯度下降。

        Inputs:
        - X: 包含训练数据的形状(N, D)的numpy数组;有N个维度D的训练样本。
        - y: 包含训练标签的形状(N,)的numpy数组;y[i]= c表示X[i]对应c类,0 <= c < C共C个类别.
        - learning_rate: (float)用于优化的学习率。
        - reg: (float)正则化强度。
        - num_iters: (整数)优化时要采取的步骤数。
        - batch_size: (整数)在每个步骤中使用的训练示例的数量。
        - verbose: (boolean)如果为真,则在优化期间打印进度。

        Outputs:
        包含每次训练迭代时损失函数值的列表。
        """
        num_train, dim = X.shape# 分别获取样本数量,以及特征数(维度)
        num_classes = np.max(y) + 1 # 获取类的个数, 假设y取0…K-1,其中K是类的个数
        if self.W is None:
            # 延迟初始化W
            self.W = 0.001 * np.random.randn(dim, num_classes)

        # 运行随机梯度下降来优化W
        loss_history = []
        for it in range(num_iters):# 遍历,(整数)优化时要采取的步骤数
            X_batch = None
            y_batch = None

            #########################################################################
            # TODO:                                                                 #
            # 从训练数据及其对应的标签中提取batch_size元素样本,用于这一轮梯度下降       #
            # 将数据存储在X_batch中,相应的标签存储在y_batch中;                        #
            # 采样后X_batch应该有shape (batch_size, dim),                           #
            # y_batch应该有shape (batch_size,)                                      #
            # Hint: Use np.random.choice to generate indices. Sampling with         #
            # replacement is faster than sampling without replacement.              #
            #########################################################################
            # *****START OF YOUR CODE (DO NOT DELETE/MODIFY THIS LINE)*****

            i=np.random.choice(a=num_train,size=batch_size)# 取num_train中,随机选取大小为batch_size的数据
            X_batch=X[i,:]# 获取所选取的i个样本,及其对应的特征
            y_batch=y[i]# 获取所选取的i个样本的类标签


            # *****END OF YOUR CODE (DO NOT DELETE/MODIFY THIS LINE)*****

            # 评估损失和梯度
            loss, grad = self.loss(X_batch, y_batch, reg)
            loss_history.append(loss)

            # 执行参数更新
            #########################################################################
            # TODO:                                                                 #
            # 使用梯度和学习率更新权重。          #
            #########################################################################
            # *****START OF YOUR CODE (DO NOT DELETE/MODIFY THIS LINE)*****

            #将参数沿着梯度的反方向移动一点,从而使这批数据上的损失减小一点
            # learning_rate 是步长(学习率),grad是梯度
            self.W-=learning_rate*grad

            # *****END OF YOUR CODE (DO NOT DELETE/MODIFY THIS LINE)*****

            if verbose and it % 100 == 0:
                print('iteration %d / %d: loss %f' % (it, num_iters, loss))

        return loss_history

def loss(self, X_batch, y_batch, reg):
        """
        计算损失函数及其导数
        Compute the loss function and its derivative..
        子类将覆盖它
        Subclasses will override this.

        Inputs:
        - X_batch:形状(N, D)的numpy数组,包含N个数据点;每个点都有维数D。
          data points; each point has dimension D.
        - y_batch: 一个形状(N,)的numpy数组,其中包含用于minibatch的标签。
        - reg: (float)正则化强度。

        Returns: A tuple containing:
        - loss as a single float
        - 关于self.W的梯度;与W形状相同的数组
        """
        loss=0.0#初始化为0,float
        dw=np.zeros(self.W.shape) # 与W形状相同的数组(初始化为0)

        #计算损失:
        num_train=X_batch.shape[0]#获取样本范围

        scores=X_batch.dot(self.W)
        correct_scores=scores[np.arange(num_train),y_batch]
        margins=np.maximum(0,scores-correct_scores+1)
        loss+=np.sum(margins)
        loss/=num_train
        loss+=reg*np.sum(self.W*self.W)

        # 计算梯度:
        margins[margins>0]=1
        row_num=-np.sum(margins,1)
        margins[np.arange(num_train),y]=row_num
        dW+=np.dot(X_batch.T,margins)/num_train+reg*self.W

        return (loss,dW)
使用下面的代码运行它:
# In the file linear_classifier.py, implement SGD in the function
# LinearClassifier.train() and then run it with the code below.
from cs231n.classifiers import LinearSVM
import time
svm = LinearSVM()
tic = time.time()
loss_hist = svm.train(X_train, y_train, learning_rate=1e-7, reg=2.5e4,
                      num_iters=1500, verbose=True)
toc = time.time()
print('That took %fs' % (toc - tic))
输出:
iteration 0 / 1500: loss 789.405783
iteration 100 / 1500: loss 472.978017
iteration 200 / 1500: loss 285.306878
iteration 300 / 1500: loss 174.044791
iteration 400 / 1500: loss 107.907740
iteration 500 / 1500: loss 66.819007
iteration 600 / 1500: loss 42.569682
iteration 700 / 1500: loss 27.708639
iteration 800 / 1500: loss 19.144009
iteration 900 / 1500: loss 13.269638
iteration 1000 / 1500: loss 10.304991
iteration 1100 / 1500: loss 8.674060
iteration 1200 / 1500: loss 7.484901
iteration 1300 / 1500: loss 6.582193
iteration 1400 / 1500: loss 6.049578
That took 5.839375s
#一个有用的调试策略是将损失绘制为迭代数的函数
plt.plot(loss_hist)
plt.xlabel('Iteration number')
plt.ylabel('Loss value')
plt.show()
# 写LinearSVM.predict函数,并在训练集和验证集上评估
y_train_pred = svm.predict(X_train)
print('training accuracy: %f' % (np.mean(y_train == y_train_pred), ))
y_val_pred = svm.predict(X_val)
print('validation accuracy: %f' % (np.mean(y_val == y_val_pred), ))
training accuracy: 0.379469
validation accuracy: 0.385000
使用验证集来调优超参数(正则化强度和学习率)
#使用验证集来调优超参数(正则化强度和学习率)
#实验不同范围的学习率和正则化强度
# 如果您仔细的话,您应该能够在验证集上获得大约0.39的分类精度。

#注意:在超参数搜索期间,您可能会看到运行时间/溢出警告。
#这可能是由极值引起的,而不是一个bug。

learning_rates = [1e-7, 5e-5]
regularization_strengths = [2.5e4, 5e4]

# 结果是一个元组到元组的字典映射
# (learning_rate, regularization_strength) to (training_accuracy, validation_accuracy).
#准确度只是正确分类的数据点的比例。
results = {}
best_val = -1   # The highest validation accuracy that we have seen so far.
best_svm = None # The LinearSVM object that achieved the highest validation rate.

################################################################################
# TODO:                                                                        #
# 通过调整验证集来选择最佳超参数。
#对于每个超参数组合,在训练集上训练一个线性SVM,
# 在训练集和验证集上计算其精度,并将这些数字存储在结果字典中。
# 此外,将最佳验证精度存储在best_val中
#而在best_svm中存储实现此精度的线性svm对象。
# Hint: 在开发验证代码时,应该为num_iter使用一个小值,
#这样SVMs就不会花费太多时间进行培训;
# 一旦您确信您的验证代码可以工作,
#您就应该用一个更大的num_iter重新运行验证代码。                                #################################################################################
# *****START OF YOUR CODE (DO NOT DELETE/MODIFY THIS LINE)*****

for learning_rate in learning_rates:
    for regularization_strength in regularization_strengths:
        svm=LinearSVM()# 对于每个超参数组合,训练一个线性SVM
        loss_history=svm.train(X_train,y_train,
                               learning_rate=learning_rate,
                               reg=regularization_strength,
                               num_iters=1500,verbose=True)

        y_train_pred=svm.predict(X_train)# 对训练集进行预测
        train_acc=np.mean(y_train==y_train_pred)# 在训练集上计算其精度

        y_val_pred=svm.predict(X_val)
        val_acc=np.mean(y_val==y_val_pred)

        if val_acc>best_val:
            best_val=val_acc# 最佳验证精度存储在best_val中
            best_svm=svm# 同时获取实现此精度的线性svm对象

        results[(learning_rate,regularization_strength)]=[train_acc,val_acc]


# *****END OF YOUR CODE (DO NOT DELETE/MODIFY THIS LINE)*****

# Print out results.
for lr, reg in sorted(results):
    train_accuracy, val_accuracy = results[(lr, reg)]
    print('lr %e reg %e train accuracy: %f val accuracy: %f' % (
                lr, reg, train_accuracy, val_accuracy))

print('best validation accuracy achieved during cross-validation: %f' % best_val)
......
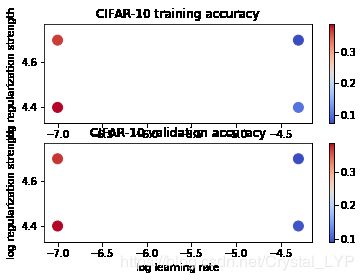
lr 1.000000e-07 reg 2.500000e+04 train accuracy: 0.387367 val accuracy: 0.386000
lr 1.000000e-07 reg 5.000000e+04 train accuracy: 0.367449 val accuracy: 0.371000
lr 5.000000e-05 reg 2.500000e+04 train accuracy: 0.102224 val accuracy: 0.097000
lr 5.000000e-05 reg 5.000000e+04 train accuracy: 0.073918 val accuracy: 0.091000
best validation accuracy achieved during cross-validation: 0.386000
# 可视化 cross-validation 结果
import math
x_scatter = [math.log10(x[0]) for x in results]
y_scatter = [math.log10(x[1]) for x in results]

# 画训练集准确度
marker_size = 100
colors = [results[x][0] for x in results]
plt.subplot(2, 1, 1)
plt.scatter(x_scatter, y_scatter, marker_size, c=colors, cmap=plt.cm.coolwarm)
plt.colorbar()
plt.xlabel('log learning rate')
plt.ylabel('log regularization strength')
plt.title('CIFAR-10 training accuracy')

#画验证集准确度
colors = [results[x][1] for x in results] # default size of markers is 20
plt.subplot(2, 1, 2)
plt.scatter(x_scatter, y_scatter, marker_size, c=colors, cmap=plt.cm.coolwarm)
plt.colorbar()
plt.xlabel('log learning rate')
plt.ylabel('log regularization strength')
plt.title('CIFAR-10 validation accuracy')
plt.show()
#评估测试集上的最佳svm
y_test_pred = best_svm.predict(X_test)
test_accuracy = np.mean(y_test == y_test_pred)
print('linear SVM on raw pixels final test set accuracy: %f' % test_accuracy)
输出:
linear SVM on raw pixels final test set accuracy: 0.391000
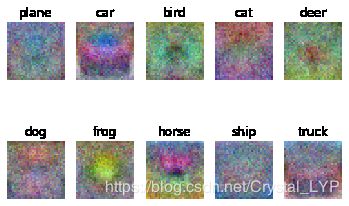
#可视化每一类学习到的权重
#根据你对学习速度和正则化强度的选择,这些可能好看,也可能不好看。
w = best_svm.W[:-1,:] # strip out the bias
w = w.reshape(32, 32, 3, 10)
w_min, w_max = np.min(w), np.max(w)
classes = ['plane', 'car', 'bird', 'cat', 'deer', 'dog', 'frog', 'horse', 'ship', 'truck']
for i in range(10):
    plt.subplot(2, 5, i + 1)

    # 将权重重新缩放到0到255之间
    wimg = 255.0 * (w[:, :, :, i].squeeze() - w_min) / (w_max - w_min)
    plt.imshow(wimg.astype('uint8'))
    plt.axis('off')
    plt.title(classes[i])
描述您的可视化支持向量机权重是什么样子的,并提供一个简短的解释,为什么它们看起来是这样的。
Your Answier: 它们看起来像模糊信号,因为它学了数据集中的所有图片。
