2019独角兽企业重金招聘Python工程师标准>>> ![]()
一、升级可升级的包
1、首先升级webpack4,我已经升级到4.27.1
npm install [email protected] --save-dev
2、尽可能的升级-loader包
- 包括: css-loader、style-loader、file-loader、url-loader、babel-loader
3、升级其他包
- 包括:eventsource-polyfill、webpack-dev-middleware、webpack-hot-middleware、vue-loader、webpack-merge、html-webpack-plugin、friendly-errors-webpack-plugin、webpack-dev-server
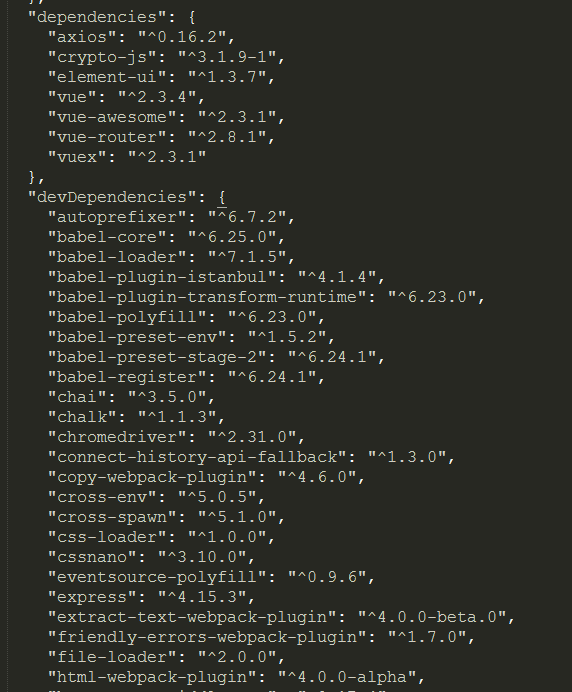
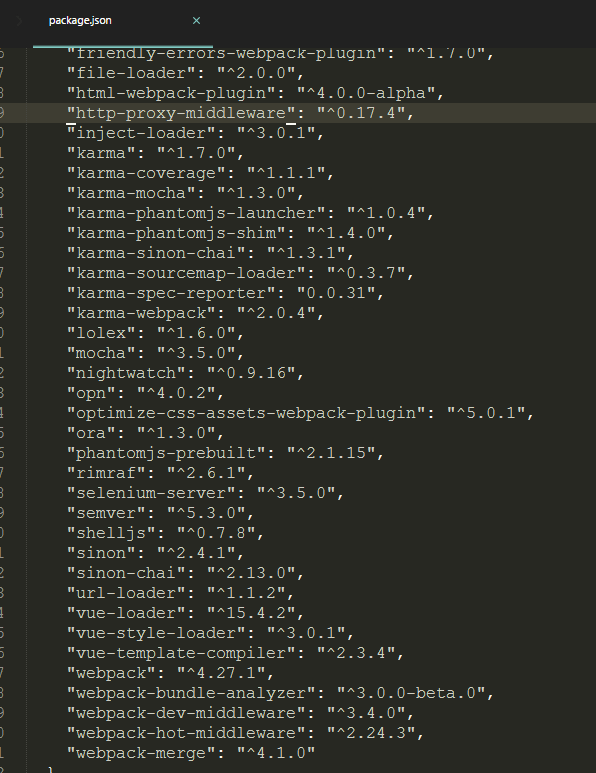
- 我使用的一些包的版本


4、新增包
- 包括:mini-css-extract-plugin、webpack-bundle-analyzer(可查看打包内容)
二、修改配置文件代码
1、在配置文件中添加mode属性
//webpack.dev.conf.js和webpack.prod.conf.js
var webpackConfig = merge(baseWebpackConfig, {
  mode: 'production', //'development'
  ...
  })
2、取消commonchunk,增加optimization,配置可查找官网相关配置webpack官网或中文网webpack中文网
//webpack.prod.conf.js中注释有关CommonsChunkPlugin代码
// split vendor js into its own file
    // new webpack.optimize.CommonsChunkPlugin({
    //   name: 'vendor',
    //   minChunks: function (module, count) {
    //     // any required modules inside node_modules are extracted to vendor
    //     return (
    //       module.resource &&
    //       /\.js$/.test(module.resource) &&
    //       module.resource.indexOf(
    //         path.join(__dirname, '../node_modules')
    //       ) === 0
    //     )
    //   }
    // }),
    // extract webpack runtime and module manifest to its own file in order to
    // prevent vendor hash from being updated whenever app bundle is updated
    // new webpack.optimize.CommonsChunkPlugin({
    //   name: 'manifest',
    //   chunks: ['vendor']
    // }),
//webpack.base.conf.js中添加如下配置,此配置可根据分割代码自行设置
optimization: {
    minimize: true, //[new UglifyJsPlugin({})]
    splitChunks: {
      chunks: 'all',
      cacheGroups: {
       vendors: {
         test: /[\\/]node_modules[\\/]/,
         name: 'vendors',
         chunks: 'all'
       },
       'async-vendors': {
        test: /[\\/]node_modules[\\/]/,
        minChunks: 2,
        chunks: 'async',
        name: 'async-vendors'
       },
       styles: {
         name: 'styles',
         test: /\.(scss|css)$/,
         chunks: 'all',
         minChunks: 1,
         reuseExistingChunk: true,
         enforce: true
       }
      }
    },
    runtimeChunk: { name: 'runtime' }
  },
3、取消webpack.optimize.UglifyJsPlugin配置,只需要使用optimization.minimize为true就行
4、extract-text-webpack-plugin插件废弃,使用mini-css-extract-plugin插件代替
//utils.js和webpack.prod.conf.js中注释extract-text-webpack-plugin相关配置,并添加mini-css-extract-plugin配置
//**utils.js**
var MiniCssExtractPlugin = require('mini-css-extract-plugin')
function generateLoaders (loader, loaderOptions) {
    var loaders = [cssLoader]
    if (loader) {
      loaders.push({
        loader: loader + '-loader',
        options: Object.assign({}, loaderOptions, {
          sourceMap: options.sourceMap
        })
      })
    }

    // Extract CSS when that option is specified
    // (which is the case during production build)
    // if (options.extract) {
    //   return ExtractTextPlugin.extract({
    //     use: loaders,
    //     fallback: 'vue-style-loader'
    //   })
    // } else {
    //   return ['vue-style-loader'].concat(loaders)
    // }
    //
    return [
      options.extract ? MiniCssExtractPlugin.loader : 'vue-style-loader',
    ].concat(loaders)
  }
//**webpack.prod.conf.js**
// var ExtractTextPlugin = require('extract-text-webpack-plugin')
var MiniCssExtractPlugin = require('mini-css-extract-plugin')
// new webpack.optimize.UglifyJsPlugin({
    //   compress: {
    //     warnings: false
    //   },
    //   sourceMap: true
    // }),
    // extract css into its own file
    // new ExtractTextPlugin({
    //   filename: utils.assetsPath('css/[name].[contenthash].css')
    // }),
    new MiniCssExtractPlugin({
      filename: utils.assetsPath('css/[name].[contenthash].css'),
      allChunks: true,
    }),
三、升级报错填坑记
1、如果是cannot find module XXX
- 直接npm run XXX --save-dev,可直接下载所需要依赖的模块
2、vue-loader报错
- 升级vue-loader
- 添加如下配置
const { VueLoaderPlugin } = require('vue-loader')
module.exports = {
    mode : 'development',
    plugins: [
        new VueLoaderPlugin()
    ]
}
3、DeprecationWarning: Tapable.plugin is deprecated. Use new API on .hooks ...
- 好多都建议更新extract-text-webpack-plugin插件,但webpack4已经不建议使用该插件,所以可以下载mini-css-extract-plugin插件代替
- 如果仍然报错,别着急,我们其实可以具体定位是哪个插件不适合使用,这个找了很久,太坑了,赶紧收藏吧
//webpack.base.conf.js最上面添加如下代码
process.traceDeprecation = true
//然后运行npm run dev/npm run build,查看哪个node_modules需要更新
- 更新所有需要更新的包后,如果仍有这项报错,可以尝试注释以下代码试试
//dev-server.js
//compiler.plugin('compilation', function (compilation) {
//   compilation.plugin('html-webpack-plugin-after-emit', function (data, cb) {
//     hotMiddleware.publish({ action: 'reload' })
//     cb()
//   })
// })
4、其他页面都显示正常,但router-view渲染的页面一直报错,无法正常显示
- 报错代码如下:
//[Vue Warn]: Failed to mount component: template or render function not defined.
- 找了很久这个问题的解决方式,但一直没有定位到具体问题,很感谢这个项目webpack2.x迁移到4.x预研笔记,找到把vue-router从2.6.x升级到最新2.8.1,然后就解决了。
- 后来由于重新升级了一系列包,又报错了,最终发现把routes中require引用的包改为异步引用就好了,醉了。
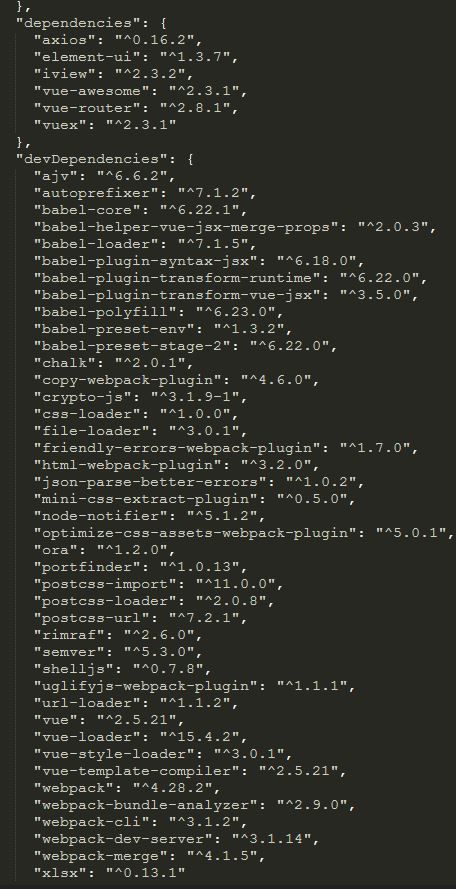
- 把各种包代码截图如下:
- routes部分配置修改如下:
//使用resolve异步请求,或使用.default
  {
    path: '*',
    name: 'page403',
    component: resolve => require(['@/components/page403'], resolve)
  },
  {
    path: '*',
    name: 'page403',
    component: require('@/components/page403').default
  },
5、npm run dev后一直显示构建信息,怎样去除
//dev-Server.js
var devMiddleware = require('webpack-dev-middleware')(compiler, {
  publicPath: webpackConfig.output.publicPath,
  quiet: true,
  logLevel: 'error'    //划重点,敲黑板,就是这里,添加这条,这样就ok了,万事大吉
})
- 配置说明: webpack-dev-middleware--npm
6、IE11页面无法正常显示
- 在网上找很多说需要入口文件配置处entry处添加配置,其实不必,首先查看如下配置是否正确,并确保babel-polyfill插件已经安装
//webpack.base.conf.js
entry: {
    app: './src/main.js'
  },
//入口文件main.js最上面引入
import 'babel-polyfill'
- 一般这样可以正常显示,但升级webpack4后发现不管用了
- 问题出在版本上,我使用了如下版本后就可以正常显示了,真的很奇葩(注意babel-polyfill和babel-loader的版本需要有所对应)
"babel-polyfill": "^6.23.0",
"babel-core": "^6.22.1",
"babel-loader": "^7.1.5",
"babel-plugin-istanbul": "^4.1.1",
"babel-plugin-transform-runtime": "^6.22.0",
- 如果仍然没有解决,可以看看这里,添加如下代码试试
//webpack.base.conf.js
//添加代码resolve('node_modules/vue-awesome')
{
  test: /\.js$/,
  loader: 'babel-loader',
  include: [resolve('src'), resolve('test'),resolve('node_modules/vue-awesome')]
},
7、[vue-router] Failed to resolve async component default: Error: Loading chunk 10 failed.(strict 模式不允许一个属性有多个定义)
- 发生这个问题的原因基本上都是页面上对于一个标签的属性可能定义了多次(包括属性,样式是否多次定义),如下:
/*注意:此处border属性定义了两次*/
8、【image-webpack-plugin】报错:module build failed(from ./node_modules/image-webpack-loader/index.js):Error
- 修改内容如下
//webpack.base.js
{
  test:/\.(png|jpg|gif|svg)$/,
  use:[{
    loader:'url-loader',
    options:{ // 这里的options选项参数可以定义多大的图片转换为base64
      name: utils.assetsPath('img/[name].[hash:7].[ext]'),
      limit:50000, // 表示小于50kb的图片转为base64,大于50kb的是路径
      outputPath:'images' //定义输出的图片文件夹
    }
  },
  { //压缩图片要在file-loader之后使用
    loader:'image-webpack-loader',
    options:{
	//这里配置使用disable,去除byPassOnDebug:true
	  byPassOnDebug: true,//去掉这个配置即可
      disable: true
    }
  }
]
},
9、奇葩问题解决方式
- 基本上述方式可以解决所有的问题,如果还不行,只能按照如下方式继续查找
- webpack官网或社区查找问题
- google搜索问题
四、其他链接
- vue-cli 构建vue项目升级webpack4
- webpack4升级完全指南
- vue项目升级webpack4指南
- webpack4报错compilation.mainTemplate.applyPluginsWaterfall is not a function
- vue-cli中的webpack4一步到位填坑记

