SSM框架搭建精简
本篇博客与其他大多数博客的不同之处在于,对依赖的添加进行了精简,避免了依赖的不必要手动添加,提高开发效率
如果你使用spring boot的话,以下纯属瞎折腾,敬请跳过。
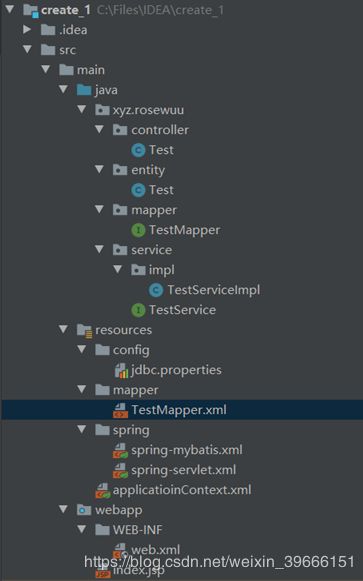
项目结构
导入依赖
pom.xml文件
  <dependencies>
    <dependency>
      <groupId>junitgroupId>
      <artifactId>junitartifactId>
      <version>4.11version>
      <scope>testscope>
    dependency>


    <dependency>
      <groupId>org.springframeworkgroupId>
      <artifactId>spring-webmvcartifactId>
      <version>5.2.2.RELEASEversion>
    dependency>


    <dependency>
      <groupId>org.mybatisgroupId>
      <artifactId>mybatisartifactId>
      <version>3.4.6version>
    dependency>


    <dependency>
      <groupId>mysqlgroupId>
      <artifactId>mysql-connector-javaartifactId>
      <version>5.1.38version>
    dependency>


    <dependency>
      <groupId>org.mybatisgroupId>
      <artifactId>mybatis-springartifactId>
      <version>1.3.2version>
    dependency>


    <dependency>
      <groupId>org.springframeworkgroupId>
      <artifactId>spring-jdbcartifactId>
      <version>5.2.2.RELEASEversion>
    dependency>


    <dependency>
      <groupId>com.mchangegroupId>
      <artifactId>c3p0artifactId>
      <version>0.9.5.2version>
    dependency>

  dependencies>
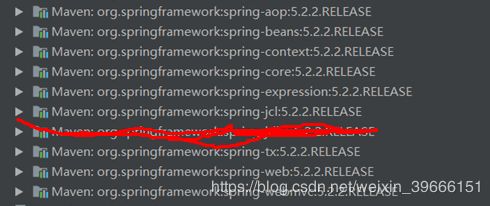
值得一提的是,注入spring-webmvc依赖后,其他相关的spring依赖会自动导入,并不需要再手动添加,如spring-core,spring-bean等等
添加spring-webmvc后会自动导入这些依赖
配置文件
jdbc文件
driver=com.mysql.jdbc.Driver
url=jdbc:mysql://xxx.xxx.xxx.xxx:3306/xxx?characterEncoding=utf-8&useSSL=false
username=
password=
Web.xml文件
<web-app>
  <display-name>Archetype Created Web Applicationdisplay-name>

    <listener>
      <listener-class>org.springframework.web.context.ContextLoaderListenerlistener-class>
    listener>


    <context-param>
      <param-name>contextConfigLocationparam-name>
      <param-value>classpath:applicatioinContext.xmlparam-value>
    context-param>


    <servlet>
      <servlet-name>appservlet-name>
      <servlet-class>org.springframework.web.servlet.DispatcherServletservlet-class>
      <init-param>
        <param-name>contextConfigLocationparam-name>
        <param-value>param-value>
      init-param>
      <load-on-startup>1load-on-startup>
    servlet>

    <servlet-mapping>
      <servlet-name>appservlet-name>
      <url-pattern>/url-pattern>
    servlet-mapping>

web-app>
applicationContext文件
需要注意的是,spring-servlet跟spring-mybatis只是spring上下文配置的子配置文件而已,因此在web.xml中只需指定applicationContext为spring的上下文配置文件即可
<beans xmlns="http://www.springframework.org/schema/beans"
       xmlns:xsi="http://www.w3.org/2001/XMLSchema-instance"
       xsi:schemaLocation="
        http://www.springframework.org/schema/beans
        https://www.springframework.org/schema/beans/spring-beans.xsd">

    <import resource="classpath:spring/*.xml" />

beans>
spring-servlet文件
<beans xmlns="http://www.springframework.org/schema/beans"
       xmlns:xsi="http://www.w3.org/2001/XMLSchema-instance"
       xmlns:context="http://www.springframework.org/schema/context"
       xmlns:mvc="http://www.springframework.org/schema/mvc"
       xsi:schemaLocation="http://www.springframework.org/schema/beans
        https://www.springframework.org/schema/beans/spring-beans.xsd
        http://www.springframework.org/schema/context
        https://www.springframework.org/schema/context/spring-context.xsd http://www.springframework.org/schema/mvc https://www.springframework.org/schema/mvc/spring-mvc.xsd">


    <mvc:annotation-driven/>


    <context:component-scan base-package="xyz.rosewuu"/>


    <mvc:default-servlet-handler/>

    <bean id="viewResolver" class="org.springframework.web.servlet.view.InternalResourceViewResolver">
        <property name="viewClass" value="org.springframework.web.servlet.view.JstlView"/>
        <property name="prefix" value="/WEB-INF/jsp/"/>
        <property name="suffix" value=".jsp"/>
    bean>
beans>
spring-mybatis文件
<beans xmlns="http://www.springframework.org/schema/beans"
       xmlns:xsi="http://www.w3.org/2001/XMLSchema-instance"
       xmlns:context="http://www.springframework.org/schema/context"
       xsi:schemaLocation="http://www.springframework.org/schema/beans
        https://www.springframework.org/schema/beans/spring-beans.xsd
        http://www.springframework.org/schema/context
        https://www.springframework.org/schema/context/spring-context.xsd">

    <bean id="sqlSessionFactory" class="org.mybatis.spring.SqlSessionFactoryBean">
        <property name="dataSource" ref="dataSource" />
        <property name="mapperLocations" value="classpath:mapper/*.xml" />
    bean>

    <context:property-placeholder location="classpath:config/jdbc.properties" />
    <bean id="dataSource" class="com.mchange.v2.c3p0.ComboPooledDataSource">
        <property name="driverClass" value="${driver}" />
        <property name="jdbcUrl" value="${url}" />
        <property name="user" value="${username}" />
        <property name="password" value="${password}" />
    bean>


    <bean id="sqlSession" class="org.mybatis.spring.SqlSessionTemplate">
        <constructor-arg index="0" ref="sqlSessionFactory" />
    bean>


    <bean id="testService" class="xyz.rosewuu.service.impl.TestServiceImpl">
        <property name="sqlSession" ref="sqlSession" />
    bean>
beans>
数据库结构
测试类
控制类
package xyz.rosewuu.controller;

import org.springframework.beans.factory.annotation.Autowired;
import org.springframework.stereotype.Controller;
import org.springframework.web.bind.annotation.RequestMapping;
import org.springframework.web.bind.annotation.ResponseBody;
import xyz.rosewuu.service.TestService;

import java.io.IOException;

@Controller
public class Test {
    @Autowired
    private TestService testService;

    @RequestMapping("/test")
    @ResponseBody
    public String hello() throws IOException {
        testService.hello();
        return "Hello";
    }

}
实体类
package xyz.rosewuu.entity;

public class Test {
    private int id;
    private String name;

    public int getId() {
        return id;
    }

    public void setId(int id) {
        this.id = id;
    }

    public String getName() {
        return name;
    }

    public void setName(String name) {
        this.name = name;
    }

    @Override
    public String toString() {
        return "Test{" +
                "id=" + id +
                ", name='" + name + '\'' +
                '}';
    }
}
但本人并不建议实体类自己手动添加getter/setter等方法,因为一旦修改变量则工作变得繁琐。因此我推荐在IDEA中安装Lombok插件,具体可参考这里https://www.zhihu.com/question/42348457
Service层接口
package xyz.rosewuu.service;

import java.io.IOException;

public interface TestService {
    void test() throws IOException;
}
Service层实现类
package xyz.rosewuu.service.impl;

import org.apache.ibatis.session.SqlSession;
import org.springframework.stereotype.Service;
import xyz.rosewuu.entity.Test;
import xyz.rosewuu.mapper.TestMapper;
import xyz.rosewuu.service.TestService;

import java.io.IOException;

@Service
public class TestServiceImpl implements TestService {
    private SqlSession sqlSession;

    public void setSqlSession(SqlSession sqlSession){
        this.sqlSession = sqlSession;
    }
    @Override
    public void test() throws IOException {
        Test test = sqlSession.getMapper(TestMapper.class).test();
        System.out.println(test);
    }
}
Dao接口(Mapper)
package xyz.rosewuu.mapper;

import xyz.rosewuu.entity.Test;

public interface TestMapper {
    Test test();
}
Mapper配置文件
<mapper namespace="xyz.rosewuu.mapper.TestMapper">
    <select id="test" resultType="xyz.rosewuu.entity.Test">
        select * from test
    select>
mapper>
从mapper到mapper配置文件语句生成的这个过程,其实也是可以减少自己的工作量,那就是使用MybatisX插件,具体安装过程自己可快速搜索一下。


