Ubuntu18.04,CUDA 10.0,cuDNN 7.4,tensorflow1.13.1环境配置
一开始接触到这个配置的时候说实话是十分茫然的,花了很久的时间查资料,好在最后安装成功了!下面是本人安装的过程。
首先,在开始之前先看需要装什么版本的CUNA,cuDNN,以及tensorflow-gpu的版本。
步骤一:
检查GPU驱动是否完成:
~$ nvidia-smi结果如下表示驱动安装成功:
+-----------------------------------------------------------------------------+
| NVIDIA-SMI 418.40.04    Driver Version: 418.40.04    CUDA Version: 10.1     |
|-------------------------------+----------------------+----------------------+
| GPU  Name        Persistence-M| Bus-Id        Disp.A | Volatile Uncorr. ECC |
| Fan  Temp  Perf  Pwr:Usage/Cap|         Memory-Usage | GPU-Util  Compute M. |
|===============================+======================+======================|
|   0  Tesla P4            Off  | 00000000:03:00.0 Off |                    0 |
| N/A   37C    P8     6W /  75W |      0MiB /  7611MiB |      0%      Default |
+-------------------------------+----------------------+----------------------+

+-----------------------------------------------------------------------------+
| Processes:                                                       GPU Memory |
|  GPU       PID   Type   Process name                             Usage      |
|=============================================================================|
|  No running processes found                                                 |
+-----------------------------------------------------------------------------+
查看服务器的当前个数:
$ lspci|grep -i nvidia查看结果为:
03:00.0 3D controller: NVIDIA Corporation GP104GL [Tesla P4] (rev a1)步骤二:我这里是已经安装了GPU驱动,所以安装的步骤上面没有介绍。接下来是查看CUDA,cuDNN和tensorflow-gpu的版本对应情况。注意一定要对应,才能安装成功。
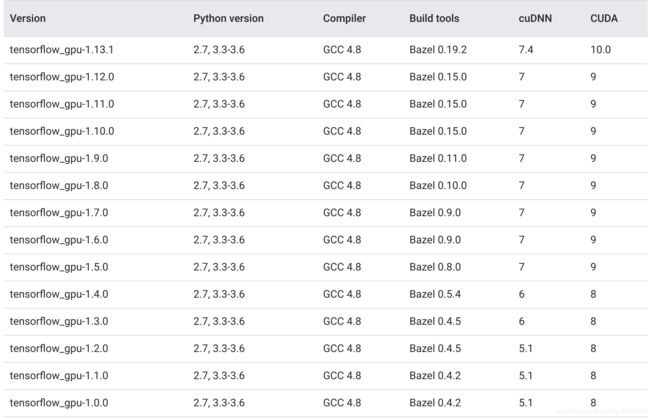
在这里,我安装的是第一行的tensorflow-gpu 1.13.1,CUNA10.0,cuDNN7.4.
步骤三:CUDA的安装
下载链接:https://developer.nvidia.com/cuda-10.0-download-archive?target_os=Linux&target_arch=x86_64&target_distro=Ubuntu&target_version=1804&target_type=runfilelocal
根据如下图的选择下载CUNA10.0:
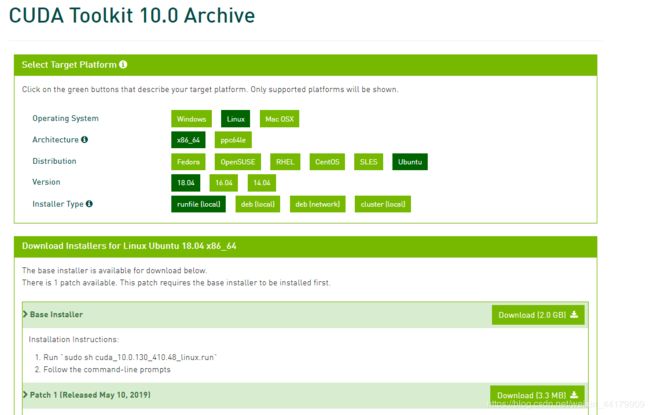
这里将安装包和补丁都下载,补丁后面后用到。
下载完成后,用命令进行安装:
sudo sh cuda_10.0.130_410.48_linux.run然后会出现以下的安装内容,如下进行选择:
Do you accept the previously read EULA?
accept/decline/quit: accept

Install NVIDIA Accelerated Graphics Driver for Linux-x86_64 410.48?
(y)es/(n)o/(q)uit: n

Install the CUDA 10.0 Toolkit?
(y)es/(n)o/(q)uit: y

Enter Toolkit Location
 [ default is /usr/local/cuda-10.0 ]:

Do you want to install a symbolic link at /usr/local/cuda?
(y)es/(n)o/(q)uit: y

Install the CUDA 10.0 Samples?
(y)es/(n)o/(q)uit: y

Enter CUDA Samples Location
 [ default is /home/wanying ]:
接着会出现以下内容:
Installing the CUDA Samples in /home/wanying ...
Copying samples to /home/wanying/NVIDIA_CUDA-10.0_Samples now...
Finished copying samples.

===========
= Summary =
===========

Driver:   Not Selected
Toolkit:  Installed in /usr/local/cuda-10.0
Samples:  Installed in /home/wanying, but missing recommended libraries

Please make sure that
 -   PATH includes /usr/local/cuda-10.0/bin
 -   LD_LIBRARY_PATH includes /usr/local/cuda-10.0/lib64, or, add /usr/local/cuda-10.0/lib64 to /etc/ld.so.conf and run ldconfig as root

To uninstall the CUDA Toolkit, run the uninstall script in /usr/local/cuda-10.0/bin

Please see CUDA_Installation_Guide_Linux.pdf in /usr/local/cuda-10.0/doc/pdf for detailed information on setting up CUDA.

***WARNING: Incomplete installation! This installation did not install the CUDA Driver. A driver of version at least 384.00 is required for CUDA 10.0 functionality to work.
To install the driver using this installer, run the following command, replacing  with the name of this run file:
    sudo .run -silent -driver

Logfile is /tmp/cuda_install_45102.log
接下来将之前下载的补丁也安装:
sudo sh cuda_10.0.130.1_linux.run最后配置环境变量,首先打开bashrc文件,将路径添加在后面:
vim ~/.bashrc接着对bashrc文件进行编辑,添加下面几句话,第一行为注释,不用添加:
# cuda PATH
export  PATH=/usr/local/cuda-10.0/bin:$PATH
export  LD_LIBRARY_PATH=/usr/local/cuda-10.0/lib64:$LD_LIBRARY_PATH
到这里,CUDA的安装完成,接下来,我们进行测试,看是否安装成功。先进入到测试样本的目录下:
$ cd NVIDIA_CUDA-10.0_Samples/1_Utilities/deviceQuery然后进行测试;
sudo make
./deviceQuery
出现以下结果,测试通过(全部内容很多,只截取了最后的部分)。CUDA安装完成!
deviceQuery, CUDA Driver = CUDART, CUDA Driver Version = 10.1, CUDA Runtime Version = 10.0, NumDevs = 1
Result = PASS
步骤四:cuDNN的安装
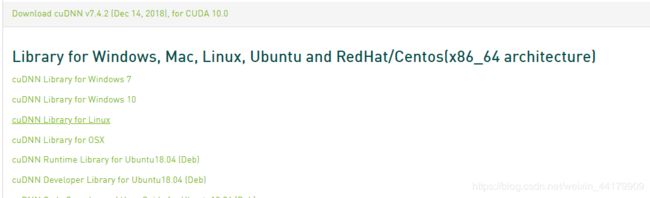
根据对应的版本,下载链接为:https://developer.nvidia.com/rdp/cudnn-archive。我这里下载的是cuDNN7.4.2,下载cuDNN Library for Linux,
下载完cudnn-10.0-linux-x64-v7.4.2.24之后进行解压,解压之后是cuda文件夹,进入cuda/include目录,在命令行进行如下操作:
sudo cp cudnn.h /usr/local/cuda/include/ #复制头文件再进入cuda/lib64目录下的动态文件进行复制和链接(根据自己的版本号修改libcudnn.so):
sudo cp lib* /usr/local/cuda/lib64/ # 复制动态链接库
cd /usr/local/cuda/lib64/
sudo rm -rf libcudnn.so libcudnn.so.7 # 删除原有动态文件
sudo ln -s libcudnn.so.7.4.2 libcudnn.so.7 # 生成软衔接
sudo ln -s libcudnn.so.7 libcudnn.so # 生成软链接
然后对cuDNN是否安装成功进行测试,先下载三个包,链接与下载cuDNN安装包的链接一样。如下图:
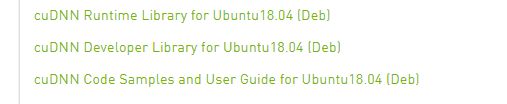
下载完成后,用命令安装(我装的时候没注意顺序出错了,不确定是不是顺序的原因,最好是按照顺序来装):
$ sudo dpkg -i libcudnn7_7.4.2.24-1+cuda10.0_amd64.deb
$ sudo dpkg -i libcudnn7-dev_7.4.2.24-1+cuda10.0_amd64.deb
$ sudo dpkg -i libcudnn7-doc_7.4.2.24-1+cuda10.0_amd64.deb
安装完成后,
cp -r /usr/src/cudnn_samples_v7/mnistCUDNN $HOME

cd $HOME/mnistCUDNN

make clean && make

./mnistCUDNN
运行结果如下,表示成功:
Testing half precision (math in single precision)
Loading image data/one_28x28.pgm
Performing forward propagation ...
Testing cudnnGetConvolutionForwardAlgorithm ...
Fastest algorithm is Algo 1
Testing cudnnFindConvolutionForwardAlgorithm ...
^^^^ CUDNN_STATUS_SUCCESS for Algo 0: 0.024576 time requiring 0 memory
^^^^ CUDNN_STATUS_SUCCESS for Algo 1: 0.032768 time requiring 3464 memory
^^^^ CUDNN_STATUS_SUCCESS for Algo 2: 0.045056 time requiring 28800 memory
^^^^ CUDNN_STATUS_SUCCESS for Algo 4: 0.100352 time requiring 207360 memory
^^^^ CUDNN_STATUS_SUCCESS for Algo 7: 0.133120 time requiring 2057744 memory
Resulting weights from Softmax:
0.0000001 1.0000000 0.0000001 0.0000000 0.0000563 0.0000001 0.0000012 0.0000017 0.0000010 0.0000001
Loading image data/three_28x28.pgm
Performing forward propagation ...
Resulting weights from Softmax:
0.0000000 0.0000000 0.0000000 1.0000000 0.0000000 0.0000714 0.0000000 0.0000000 0.0000000 0.0000000
Loading image data/five_28x28.pgm
Performing forward propagation ...
Resulting weights from Softmax:
0.0000000 0.0000008 0.0000000 0.0000002 0.0000000 1.0000000 0.0000154 0.0000000 0.0000012 0.0000006

Result of classification: 1 3 5

Test passed!
步骤五:tensorflow-gpu的安装
首先,我们要确保系统中安装了如下Python环境:python3, pip3,以及 virtualenv,在命令行查询相应的版本
python3 --version
pip3 --version
virtualenv --version
如果缺什么就按照如下命令进行安装:(缺什么安装什么)
sudo apt update
sudo apt install python3-dev python3-pip
sudo pip3 install -U virtualenv
接下来安装python虚拟环境,python的虚拟环境用来隔离系统和相应的安装包,这非常有利于不同版本之间的隔离,总之好处多多,尤其是不同的项目使用不同的软件版本时,能避免令人头痛的版本混乱问题,强烈建议安装虚拟环境。安装命令如下:
virtualenv --system-site-packages -p python3 ./venv  # 创建python3虚拟环境
source ./venv/bin/activate # 激活虚拟环境
安装Tensorflow
激活虚拟环境后, 安装对应版本的tensorflow-gpu, 我的版本是:tensorflow-gpu 1.13.1, 安装命令如下:
pip install tensorflow-gpu==1.13.1安装完成之后,测试是否安装成功命令如下:
python -c "import tensorflow as tf; tf.enable_eager_execution(); print(tf.reduce_sum(tf.rando
m_normal([1000, 1000])))"
运行结果如下:
2019-07-01 18:25:42.769805: I tensorflow/core/platform/cpu_feature_guard.cc:141] Your CPU supports instructions that this TensorFlow binary was not compiled to use: AVX2 FMA
2019-07-01 18:25:42.909912: I tensorflow/compiler/xla/service/service.cc:150] XLA service 0x182b620 executing computations on platform CUDA. Devices:
2019-07-01 18:25:42.909982: I tensorflow/compiler/xla/service/service.cc:158]   StreamExecutor device (0): Tesla P4, Compute Capability 6.1
2019-07-01 18:25:42.932521: I tensorflow/core/platform/profile_utils/cpu_utils.cc:94] CPU Frequency: 2399945000 Hz
2019-07-01 18:25:42.937288: I tensorflow/compiler/xla/service/service.cc:150] XLA service 0x1eef3d0 executing computations on platform Host. Devices:
2019-07-01 18:25:42.937345: I tensorflow/compiler/xla/service/service.cc:158]   StreamExecutor device (0): ,
2019-07-01 18:25:42.938332: I tensorflow/core/common_runtime/gpu/gpu_device.cc:1433] Found device 0 with properties:
name: Tesla P4 major: 6 minor: 1 memoryClockRate(GHz): 1.1135
pciBusID: 0000:03:00.0
totalMemory: 7.43GiB freeMemory: 7.32GiB
2019-07-01 18:25:42.938377: I tensorflow/core/common_runtime/gpu/gpu_device.cc:1512] Adding visible gpu devices: 0
2019-07-01 18:25:42.940093: I tensorflow/core/common_runtime/gpu/gpu_device.cc:984] Device interconnect StreamExecutor with strength 1 edge matrix:
2019-07-01 18:25:42.940124: I tensorflow/core/common_runtime/gpu/gpu_device.cc:990]      0
2019-07-01 18:25:42.940138: I tensorflow/core/common_runtime/gpu/gpu_device.cc:1003] 0:   N
2019-07-01 18:25:42.941039: I tensorflow/core/common_runtime/gpu/gpu_device.cc:1115] Created TensorFlow device (/job:localhost/replica:0/task:0/device:GPU:0 with 7123 MB memory) -> physical GPU (device: 0, name: Tesla P4, pci bus id: 0000:03:00.0, compute capability: 6.1)
tf.Tensor(-685.63104, shape=(), dtype=float32)
至此,完成tensorflow-gpu版本的配置。 可以愉快玩耍了!!!