UITableViewCell高度自适应探索--AutoLayout结合Frame
转
之前我们已经对Cell高度自适应进行了几次研究:
UITableViewCell高度自适应探索--UITableView+FDTemplateLayoutCell
地址: http://www.jianshu.com/p/7839e3a273a6
UITableViewCell高度自适应探索--cell预估高度(一)
地址: http://www.jianshu.com/p/6ab92579fcf1
UITableViewCell高度自适应探索--cell预估高度(二)
地址: http://www.jianshu.com/p/f3609cd9392e
今天,再提供一种AutoLayout与Frame相结合的方式来设置cell高度的方法.
今天这个方法的要点是:
- 使用Autolayout在进行布局.
- 使用Frame进行高度计算
- 使用模型的属性缓存每个Cell第一次计算的高度.
相对于之前说的那些方法,这个方法比UITableView+FDTemplateLayoutCell使用起来更简单和容易理解(自从写FD那篇文章发表后收到很多网友的关于使用的问题,大部分是由于没有使用正确);并且克服了预估高度方式的那些问题,也不用把约束改来改去, 使计算的过程更加可控.
这种方法虽然是使用fram的方式计算,但是如果没有autoLayout,计算的过程就会复杂几倍,有时候可能还需要一个专门的类去管理子控件的frame.在我看来是一个比较不错的方法.
进入正题.
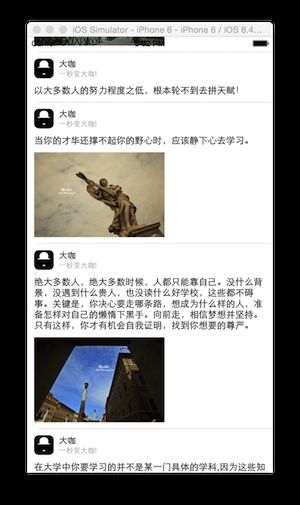
先看要实现的效果:
其中文字的长度不一,图片可能有或没有.为了排除其他干扰,数据来自plist文件.
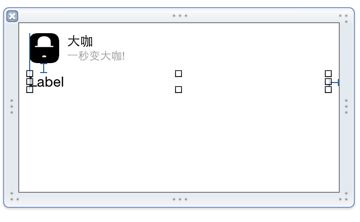
- 这是我们自定义cell的设置,这些元素是固定的,我们使用AutoLayout对它们几个进行布局.
- 创建一个Message模型,赋予其对应的属性.
由于cell的高度本质上还是基于模型数据来算的,所以计算高度的任务交给模型,故模型同时开放一个cellHeight的只读属性,将来好拿给控制器使用.
@interface Message : NSObject

// 头像、名字、和描述文字我给固定了,所以没有弄属性处理
@property (nonatomic, copy) NSString *imageName;
@property (nonatomic, copy) NSString *content;
@property (nonatomic, assign, readonly) CGFloat cellHeight;

@end- 模型计算Cell高度,通过重写cellHeight的getter方法实现
- (CGFloat)cellHeight {
    if (!_cellHeight) {
        CGFloat contentW = [UIScreen mainScreen].bounds.size.width - 2 * margin; // 屏幕宽度减去左右间距
        CGFloat contentH = [self.content boundingRectWithSize:CGSizeMake(contentW, MAXFLOAT)
                                                      options:NSStringDrawingUsesLineFragmentOrigin
                                                   attributes:@{NSFontAttributeName : [UIFont systemFontOfSize:contentFont]}
                                                      context:nil].size.height;
        _cellHeight = contentLabelY + contentH + margin;
    }
    return _cellHeight;
}
注意:
上面高度的计算还没有将内容图片的高度计算在内.
并且实现了利用模型的cellHeight属性缓存第一次计算高度.- 由于内容图片不是每个cell都有,所以使用代码动态添加.
// 属性声明
@property (strong, nonatomic) UIImageView *contentImageView;
// getter实现
- (UIImageView *)contentImageView {
if (!_contentImageView) {
_contentImageView = [[UIImageView alloc] init];
[self.contentView addSubview:_contentImageView];
}
return _contentImageView;
}- cell该接收模型了
@property (nonatomic, strong) Message *message;- (void)setMessage:(Message *)message {
_message = message;
self.contentLabel.text = _message.content;
if (message.imageName.length) {
self.contentImageView.hidden = NO;
self.contentImageView.image = [UIImage imageNamed:message.imageName];
}
else {
self.contentImageView.hidden = YES;
}
}当然,这时候contentImageView当然是显示不出来的,因为我们还没有赠送它一个frame.那么它的frame从何而来呢?
一开始我们说过,计算要基于模型,所以接下来的思路是由模型算出imageView的frame,拿去给cell用.
回到模型cellHeight的getter方法,添加对imageName属性的处理:
// 图片将要展示的frame作为模型的其中一个属性
@property (nonatomic, assign) CGRect contentImageFrame;
- (CGFloat)cellHeight {
if (!_cellHeight) {
CGFloat contentW = [UIScreen mainScreen].bounds.size.width - 2 * margin; // 屏幕宽度减去左右间距
CGFloat contentH = [self.content boundingRectWithSize:CGSizeMake(contentW, MAXFLOAT)
options:NSStringDrawingUsesLineFragmentOrigin
attributes:@{NSFontAttributeName : [UIFont systemFontOfSize:contentFont]}
context:nil].size.height;
_cellHeight = contentLabelY + contentH + margin;
// 对imageName属性的处理
if (self.imageName.length) {
UIImage *image = [UIImage imageNamed:self.imageName];
CGFloat imageH = image.size.height;
CGFloat imageW = image.size.width;
// 直接得出contentImageView应该显示的frame
_contentImageFrame = CGRectMake(margin, _cellHeight, imageW, imageH);
_cellHeight += imageH + margin;
}
}
return _cellHeight;
}当上面代码执行完毕,contentImageFrame就有值了.接着,回到cell的setMessage:方法给contentImageView赋值.
- (void)setMessage:(Message *)message {
    _message = message;
    self.contentLabel.text = _message.content;
    if (message.imageName.length) {
        self.contentImageView.hidden = NO;
        self.contentImageView.image = [UIImage imageNamed:message.imageName];
        // 给图片的frame赋值,这个值就是上面得到那个
        self.contentImageView.frame = _message.contentImageFrame;
    }
    else {
        self.contentImageView.hidden = YES;
    }
}- 这时候使用起来就非常轻松了
// 控制器tableView协议方法实现
- (CGFloat)tableView:(UITableView *)tableView heightForRowAtIndexPath:(NSIndexPath *)indexPath {
    Message *message = self.dataList[indexPath.row];
    return message.cellHeight;
}
完整代码下载:https://github.com/CoderAO/AutoCellHeightMix
原文链接:http://www.jianshu.com/p/cd457a617e78
著作权归作者所有,转载请联系作者获得授权,并标注“简书作者”。

