Springboot自定义配置Mongodb数据源
该篇文章配置的Mongodb数据源的背景是在多数据源的情况下——已经配置了俩个Mysql的数据源。如果仅仅只需要配置一个mongodb数据源,那么就非常简单,配置文件里面添上mongodb的host,port,database(主机,端口号,数据库名),之后使用Springboot的自动化配置,直接注入MongoTemplate就能够进行操作。
而如果在已经配置了其他数据源的情况下(多数据源都是自定义配置),就需要自己手动配置需要的bean了。
源代码地址:https://github.com/AliceAsuna/KiritoV1.git
一、配置文件
spring:
  datasource:
    test1:
        jdbc-url: jdbc:mysql://localhost:3306/alice_test?serverTimezone=CTT&useUnicode=true&characterEncoding=utf8
        driverClassName: com.mysql.cj.jdbc.Driver
        username: root
        password: xxx
    test2:
        jdbc-url: jdbc:mysql://localhost:3306/alice_test_two?serverTimezone=CTT&useUnicode=true&characterEncoding=utf8
        driverClassName: com.mysql.cj.jdbc.Driver
        username: root
        password: xxx
    mongodb:
        host: 127.0.0.1
        port: 27017
        database: own_test_mongodb

mybatis:
  mapper-locations: classpath:*/mapper/**.xml
二、Mongodb配置类
Mysql配置类在上一篇文章(Springboot整合Mybatis多数据源配置)中提及,这里就不在展示代码
package com.alice.springboot.config;

import com.mongodb.MongoClient;
import com.mongodb.MongoClientOptions;
import com.mongodb.ServerAddress;
import org.springframework.beans.factory.annotation.Autowired;
import org.springframework.beans.factory.annotation.Value;
import org.springframework.context.annotation.Bean;
import org.springframework.context.annotation.Configuration;
import org.springframework.data.mongodb.MongoDbFactory;
import org.springframework.data.mongodb.core.MongoTemplate;
import org.springframework.data.mongodb.core.SimpleMongoDbFactory;

import java.util.ArrayList;
import java.util.List;

@Configuration
public class MongoConfig {
    @Value("${spring.datasource.mongodb.host}")
    private String host;

    @Value("${spring.datasource.mongodb.port}")
    private int port;

    @Value("${spring.datasource.mongodb.database}")
    private String database;

    @Bean(name = "mongoDbFactory")
    public MongoDbFactory mongoDbFactory() {

        // 客户端
        MongoClientOptions.Builder builder = new MongoClientOptions.Builder();
        builder.connectTimeout(10000);
        builder.maxWaitTime(120000);

        //数据库连接池其他参数,如最大连接数这些,可以参考着使用部分参数
        //builder.connectionsPerHost();
        //builder.minConnectionsPerHost();
        //builder.requiredReplicaSetName();
        //builder.threadsAllowedToBlockForConnectionMultiplier();
        //builder.serverSelectionTimeout();
        //builder.maxConnectionIdleTime();
        //builder.maxConnectionLifeTime();
        //builder.socketTimeout());
        //builder.socketKeepAlive();
        //builder.sslEnabled());
        //builder.sslInvalidHostNameAllowed();
        //builder.alwaysUseMBeans();
        //builder.heartbeatFrequency();
        //builder.minHeartbeatFrequency();
        //builder.heartbeatConnectTimeout();
        //builder.heartbeatSocketTimeout();
        //builder.localThreshold();

        MongoClientOptions mongoClientOptions = builder.build();

        // MongoDB地址列表,如果有多个ip地址,那么配置文件里面可以用逗号分隔ip地址,这里再把每一个ip地址和端口号添加进list里面
        List serverAddresses = new ArrayList<>();
        ServerAddress serverAddress = new ServerAddress(host, port);
        serverAddresses.add(serverAddress);

        // 连接认证,如果设置了用户名和密码的话
        // MongoCredential mongoCredential = null;
        // mongoCredential = MongoCredential.createScramSha1Credential();

        // 创建认证客户端(存在用户名和密码)
        // MongoClient mongoClient = new MongoClient(serverAddresses, mongoCredential, mongoClientOptions);

        // 创建非认证客户端(没有设置mongodb数据库的用户名和密码)
        MongoClient mongoClient = new MongoClient(serverAddresses, mongoClientOptions);

        // 创建MongoDbFactory
        MongoDbFactory mongoDbFactory = new SimpleMongoDbFactory(mongoClient, database);
        return mongoDbFactory;
    }

    @Bean(name = "mongoTemplate")
    @Autowired
    public MongoTemplate getMongoTemplate(MongoDbFactory mongoDbFactory)
    {
        return new MongoTemplate(mongoDbFactory);
    }
}
三、Dao层
这里只展示dao实现层,接口层就不贴出来了
package com.alice.springboot.dao.impl;

import com.alice.springboot.dao.IMongoCommonDao;
import com.mongodb.client.MongoCollection;
import org.bson.Document;
import org.springframework.beans.factory.annotation.Autowired;
import org.springframework.data.mongodb.core.MongoTemplate;
import org.springframework.stereotype.Repository;

@Repository
public class MongoCommonDaoImpl implements IMongoCommonDao {
    @Autowired
    private MongoTemplate mongoTemplate;

    private MongoCollection getCollection(String collectionName)
    {
        return mongoTemplate.getCollection(collectionName);
    }

    @Override
    public void saveDataToMongoDB(String collectionName, Document document) {
        MongoCollection collection = getCollection(collectionName);
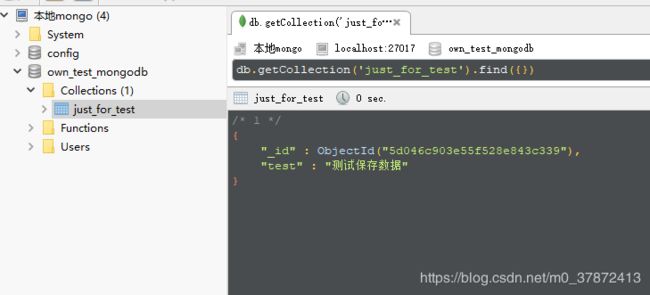
        collection.insertOne(new Document().append("test", "测试保存数据"));
    }
}
四、controller层
实际上应该是在service层调用dao层,这里为了测试,就直接在controller用dao层了
package com.alice.springboot.controller;

import com.alice.springboot.constants.ResponseStatusEnum;
import com.alice.springboot.dao.IMongoCommonDao;
import com.alice.springboot.model.ResponseResult;
import org.springframework.beans.factory.annotation.Autowired;
import org.springframework.web.bind.annotation.RequestMapping;
import org.springframework.web.bind.annotation.RequestMethod;
import org.springframework.web.bind.annotation.RestController;

@RestController
@RequestMapping("/v1")
public class MongoDBTestController {
    @Autowired
    private IMongoCommonDao mongoCommonDao;

    @RequestMapping(value = "/test/mongo/person", method = RequestMethod.GET)
    public ResponseResult testMongo()
    {
        ResponseResult result = new ResponseResult<>();
        try
        {
            mongoCommonDao.saveDataToMongoDB("just_for_test", null);
            result.setMessage("成功测试链接mongodb");
            result.setStatus(ResponseStatusEnum.SUCCESS);
        }
        catch (Exception e)
        {
            e.printStackTrace();
        }
        return result;
    }
}
为了测试,接口也没有按照restful接口规范来,保存数据应该用Post方法。
五、响应结果
{"status":"SUCCESS","other":null,"message":"成功测试链接mongodb","code":"200","params":[],"data":null}