PyTorch ------NIN(NetworkInNetwork)卷积神经网络实现mnist手写体识别
-
接上一篇 VGG实现mnist手写识别
-
使用NIN经典模型实现相同的功能
-
今天介绍的是NIN(NetworkInNetwork)
-
原文地址传送门
-
正在考虑找个时间把论文翻一下,有同样想法的小伙伴吗,一起搞事情
-
这个模型有两个创新点:
- 1、使用MLP Convolution layers
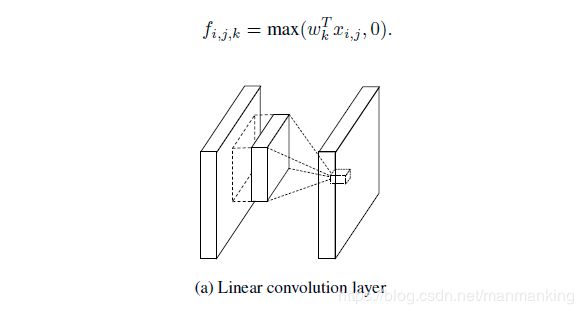
- 经典的神经网络模型是堆叠卷积层和池化层,由卷积层线性生成features map 然后通过激活函数完成非线性映射.
- 公式和示意图如下:

- 解释一下上图公式中各个变量的含义(i,j)是features map 的像素索引,X(i,j)表示输入像素单元的索引的中心,k表示features map 的索引
- 当潜在特征线性可分时,这种线性卷积足可以抽象,但是想要得到更好的抽象,需要用更加通用的函数来提取特征,这样可以尽可能的逼近潜在特征的表现形式.
- 在传统的CNN中可以通过一套完整的滤波器来涵盖同一特征的所有变体,但是同一特征使用太多的滤波器,将会给下一层带来额外的负担
- 使用一个通用函数逼近器做局部特征的特征提取,因为它能逼近潜在特征的更多抽象表示.
- 在这里有两个选择一个是径向基(Radial basis network)和多层感知器(multilayer perceptron),使用多层感知机有两个原因:首先是因为多层感知机与神经网络结构兼容,可以使用反向传播进行训练,第二是多层感知机可以是很深的模型
- 使用MLP代替了GLM,形成MLPConv层
- 下图是MLPConv计算公式和示意图:

- 1、使用MLP Convolution layers
-
- 当时作者使用1X1卷积核,具有里程碑式的意义,之后的模型都开始关注1X1的卷积核.
-
2 、(GAP)Global Average Pooling
- 传统卷积神经网络在网络的浅层进行卷积提取特征,将由最后一个卷积层得到的features map 输入到 全连接层,然后由全连接层完成分类任务
- 但是全连接层参数过多,容易产生过拟合,从而阻碍了模型的泛化能力,作者提出了一种叫做全局平均池化层,由他代替CNN中的全连接层.
- GAP相比较全连接层的优点:
- 在于通过增强特征图与类比间对应关系使卷积结构保留的更好,
- 使特征图分类是可信的,更具有解释性
- GAP没有优化的参数
- 可以将GAP视作一种结构化正则化
-
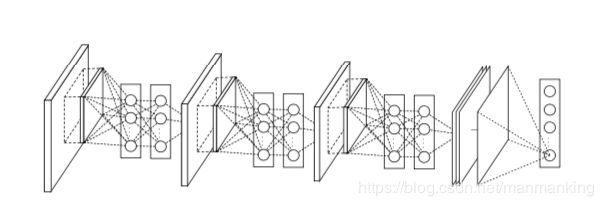
NIN模型结构:
-
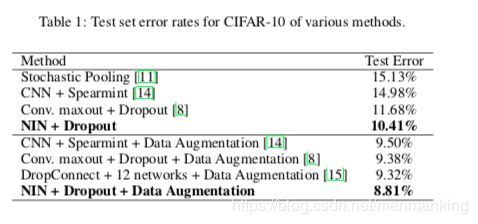
下面看一下NIN在各个数据集的性能
-
下面上代码:
 import time
 import torch
 from torch import nn, optim
 import torchvision
 import numpy as np
 import sys
 import os
 import torch.nn.functional as F
 device = torch.device(“cuda” if torch.cuda.is_available() else “cpu”)
 class FlattenLayer(torch.nn.Module):
 def init(self):
 super(FlattenLayer, self).init()
 def forward(self, x): # x shape: (batch, *, *, …)
 return x.view(x.shape[0], -1)
 def nin_block(in_channels,out_channels,kernel_size,stride,padding):
 blk = nn.Sequential(
 nn.Conv2d(in_channels,out_channels,kernel_size,stride,padding),
 nn.ReLU(),
 nn.Conv2d(out_channels,out_channels,kernel_size = 1),# 模拟全连接的多层感知机
 nn.ReLU(),
 nn.Conv2d(out_channels,out_channels,kernel_size = 1),
 nn.ReLU()
 )
 return blk
 class GlobalAvgPool2d(nn.Module):
 def init(self):
 super(GlobalAvgPool2d,self).init()
 def forward(self,x):
 return F.avg_pool2d(x,kernel_size = x.size()[2:])
 net = nn.Sequential(
 nin_block(1,96,kernel_size=11,stride=4,padding=0),
 nn.MaxPool2d(kernel_size=3,stride=2),
 nin_block(96,256,kernel_size=5,stride=1,padding=2),
 nn.MaxPool2d(kernel_size=3,stride=2),
 nin_block(256,384,kernel_size=3,stride=1,padding=1),
 nn.MaxPool2d(kernel_size=3,stride=2),
 nn.Dropout(0.5),
 nin_block(384,10,kernel_size=3,stride=1,padding=1),
 GlobalAvgPool2d(),
 FlattenLayer()
 )
 X = torch.rand(1,1,224,224)
 for name,blk in net.named_children():
 X = blk(X)
 print(name,“out shape:”,X.shape)
 print(net)
 #下载数据 组装好训练数据 测试数据
 def load_data_fashion_mnist(batch_size,resize = None,root = “./dataset/input/FashionMNIST2065”):
 trans = []
 if resize:
 # 做数据增强 处理 将图片转化为 规定大小 数据内容不会丢失 等比例 处理
 trans.append(torchvision.transforms.Resize(size=resize))
 #将 图片 类型 转化为Tensor类型
 trans.append(torchvision.transforms.ToTensor())
 #将图片 增强方式 添加到Compose 类中处理
 transform = torchvision.transforms.Compose(trans)
 #读取训练数据
 mnist_train = torchvision.datasets.FashionMNIST(root=root,train=True,download=False,transform = transform)
 #读取 测试数据
 mnist_test = torchvision.datasets.FashionMNIST(root = root,train=False,download=False,transform = transform)
 #数据加载器 在训练 测试阶段 使用多线程按批采样数据 默认不使用多线程 num_worker 表示设置的线程数量
 train_iter = torch.utils.data.DataLoader(mnist_train,batch_size = batch_size,shuffle = True,num_workers = 2)
 test_iter = torch.utils.data.DataLoader(mnist_test,batch_size = batch_size,shuffle = False,num_workers = 2)
 return train_iter,test_iter
 batch_size = 64
 #如出现“out of memory”的报错信息,可减小batch_size或resize
 train_iter,test_iter = load_data_fashion_mnist(batch_size,224)
 #计算准确率
 def evaluate_accuracy(data_iter,net,device = torch.device(“cpu”)):
 #创建 正确率 和 总个数
 acc_sum ,n = torch.tensor([0],dtype=torch.float32,device=device),0
 for X,y in data_iter:
 # 适配 设备
 X,y = X.to(device),y.to(device)
 # 设置 验证模式
 net.eval()
 with torch.no_grad(): #隔离开 不要计算在计算图内
 y = y.long()#在这里将y转成long确实是不必要的。但是在计算交叉熵时,Pytorch强制要求y是long
 acc_sum += torch.sum((torch.argmax(net(X),dim=1) == y)) # 累计预测正确的个数
 n += y.shape[0] # 累计总的标签个数
 return acc_sum.item() / n
 def train_fit(net,train_iter,test_iter,batch_size,optimizer,device,num_epochs):
 #将读取的数据 拷贝到 指定的GPU上
 net = net.to(device)
 print("tainning on ",device)
 #设置 损失函数 交叉熵损失函数
 loss = torch.nn.CrossEntropyLoss()
 #设置训练次数
 for epoch in range(num_epochs):
 train_l_sum,train_acc_sum,n,batch_count,start = 0.0,0.0,0,0,time.time()
 #读取批量数据 进行训练
 for X,y in train_iter:
 X = X.to(device)
 y = y.to(device)
 #训练结果
 y_hat = net(X)
 # 计算 预测与标签分布 差异
 l = loss(y_hat,y)
 # 优化函数 梯度置为零
 # 1、因为梯度可以累加
 # 2、每批采样的梯度不同,只需记录本次样本的梯度
 optimizer.zero_grad()
 # 反向求导
 l.backward()
 # 更新权重参数
 optimizer.step()
 train_l_sum += l.cpu().item()
 #train_acc_sum += (torch.argmax(y_hat,dim = 1) == y).cpu().item()
 # 将张量元素值累计
 train_acc_sum += (y_hat.argmax(dim=1) == y).sum().cpu().item()
 n += y.shape[0]
 batch_count += 1
 test_acc = evaluate_accuracy(test_iter,net)
 print(‘epoch %d, loss %.4f, train acc %.3f, test acc %.3f, time %.1f sec’
 % (epoch + 1, train_l_sum / batch_count, train_acc_sum / n, test_acc, time.time() - start))
 lr,num_epochs = 0.002,5
 optimizer = torch.optim.Adam(net.parameters(),lr = lr)
train_fit(net,train_iter,test_iter,batch_size,optimizer,device,num_epochs) -
代码到此结束
-
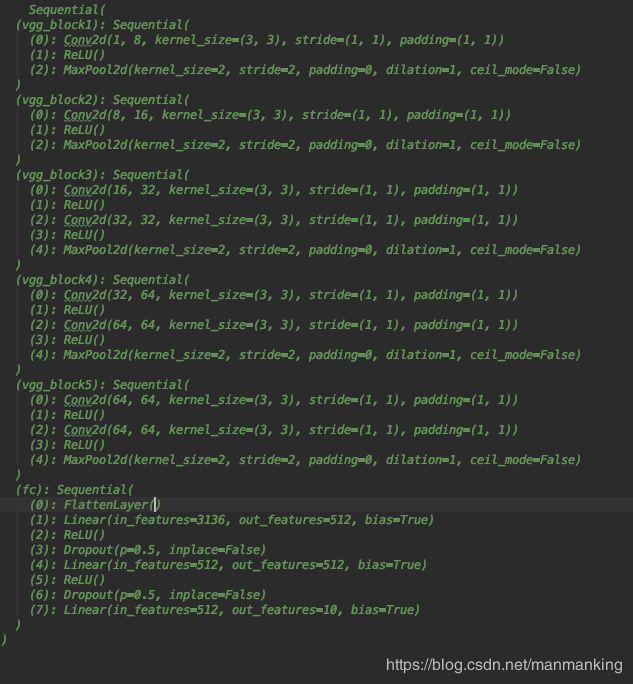
下面在上一个VGG 和NIN的结构对比,增加印象:
-
先上VGG的网络结构:


