深度学习--第9篇: Pytorch模型创建与nn.Module
Pytorch模型创建与nn.Module
- 1. 模型创建步骤
- 1.1 构建模型的两要素
- 2. nn.Module属性
- 2.1 torch.nn
- 2.2 nn.Module
- 3. 模型容器Containers
- 3.1 nn.Sequential
- 3.2 nn.ModuleList
- 3.3 nn.ModuleDict
- 3.4 容器总结
- 4. AlexNet创建
- 5. VGG16创建
- 6. MobileNetv2创建
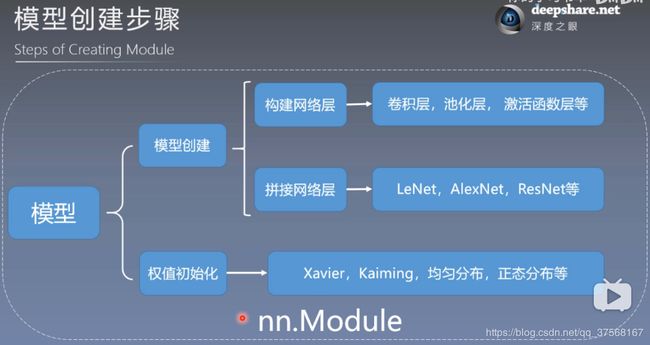
1. 模型创建步骤
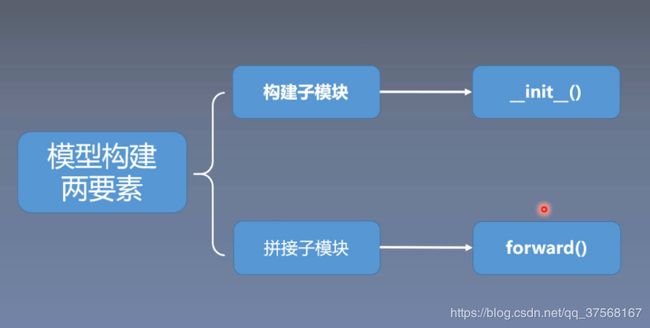
1.1 构建模型的两要素
 - 构建子模块:  __init__()
 - 拼接子模块:  forward()
2. nn.Module属性
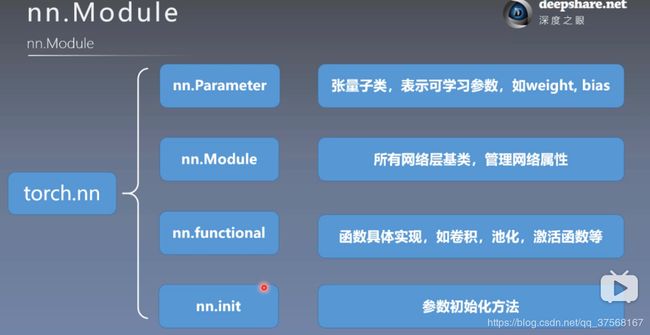
2.1 torch.nn
nn.Module属性包含在torch.nn文件中,属于其中的一个模块之一.
使用nn.Module时,必须导入以下功能包:
import torch.nn as nn
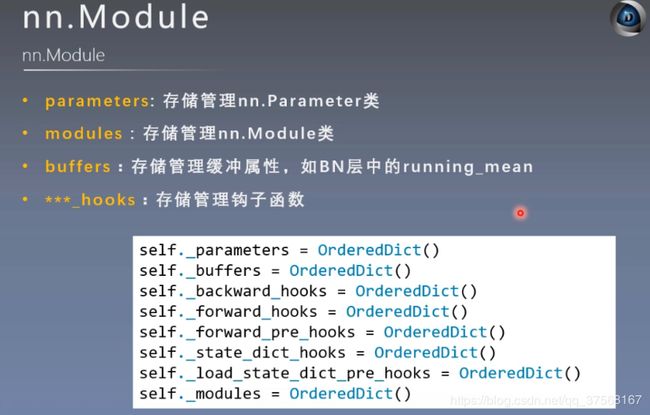
2.2 nn.Module
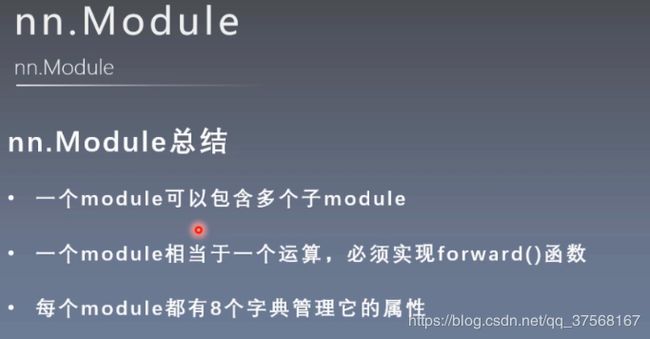
- nn.Module总结
3. 模型容器Containers
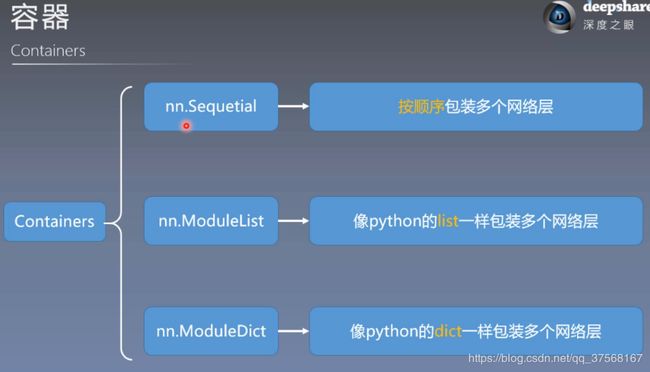
模型容器: 按照一定的方法包装网络层.
- 三个常用的模型容器
3.1 nn.Sequential
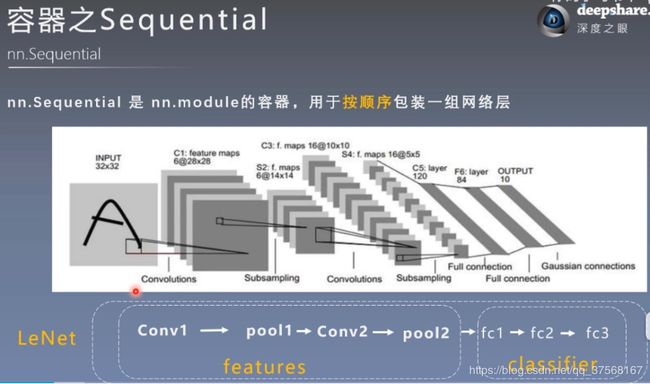
- nn.Sequential是nn.module的容器,用于按顺序包装一组网络层
- 顺序性:各网络层之间严格按照顺序构建
- 自带forward():通过for循环按照顺序取出nn.Sequential(模型1,模型2,。。)(x)中的模型,将模型带入x,以x= 模型1(x),x=模型2(x)这样的形式迭代数据x,得出最后的结论。
import torch
import torch.nn as nn
import torchvision

class LeNet(nn.Module):
    def __init__(self, classes):
        super(LeNet, self).__init__()

        self.feature = nn.Sequential(
            nn.Conv2d(3, 6, 5),
            nn.ReLU(),
            nn.MaxPool2d(kernel_size=2, stride=2),
            nn.Conv2d(6, 16, 5),
            nn.ReLU(),
            nn.MaxPool2d(kernel_size=2, stride=2)
        )

        self.classifier = nn.Sequential(
            nn.Linear(16*5*5, 120),   # y=x*w+b  输入样本大小x, 输出样本大小y
            nn.ReLU(),
            nn.Linear(120, 84),
            nn.ReLU(),
            nn.Linear(84, classes)
        )

    def forward(self, x):
        x = self.feature(x)  # (1, 16, 5, 5)
        x = x.view(x.size()[0], -1)  # (1, 16*5*5)
        print(x.shape)  # (1, 16*5*5)
        x = self.classifier(x)
        print(x.shape)  # (1, classes)

        return x


net = LeNet(classes=10)
# 模拟输入一幅图像(3*32*32), 如果是批输入, 则改为(number, 3, 32, 32)
fake_img = torch.randn([1, 3, 32, 32])
output = net(fake_img)

print(net)
print(output)
3.2 nn.ModuleList
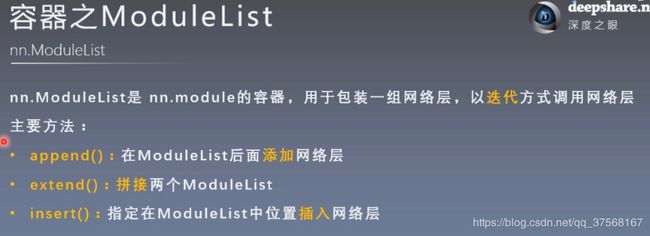
nn.moduleList是nn.module的容器,用于包装一组网络层,以迭代的方式调用网络层,主要方法是:
 - append():再ModuleList后面添加网络层
 - entend():拼接两个ModuleList
 - insert()指定在ModuleList位置中插入网络层
import torch
import torch.nn as nn

class ModuleList(nn.Module):
    def __init__(self):
        super(ModuleList, self).__init__()
        self.linears = nn.ModuleList([nn.Linear(10, 10) for i in range(20)])

    def forward(self, x):
        for i, linear in enumerate(self.linears):
            x = linear(x)
        return x


net = ModuleList()
print(net)
fake_data = torch.ones((10, 10))
output = net(fake_data)
print(output)
3.3 nn.ModuleDict
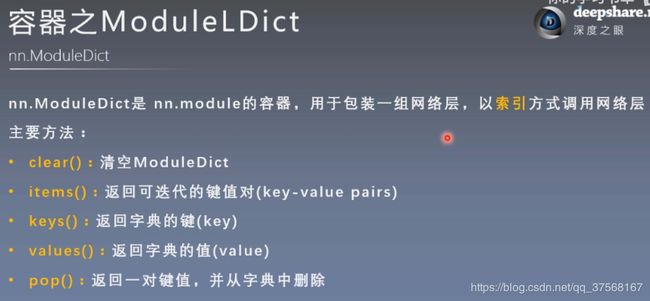
nn.ModuleDict 用于包装一组网络层,以索引方式调用网络层
主要方法:
 - clear():清空ModuleList
 - items():返回可迭代的键值对(key-value paris)
 - keys():返回字典的键key
 - values():返回字典的值values
 - pop():返回一对键值,并从字典中删除
import torch
import torch.nn as nn

class ModuleDict(nn.Module):
    def __init__(self):
        super(ModuleDict, self).__init__()
        self.choices = nn.ModuleDict({
            'conv': nn.Conv2d(10, 10, 3),
            'pool': nn.MaxPool2d(3)
        })

        self.activations = nn.ModuleDict({
            'relu': nn.ReLU(),
            'prelu': nn.PReLU()
        })

    def forward(self, x, choice, act):
        x = self.choices[choice](x)
        x = self.activations[act](x)
        return x


net = ModuleDict()
fake_img = torch.randn((4, 10, 32, 32))
output = net(fake_img, 'conv', 'relu')
print(output)
3.4 容器总结
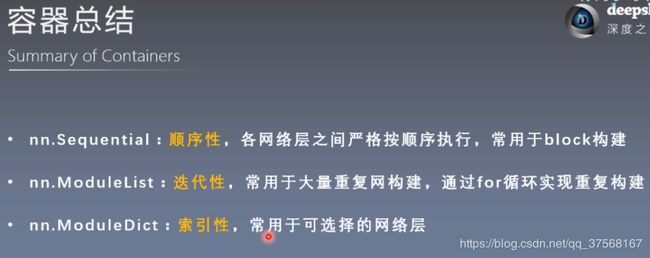
 - nn.Sequential:顺序性,各网络层之间严格按顺序执行,常用于block构建
 - nn.ModuleList:用于大量重复网络构建,通过for重复实现循环构建
 - nn.ModuleDict:索引性,常用于可选择的网络层
4. AlexNet创建
# 直接调用torchvision中的模型
import torchvision
alexnet = torchvision.models.AlexNet()
# 自己搭建模型
import torch
import torch.nn as nn

class AlexNet(nn.Module):
    def __init__(self, classes=1000):
        super(AlexNet, self).__init__()

        self.feature = nn.Sequential(
            nn.Conv2d(3, 96, 11, 4),
            nn.ReLU(),
            nn.MaxPool2d(3, 2),
            nn.Conv2d(96, 256, 5, padding=2),
            nn.ReLU(),
            nn.MaxPool2d(3, 2),
            nn.Conv2d(256, 384, 3, padding=1),
            nn.ReLU(),
            nn.Conv2d(384, 384, 3, padding=1),
            nn.ReLU(),
            nn.Conv2d(384, 256, 3, padding=1),
            nn.ReLU(),
            nn.MaxPool2d(3, 2)
        )

        self.fc = nn.Sequential(
            nn.Linear(6*6*256, 4096),
            nn.ReLU(),
            nn.Dropout(),
            nn.Linear(4096, 4096),
            nn.ReLU(),
            nn.Dropout(),
            nn.Linear(4096, classes),
        )

    def forward(self, x):
        x = self.feature(x)
        print(x.shape)
        x = x.view(x.size()[0], -1)
        x = self.fc(x)
        print(x.shape)

        return x


image = torch.randn([1, 3, 227, 227])
net = AlexNet(classes=2)
output = net(image)

print(output)
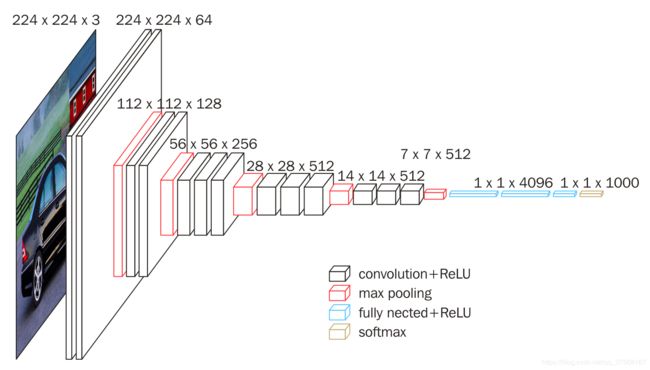
5. VGG16创建
- 卷积层参数: (kernel_size=3, padding=1)
- 最大值池化参数: (kernel_size=2, stride=2)
import torch
import torch.nn as nn


class VGG16(nn.Module):
    def __init__(self, classes=1000):
        super(VGG16, self).__init__()

        self.feature = nn.Sequential(

            nn.Conv2d(3, 64, 3, padding=1),
            nn.ReLU(),
            nn.Conv2d(64, 64, 3, padding=1),
            nn.ReLU(),
            nn.MaxPool2d(kernel_size=2, stride=2),

            nn.Conv2d(64, 128, 3, padding=1),
            nn.ReLU(),
            nn.Conv2d(128, 128, 3, padding=1),
            nn.ReLU(),
            nn.MaxPool2d(kernel_size=2, stride=2),

            nn.Conv2d(128, 256, 3, padding=1),
            nn.ReLU(),
            nn.Conv2d(256, 256, 3, padding=1),
            nn.ReLU(),
            nn.Conv2d(256, 256, 3, padding=1),
            nn.ReLU(),
            nn.MaxPool2d(kernel_size=2, stride=2),

            nn.Conv2d(256, 512, 3, padding=1),
            nn.ReLU(),
            nn.Conv2d(512, 512, 3, padding=1),
            nn.ReLU(),
            nn.Conv2d(512, 512, 3, padding=1),
            nn.ReLU(),
            nn.MaxPool2d(kernel_size=2, stride=2),

            nn.Conv2d(512, 512, 3, padding=1),
            nn.ReLU(),
            nn.Conv2d(512, 512, 3, padding=1),
            nn.ReLU(),
            nn.Conv2d(512, 512, 3, padding=1),
            nn.ReLU(),
            nn.MaxPool2d(kernel_size=2, stride=2)
        )


        self.fc = nn.Sequential(

            nn.Linear(512*7*7, 4096),
            nn.ReLU(),

            nn.Linear(4096, 4096),
            nn.ReLU(),

            nn.Linear(4096, classes)
        )


    def forward(self, x):
        x = self.feature(x)
        print(x.shape)
        x = x.view(x.size()[0], -1)
        x = self.fc(x)
        print(x.shape)

        return x


img = torch.randn([1, 3, 244, 244])  # 模拟图像数据
net = VGG16(classes = 10)
output = net(img)

print(output)
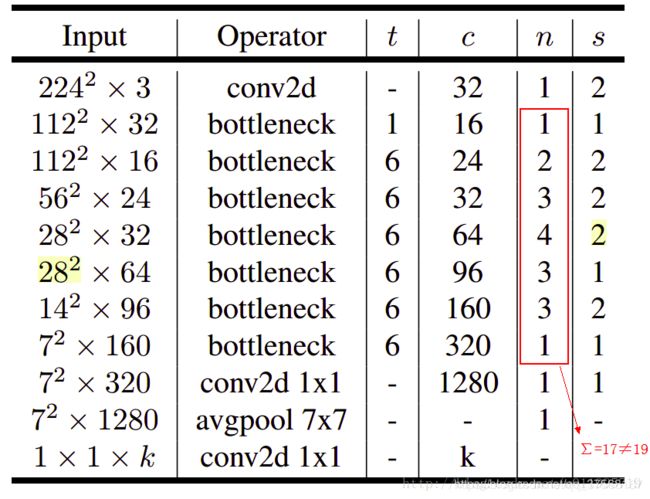
6. MobileNetv2创建
参考博客:https://blog.csdn.net/u011995719/article/details/79135818
- 单个bottleneck结构
-
开始的Conv2需要填充padding=1
-
Block中 3*3卷积层,需要填充padding=1
-
重复的Block时,除了第一个步长是给定值外,其他的都为1
-
MobileNetv2网络搭建
import torch
import torch.nn as nn


# 单个网络结构, 包含1*1卷积, 3*3卷积, 1*1卷积
def Block(input, output, stride, expand_ratio):

    hidden_out = int(input * expand_ratio)

    return nn.Sequential(

        nn.Conv2d(input, hidden_out, kernel_size=1, bias=False),
        nn.BatchNorm2d(hidden_out),
        nn.ReLU6(inplace=True),

        nn.Conv2d(hidden_out, hidden_out, kernel_size=3, stride=stride, padding=1, groups=hidden_out, bias=False),
        nn.BatchNorm2d(hidden_out),
        nn.ReLU6(inplace=True),

        nn.Conv2d(hidden_out, output, kernel_size=1, bias=False),
        nn.BatchNorm2d(output)
    )


# 创建MobileNetv2网络
class MobileNetv2(nn.Module):

    def __init__(self, classes=1000):
        super(MobileNetv2, self).__init__()

        self.feature = nn.Sequential(

            nn.Conv2d(3, 32, kernel_size=3, stride=2, padding=1, bias=False),
            nn.BatchNorm2d(32),
            nn.ReLU6(inplace=True),

            Block(32, 16, 1, 1),

            Block(16, 24, 2, 6),
            Block(24, 24, 1, 6),

            Block(24, 32, 2, 6),
            Block(32, 32, 1, 6),
            Block(32, 32, 1, 6),

            Block(32, 64, 2, 6),
            Block(64, 64, 1, 6),
            Block(64, 64, 1, 6),
            Block(64, 64, 1, 6),

            Block(64, 96, 1, 6),
            Block(96, 96, 1, 6),
            Block(96, 96, 1, 6),

            Block(96, 160, 2, 6),
            Block(160, 160, 1, 6),
            Block(160, 160, 1, 6),

            Block(160, 320, 1, 6),

            nn.Conv2d(320, 1280, 1, bias=False),
            nn.BatchNorm2d(1280),
            nn.ReLU6(inplace=True)

        )

        self.fc = nn.Linear(7*7*1280, classes)

    def forward(self, x):
        x = self.feature(x)
        print(x.shape)
        x = x.view(x.size()[0], -1)
        x = self.fc(x)
        print(x.shape)

        return x

img = torch.randn([1, 3, 224, 224])
net = MobileNetv2(classes=10)
output = net(img)

print(output)
