基于TensorFlow Object Detection API训练自己的目标识别模型
基于TensorFlow Object Detection API训练自己的目标识别模型
环境
Windows10
CUDA_9
Cudnn_9.0
Anaconda3-5.2.0
Tensorflow-GPU-1.12.0
TensorFlow Object Detection 1.12.0
1.安装TensorFlow Object Detection API:
请查看我的上一篇文章
2.项目文件结构:
├─data
│ ├─test
│ │ ├─test_img
│ │ └─test_xml
│ └─train
│ ├─train_img
│ └─train_xml
├─detection
├─evaluation
├─model
├─save_model
├─test_images
└─train_files
3.获取数据集:
1.公开数据集:
我自己使用的是视频数据集、对视频文件进行每10帧抽取一帧保存为图片在进行标注。代码在这里~
2.爬取网络图片:
4.对图片进行标注:
1.LabelImg:
下载地址:https://tzutalin.github.io/labelImg/
通过修改:
F:\windows_v1.8.0\data\predefined_classes.txt
可以修改默认分类
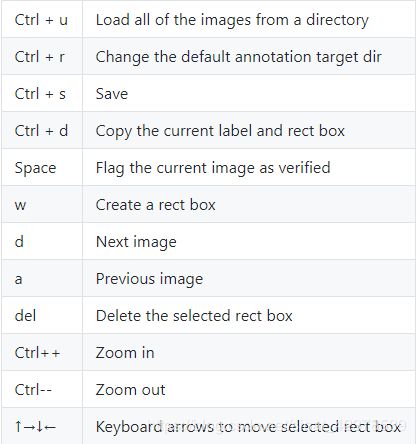
快捷键:
优点:轻巧、绿色软件
缺点:只能画矩形、输出文件格式只有VOC格式
2.Colabeler(精灵标注助手):
下载地址:http://www.jinglingbiaozhu.com/

优点:文本标注、音频标注、视频标注、图片标注、能画多边形、有多种输出格式
缺点:我不知道……但我还是选择了LabelImg
输出的xml格式相同:
<annotation>
	<folder>catfolder>
	<filename>下载.jpgfilename>
	<path>C:\Users\qigqi\Desktop\cat\下载.jpgpath>
	<source>
		<database>Unknowndatabase>
	source>
	<size>
		<width>225width>
		<height>225height>
		<depth>3depth>
	size>
	<segmented>0segmented>
	<object>
		<name>catname>
		<pose>Unspecifiedpose>
		<truncated>0truncated>
		<difficult>0difficult>
		<bndbox>
			<xmin>70xmin>
			<ymin>25ymin>
			<xmax>175xmax>
			<ymax>138ymax>
		bndbox>
	object>
annotation>
5.制作训练集:
要喂给TensorFlow需要把标注出来的VOC数据集进行转换,需要进行两次转换操作。
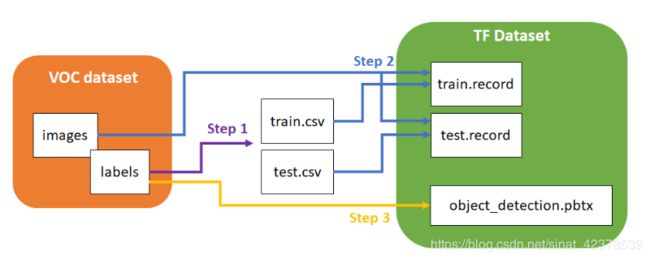
1.xml to csv
import glob
import pandas as pd
import xml.etree.ElementTree as ET

train_images_path = 'Your_PATH/train_xml' # 存放训练图片xml文件的地址
test_images_path = 'Your_PATH/test_xml'	# 存放测试图片xml文件的地址
def xml_to_csv(path):
    xml_list = []
    for xml_file in glob.glob(path + '/*.xml'):
        tree = ET.parse(xml_file)
        root = tree.getroot()
        for member in root.findall('object'):
            value = (root.find('filename').text,
                     int(root.find('size')[0].text),
                     int(root.find('size')[1].text),
                     member[0].text,
                     int(member[4][0].text),
                     int(member[4][1].text),
                     int(member[4][2].text),
                     int(member[4][3].text)
                     )
            xml_list.append(value)
    column_name = ['filename', 'width', 'height', 'class', 'xmin', 'ymin', 'xmax', 'ymax']
    xml_df = pd.DataFrame(xml_list, columns=column_name)
    return xml_df


def main():

    train_xml_df = xml_to_csv(train_images_path)
    test_mxl_df = xml_to_csv(test_images_path)
    train_xml_df.to_csv('Your_PATH/train_csv.csv', index=None)	# 输出训练图片.csv
    test_mxl_df.to_csv('Your_PATH/test_csv.csv',index=None)		# 输出测试图片.csv
    print('Successfully converted xml to csv.')


main()
输出的csv文件:

2.create TFRcord
import os
import io
import pandas as pd
import tensorflow as tf

from PIL import Image
from object_detection.utils import dataset_util
from collections import namedtuple, OrderedDict
# 修改为自己对应的地址即可、train和test要单独运行。
# 生成的.record文件放在train_file文件下
flags = tf.app.flags
flags.DEFINE_string('csv_input', 'Your_PATH/train_csv.csv', 'Path to the CSV input')
flags.DEFINE_string('output_path', 'Your_PATH/train.record', 'Path to output TFRecord')
flags.DEFINE_string('image_dir', 'Your_PATH/train_img', 'Path to images')
FLAGS = flags.FLAGS


def class_text_to_int(row_label):
	# 要修改下面的row_label、这里我的是13个类型。
	# 只有一类的话就是
	# if row_label == 'Bonn forceps':
	#	 return 1
	# else:
	#	 None
	# 以此类推
	# 必须以else:None结尾、return从1开始而不是0.
    if row_label == 'Bonn forceps':
        return 1
    elif row_label == 'capsulorhexis cystotome':
        return 2
    elif row_label == 'capsulorhexis forceps':
        return 3
    elif row_label == 'hydrodissection canula':
        return 4
    elif row_label == 'implant injector':
        return 5
    elif row_label == 'irrigation/aspiration handpiece':
        return 6
    elif row_label == 'micromanipulator':
        return 7
    elif row_label == 'phacoemulsifier handpiece':
        return 8
    elif row_label == 'primary incision knife':
        return 9
    elif row_label == 'Rycroft canula':
        return 10
    elif row_label == 'secondary incision knife':
        return 11
    elif row_label == 'Troutman forceps':
        return 12
    elif row_label == 'viscoelastic cannula':
        return 13
    else:
        None


def split(df, group):
    data = namedtuple('data', ['filename', 'object'])
    gb = df.groupby(group)
    return [data(filename, gb.get_group(x)) for filename, x in zip(gb.groups.keys(), gb.groups)]


def create_tf_example(group, path):
    with tf.gfile.GFile(os.path.join(path, '{}'.format(group.filename)), 'rb') as fid:
        encoded_jpg = fid.read()
    encoded_jpg_io = io.BytesIO(encoded_jpg)
    image = Image.open(encoded_jpg_io)
    width, height = image.size

    filename = group.filename.encode('utf8')
    image_format = b'jpg'
    xmins = []
    xmaxs = []
    ymins = []
    ymaxs = []
    classes_text = []
    classes = []

    for index, row in group.object.iterrows():
        xmins.append(row['xmin'] / width)
        xmaxs.append(row['xmax'] / width)
        ymins.append(row['ymin'] / height)
        ymaxs.append(row['ymax'] / height)
        classes_text.append(row['class'].encode('utf8'))
        classes.append(class_text_to_int(row['class']))

    tf_example = tf.train.Example(features=tf.train.Features(feature={
        'image/height': dataset_util.int64_feature(height),
        'image/width': dataset_util.int64_feature(width),
        'image/filename': dataset_util.bytes_feature(filename),
        'image/source_id': dataset_util.bytes_feature(filename),
        'image/encoded': dataset_util.bytes_feature(encoded_jpg),
        'image/format': dataset_util.bytes_feature(image_format),
        'image/object/bbox/xmin': dataset_util.float_list_feature(xmins),
        'image/object/bbox/xmax': dataset_util.float_list_feature(xmaxs),
        'image/object/bbox/ymin': dataset_util.float_list_feature(ymins),
        'image/object/bbox/ymax': dataset_util.float_list_feature(ymaxs),
        'image/object/class/text': dataset_util.bytes_list_feature(classes_text),
        'image/object/class/label': dataset_util.int64_list_feature(classes),
    }))
    return tf_example


def main(_):
    writer = tf.python_io.TFRecordWriter(FLAGS.output_path)
    path = os.path.join(FLAGS.image_dir)
    examples = pd.read_csv(FLAGS.csv_input)
    grouped = split(examples, 'filename')
    for group in grouped:
        tf_example = create_tf_example(group, path)
        writer.write(tf_example.SerializeToString())

    writer.close()
    output_path = os.path.join(os.getcwd(), FLAGS.output_path)
    print('Successfully created the TFRecords: {}'.format(output_path))


if __name__ == '__main__':
    tf.app.run()
6.下载模型:
下载地址:https://github.com/tensorflow/models/blob/master/research/object_detection/g3doc/detection_model_zoo.md

Speed:运行速度越快越好
mAP:评价模型的指标越高越好
但速度慢的模型一般mAP较高
7.下载配置文件:
要选择与自己下载的模型名对应的config文件、放在train_file文件下。
下载地址:https://github.com/tensorflow/models/tree/master/research/object_detection/samples/configs
在本地文件中也有: D:\models\research\object_detection\samples\configs

8.修改配置文件:
1.修改.pbtxt文件
./model/research/object_detection/data
在该目录下有很多现成的.pbtxt随意复制一个到train_file文件下进行修改:
修改方式与修改生成.record的相似并与其对应、添加/删除 item,id从1开始
item {
  id: 1
  name: 'Bonn forceps'
}

item {
  id: 2
  name: 'capsulorhexis cystotome'
}

item {
  id: 3
  name: 'capsulorhexis forceps'
}

item {
  id: 4
  name: 'hydrodissection canula'
}

item {
  id: 5
  name: 'implant injector'
}

item {
  id: 6
  name: 'irrigation/aspiration handpiece'
}

item {
  id: 7
  name: 'micromanipulator'
}

item {
  id: 8
  name: 'phacoemulsifier handpiece'
}

item {
  id: 9
  name: 'primary incision knife'
}

item {
  id: 10
  name: 'Rycroft canula'
}

item {
  id: 11
  name: 'secondary incision knife'
}

item {
  id: 12
  name: 'Troutman forceps'
}

item {
  id: 13
  name: 'viscoelastic cannula'
}
2.修改.config文件
有些.config文件是用于TPU训练注意看文档说明。
# Faster R-CNN with Inception v2, configuration for MSCOCO Dataset.
# Users should configure the fine_tune_checkpoint field in the train config as
# well as the label_map_path and input_path fields in the train_input_reader and
# eval_input_reader. Search for "PATH_TO_BE_CONFIGURED" to find the fields that
# should be configured.

# model部分为对模型进行微调
model {
  faster_rcnn {
    num_classes: 13			# 修改这里 改成自己的分类数
    image_resizer {
      keep_aspect_ratio_resizer {
        min_dimension: 600
        max_dimension: 1024
      }
    }
    feature_extractor {
      type: 'faster_rcnn_inception_v2'
      first_stage_features_stride: 16
    }
    first_stage_anchor_generator {
      grid_anchor_generator {
        scales: [0.25, 0.5, 1.0, 2.0]
        aspect_ratios: [0.5, 1.0, 2.0]
        height_stride: 16
        width_stride: 16
      }
    }
    first_stage_box_predictor_conv_hyperparams {
      op: CONV
      regularizer {
        l2_regularizer {
          weight: 0.0
        }
      }
      initializer {
        truncated_normal_initializer {
          stddev: 0.01
        }
      }
    }
    first_stage_nms_score_threshold: 0.0
    first_stage_nms_iou_threshold: 0.7
    first_stage_max_proposals: 300
    first_stage_localization_loss_weight: 2.0
    first_stage_objectness_loss_weight: 1.0
    initial_crop_size: 14
    maxpool_kernel_size: 2
    maxpool_stride: 2
    second_stage_box_predictor {
      mask_rcnn_box_predictor {
        use_dropout: false
        dropout_keep_probability: 1.0
        fc_hyperparams {
          op: FC
          regularizer {
            l2_regularizer {
              weight: 0.0
            }
          }
          initializer {
            variance_scaling_initializer {
              factor: 1.0
              uniform: true
              mode: FAN_AVG
            }
          }
        }
      }
    }
    second_stage_post_processing {
      batch_non_max_suppression {
        score_threshold: 0.0
        iou_threshold: 0.6
        max_detections_per_class: 100
        max_total_detections: 300
      }
      score_converter: SOFTMAX
    }
    second_stage_localization_loss_weight: 2.0
    second_stage_classification_loss_weight: 1.0
  }
}
# 这部分为对训练过程进行微调
train_config: {

# batch_size 可根据自己的显存大小调整
  batch_size: 1

  optimizer {
    momentum_optimizer: {
      learning_rate: {
        manual_step_learning_rate {
          initial_learning_rate: 0.0002
          schedule {
            step: 900000
            learning_rate: .00002
          }
          schedule {
            step: 1200000
            learning_rate: .000002
          }
        }
      }
      momentum_optimizer_value: 0.9
    }
    use_moving_average: false
  }
  gradient_clipping_by_norm: 10.0

  # 这里修改为刚才下载的模型解压后的地址
  fine_tune_checkpoint: "D:/models/models-1.12.0/GraduationProject/model/faster_rcnn_inception_v2_coco_2018_01_28/model.ckpt"

  # 如不使用迁移学习改为false
  from_detection_checkpoint: true

  # Note: The below line limits the training process to 200K steps, which we
  # empirically found to be sufficient enough to train the COCO dataset. This
  # effectively bypasses the learning rate schedule (the learning rate will
  # never decay). Remove the below line to train indefinitely.
  num_steps: 200000
  data_augmentation_options {
    random_horizontal_flip {
    }
  }
}

train_input_reader: {
  tf_record_input_reader {
    # 修改为训练.record地址
    input_path: "D:/models/models-1.12.0/GraduationProject/train_files/train.record"
  }
  # 修改为.pptxt地址
  label_map_path: "D:/models/models-1.12.0/GraduationProject/train_files/label_map.pbtxt"
}

eval_config: {
  # 修改为自己测试集图片的数量
  num_examples: 3531
  # Note: The below line limits the evaluation process to 10 evaluations.
  # Remove the below line to evaluate indefinitely.
  max_evals: 10
}

eval_input_reader: {
  tf_record_input_reader {
  	# 修改为测试.record地址
    input_path: "D:/models/models-1.12.0/GraduationProject/train_files/test.record"
  }
  # 同上面的一样.pptxt
  label_map_path: "D:/models/models-1.12.0/GraduationProject/train_files/label_map.pbtxt"
  shuffle: false
  num_readers: 1
}
9.开始训练:
TensorFlow Object Detection API更新后是使用model_main.py进行训练但是不知什么原因、我的卡着不动不会开始训练,所以
在这就把这两种方法都写上来了。
1.model_main .py
在.\models\research打开cmd输入:
python object_detection/model_main.py --alsologtostderr \
--pipeline_config_path=D:/models/models-1.12.0/GraduationProject/train_files/faster_rcnn_resnet50_coco.config \
--model_dir=D:/models/models-1.12.0/GraduationProject/save_model \
--num_train_steps=50000 \
--num_eval_steps=2000
model_dir:用于保存输出的模型
pipeline_config_path:填.config文件地址
2.train .py
在.\models\research打开cmd输入:
python object_detection\legacy\train.py --logtostderr \
 --train_dir=D:/models/models-1.12.0/GraduationProject/save_model \
 --pipeline_config_path=D:/models/models-1.12.0/GraduationProject/train_files/faster_rcnn_inception_v2_coco.config
train_dir:用于保存输出的模型
pipeline_config_path:填.config文件地址
开始训练后另开一个cmd输入
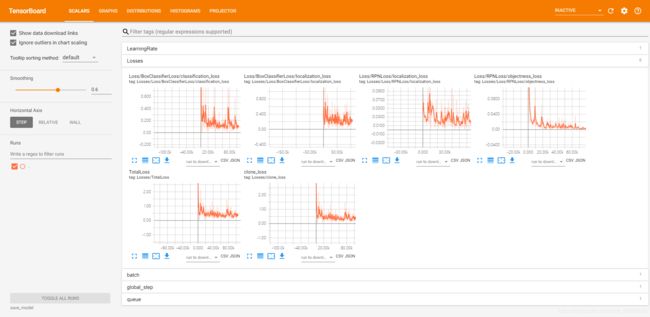
tensorboard --logdir=save_model
即可可视化训练过程:
10.验证模型效果:
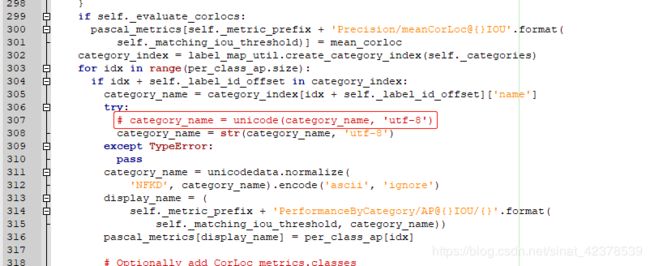
如果使用Python 3.x需要先修改一个文件(很奇怪明明TensorFlow Object Detection 1.12.0不支持Python 2.x 但却有使用2.x的unicode):
修改下面的这个文件307行 unicode修改为str。
E:\Ananconda\Lib\site-packages\object_detection-0.1-py3.6.egg\object_detection\utils\object_detection_evaluation.py
修改完后在.\research\object_detection\legacy下打开cmd输入:
python eval.py --logtostderr \
--checkpoint_dir=D:/models/models-1.12.0/GraduationProject/save_model \
--eval_dir=D:/models/models-1.12.0/GraduationProject/evaluation \
--pipeline_config_path=D:/models/models-1.12.0/GraduationProject/train_files/faster_rcnn_inception_v2_coco.config
即可看到mAP等参数、如显存足够的话可以同时运行train .py和eval .py
输入
tensorboard --logdir=evalution
即可视化mAP的变化、如果不是同时运行的话只有一个点,最后一个保存的模型的mAP。就像我的一样~


11.模型转换:
在训练完成后需要将训练产生的最后一组.meta, .index, .ckpt, checkpoint文件。其中meta保存了graph和metadata,ckpt保存了
网络的weights。而在生产环境中进行预测的时候是只需要模型和权重,不需要metadata,所以需要将其提出进行freeze操作,
将所需的部分放到一个文件,方便之后的调用,也减少模型加载所需的内存。(在下载的预训练模型解压后可以找到4个文件,
其中名为frozen_inference_graph.pb的文件就是freeze后产生的模型文件,比weights文件大,但是比weights和meta文件加起来
要小不少。)
在D:\models\models-1.12.0\research\object_detection下打开cmd输入:
python export_inference_graph.py --input_type=image_tensor \
 --pipeline_config_path=D:/models/models-1.12.0/GraduationProject/train_files/faster_rcnn_inception_v2_coco.config \
 --trained_checkpoint_prefix=D:/models/models-1.12.0/GraduationProject/save_model/model.ckpt-100181 \
 --output_directory=D:/models/models-1.12.0/GraduationProject/detection/
这里要根据自己训练的次数修改model.ckpt-100181的数字
trained_checkpoint_prefix=D:/models/models-1.12.0/GraduationProject/save_model/model.ckpt-100181output_directory:输入转换后保存模型的地址
12.测试模型:
这里就修改一下官方Demo的代码就可以了删掉下载模型部分的代码就可以了,因为我没在jupyter notebook上运行所以会有一点
点不同。
import numpy as np
import os
import sys
import tensorflow as tf
from distutils.version import StrictVersion
from matplotlib import pyplot as plt	# 导入plt
from PIL import Image

sys.path.append("..")
from object_detection.utils import ops as utils_ops

if StrictVersion(tf.__version__) < StrictVersion('1.9.0'):
  raise ImportError('Please upgrade your TensorFlow installation to v1.9.* or later!')

from object_detection.utils import label_map_util
from object_detection.utils import visualization_utils as vis_util

MODEL_NAME = 'D:/models/models-1.12.0/GraduationProject/detection'	# 转换后的模型地址

PATH_TO_FROZEN_GRAPH = MODEL_NAME + '/frozen_inference_graph.pb'	# 不用动

PATH_TO_LABELS = 'D:/models/models-1.12.0/GraduationProject/train_files/label_map.pbtxt'	# .pbtxt对应的地址

detection_graph = tf.Graph()
with detection_graph.as_default():
  od_graph_def = tf.GraphDef()
  with tf.gfile.GFile(PATH_TO_FROZEN_GRAPH, 'rb') as fid:
    serialized_graph = fid.read()
    od_graph_def.ParseFromString(serialized_graph)
    tf.import_graph_def(od_graph_def, name='')

category_index = label_map_util.create_category_index_from_labelmap(PATH_TO_LABELS, use_display_name=True)

def load_image_into_numpy_array(image):
  (im_width, im_height) = image.size
  return np.array(image.getdata()).reshape(
      (im_height, im_width, 3)).astype(np.uint8)

PATH_TO_TEST_IMAGES_DIR = 'D:/models/models-1.12.0/GraduationProject/test_images'	# 喂给模型的图片
# test_images下的文件名为image0、image1、image2....image9后面续上重命名脚本代码
TEST_IMAGE_PATHS = [ os.path.join(PATH_TO_TEST_IMAGES_DIR, 'image{}.jpg'.format(i)) for i in range(0, 10) ]
# 或者改成这种直接读取该目录下的所有文件、文件名不会影响。
# TEST_IMAGE_PATHS = os.listdir(PATH_TO_TEST_IMAGES_DIR)

IMAGE_SIZE = (12, 8)

def run_inference_for_single_image(image, graph):
  with graph.as_default():
    with tf.Session() as sess:
      ops = tf.get_default_graph().get_operations()
      all_tensor_names = {output.name for op in ops for output in op.outputs}
      tensor_dict = {}
      for key in [
          'num_detections', 'detection_boxes', 'detection_scores',
          'detection_classes', 'detection_masks'
      ]:
        tensor_name = key + ':0'
        if tensor_name in all_tensor_names:
          tensor_dict[key] = tf.get_default_graph().get_tensor_by_name(
              tensor_name)
      if 'detection_masks' in tensor_dict:
        detection_boxes = tf.squeeze(tensor_dict['detection_boxes'], [0])
        detection_masks = tf.squeeze(tensor_dict['detection_masks'], [0])
        real_num_detection = tf.cast(tensor_dict['num_detections'][0], tf.int32)
        detection_boxes = tf.slice(detection_boxes, [0, 0], [real_num_detection, -1])
        detection_masks = tf.slice(detection_masks, [0, 0, 0], [real_num_detection, -1, -1])
        detection_masks_reframed = utils_ops.reframe_box_masks_to_image_masks(
            detection_masks, detection_boxes, image.shape[0], image.shape[1])
        detection_masks_reframed = tf.cast(
            tf.greater(detection_masks_reframed, 0.5), tf.uint8)
        tensor_dict['detection_masks'] = tf.expand_dims(
            detection_masks_reframed, 0)
      image_tensor = tf.get_default_graph().get_tensor_by_name('image_tensor:0')

      output_dict = sess.run(tensor_dict,
                             feed_dict={image_tensor: np.expand_dims(image, 0)})
      output_dict['num_detections'] = int(output_dict['num_detections'][0])
      output_dict['detection_classes'] = output_dict[
          'detection_classes'][0].astype(np.uint8)
      output_dict['detection_boxes'] = output_dict['detection_boxes'][0]
      output_dict['detection_scores'] = output_dict['detection_scores'][0]
      if 'detection_masks' in output_dict:
        output_dict['detection_masks'] = output_dict['detection_masks'][0]
  return output_dict

for image_path in TEST_IMAGE_PATHS:
  image = Image.open(image_path)
  image_np = load_image_into_numpy_array(image)
  image_np_expanded = np.expand_dims(image_np, axis=0)
  output_dict = run_inference_for_single_image(image_np, detection_graph)
  vis_util.visualize_boxes_and_labels_on_image_array(
      image_np,
      output_dict['detection_boxes'],
      output_dict['detection_classes'],
      output_dict['detection_scores'],
      category_index,
      instance_masks=output_dict.get('detection_masks'),
      use_normalized_coordinates=True,
      line_thickness=8)
  plt.figure(figsize=IMAGE_SIZE)
  plt.imshow(image_np)
  plt.show()		# show输出
import os
# 重命名脚本
file_path = 'Your_PATH'
file_names = os.listdir(file_path)

for i in range(len(file_names)):

    os.rename(file_path+file_names[i], file_path+'image'+str(i)+'.jpg')
    print(file_names[i], 'success!')
遇到的错误:
1.NameError: name ‘unicode’ is not defined
原因:Python3.x 中已经不存在Unicode方法。
解决方法:参考第10部分;
2.ValueError(‘Image with id {} already added.’.format(image_id))
原因:未修改.pptxt文件中的测试集number
解决方法:参考第8部分;
3.WARNING:root:image xxx does not have groundtruth difficult flag specified
只是警告、不会影响最终结果;
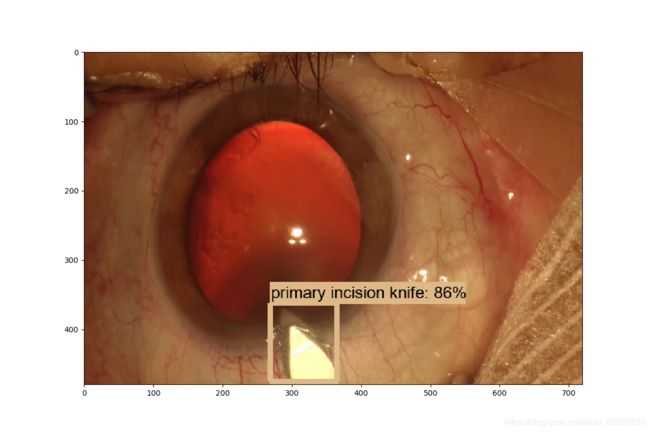
输出图片(警告!会引起轻微不适的白内障手术图片)
.
.
.
.
.
.
.
.
.
.
.
.
.
.
.
.
.

参考资料:
1.https://blog.csdn.net/dy_guox/article/details/79111949
2.https://blog.csdn.net/zong596568821xp/article/details/84842688
3.https://towardsdatascience.com/how-to-train-your-own-object-detector-with-tensorflows-object-detector-api-bec72ecfe1d9
4.https://chtseng.wordpress.com/2019/02/16/如何使用google-object-detection-api訓練自己的模型/
5.https://stackoverflow.com/questions/53091085/raise-valueerrorimage-with-id-already-added-formatimage-id-in-tensorfl
6.https://www.cnblogs.com/arkenstone/p/7237292.html