GeoQuiz的个人见解
写在前面的话:在CSDN上第一次发表博客,请多指教!
有一次登录微信网页版,需要用手机扫描电脑上的二维码并在手机客户端点击确认才能登陆,这没啥新奇的;后来无意发现边上的小哥跟我做同样的事——用他的手机扫描电脑的二维码然后点击确认登录,这依然没啥新奇的。后来自己细细想想,不同账号的微信扫描同一个二维码,系统居然能分辨出不同的账号,二维码可不知道是谁扫了它,可是它居然做出判断,我当时就在想,移动开发真是一件牛逼的事,在我看来简直太神奇了,于是就这么着,我踏上了移动开发的这条不归路。
如今研究Android开发也有半年多的时间了,在这之中有困惑,有惊喜,有恼火,有成就,唯一不变的是一直走下去的决心。在这期间遇到了不少问题,这些问题大部分是通过参阅别人写的博客解决的,这说明我遇到的问题别人也遇到了,不过人家通过写博客的方式,把自己的问题完美的解决了,不仅可供后来人参阅,还能加深印象,可谓一举两得。于是,我也决定把自己学到的一些东西跟大家分享一下,一来可以让CSDN上的诸多大神批评指正,二来可以巩固所学知识,也可谓一石二鸟。
前两天在逛当当的时候发现了一本书——《Android编程权威指南》,这本书号称是在美帝亚马逊上销量高居榜首的Android学习书籍,于是我就买了一本。(其实老外写的技术类书籍我一直比较敬而远之,第一,本人英语是硬伤;二,汉化版真是不敢恭维,翻译的驴唇不对马嘴。可是话说回来,想学编程起码英语过得去,毕竟编程就是人家老外发明的,况且,作为一个经历过高考、考研、和四六级英语洗礼却跟老外连寒暄几句的本事都没有的屌丝,说起来都丢人,所以这硬伤一定得解决;再者,既然是老外发明的,那人家是权威,尤其是书籍,国内的书籍再好,跟国外的比还是有那么一丝说不出的差距。)这本书买来翻了翻,这一翻不得了,直接看了一通宵,先不说内容有多好,就这汉化、校验水平绝对牛逼,连一个错别字都没有,内容我就不夸了,各位有兴趣的自己买一本看看吧,无论您有多高的造诣,都能从这本书上学到点东西。
GeoQuiz应用介绍
该应用是《Android权威编程指南》中的第一个DEMO,大概占了六-七章的篇幅,主要功能是:
- 用户通过点击“True”或“False”按钮回答屏幕上显示的判断题,并根据Toast出的信息检查自己的答案是否正确;
- 通过点击“上一题”或“下一题”切换题目;
- 该应用还提供了作弊功能,当用户点击“Cheat”按钮时,应用会告诉你正确答案,但通过作弊手段得到正确答案的题目将在用户回答该问题时Toast出“你是个作弊者”的信息;
- 该应用还提供了重置功能,当用户点击“RESET”时,所有作弊记录都将被清空。(这个功能书上没有);
本人还修复了该DEMO的若干个bug(这些bug实际上是该书故意留给读者解决的):
- 当用户来到作弊界面以后,可以通过旋转屏幕的方式来清除作弊痕迹;
- 作弊并返回答题界面后,用户可以通过旋转屏幕的方式来清除作弊痕迹;
- 在作弊界面,用户得到题目的结果后,若旋转屏幕,结果丢失;
- 用户可以通过切换题目的方式清除作弊记录;
通过该DEMO能学到的知识点:
- 通过onSaveInstanceState()方法保存Activity界面上的临时数据;
- 横竖屏切换和Activity生命周期的关系;
- UI控件AlertDialog的设计模式;
- layout布局中各控件带“layout”属性和不带“layout”属性的区别
- MVC设计模式;
一、 答题界面的activity和它的布局介绍
1、引用资源
首先,说一下应用中用到的资源:GeoQuiz应用使用了两张图片和一些字符串资源。
图片资源作为切换题目按钮的资源,保存于res/drawable中,如下所示:

字符串资源用来保存题目的内容等,保存于res/values/strings.xml中(在商业应用中,除了需要放在Bundle中的键值对所对应的键和一些静态字符串变量需要在代码中用全大写变量声明外,其他的一些字符串资源应该放到res/values/strings.xml(从服务器的解析数据单说)),如下所示:
    <string name="app_name">GeoQiuzstring>
    <string name="true_button">Truestring>
    <string name="false_button">Falsestring>
    <string name="cheat_button">Cheat!string>
    <string name="correct_toast">Correct!string>
    <string name="incorrect_toast">Incorrect!string>
    <string name="question_oceans">The Pacific Ocrean is larger than the Atlantic Ocean.string>
    <string name="question_mideast">The Suez Canal connects the Red Sea.string>
    <string name="question_africa">The Source of the Mile River is in Egypt.string>
    <string name="question_americas">The Amazon River is the longest river in the Americas.string>
    <string name="question_asia">Lake Baikal is the world\'s oldest and deepest freshwater lake.string>
    <string name="desc_prev">click this button to turn to the previous questionstring>
    <string name="desc_next">click this button to turn to the next questionstring>
    <string name="warning_text">Are you sure u want to do thisstring>
    <string name="show_answer_button">Show answerstring>
    <string name="cheater_judgement_toast">U are a cheater!string>
    <string name="cheat_reset_button">RESETstring>
2、答题界面的布局
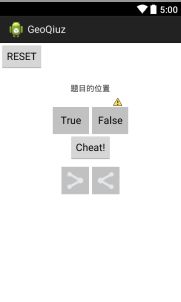
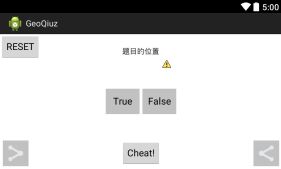
接着,我们将为答题界面(由主activity控制)布局做一简单解析(我们先通过所见即所得的Graphic Layout看看布局长啥样):


图2对应的XML被放在res/layout文件夹中,图3对应的XML被放在res/layout-land文件夹中,需要注意的是,这两个XML的名称相同,它们只是不同方向布局的不同呈现,在商业应用中,应该对不同方向的布局分别定制,而不能仅仅是让横竖布局的XML内容完全一样。
以下是这两个XML的代码:
<LinearLayout xmlns:android="http://schemas.android.com/apk/res/android"
    android:layout_width="match_parent"
    android:layout_height="match_parent"
    android:orientation="vertical" >

    <Button
        android:id="@+id/cheat_reset_button"
        android:layout_width="wrap_content"
        android:layout_height="wrap_content"
        android:text="@string/cheat_reset_button" />

    <TextView
        android:id="@+id/question_text_view"
        android:layout_width="wrap_content"
        android:layout_height="wrap_content"
        android:layout_gravity="center"
        android:gravity="center"
        android:padding="24dp"
        android:text="题目的位置"/>

    <RelativeLayout
        android:layout_width="wrap_content"
        android:layout_height="wrap_content"
        android:layout_gravity="center"
        android:gravity="center" >

        <Button
            android:id="@+id/true_button"
            style="?android:attr/buttonBarButtonStyle"
            android:layout_width="wrap_content"
            android:layout_height="wrap_content"
            android:background="#69696969"
            android:text="@string/true_button" />

        <Button
            android:id="@+id/false_button"
            style="?android:attr/buttonBarButtonStyle"
            android:layout_width="wrap_content"
            android:layout_height="wrap_content"
            android:layout_marginLeft="5dp"
            android:layout_toRightOf="@id/true_button"
            android:background="#69696969"
            android:text="@string/false_button" >
        Button>
    RelativeLayout>

    <Button
        android:id="@+id/cheat_button"
        android:layout_width="wrap_content"
        android:layout_height="wrap_content"
        android:layout_gravity="center"
        android:text="@string/cheat_button" />

    <RelativeLayout
        android:layout_width="wrap_content"
        android:layout_height="wrap_content"
        android:layout_gravity="center"
        android:layout_marginTop="10dp"
        android:gravity="center" >

        <ImageButton
            android:id="@+id/prev_button"
            android:layout_width="wrap_content"
            android:layout_height="wrap_content"
            android:background="#69696969"
            android:contentDescription="@string/desc_prev"
            android:padding="3dp"
            android:src="@drawable/image_view_button_share_prev" />

        <ImageButton
            android:id="@+id/next_button"
            android:layout_width="wrap_content"
            android:layout_height="wrap_content"
            android:layout_marginLeft="5dp"
            android:layout_toRightOf="@id/prev_button"
            android:background="#69696969"
            android:contentDescription="@string/desc_next"
            android:padding="3dp"
            android:src="@drawable/image_view_button_share" />
    RelativeLayout>

LinearLayout>
<FrameLayout xmlns:android="http://schemas.android.com/apk/res/android"
    android:layout_width="match_parent"
    android:layout_height="match_parent" >

    <Button
        android:id="@+id/cheat_reset_button"
        android:layout_width="wrap_content"
        android:layout_height="wrap_content"
        android:text="@string/cheat_reset_button" />

    <TextView
        android:id="@+id/question_text_view"
        android:layout_width="wrap_content"
        android:layout_height="wrap_content"
        android:layout_gravity="center_horizontal"
        android:padding="24dp"
        android:text="题目的位置" />

    <RelativeLayout
        android:layout_width="wrap_content"
        android:layout_height="wrap_content"
        android:layout_gravity="center" >

        <Button
            android:id="@+id/true_button"
            style="?android:attr/buttonBarButtonStyle"
            android:layout_width="wrap_content"
            android:layout_height="wrap_content"
            android:background="#69696969"
            android:text="@string/true_button" />

        <Button
            android:id="@+id/false_button"
            style="?android:attr/buttonBarButtonStyle"
            android:layout_width="wrap_content"
            android:layout_height="wrap_content"
            android:layout_marginLeft="5dp"
            android:layout_toRightOf="@id/true_button"
            android:background="#69696969"
            android:text="@string/false_button" >
        Button>
    RelativeLayout>

    <RelativeLayout
        android:layout_width="match_parent"
        android:layout_height="wrap_content"
        android:layout_gravity="bottom"
        android:layout_margin="5dp" >

        <ImageButton
            android:id="@+id/prev_button"
            android:layout_width="wrap_content"
            android:layout_height="wrap_content"
            android:layout_alignParentLeft="true"
            android:background="#69696969"
            android:contentDescription="@string/desc_prev"
            android:padding="3dp"
            android:src="@drawable/image_view_button_share_prev" />

        <Button
            android:id="@+id/cheat_button"
            android:layout_width="wrap_content"
            android:layout_height="wrap_content"
            android:layout_centerInParent="true"
            android:text="@string/cheat_button" />

        <ImageButton
            android:id="@+id/next_button"
            android:layout_width="wrap_content"
            android:layout_height="wrap_content"
            android:layout_alignParentRight="true"
            android:background="#69696969"
            android:contentDescription="@string/desc_next"
            android:padding="3dp"
            android:src="@drawable/image_view_button_share" />
    RelativeLayout>

FrameLayout>在UI控件中,有的属性带“layout”前缀,有的不带,这区别可大了:所有带layout前缀的属性,它都表示该控件相对于它的父控件的位置,而不带layout的属性则表示该控件自身的内容相对于该控件的位置。比方说,layout_gravity这个属性,如果在一个Button中声明了这个属性,并设置为center,则表示该Button位于它的父容器的中心位置;如果为该Button声明了gravity这个属性,则表示它的text中的内容在这个Button控件的中心位置。
顺带再说一句Button这个控件(包含类似的附带图片展示的控件),android提供了一个很好的属性:contentDescription,当背景图片因为某种原因未正常显示时,该图片位置将显示contextDescription属性定义的内容。
3、控制答题界面的activity(主activity)
1、保存题目的TrueFalse类
首先,我们需要一个能保存每一道题目信息的类,该类就是一个简单的DTO对象,包含三个成员变量,分别用于存储题目、答案、用户是否做过弊,代码如下:
public class TrueFalse {
    //题目内容,题目保存于strings.xml中,需用R.string.....引用,
    //所以是int类型
    private int mQuestion;
    //题目的答案
    private boolean mTrueQuestion;
    //用户是否在该题上作弊
    private boolean mCheated;
    public boolean isCheated() {
        return mCheated;
    }

    public void setCheated(boolean cheated) {
        mCheated = cheated;
    }

    public TrueFalse(int question,boolean trueQuestion,boolean cheated)
    {
        mQuestion = question;
        mTrueQuestion = trueQuestion;
        mCheated = cheated;
    }

    public int getQuestion() {
        return mQuestion;
    }

    public void setQuestion(int question) {
        mQuestion = question;
    }

    public boolean isTrueQuestion() {
        return mTrueQuestion;
    }

    public void setTrueQuestion(boolean trueQuestion) {
        mTrueQuestion = trueQuestion;
    }
}
顺便说一下,在Eclipse中生成getter()和setter()方法相信对大多数朋友都是轻车熟路,现在一些约定俗成的的命名规则要求成员变量以m开头,所以在生成getter()和setter方法时,可以在Window->Java->Code Style中配置,在方法名中忽略字母m。
2、QuizActivity类(主activity)
public class MainActivity extends Activity {
    private Button mTrueButton;
    private Button mFalseButton;

    // private boolean mTrueQuestion;

    private ImageButton mNextButton;
    private ImageButton mPrevButton;

    private TextView mQuestionTextView;

    private Button mCheatButton;
    private Button mResetButton;
    // private AlertDialog.Builder mBuilder = new AlertDialog.Builder(this);

    private int mCurrentIndex = 0;

    // 当屏幕旋转时,保存数据
    private static final String KEY_INDEX = "Index";
    // 将该键值打包进Bundle后放入intent传递
    public static final String EXTRA_ANSWER_IS_TRUE = "com.text.geoquiz.answer_is_true";

    // private boolean mIsCheater;
    // 通过该键可确定user是否查看了答案
    private String CHEARTER = "USERISACHEATER";

    private TrueFalse[] mQuestionBank = new TrueFalse[] {
            new TrueFalse(R.string.question_oceans, true, false),
            new TrueFalse(R.string.question_mideast, false, false),
            new TrueFalse(R.string.question_americas, true, false),
            new TrueFalse(R.string.question_africa, false, false),
            new TrueFalse(R.string.question_asia, true, false) };
    //更新题目的内容
    private void updateQuestion() {
        int _question = mQuestionBank[mCurrentIndex].getQuestion();
        mQuestionTextView.setText(_question);
    }
    //判断用户的答案是否正确
    private void checkAnswer(boolean userPressedTrue) {
        boolean answerTrue = mQuestionBank[mCurrentIndex].isTrueQuestion();
        int messageResId = 0;
        //如果用户偷窥了答案,那么在作答时,将Toast出“你是个作弊者”的信息
        if (mQuestionBank[mCurrentIndex].isCheated()) {
            messageResId = R.string.cheater_judgement_toast;
        }
        //如果用户没有作弊,,那么在作答时,将Toast出作答的正确性
        else {
            if (answerTrue == userPressedTrue) {
                messageResId = R.string.correct_toast;
            } else {
                messageResId = R.string.incorrect_toast;
            }

        }
        Toast.makeText(this, messageResId, Toast.LENGTH_SHORT).show();

    }

    @Override
    protected void onCreate(Bundle savedInstanceState) {
        // TODO Auto-generated method stub
        super.onCreate(savedInstanceState);
        setContentView(com.text.geoqiuz.R.layout.activity_main);
        //用于接收在activity被销毁之前,保存的临时数据,包含当前答题的题号和用户是否作弊的信息
        if (savedInstanceState != null) {
            mCurrentIndex = savedInstanceState.getInt(KEY_INDEX, 0);
            // mIsCheater = savedInstanceState.getBoolean(CHEARTER);
            mQuestionBank[mCurrentIndex].setCheated(savedInstanceState
                    .getBoolean(CHEARTER));
        }

        mQuestionTextView = (TextView) findViewById(R.id.question_text_view);
        updateQuestion();

        mTrueButton = (Button) findViewById(R.id.true_button);
        mFalseButton = (Button) findViewById(R.id.false_button);
        mNextButton = (ImageButton) findViewById(R.id.next_button);
        mPrevButton = (ImageButton) findViewById(R.id.prev_button);
        mCheatButton = (Button) findViewById(R.id.cheat_button);
        mResetButton = (Button) findViewById(R.id.cheat_reset_button);

        mTrueButton.setOnClickListener(new OnClickListener() {

            @Override
            public void onClick(View v) {
                // TODO Auto-generated method stub
                checkAnswer(true);

            }

        });

        mFalseButton.setOnClickListener(new OnClickListener() {

            @Override
            public void onClick(View v) {
                // TODO Auto-generated method stub
                checkAnswer(false);
            }
        });

        mPrevButton.setOnClickListener(new OnClickListener() {

            @Override
            public void onClick(View v) {
                // TODO Auto-generated method stub
                if (mCurrentIndex == 0) {
                    mCurrentIndex = mQuestionBank.length - 1;
                    // updateQuestion();
                } else {
                    mCurrentIndex -= 1;
                    // updateQuestion();

                }
                // mIsCheater = false;

                updateQuestion();
            }
        });
        mNextButton.setOnClickListener(new OnClickListener() {

            @Override
            public void onClick(View v) {
                // TODO Auto-generated method stub
                mCurrentIndex = (mCurrentIndex + 1) % mQuestionBank.length;
                // 重置参数
                // mIsCheater = false;

                updateQuestion();
            }
        });
        //点击Cheat按钮,将以显式intent的方式创建CheatActivity对象,
        //同时intent还携带了一个该题得正确答案
        mCheatButton.setOnClickListener(new OnClickListener() {

            @Override
            public void onClick(View v) {
                // TODO Auto-generated method stub
                Intent _intent = new Intent(MainActivity.this,
                        SecondActivity.class);
                boolean _answerIsTrue = mQuestionBank[mCurrentIndex]
                        .isTrueQuestion();
                _intent.putExtra(EXTRA_ANSWER_IS_TRUE, _answerIsTrue);
                startActivityForResult(_intent, 0);
            }
        });
        //新增一个RESET按钮,该按钮用于清除所有题目的作弊记录,
        //弹出一个AlertDialog防止用户操作失误
        mResetButton.setOnClickListener(new OnClickListener() {

            @Override
            public void onClick(View v) {
                // TODO Auto-generated method stub
                new AlertDialog.Builder(MainActivity.this)
                        .setTitle("RESET")
                        .setIcon(R.drawable.ic_launcher)
                        .setMessage("Are U Sure To Clean All Cheating Marks?")

                        .setPositiveButton("Clean",
                                new DialogInterface.OnClickListener() {

                                    @Override
                                    public void onClick(DialogInterface dialog,
                                            int which) {
                                        // TODO Auto-generated method stub
                                        for (int i = 0; i < mQuestionBank.length; i++) {
                                            mQuestionBank[i].setCheated(false);
                                        }
                                        Toast.makeText(MainActivity.this,
                                                "all cheated marks cleaned!",
                                                Toast.LENGTH_SHORT).show();
                                    }
                                }).setNegativeButton("Cancel", null).show();

            }
        });

        //通过点击题目也能切换至下一题
        mQuestionTextView.setOnClickListener(new OnClickListener() {

            @Override
            public void onClick(View v) {
                // TODO Auto-generated method stub
                mCurrentIndex = (mCurrentIndex + 1) % mQuestionBank.length;

                updateQuestion();
            }
        });

    }
    //接收作弊activity传过来的bundle,该bundle携带了用户是否作弊的信息
    @Override
    protected void onActivityResult(int requestCode, int resultCode, Intent data) {
        // TODO Auto-generated method stub
        super.onActivityResult(requestCode, resultCode, data);
        if (data == null) {
            return;
        }
        mQuestionBank[mCurrentIndex].setCheated(data.getBooleanExtra(
                SecondActivity.EXTRA_ANSWER_IS_SHOWN, false));

    }

    //旋转屏幕时,系统会销毁该activity对象,在销毁之前保存一些有用的数据
    @Override
    protected void onSaveInstanceState(Bundle outState) {
        // TODO Auto-generated method stub
        super.onSaveInstanceState(outState);
        outState.putInt(KEY_INDEX, mCurrentIndex);
        outState.putBoolean(CHEARTER, mQuestionBank[mCurrentIndex].isCheated());

    }

}先说一下UI控件中的AlertDialog:从它的创建模式跟一般的对象创建模式不太一样——AlertDialog用到了所谓的建造者(Builder)模式。众所周知,对话框是一个可以高度定制的UI控件,我们可以设置它的抬头,背景,标题,子标题,内容,确定和取消的按钮等,若用常规的初始化方法将dialog初始化,那构造函数的参数就得写上好几行,而且有些内容可设可不设,那么就要重载N多个构造方法,所以不妨对dialog的每一部分都设置一个方法,这样就可以有选择的构造每一部分,构造方法也不必是好几行了。
再简单说一下onSaveInstanceState(),这个方法实际上和activity的生命周期有关:众做周知,在一个activity实例被销毁之前,都要回调onPause()、onStop()、onDestory()方法,因为系统一般不会销毁正在onResume的activity,而可能会回收处于暂停或停止状态的activity对象,所以,onSaveInstanceState()方法被回调的时刻有可能是在onPause()被调用之后(也就是onStop()被调用之前),或者onStop()被调用之后;但是还有一个问题,当系统销毁activity后,用onSaveInstanceState()将数据保存在系统中就安全了吗?有时候内存不够用了,或是用户通过back键退出应用一段时间了,这时候系统不仅会销毁activity,还会销毁应用所在进程,这时候数据可能就真的不在了。
至于内存还剩多少不够用,或是说系统如何按照进程的优先级杀死应用,以及退出应用多长时间该进程被销毁,这就是系统的事了。
二、 作弊界面的activity和它的布局介绍
1、布局介绍
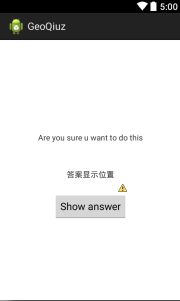
至于作弊界面的布局,就简单多了,如下所示:

以下是布局的xml文件:
<LinearLayout xmlns:android="http://schemas.android.com/apk/res/android"
    android:layout_width="match_parent"
    android:layout_height="match_parent"
    android:gravity="center"
    android:orientation="vertical" >

    <TextView
        android:layout_width="wrap_content"
        android:layout_height="wrap_content"
        android:padding="24dp"
        android:text="@string/warning_text" />

    <TextView
        android:id="@+id/answer_text_view"
        android:layout_width="wrap_content"
        android:layout_height="wrap_content"
        android:padding="24dp"
        android:text="答案显示位置" />

    <Button
        android:id="@+id/show_answer_button"
        android:layout_width="wrap_content"
        android:layout_height="wrap_content"
        android:text="@string/show_answer_button" />

LinearLayout>
2、作弊界面的activity
该activity接收主activity传过来的答案信息,同时通过setResult()的bundle携带“用户是否触发了作弊按钮”信息回传给主activity,以下是代码:
public class SecondActivity extends Activity {
    private boolean mAnswerIsTrue;
    private Button mShowAnswerButton;
    private TextView mAnswerTextView;
    private String CHEATER = "CHEATER IS CHEAT";
    //用于获得用户是否作弊的信息
    private boolean mCheater = false;
    private String ANSWERISTRUE = "ANSWERISTRUE";

    public static final String EXTRA_ANSWER_IS_SHOWN = "com.text.geoquiz.answer_is_shown";

    @Override
    protected void onCreate(Bundle savedInstanceState) {
        // TODO Auto-generated method stub
        super.onCreate(savedInstanceState);

        setContentView(R.layout.activity_second);

        mAnswerIsTrue = getIntent().getBooleanExtra(
                MainActivity.EXTRA_ANSWER_IS_TRUE, false);

        mShowAnswerButton = (Button) findViewById(R.id.show_answer_button);
        mAnswerTextView = (TextView) findViewById(R.id.answer_text_view);

        if (savedInstanceState != null) {
            mCheater = savedInstanceState.getBoolean(CHEATER);
            mAnswerTextView.setText(savedInstanceState
                    .getCharSequence(ANSWERISTRUE));
        }

        setAnswerShownResult(mCheater);
        mShowAnswerButton.setOnClickListener(new OnClickListener() {

            @Override
            public void onClick(View v) {
                // TODO Auto-generated method stub
                if (mAnswerIsTrue) {
                    mAnswerTextView.setText(R.string.true_button);
                } else {
                    mAnswerTextView.setText(R.string.false_button);
                }
                mCheater = true;
                setAnswerShownResult(mCheater);
            }
        });
    }
    //将用户作弊的情况回传给主activity
    private void setAnswerShownResult(boolean isAnswerShown) {
        Intent data = new Intent();
        data.putExtra(EXTRA_ANSWER_IS_SHOWN, isAnswerShown);
        setResult(RESULT_OK, data);
    }

    //1、保存用户的作弊信息,防止用户通过旋转屏幕清除作弊痕迹
    //2、保存用户得到答案的信息,防止用户旋转屏幕而造成信息丢失
    @Override
    protected void onSaveInstanceState(Bundle outState) {
        // TODO Auto-generated method stub
        super.onSaveInstanceState(outState);
        outState.putBoolean(CHEATER, mCheater);
        outState.putCharSequence(ANSWERISTRUE, mAnswerTextView.getText());
    }

}
三、GeoQuiz应用总结以及MVC模式
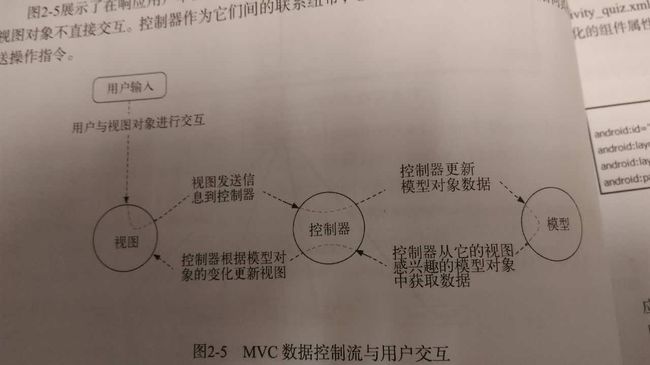
在结束之前,我想再跟各位叨叨一下MVC模式,所谓的MVC,就是Model-View-Controller模式,下面是我从书中照的一张MVC流程图

将本应用适用于该图,模型(Model)对应着TrueFalse类,控制器(Controller)对应着两个activity,而视图(View)对应着xml文件。可以看出,activity是连接视图和模型的桥梁
对于一个简单的应用,我们可能还无法体会出MVC模式的好处,但是对于复杂得多的商业应用,基于MVC的组织模式,可以实现模块的解耦,对应用开发好处多多。要知道,Controller可不仅仅只能是activity,还有可能是fragment,Service等;View的布局也不可能这么简单,往往是层层嵌套甚至还有自定义的View,Model也并不会存在本地,更多的时候会存在服务器中,我们需要对从服务器请求的结果进行解析,即便存在本地,也可能存在sqlite中。
至此,这个DEMO先说到这儿,下面是我第一次写博客的一些感想:
对于在CSDN上卧虎从龙的高手,这个应用闭着眼睛就能写完,不过对于像我这样资历较浅的android开发者来说,这个DEMO确实有不少值得学习的东西;第一次写博客,最深的感觉就是“自己脑子想一遍”与“边想边把想的东西写下来”的差别相当之大,通过后者,我仿佛又重新把知识学了一遍而且以后再也不会忘了,而且,通过写博客,我希望能从中得到CSDN上各路大师的指点,所以,最后我要呼应一下开篇的那句话:第一次在CSDN上发博客,请多指教!