Java中的加密与安全,你了解多少
文章目录
- 数据安全
- 编码算法
- 摘要算法
- MD5算法
- SAH-1算法
- BouncyCastle算法
- Hmac算法
- 加密算法
- 对称加密算法
- 口令加密算法
- 密钥交换算法
- 非对称加密算法
- 数字签名算法
- RSA签名算法
- DSA签名算法
- 数字证书
数据安全
什么是数据安全?假如Bob要给Alice发送一封邮件,在发送邮件的过程中,黑客可能会窃取到邮件的内容,所以我们需要防窃听;黑客也有可能会篡改邮件的内容,所以Alice必须要有能有去识别邮件是否被篡改;最后,黑客也可能假冒Bob给Alice发送邮件,所以Alice还必须有能力识别出伪造的邮件。所以数据安全的几个要点就是:防窃听、防篡改和防伪造。
古代的加密方式:
- 移位密码:HELLO => IFMMP (把英文字母按顺序往后移动几位,这里就是HELLO中的每个字母向后移动一位,就变成了IFMMP)
- 替代密码:HELLO => p12,5,3(用某个书籍的某一页某一行的第几个单词来记录信息)
现代计算机加密:
- 建立在严格的数学理论基础上
- 密码学逐渐发展成一门科学
总结:
- 设计一个安全的加密算法非常困难
- 验证一个加密算法是否安全更加困难
- 当前被认为安全的加密算法仅仅是迄今为止尚未被攻破
- 不要自己去设计加密算法
- 不要自己去实现加密算法
- 不要自己修改已有的加密算法
编码算法
ASCII编码就是一种编码,部分编码如下:
| 字母 | 编码(16进制) |
|---|---|
| A | 0x41 |
| B | 0x42 |
| C | 0x43 |
| D | 0x44 |
| … | … |
汉字使用不同的编码算法,得到的编码是不一样的,汉字是使用Unicode编码后是两个字节,经过UTF-8编码后得到三个字节:
| 汉字 | Unicode编码 | UTF-8编码 |
|---|---|---|
| 中 | 0x4e2d | 0xe4b8ad |
| 文 | 0x6587 | 0xe69687 |
| 编 | 0x7f16 | 0xe7bc96 |
| 码 | 0x7801 | 0xe7a081 |
| … | … | … |
URL编码是浏览器发送数据给服务器时使用的编码:
- key1=value1&key2=value2&key3=value3
- q=%E4%B8%AD%E6%95%87
URL编码规则: - AZ,az,0~9以及-_.*保持不变
- 其它字符以%xx(以%开头的16进制来表示)
- <: %3C
- 中:%E4%B8%AD (正好对应UTF-8编码的16进制: 0xe4b8ad)
    public static void main(String[] args) throws Exception {
        String orginal = "URL 参数";
        // URL 编码
        String encode = URLEncoder.encode(orginal, "UTF-8");
        System.out.println(encode); // URL+%E5%8F%82%E6%95%B0

        // URL解码
        String decode = URLDecoder.decode(encode, "UTF-8");
        System.out.println(decode); // URL 参数
    }
通过运行结果可以看到:URL编码英文字母保持不变,空格编码为"+",一个中文经过UTF-8编码后,通常是以%开头的16进制编码。
总结:URL编码是编码算法,不是加密算法;URL编码的目的是把任意文本数据编码为%前缀表示的文本,编码后的文本仅包含AZ,az,0~9,-_.*,%,便于浏览器和服务器处理。
Base64编码:一种把二进制数据用文本表示的编码算法,例如我们有一个字节数组byte[]{0xe4,0xb8,0xad},通过Base64编码后得到的字符串为"5Lit"。如何使用Base64进行编码?假如我们把汉字“中”用UTF8表示的字节表示出来,它就是{0xe4,0xb8,0xad},这三个字节就是24位(11100100 10111000 10101101),我们把这24位按照每6位分组就形成4个字节,这四个字节对应的16进制就是{0x39,0x0b,0x22,0x2d},通过查表就可得到分别对应的是{5,L,i,T},所以最终编码出来的字符串就是5LiT。Base64对应的编码表从索引0开始,如下:
| 索引 | 编码 | 索引 | 编码 | 索引 | 编码 | 索引 | 编码 |
|---|---|---|---|---|---|---|---|
| 0 | A | 25 | Z | 51 | z | 61 | 9 |
| 1 | B | 26 | a | 52 | 0 | 62 | + |
| 2 | C | 27 | b | 53 | 1 | 63 | / |
| 3 | D | 28 | c | 54 | 2 | ||
| … | … | … | … | … | … |
使用Base64编码的目的:一种用文本(AZ,az,0~9,+/=)表示二进制内容的方式,适用于文本协议,但效率会下降(因为二进制经过Bse64编码长度会增加1/3),应用比如电子邮件协议。如果数组的长度不是3的整数倍,末尾补0x00或0x00 0x00,编码后加=表示补充了一个字节,编码后加==表示补充了2个字节。在解码时就可以去掉补充的字节。
    public static void main(String[] args) throws UnsupportedEncodingException {
        String orignal = "Hello\u00ff编码测试";
//        String b64 = Base64.getEncoder().encodeToString(orignal.getBytes("UTF-8"));

        //去掉等号,实际上有没等号在解码时是不影响的
        String b64 = Base64.getEncoder().withoutPadding().encodeToString(orignal.getBytes("UTF-8"));
        System.out.println(b64);

        String ori = new String(Base64.getDecoder().decode(b64), "UTF-8");
        System.out.println(ori);

        //实现URL的Base64编码和解码
        String urlB64 = Base64.getUrlEncoder().withoutPadding().encodeToString(orignal.getBytes("UTF-8"));
        System.out.println(urlB64);

        String urlOri = new String(Base64.getUrlDecoder().decode(urlB64), "UTF-8");
        System.out.println(urlOri);

        //在Java中,使用URL的Base64编码,它会把"+"变为"-",把"/"变为"_",这样我们在传递URL参数的时候,就不会引起冲突
    }
总结:Base64是编码算法,不是加密算法;Base64编码的目的是把任意二进制数据编码为文本(长度增加1/3);其它编码:Base32,Base48,Base58
摘要算法
摘要算法(哈希算法/Hash/Digst/数字指纹),计算任意长度数据的摘要(固定长度),相同数据的输入始终得到相同的输出,不同的输入数据尽量得到不同的输出,目的是为了验证原始数据是否被篡改。如果我们的输入是任意长度的数据,而输出的是固定长度的数据,我们就可以称之为摘要算法。Java中Object的hashCode()方法就是一个摘要算法。什么是碰撞呢?碰撞是指两个不同的输入得到了相同的输出,而且碰撞是不能避免的,这是因为输出的字节长度是固定的,而输入的字节的长度是不固定的,所以hash算法实际上是将一个无限的输入集合映射到一个有限的输出集合。
Hash算法的安全性:
- 碰撞率低
- 不能猜测输出
- 输入的任意一个bit的变化会造成输出完全不同
- 很难以从输出反推输入(只能依靠暴力穷举)
常用的摘要算法
| 算法 | 输出长度 | |
| MD5 | 128 bits | 16 bytes |
| SHA-1 | 160 bits | 20 bytes |
| SHA-256 | 256 bits | 32 bytes |
| RipeMD-160 | 160 bits | 20 bytes |
MD5算法
在Java中使用MD5:
    public static void main(String[] args) throws Exception {
        MessageDigest digest1 = MessageDigest.getInstance("MD5");
        digest1.update("helloworld".getBytes("UTF-8"));
        byte[] result1 = digest1.digest();
        for (byte b : result1) {
            System.out.print(b + "\t"); // -4 94 3 -115	56 -91	112 50	8 84 65	-25 -2 112 16 -80
        }

        System.out.println();

        //输入的数据可以分片输入,得到的结果是一样的
        MessageDigest digest2 = MessageDigest.getInstance("MD5");
        digest2.update("hello".getBytes("UTF-8"));
        digest2.update("world".getBytes("UTF-8"));
        byte[] result2 = digest2.digest();
        for (byte b : result2) {
            System.out.print(b + "\t"); // -4 94 3 -115	56 -91	112 50	8 84 65	-25 -2 112 16 -80
        }
    }
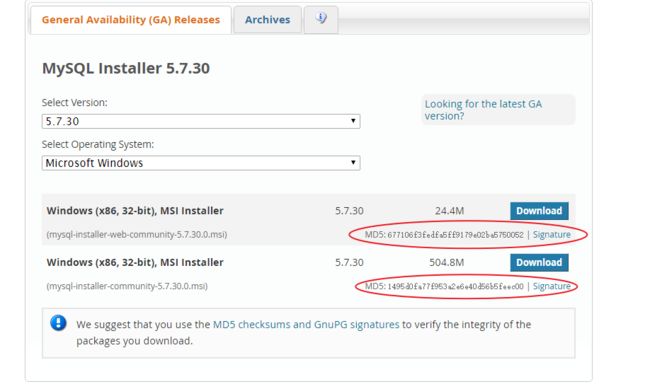
MD5用途:可以用来验证文件的完整性,比如我们在MySQL网站下载mysql时,mysql网站会给出每一个下载文件的MD5值,在下完文件后,通过计算MD5和网站给出的MD5对比,就可以计算出文件在下载过程中是否出现错误。

MD5存储用户口令,由于系统不存储用户原始口令(例如数据库中存储的密码),系统存储用户原始口令的MD5。如何判断用户口令是否正确?系统计算用户输入的原始口令的MD5和数据库存储的MD5进行对比,相同则口令正确,不相同则口令错误。使用MD5要避免彩虹表攻击,什么是彩虹表呢?彩虹表就是预先计算好的常用口令。为了抵御彩虹表攻击,通常我们需要对每个口令额外添加随机数salt。
SAH-1算法
SAH-1算法是一种哈希算法,输出160 bits / 20 bytes,美国国家安全局开发,常见的有SHA-1 / SHA-256 / SHA-512。SAH-1算法是比MD5更安全的哈希算法。
BouncyCastle算法
BouncyCastle是第三方提供的一组加密/哈希算法,提供JDK没有提供的算法(RipeMD160 算法),如何使用第三方提供的算法?先添加第三方jar至classpath,注册第三方算法提供方(通过Security.addProvider()注册),正常使用JDK提供的接口。
Hmac算法
Hmac:Hash-based Message Authentication Code的缩写,基于密钥的消息认证码算法,是更安全的消息摘要算法。HmacMD5相当于md5(secure_random_key,data),所以HmacMD5可以看作带安全Salt的MD5。Hmac是把key混入摘要的算法,并不是新发明的一种算法,必须配合MD5,SHA-1等摘要算法,摘要长度和原摘要算法长度相同。
加密算法
对称加密算法
对称加密算法的加密和解密使用同一个密钥,例如WinRAR,我们在对文件进行压缩时,可以设一个密码,再解压时,我们需要使用 同一个密码才能进行解压,winRAR就是使用的对称加密算法。加密:encrypt(密钥key,原文message)->密文s,解密:decrypt(密钥key,密文s)-> 原文message。常用的对称加密算法有DES,AES,IDEA等。由于DES的密钥较短,可以在短时间内暴力破解,现在已经不使用了。
Java使用 AES的ECB模式下的加密和解密:
public class AES_ECB_Cipher {

    private static final String CIPHER_NAME = "AES/ECB/PKCS5Padding";

    //加密
    public static byte[] encrypt(byte[] key, byte[] input) throws Exception {
        Cipher cipher = Cipher.getInstance(CIPHER_NAME);
        SecretKeySpec keySpec = new SecretKeySpec(key, "AES");
        //使用加密模式
        cipher.init(Cipher.ENCRYPT_MODE, keySpec);
        //通过doFinal()得到加密后的字节数组
        return cipher.doFinal(input);
    }

    //解密
    public static byte[] decrypt(byte[] key, byte[] input) throws Exception {
        Cipher cipher = Cipher.getInstance(CIPHER_NAME);
        SecretKeySpec keySpec = new SecretKeySpec(key, "AES");
        //使用解密模式
        cipher.init(Cipher.DECRYPT_MODE, keySpec);
        //通过doFinal()将密文还原为原文
        return cipher.doFinal(input);
    }

    public static void main(String[] args) throws Exception {
        //原文
        String message = "Hello, World! encrypted using AES";
        System.out.println("Message: " + message); // message: Hello, World! encrypted using AES

        //128位密钥 = 16 bytes key
        byte[] key = "1234567890abcdef".getBytes("UTF-8");
        //加密
        byte[] data = message.getBytes(StandardCharsets.UTF_8);
        byte[] encrypted = encrypt(key, data);
        //加密后的密文: Encrypted data: g89TtEMHXpwwjrEbXcljDQIUi09dPO9fVx4OgZ7ozsFgo8Zilj6cypxChst75GTR
        System.out.println("Encrypted data: " + Base64.getEncoder().encodeToString(encrypted));
        //解密
        byte[] decrypted = decrypt(key, encrypted);
        //解密后得到结果与原文相同:Decrypted data: Hello, World! encrypted using AES
        System.out.println("Decrypted data: " + new String(decrypted,"UTF-8"));
    }
}
Java使用 AES的CBC模式下的加密和解密:
public class AES_CBC_Cipher {

    private static final String CIPHER_NAME = "AES/CBC/PKCS5Padding";

    //加密
    public static byte[] encrypt(byte[] key, byte[] input) throws Exception {
        Cipher cipher = Cipher.getInstance(CIPHER_NAME);
        SecretKeySpec keySpec = new SecretKeySpec(key, "AES");
        //CBC模式需要生成一个16字节的initiallization vector
        SecureRandom sr = SecureRandom.getInstanceStrong();
        //获取向量,即16位字节的随机数
        byte[] iv = sr.generateSeed(16);
        //把字节数组转为IvParameterSpec对象
        IvParameterSpec ivps = new IvParameterSpec(iv);
        cipher.init(Cipher.ENCRYPT_MODE, keySpec, ivps);
        byte[] data = cipher.doFinal(input);
        //IV不需要保密,把IV和密文一起返回
        return join(iv, data);
    }

    private static byte[] join(byte[] iv, byte[] data) {
        byte[] r = new byte[iv.length + data.length];
        System.arraycopy(iv, 0 ,r, 0, iv.length);
        System.arraycopy(data, 0 ,r, iv.length, data.length);
        return r;
    }

    //解密
    public static byte[] decrypt(byte[] key, byte[] input) throws Exception {
        //把input分割成iv和密文
        byte[] iv = new byte[16];
        byte[] data = new byte[input.length - 16];
        System.arraycopy(input, 0 ,iv, 0, 16);
        System.arraycopy(input, 16 ,data, 0, data.length);

        //解密
        Cipher cipher = Cipher.getInstance(CIPHER_NAME);
        SecretKeySpec keySpec = new SecretKeySpec(key, "AES");
        IvParameterSpec ivps = new IvParameterSpec(iv);
        cipher.init(Cipher.DECRYPT_MODE,keySpec,ivps);
        return cipher.doFinal(data);
    }

    public static void main(String[] args) throws Exception {
        //原文
        String message = "Hello, World! encrypted using AES";
        System.out.println("Message: " + message); // message: Hello, World! encrypted using AES

        //128位密钥 = 16 bytes key
        byte[] key = "1234567890abcdef".getBytes("UTF-8");
        //加密
        byte[] data = message.getBytes(StandardCharsets.UTF_8);
        byte[] encrypted = encrypt(key, data);
        //加密后的密文: Encrypted data: 3iwMkdAqR0eQYQqaxOEKao+N0gSp/05i+mULmLvndSKq4Z2xz122wmFARWbAwF6dElmnceO/x5pJHcwXSr8inQ==
        System.out.println("Encrypted data: " + Base64.getEncoder().encodeToString(encrypted));
        //解密
        byte[] decrypted = decrypt(key, encrypted);
        //解密后得到结果与原文相同:Decrypted data: Hello, World! encrypted using AES
        System.out.println("Decrypted data: " + new String(decrypted,"UTF-8"));
    }
}
口令加密算法
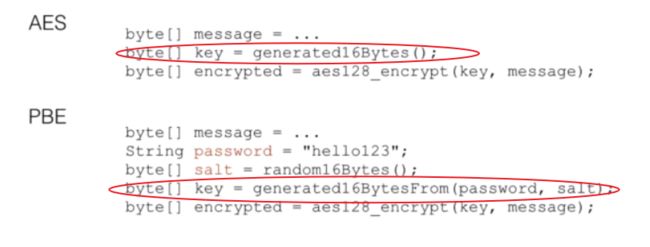
PBE(Passwoord Based Encrytion)算法:由用户输入口令,采用随机数杂凑计算出密钥再进行加密,password:用户口令,例如"hello123",Salt:随机生成的byte[],密钥Key:generate(byte[] salt, String password)。如果把随机Salt存储在U盘,就得到了一个“口令”+USB Key加密软件,这样做的好处是即时用户使用非常弱的口令,没有USB Key仍然无法解密。

总结:PBE算法通过用户口令和随机数Salt计算Key然后加密,Key通过用户口令和随机数Salt计算得出,提高了安全性,PBE算法内部仍然使用的是标准对称加密算法(例如AES)。
密钥交换算法
我们在使用对称加密算法的时候,我们的加密和解密使用的是同一个密钥Key。我们以AES加密为例,当我们要加密明文,我们需要使用一个随机生成的Key作为密钥进行加解密,最后我们的问题就是如何传递密钥?因为不给对方密钥,对方就无法解密,而直接传递密钥,会被黑客监听,所以问题就变成了:如何在不安全的信道上安全地传输密钥?密钥交换算法也就是Diff-Hellman算法,即DH算法。

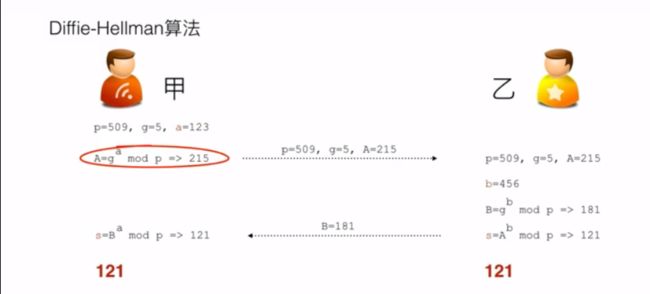
- 甲首先选择一个素数P=509,然后在选择一个底数g和一个随机数a,然后计算 A= g a g^a ga mod p => 215
- 甲发送P=509,g=5,A=215,乙收到以后,也选择一个随机数b=456,然后计算 B= g b g^b gb mod p => 181,然后接着计算 s = A b A^b Ab mod p => 121
- 乙把计算的B=181发送给甲,甲通过 s= B a B^a Ba mod p 可以计算出也等于121。所以双方协商出的密钥就是121。
要注意这个密钥并没有在网络上进行传输,通过网络传输的是p=509,g=5, A=215, B=181,但是通过这四个数,黑客是无法推算出密钥s的。更确切的说,DH算法它是一个密钥协商算法,双发最终协商出一个共同的密钥。我们把a看成是甲的私钥,A看成是甲的公钥,b看成是乙的私钥,B看成是乙的公钥,DH算法的本质就是:双方各自生成自己的私钥和公钥,然后交换公钥,并且根据自己的私钥和对方的公钥生成最终的密钥。DH算法根据数学定律保证了双方各自计算出来的key是相同的。
import javax.crypto.Cipher;
import javax.crypto.KeyAgreement;
import javax.crypto.SecretKey;
import java.io.IOException;
import java.math.BigInteger;
import java.security.*;
import java.security.spec.X509EncodedKeySpec;
import java.util.Base64;

class Person {
    public final String name; // 表示人的名字

    public PublicKey publicKey; // 表示这个人的公钥
    public PrivateKey privateKey; // 表示这个人的私钥
    public SecretKey secretKey; //表示最终的密钥

    public Person(String name) {
        this.name = name;
    }

    //生成本地的KeyPair
    public void generateKeyPair() {
        try {
            KeyPairGenerator keyGen = KeyPairGenerator.getInstance("DH");
            keyGen.initialize(512); //创建一个512位的keyPair
            KeyPair keyPair = keyGen.generateKeyPair();
            this.privateKey = keyPair.getPrivate();
            this.publicKey = keyPair.getPublic();
        } catch (GeneralSecurityException e) {
            throw new RuntimeException(e);
        }
    }

    public void generateSecreteKey(byte[] recivedPUblickeyBytes) {
        //从byte[]恢复PublcKey
        try {
            X509EncodedKeySpec keySpec = new X509EncodedKeySpec(recivedPUblickeyBytes);
            KeyFactory kf = KeyFactory.getInstance("DH");
            PublicKey recivedPublicKey = kf.generatePublic(keySpec);
            //生成本地密钥
            KeyAgreement keyAgreement = KeyAgreement.getInstance("DH");
            keyAgreement.init(this.privateKey); // 自己的私钥
            keyAgreement.doPhase(recivedPublicKey,true); // 对方的公钥
            //生成AES密钥
            this.secretKey = keyAgreement.generateSecret("AES");
        } catch (GeneralSecurityException e) {
            throw new RuntimeException(e);
        }
    }

    public void printKeys(){
        System.out.printf("Name: %s\n", this.name);
        System.out.printf("private key: %x\n",new BigInteger(1,this.privateKey.getEncoded()));
        System.out.printf("public key: %x\n",new BigInteger(1,this.publicKey.getEncoded()));
        System.out.printf("secrete key: %x\n",new BigInteger(1,this.secretKey.getEncoded()));
    }

    //发送加密信息
    public String sendMessage(String message){
        try {
            Cipher cipher = Cipher.getInstance("AES/ECB/PKCS5Padding");
            cipher.init(Cipher.ENCRYPT_MODE,this.secretKey);
            byte[] data = cipher.doFinal(message.getBytes("UTF-8"));
            return Base64.getEncoder().encodeToString(data);
        } catch (GeneralSecurityException |IOException e) {
           throw new RuntimeException(e);
        }
    }

    //接收加密信息并解密
    public String reciveMessage(String message){
        try {
            Cipher cipher = Cipher.getInstance("AES/ECB/PKCS5Padding");
            cipher.init(Cipher.DECRYPT_MODE,this.secretKey);
            byte[] data = cipher.doFinal(Base64.getDecoder().decode(message));
            return new String(data,"UTF-8");
        } catch (GeneralSecurityException |IOException e) {
            throw new RuntimeException(e);
        }
    }

}

public class DH {

    public static void main(String[] args) {
        //Bob和Alice
        Person bob = new Person("Bob");
        Person alice = new Person("Alice");

        //生成各自的keyPair
        bob.generateKeyPair();
        alice.generateKeyPair();

        //双方交换各自的public Key
        //Bob根据Alice的public Key生成自己的本地密钥
        bob.generateSecreteKey(alice.publicKey.getEncoded());
        //Alice根据Bob的public Key生成自己的本地密钥
        alice.generateSecreteKey(bob.publicKey.getEncoded());

        //检查双方的本地密钥是否相同
        bob.printKeys();
        alice.printKeys();

        //双方的SecretKey相同,后续通信将使用SecretKey作为密钥进行AES加解密
        String msgBobToAlice = bob.sendMessage("Hello, Alice!");
        System.out.println("Bob -> Alice: " + msgBobToAlice);
        String aliceDecrypted = alice.reciveMessage(msgBobToAlice);
        System.out.println("Alice decrypted: " + aliceDecrypted);
    }

}
运行结果如下:

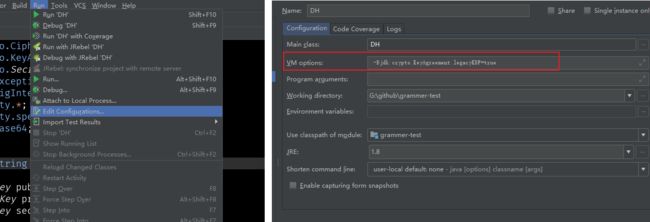
如果在运行过程中出现: Unsupported secret key algorithm: AES 异常信息,这是由于密钥所用的算法不被支持,这个是由于JDK8 update 161之后,DH的密钥长度至少为512位,但AES算法密钥不能达到这样的长度,长度不一致所以导致报错。
解决办法:将 -Djdk.crypto.KeyAgreement.legacyKDF=true 写入JVM系统变量中。可以在IEDA中的Run - Edit Configurations -> VM options中配置,如下图:

但DH算法不能避免中间人攻击,如果黑客假冒乙和甲交换密钥,同时又假冒甲和乙交换密钥,这样就可以成功地进行工具。DH算法是一种安全的密钥交换协议,通信双方通过不安全的信道协商密钥,然后进行对称加密传输。
非对称加密算法
非对称加密就是加密和解密使用不同的密钥,非对称加密的典型算法就是RSA算法,
- 加密:用对方的公钥加密,然后发送给对方 encrypt(publicKeyB,message) -> encrypted
- 解密:对方用自己私钥解密 decrypt(privateKeyB,encrypted) -> message
import javax.crypto.Cipher;
import java.security.*;
import java.security.spec.PKCS8EncodedKeySpec;
import java.security.spec.X509EncodedKeySpec;
import java.util.Base64;

public class RSAKeyPair {

    //私钥
    private PrivateKey sk;

    //公钥
    private PublicKey pk;

    //生成公钥/私钥对
    public RSAKeyPair() throws GeneralSecurityException {
        KeyPairGenerator keyGen = KeyPairGenerator.getInstance("RSA");
        keyGen.initialize(1024);
        KeyPair kp = keyGen.generateKeyPair();
        this.sk = kp.getPrivate();
        this.pk = kp.getPublic();
    }

    //从已保存的字节中(例如读取文件)恢复公钥/密钥
    public RSAKeyPair(byte[] pk, byte[] sk) throws GeneralSecurityException {
        KeyFactory keyFactory = KeyFactory.getInstance("RSA");
        X509EncodedKeySpec keySpec = new X509EncodedKeySpec(pk);
        this.pk = keyFactory.generatePublic(keySpec);
        PKCS8EncodedKeySpec skSpec = new PKCS8EncodedKeySpec(sk);
        this.sk = keyFactory.generatePrivate(skSpec);
    }

    //把私钥到处为字节
    public byte[] getPrivateKey(){
        return this.sk.getEncoded();
    }

    //把公钥导出为字节
    public byte[] getPublicKey(){
        return this.pk.getEncoded();
    }

    //用公钥加密
    public byte[] encrypt(byte[] message) throws GeneralSecurityException {
        Cipher cipher = Cipher.getInstance("RSA");
        cipher.init(Cipher.ENCRYPT_MODE,this.pk);
        return cipher.doFinal(message);
    }

    //用私钥解密
    public byte[] decrypt(byte[] input) throws GeneralSecurityException{
        Cipher cipher = Cipher.getInstance("RSA");
        cipher.init(Cipher.DECRYPT_MODE, this.sk);
        return cipher.doFinal(input);
    }

    public static void main(String[] args) throws Exception {
        //明文
        byte[] plain = "Hello,使用RSA非对称加密算法对数据进行加密".getBytes();
        //创建公钥/私钥 对
        RSAKeyPair rsa = new RSAKeyPair();
        //加密
        byte[] encrypt = rsa.encrypt(plain);
        System.out.println("encrypted: " + Base64.getEncoder().encodeToString(encrypt));
        //解密
        byte[] decrypt = rsa.decrypt(encrypt);
        System.out.println("decrypted: " + new String(decrypt,"UTF-8"));

        //保存公钥/私钥 对
        byte[] sk = rsa.getPrivateKey();
        byte[] pk = rsa.getPublicKey();
        System.out.println("sk: " + Base64.getEncoder().encodeToString(sk));
        System.out.println("pk: " + Base64.getEncoder().encodeToString(pk));

        //重新恢复公钥/私钥
        RSAKeyPair rsaKeyPair = new RSAKeyPair(pk, sk);
        //加密
        byte[] encrypted = rsaKeyPair.encrypt(plain);
        System.out.println("encrypted: " + Base64.getEncoder().encodeToString(encrypted));
        //解密
        byte[] decrypted = rsa.decrypt(encrypted);
        System.out.println("decrypted: " + new String(decrypted,"UTF-8"));


    }

}
- 对称加密需要协商密钥,而非对称加密可以安全地公开各自的公钥
- N个人之间通信
- 使用非对称加密只需要N个密钥对,每个人只管理自己的密钥对
- 使用对称加密需要N*(N-1)/2个密钥,每个人需要管理N-1个密钥
非对称加密的缺点:
- 运算速度慢
- 不能防止中间人攻击
数字签名算法
RSA签名算法
在非对称加密中,我们可以看到甲乙双方要进行通信,甲可以使用乙的publicKey对消息进行加密,然后乙使用自己的privateKey对消息进行解密,这个时候会出现一个问题,如果黑客使用乙的publicKey对消息进行加密,然后冒充甲发送给乙,那么乙怎么识别这个消息是甲发送的还是冒充的呢?所以我们就需要数字签名算法。甲在发送加密信息的时候,同时还要发送自己的签名,而这个签名是使用甲的privateKey计算的,而乙要验证这个签名是否是合法的,它会用甲的publicKey进行验证,如果验证成功,则说明这个消息确实是甲发送的。所以数字签名就是发送方用自己的私钥对消息进行签名(sig=signature(privateKey,‘message’)),接收方用发送方的公钥验证签名是否有效(boolen valid = verify(publicKey,sig,‘message’)),我们可以把数字签名理解为混入了私钥和公钥的摘要。
数字签名的目的:
- 确认信息是某个发送方发的(因为只有它用他自己的privateKey签名,其他人才可以用它的publickey来验证这个签名)
- 发送发不能抵赖它发送了消息(因为用谁的publicKey成功的验证了签名,则这个 签名也是用谁的privateKey进行的签名)
- 数据在传输过程中没有被修改
常用的数字签名算法:
- MD5withRSA
- SHA1withRSA
- SHA256withRSA
import java.nio.charset.StandardCharsets;
import java.security.*;
import java.security.spec.PKCS8EncodedKeySpec;
import java.security.spec.X509EncodedKeySpec;
import java.util.Base64;

public class SecRSASignature {

    private PublicKey pk;

    private PrivateKey sk;

    public SecRSASignature() throws GeneralSecurityException {
        //生成 KeyPair
        KeyPairGenerator keyGen = KeyPairGenerator.getInstance("RSA");
        keyGen.initialize(1024);
        KeyPair kp = keyGen.generateKeyPair();
        this.sk = kp.getPrivate();
        this.pk = kp.getPublic();
    }

    //从已保存的字节中(例如读取文件)恢复公钥/密钥
    public SecRSASignature(byte[] pk, byte[] sk) throws GeneralSecurityException {
        KeyFactory keyFactory = KeyFactory.getInstance("RSA");
        X509EncodedKeySpec keySpec = new X509EncodedKeySpec(pk);
        this.pk = keyFactory.generatePublic(keySpec);
        PKCS8EncodedKeySpec skSpec = new PKCS8EncodedKeySpec(sk);
        this.sk = keyFactory.generatePrivate(skSpec);
    }

    //把私钥到处为字节
    public byte[] getPrivateKey(){
        return this.sk.getEncoded();
    }

    //把公钥导出为字节
    public byte[] getPublicKey(){
        return this.pk.getEncoded();
    }

    //对消息进行签名
    public byte[] sign(byte[] message) throws GeneralSecurityException {
        //sign by sk
        Signature signature = Signature.getInstance("SHA1withRSA");
        signature.initSign(this.sk);
        signature.update(message);
        return signature.sign();
    }

    //私用公钥验证签名
    public boolean verify(byte[] message, byte[] sign) throws GeneralSecurityException {
        //verify by pk
        Signature sha1withRSA = Signature.getInstance("SHA1withRSA");
        sha1withRSA.initVerify(this.pk);
        sha1withRSA.update(message);
        return sha1withRSA.verify(sign);
    }

    public static void main(String[] args) throws GeneralSecurityException {
        byte[] message = "Hello,使用SHA1withRSA算法进行数字签名!".getBytes(StandardCharsets.UTF_8);
        SecRSASignature rsas = new SecRSASignature();
        byte[] sign = rsas.sign(message);
        System.out.println("sign: " + Base64.getEncoder().encodeToString(sign));
        boolean verified = rsas.verify(message, sign);
        System.out.println("verified: " + verified);
        //用另一个公钥验证
        boolean verified02 = new SecRSASignature().verify(message, sign);
        System.out.println("verify with another public key: " + verified02);
        //修改原始信息
        message[0] = 100;
        boolean verified03 = rsas.verify(message, sign);
        System.out.println("verify changed message: " + verified03);
    }

}
DSA签名算法
DSA(Digital Signature Algorithm),使用EIGamal数字签名算法,DSA只能配合SHA算法使用,所以有SHA1withDSA,SHA256withDSA,SHA512withDSA算法。和RSA数字签名算法相比,DSA算法更快。测试代码和测试RSA数字签名算法的代码一致,只需要修改算法名称就行了。
数字证书
数字正数:
- 非对称加密算法:对数据进行加密、解密
- 签名算法:确保数据的完整性和抗否认性
- 摘要算法:确保证书本身没有被篡改
数字证书可以防止中间人攻击,因为它采用链式签名认证,即通过根证书(Root CA)去签名下一级证书,这样层层签名,直到最终的用户证书。而Root CA证书内置于操作系统中,所以,任何经过CA认证的数字证书都可以对其本身进行校验,确保证书本身不是伪造的。
import javax.crypto.Cipher;
import javax.crypto.NoSuchPaddingException;
import java.io.BufferedInputStream;
import java.io.FileInputStream;
import java.io.InputStream;
import java.math.BigInteger;
import java.security.*;
import java.security.cert.X509Certificate;

public class X509 {

    private final PrivateKey privateKey;
    public final X509Certificate certificate; // 证书和证书包含的公钥和摘要信息

    public X509(KeyStore keyStore, String certName, String password) {
        try {
            this.privateKey = (PrivateKey) keyStore.getKey(certName,password.toCharArray());
            this.certificate = (X509Certificate) keyStore.getCertificate(certName);
        } catch (GeneralSecurityException e) {
            throw new RuntimeException(e);
        }
    }

    //加密
    public byte[] encrypt(byte[] message) {
        try {
            //获得加密算法
            Cipher cipher = Cipher.getInstance(this.privateKey.getAlgorithm());
            cipher.init(Cipher.ENCRYPT_MODE,this.privateKey);
            return cipher.doFinal(message);
        }  catch (GeneralSecurityException e) {
            throw new RuntimeException(e);
        }
    }

    //解密
    public byte[] decrypt(byte[] message) {
        try {
            PublicKey publicKey = this.certificate.getPublicKey();
            Cipher cipher = Cipher.getInstance(publicKey.getAlgorithm());
            cipher.init(Cipher.DECRYPT_MODE,publicKey);
            return cipher.doFinal(message);
        }  catch (GeneralSecurityException e) {
            throw new RuntimeException(e);
        }
    }

    public byte[] sign(byte[] message) {
        try {
            Signature signature = Signature.getInstance(this.certificate.getSigAlgName());
            signature.initSign(this.privateKey);
            signature.update(message);
            return signature.sign();
        }  catch (GeneralSecurityException e) {
            throw new RuntimeException(e);
        }
    }

    public boolean verify(byte[] message, byte[] sign) {
        try {
            Signature signature = Signature.getInstance(this.certificate.getSigAlgName());
            signature.initVerify(this.certificate);
            signature.update(message);
            return signature.verify(sign);
        }  catch (GeneralSecurityException e) {
            throw new RuntimeException(e);
        }
    }

    //Java中的数字证书是存储在keyStore中的
    public static KeyStore loadKeyStore(String keyStoreFile, String password) {
        try (InputStream input = new BufferedInputStream(new FileInputStream(keyStoreFile))) {
            if (input == null) {
                throw new RuntimeException("file not found in classpath: " + keyStoreFile);
            }
            KeyStore ks = KeyStore.getInstance(KeyStore.getDefaultType());
            ks.load(input, password.toCharArray());
            return ks;
        } catch (Exception e) {
            throw new RuntimeException(e);
        }
    }

    public static void main(String[] args) throws Exception {
        byte[] message = "Hello, 使用X.509证书进行加密和签名!".getBytes("UTF-8");
        // 读取KeyStore:
        KeyStore ks = loadKeyStore("my.keystore", "123456");
        // 读取证书
        X509 x509 = new X509(ks,"mycert", "123456");
        // 加密:
        byte[] encrypted = x509.encrypt(message);
        System.out.println(String.format("encrypted: %x", new BigInteger(1, encrypted)));
        // 解密:
        byte[] decrypted = x509.decrypt(encrypted);
        System.out.println("decrypted: " + new String(decrypted, "UTF-8"));
        // 签名:
        byte[] sign = x509.sign(message);
        System.out.println(String.format("signature: %x", new BigInteger(1, sign)));
        // 验证签名:
        boolean verified = x509.verify(message, sign);
        System.out.println("verify: " + verified);
    }

}
打开命令行,进入当前工程所在目录,输入命令:keytool -storepass 123456 -genkeypair -keyalg RSA -keysize 1024 -sigalg SHA1withRSA -validity 36500 -alias mycert -keystore my.keystore -dname “CN=www.sample.com, OU=sample, O=sample, L=BJ, ST=BJ, C=CN” 即可生成keystore文件,通过命令:keytool -list -keystore my.keystore -storepass 123456 可以看到keySore中的证书。
数字证书的应用:
- https: HTTP over SSL
- 服务器发送证书给客户端(发送公钥/签名/CA)
- 客服端验证服务器证书(确认服务器身份)
- 客户端用证书加密随机口令并发送给服务器端(公钥加密)
- 服务器端解密获得口令(私钥解密)
- 双方随后使用AES加密进行通信(对称加密)
总结:数字证书就是集合了多种密码学算法,用于实现数据加解密、身份认证、签名等多种功能的一种网络安全标准,数字证书采用链式签名管理,顶级CA证书已经内置于操作系统中,常用算法:MD5/SHA1/SHA256/RSA/DSA/…


