swift tableView简单实用-01 自定义cell
系统提供的UITableViewCell很难满足我们的需求,自定义cell是常有的事,所以简单使用table后写了个自定义cell,具体如下:
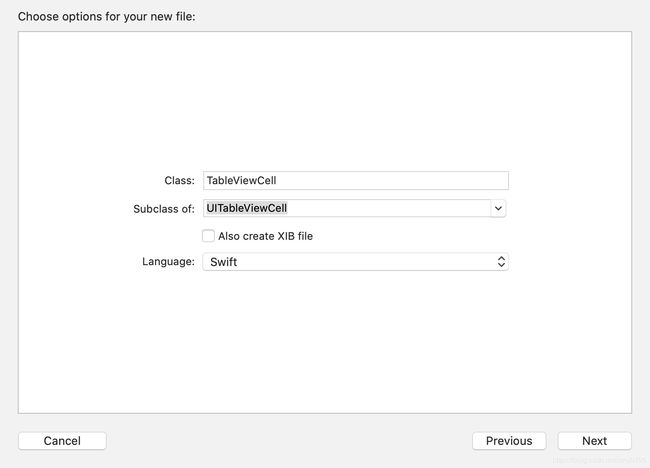
1、创建自定义cell,继承UITableViewCell,开发语言选择swift,如下图所示:
2、定义之后,在引用的vc中,
1)在viewDidLoad中添加注册,
table.register(NormalCell.self, forCellReuseIdentifier: "normalcell")2)在代理方法cellForRowAt中,初始化cell,具体如下所示:
        let cell = (tableView.dequeueReusableCell(withIdentifier: "normalcell", for: indexPath))as! NormalCell

        cell.lbl.text = String(format: "行:%d", indexPath.row+1)//自定义cell中的元素
        cell.logo.image = UIImage.init(named: "salary_select")//自定义cell中的元素
3、在自定义cell中有两个元素,一个是UILabel,一个是UIImageView,其中定义有两种方式
方法一:
1)定义元素的时候,不设置默认值(即不初始化),代码如下:
    var lbl:UILabel
    var logo:UIImageView
2)需要在复写的init初始化方法中,初始化元素,然后调用父类初始化方法,具体如下图:
方法二:
1)定义元素的时候,设置默认值(即初始化),代码如下:
    var lbl = UILabel.init()
    var logo = UIImageView.init()
2)在复写的init初始化方法中,可以先调用父类初始化方法,再设置元素,这点和oc有点不一样,具体如下图:
4、运行结果如下图所示:
5、全部代码如下:
ViewController.swift
import UIKit

class ViewController: UIViewController, UITableViewDelegate, UITableViewDataSource {
    func tableView(_ tableView: UITableView, numberOfRowsInSection section: Int) -> Int {
        return 10
    }

    func numberOfSections(in tableView: UITableView) -> Int {
        return 5
    }

    func tableView(_ tableView: UITableView, heightForHeaderInSection section: Int) -> CGFloat {
        return 20
    }

    func tableView(_ tableView: UITableView, viewForHeaderInSection section: Int) -> UIView? {
        let view = UIView.init()
        view.frame = CGRect(x: 0, y: 0, width: UIScreen.main.bounds.size.width, height: 20)
        view.backgroundColor = UIColor.lightGray

        let lbl = UILabel.init()
        lbl.frame = CGRect(x: 15, y: 0, width: 100, height: 20)
        lbl.text = String(section)
        view.addSubview(lbl)

        return view
    }

    func tableView(_ tableView: UITableView, cellForRowAt indexPath: IndexPath) -> UITableViewCell {
//        let cell = UITableViewCell.init(style: UITableViewCell.CellStyle.default, reuseIdentifier: "naormalCell")
//        cell.textLabel?.text = String(format: "行:%d", indexPath.row+1)//String(indexPath.row)
//        cell.selectionStyle = UITableViewCell.SelectionStyle.none

        let cell = (tableView.dequeueReusableCell(withIdentifier: "normalcell", for: indexPath))as! NormalCell

        cell.lbl.text = String(format: "行:%d", indexPath.row+1)
        cell.logo.image = UIImage.init(named: "salary_select")
        return cell
    }

    func tableView(_ tableView: UITableView, heightForRowAt indexPath: IndexPath) -> CGFloat {
        return 60
    }

    func tableView(_ tableView: UITableView, didSelectRowAt indexPath: IndexPath) {
        tableView.deselectRow(at: indexPath, animated: true)
        let destination = SeconViewController()
        destination.message = "传递的字符串"
        self.present(destination, animated: true, completion: nil)
    }

    func tableView(_ tableView: UITableView, canEditRowAt indexPath: IndexPath) -> Bool {
        return true
    }

    func tableView(_ tableView: UITableView, editingStyleForRowAt indexPath: IndexPath) -> UITableViewCell.EditingStyle {
        return UITableViewCell.EditingStyle.delete
    }

    func tableView(_ tableView: UITableView, commit editingStyle: UITableViewCell.EditingStyle, forRowAt indexPath: IndexPath) {
        if editingStyle == UITableViewCell.EditingStyle.delete {
            //删除数据

        }
    }

    func tableView(_ tableView: UITableView, titleForDeleteConfirmationButtonForRowAt indexPath: IndexPath) -> String? {
        return "删除"
    }

    lazy var table:UITableView = {
        let table = UITableView(frame: self.view.bounds,style: UITableView.Style.plain)
        table.backgroundColor = UIColor.lightGray
        return table
    }()

    override func viewDidLoad() {

        super.viewDidLoad()

        self.view .addSubview(table)
        table.register(NormalCell.self, forCellReuseIdentifier: "normalcell")
        table.delegate = self
        table.dataSource = self


        // Do any additional setup after loading the view.
    }


}
NormalCell.swift
import UIKit

class NormalCell: UITableViewCell {

    var lbl = UILabel.init()
    var logo = UIImageView.init()

    override init(style: UITableViewCell.CellStyle, reuseIdentifier: String?) {

        super.init(style: style, reuseIdentifier: reuseIdentifier)

        lbl = UILabel.init(frame: CGRect.zero)
        lbl.frame = CGRect(x: 65, y: 10, width: UIScreen.main.bounds.size.width, height: 40)

        logo = UIImageView.init()
        logo.frame = CGRect(x: 15, y: 10, width:40, height: 40)
        logo.layer.cornerRadius = 5
        logo.layer.masksToBounds = true

        self.backgroundColor = UIColor.white
        self.addSubview(lbl)
        self.addSubview(logo)

    }

    required init?(coder aDecoder: NSCoder) {
        fatalError("init(coder:) has not been implemented")
    }

    override func awakeFromNib() {
        super.awakeFromNib()
        // Initialization code
    }

    override func setSelected(_ selected: Bool, animated: Bool) {
        super.setSelected(selected, animated: animated)

        // Configure the view for the selected state
    }

}
这样就可以实现自定义cell了


