Android中TextView的使用详情综述
具有载入和载出动画的TextView
关于倒计时分析可点击查看
布局文件设置:
java代码中的设置:
public class TextSwitchActivity extends Activity {

    private TextSwitcher textSwitcher;

    @Override
    protected void onCreate(Bundle savedInstanceState) {
        super.onCreate(savedInstanceState);
        setContentView(R.layout.activity_text_switch);

        textSwitcher = (TextSwitcher)findViewById(R.id.textSwitcher);

        /**
         * 初始化倒计时类
         */
        TimeCount timeCount=new TimeCount(100*1000,1000);

        /**
         * 文字加载动画
         */
        textSwitcher.setInAnimation(AnimationUtils.loadAnimation(this, R.anim.textswitcher_in));//载入动画
        /**
         * 设置文字退出动画
         */
        textSwitcher.setOutAnimation(AnimationUtils.loadAnimation(this, R.anim.textswitcher_out));//载入动画

        textSwitcher.setFactory(new ViewSwitcher.ViewFactory() {
            @Override
            public View makeView() {
                TextView textView = new TextView(TextSwitchActivity.this);
                /**
                 * 设置字体颜色
                 */
                textView.setTextColor(Color.RED);//
                /**
                 * 设置字体大小
                 */
                textView.setTextSize(40);
                /**
                 * 设置内边距
                 */
                textView.setPadding(10,10,10,10);
                /**
                 * 设置字体居中
                 */
                textView.setGravity(Gravity.CENTER);
                /**
                 * 设置TextView 宽高属性
                 */
                textView.setLayoutParams(new TextSwitcher.LayoutParams(ViewGroup.LayoutParams.MATCH_PARENT,
                        ViewGroup.LayoutParams.MATCH_PARENT));//设置宽高属性
                return textView;
            }
        });
        timeCount.start();//倒计时类开始
    }
    private int count;
    class TimeCount extends CountDownTimer {//倒计时类
        public TimeCount(long millisInFuture, long countDownInterval) {//必须重载的构造方法
            super(millisInFuture, countDownInterval);
        }
        @Override
        public void onTick(long millisUntilFinished) {//计时过程中触发
            count=(int)millisUntilFinished/1000;
            textSwitcher.setText(count+"");
        }
        @Override
        public void onFinish() {//计时结束时触发
            textSwitcher.setText("Dead");
        }
    }
    }
使用到的动画文件 :
载入动画设置:
退出动画设置:
TextView中对于特殊字符的自动处理
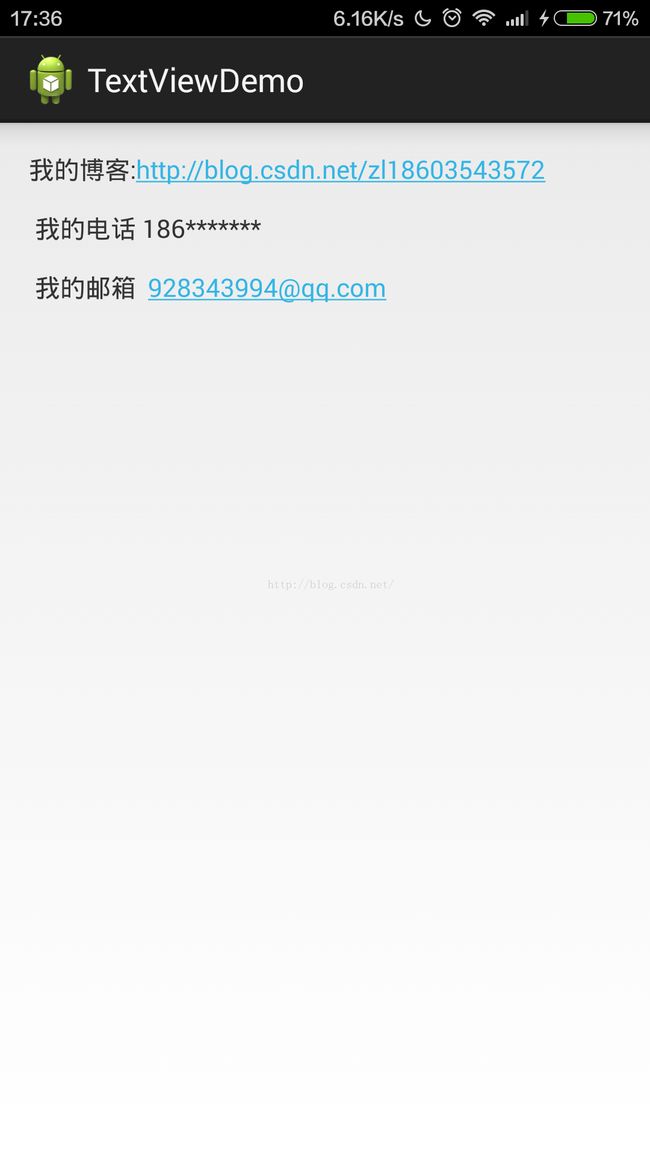
例如 :自动识别 、网址 、电话号码 、邮箱等 ... ...
上面的这个textView就会自动地去识别其中的特殊字符,识别后,如果可以自动的调用系统的默认的浏览器,拨号器等进行处理
这里面配制了属性autoLink
none: 不匹配任何链接(默认)
web: 匹配web网址
email:匹配识别E-mail地址
phone:匹配识别电话号码
all :匹配识别所有的链接
这里配制的是all,也就是可以支持自动识别所有的链接
例如:
         TextView textView = (TextView) findViewById(R.id.textview);


	 textView.setText("我的博客:http://blog.csdn.net/zl18603543572 \n\n 我的电话 186******* \n\n 我的邮箱  [email protected]");
在显示出来的页面中 点击相应的条目,就会打开系统默认的 浏览器 或者是系统默认的拨号器或者是发送邮件的应用
拦截点击超链接打开系统默认的这些应用
也就是说在点击链接的时候,指定打开的浏览器,或者是在自己的应用中打开相应的页面
// 实现超文本链接的点击 拦截
public class MainActivity extends AppCompatActivity {

    @Override
    protected void onCreate(Bundle savedInstanceState) {
        super.onCreate(savedInstanceState);
        setContentView(R.layout.activity_main);

        TextView textView1 = (TextView) findViewById(R.id.textview1);

        final String text1 = "自信是一种魅力,它让自己和周围的人感到自在,自在的人是活的比较灵活的,是一种心灵的灵活,生活赋予我们一种巨大的和无限高贵的礼品,这就是青春:充满着力量,充满着期待志愿,充满着求知和斗争的志向,充满着希望信心和青春 https://www.baidu.com ldsfkl  哈哈 https://www.baidu.com";


        /**
         * String 是java中的字符串,它继承于CharSequence。
         * String类所包含的API接口非常多。为了便于今后的使用,我对String的API进行了分类,并都给出的演示程序。
         * String 和 CharSequence 关系
         * String 继承于CharSequence,也就是说String也是CharSequence类型。
         * CharSequence是一个接口,它只包括length(), charAt(int index), subSequence(int start, int end)这几个API接口。除了String实现了CharSequence之外,StringBuffer和StringBuilder也实现了CharSequence接口。
         * 需要说明的是,CharSequence就是字符序列,String, StringBuilder和StringBuffer本质上都是通过字符数组实现的!
         */

        textView1.setText(text1);
        textView1.setMovementMethod(LinkMovementMethod.getInstance());
        CharSequence text = textView1.getText();


        /**
         * 获取 text中的超链接
         */
        Spannable spannable = new SpannableString(text);
        URLSpan[] urls = spannable.getSpans(0, text1.length(), URLSpan.class);


        if (urls.length == 0) {
            return;
        }


        /**
         * 设置点击超链接
         */
        for (URLSpan uri : urls) {
            String uriString = uri.getURL();
            if (uriString.indexOf("http://") == 0 || uriString.indexOf("https://") == 0) {
                MyClickableSpan myURLSpan = new MyClickableSpan(uriString, null);
                spannable.setSpan(myURLSpan, spannable.getSpanStart(uri), spannable.getSpanEnd(uri),
                        Spannable.SPAN_INCLUSIVE_EXCLUSIVE);
            }
        }

        textView1.setText(spannable);


    }

    /**
     * 处理TextView中的链接点击事件 链接的类型包括:url,号码,email,地图 这里只拦截url,即 http:// 开头的URI  处 https://开头的URI
     */
    private class MyClickableSpan extends ClickableSpan {
        private String mUrl; // 当前点击的实际链接

        MyClickableSpan(String url, LinkedList urls) {
            mUrl = url;
        }

        @Override
        public void updateDrawState(TextPaint ds) {
            /**
             * 设置超链接的颜色
             */
            ds.linkColor = Color.parseColor("#000000");
            /**
             * 设置超链接的背景颜色
             */
            ds.bgColor = Color.parseColor("#e6e6e6");


        }


        @Override
        public void onClick(View widget) {

            /**
             * 在这里进行拦截后的操作
             */
            System.out.println("click");

        }
} textView解析相应的html文件
        String htmlString ="i love you
";
        htmlString+="我的百度";


        CharSequence sequence = Html.fromHtml(htmlString);
        //设置要显示的文本
        mTextView.setText(sequence);
        //必须进行下面的设置,否则点击链接无法进行浏览器的中转浏览
        mTextView.setMovementMethod(LinkMovementMethod.getInstance());
如果不进行setMovementMethod方法设置,是可以正常显示链接的
关于解析html的源码分析
这里用到的Html.fromHtml()方法,在源码中
    public static Spanned fromHtml(String source) {
        return fromHtml(source, null, null);
    }

    public static Spanned fromHtml(String source, ImageGetter imageGetter,
                                   TagHandler tagHandler) {
        Parser parser = new Parser();
        try {
            parser.setProperty(Parser.schemaProperty, HtmlParser.schema);
        } catch (org.xml.sax.SAXNotRecognizedException e) {
            // Should not happen.
            throw new RuntimeException(e);
        } catch (org.xml.sax.SAXNotSupportedException e) {
            // Should not happen.
            throw new RuntimeException(e);
        }

        HtmlToSpannedConverter converter =
                new HtmlToSpannedConverter(source, imageGetter, tagHandler,
                        parser);
        return converter.convert();
    }
其中涉及到的第一个参数source就是带标签的html文字, formHtml方法中 使用到HtmlToSpannedConverter这个类,这个类是用来转换html文本的,这个类就 定义在Html.java中,
在HtmlToSpannedConverter类中,我们很容易的找到两个方法
private void handleStartTag(String tag, Attributes attributes) {
 if (tag.equalsIgnoreCase("br")) {
            // We don't need to handle this. TagSoup will ensure that there's a  for each

            // so we can safely emite the linebreaks when we handle the close tag.
        } else if (tag.equalsIgnoreCase("p")) {
            handleP(mSpannableStringBuilder);
        } else if (tag.equalsIgnoreCase("div")) {
            handleP(mSpannableStringBuilder);
        } else if (tag.equalsIgnoreCase("strong")) {
            start(mSpannableStringBuilder, new Bold());
        } else if (tag.equalsIgnoreCase("b")) {
            start(mSpannableStringBuilder, new Bold());
        } else if (tag.equalsIgnoreCase("em")) {
            start(mSpannableStringBuilder, new Italic());
        } else if (tag.equalsIgnoreCase("cite")) {
            start(mSpannableStringBuilder, new Italic());
        } else if (tag.equalsIgnoreCase("dfn")) {
            start(mSpannableStringBuilder, new Italic());
        } else if (tag.equalsIgnoreCase("i")) {
            start(mSpannableStringBuilder, new Italic());
        } else if (tag.equalsIgnoreCase("big")) {
            start(mSpannableStringBuilder, new Big());
        } else if (tag.equalsIgnoreCase("small")) {
            start(mSpannableStringBuilder, new Small());
        } else if (tag.equalsIgnoreCase("font")) {
            startFont(mSpannableStringBuilder, attributes);
        } else if (tag.equalsIgnoreCase("blockquote")) {
            handleP(mSpannableStringBuilder);
            start(mSpannableStringBuilder, new Blockquote());
        } else if (tag.equalsIgnoreCase("tt")) {
            start(mSpannableStringBuilder, new Monospace());
        } else if (tag.equalsIgnoreCase("a")) {
            startA(mSpannableStringBuilder, attributes);
        } else if (tag.equalsIgnoreCase("u")) {
            start(mSpannableStringBuilder, new Underline());
        } else if (tag.equalsIgnoreCase("sup")) {
            start(mSpannableStringBuilder, new Super());
        } else if (tag.equalsIgnoreCase("sub")) {
            start(mSpannableStringBuilder, new Sub());
        } else if (tag.length() == 2 &&
                   Character.toLowerCase(tag.charAt(0)) == 'h' &&
                   tag.charAt(1) >= '1' && tag.charAt(1) <= '6') {
            handleP(mSpannableStringBuilder);
            start(mSpannableStringBuilder, new Header(tag.charAt(1) - '1'));
        } else if (tag.equalsIgnoreCase("img")) {
            startImg(mSpannableStringBuilder, attributes, mImageGetter);
        } else if (mTagHandler != null) {
            mTagHandler.handleTag(true, tag, mSpannableStringBuilder, mReader);
        }
}
 private void handleEndTag(String tag) {
...
}
可以看到这两个方法就是用于分析html文本的开头与结尾
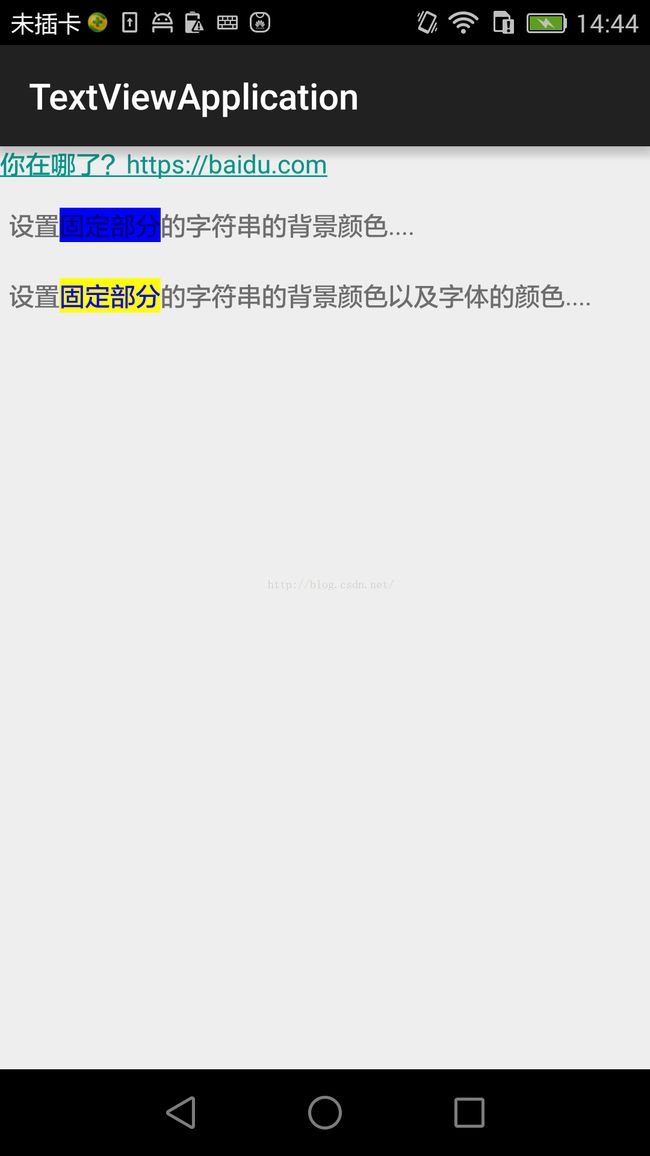
textView中设置固定文字的背景颜色
private void setTextViewBackground(){

        String test = "设置固定部分的字符串的背景颜色....";

 //将字符串转换成SpannableString对象
        SpannableString  spannableString = new SpannableString(test);
        //确定要设置的子字符串的开始位置和结束位置
        int start = 2;
        int end = 6;
        //创建BackgroundColorSpan对象
        BackgroundColorSpan backgroundColorSpan = new BackgroundColorSpan(Color.BLUE);

 //使用setSpan方法 将指定的子字符串转换成BackgroundColorSpan对象
        spannableString.setSpan(backgroundColorSpan, start, end, Spannable.SPAN_EXCLUSIVE_EXCLUSIVE);


 //设置显示到textView上
        mTextView2.setText(spannableString);
    }
textView中设置固定文字的背景色 与 显示 颜色
 private void setTextViewBackGroudnAndTextColor(){

        String test = "设置固定部分的字符串的背景颜色以及字体的颜色....";

        //将字符串转换成SpannableString对象
        SpannableString  spannableString = new SpannableString(test);

        //确定要设置的子字符串的开始位置和结束位置
        int start = 2;
        int end = 6;

        //创建BackgroundColorSpan对象
        ColorSpan backgroundColorSpan = new ColorSpan(Color.BLUE,Color.YELLOW);

        //使用setSpan方法 将指定的子字符串转换成BackgroundColorSpan对象
        spannableString.setSpan(backgroundColorSpan, start, end, Spannable.SPAN_EXCLUSIVE_EXCLUSIVE);

        //设置显示到textView上
        mTextView3.setText(spannableString);
    }
class ColorSpan extends CharacterStyle{
private int mTextColor;
private int mBackgroundColor;
public ColorSpan(int textColor,int backgroundColor){
ColorSpan.this.mBackgroundColor = backgroundColor;
ColorSpan.this.mTextColor = textColor;
}
@Override
public void updateDrawState(TextPaint tp) {
//设置背景颜色
tp.bgColor = mBackgroundColor;
//设置显示字体的颜色
tp.setColor(mTextColor);
}
}updateDrawState(TextPaint tp)TextView中设置文字的行间距
常用方法:
在布局文件中使用android:lineSpacingExtra
android:lineSpacingExtra="20dp"第一行文本与第二文本之间的行间距是20dp
在布局文件中使用android:lineSpancingMultiplier属性
android:lineSpancingMltiplier = “1.8”使用style
java代码中使用setLineSpancing方法设置
textView.setLineSpacing(50,1.2f);这里面有两个参数,第一个相当于android:lineSpacingExtra属性,第二个参数相当于android:lineSpancingMultiplier属性,系统会采用表示行间距大的那个值
在TextView中设置省略号
当文字过多的时候 ,我们可以在文字的最后 或者是最前面或者 是中间添加省略号,使用的时候就是在TextView中设置属性ellipsize
1. 在开头设置省略号
android:ellipsize="middle"2 .在中间设置省略号
android:ellipsize="start"3. 在结尾设置省略号
android:ellipsize="end"4.不显示省略号
android:ellipsize="none"
5.在代码中进行设置
textView.setEllipsize(TextUtils.TruncateAt.END);TextView设置走马灯的效果
http://blog.csdn.net/zl18603543572/article/details/49980623
TextView设置滚动效果
其中:
scorllbarFadeDuration 设置的是滚动条从出现到消失的时间 ,单位是毫秒;
mTextView4.setMovementMethod(ScrollingMovementMethod.getInstance());EditText中输入表情
public void addFaceEmotionClick(View view){
        //随机产生1到44的整数

        int randomId = 1+new Random().nextInt(44);

        try {
            //根据随机产生的整数从R.drawable类中获得相应资源ID的Field对象
            Field field = R.drawable.class.getDeclaredField("ee_" + randomId);
            //获得资源ID的值
            int resurceId = Integer.parseInt(field.get(null).toString());
            //根据资源ID获得资源图像的Bitmap对象
            Bitmap bitmap = BitmapFactory.decodeResource(getResources(),resurceId);
            //根据bitmap对象创建imagespan对象
            ImageSpan imageSpan = new ImageSpan(this,bitmap);
            //创建spannableString对象,插入用Imagespan对象封装的图像
            SpannableString spannableString = new SpannableString("ee_");
            //用imageSpan对象替换ee_
            spannableString.setSpan(imageSpan,0,3,Spannable.SPAN_EXCLUSIVE_EXCLUSIVE);
            //将随机获得的图像追加到EditText控件的最后
            mEditText.append(spannableString);
        } catch (NoSuchFieldException e) {
            e.printStackTrace();
        } catch (IllegalAccessException e) {
            e.printStackTrace();
        }
    }
这里面使用到的"ee_" 是文件中的表情的名称
使用field.get方法来获取值的时候,如果获取的是静态变量,field.get方法的值设为Null即可,如果不是静态变量,需要指定一个变量所在的对象为值
EditTex中不能直接插入span对象,因此需要先使用SpannableString对象封装span对象,然后再将SpannableString对象插入到EditText控件中
设置下面的这个方法,弹出的系统软件盘不会遮挡文字的输入框
getWindow().setSoftInputMode(WindowManager.LayoutParams.SOFT_INPUT_ADJUST_PAN);效果图
源码:


