celery在Django3.0中的应用——个人备忘录
写在前面:本文章非完整的技术博客,只用于记录个人开发中遇到的问题,在项目中需求通过api处理爬虫,但由于爬虫的运行时间较长,所以需要 采用异步任务的方式处理请求,因此采用了celery和Django的结合。
1.框架版本
Python 3.7
Django 3.0 +
celery 4.4.2
redis 3.2
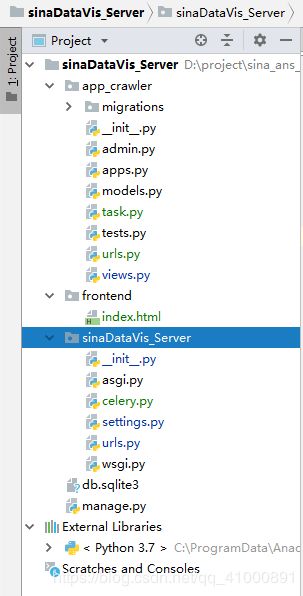
2.基本视图结构
3.需要预先安装的组件及库
- *redis (本地开发环境为win10,redis支持最高版本为3.2;Linux稳定版本为5.0)下载链接:https://github.com/MSOpenTech/redis/releases
- *pip3 install celery (使用版本为4.4.2)
- *pip3 install redis (python应用的redis,区分redis本身)
- pip3 install django-celery (和celery不同,使用的是django自带的ORM框架,目前出现NoneType 问题,暂不使用)
- *pip3 install flower (监控celery所用,非必备)
- pip3 install eventlet (win10兼容celery所用,但会引发数据库错误,非必备)
4.重要代码备忘
①seetings.py中
# 异步任务调度设置
CELERY_TIMEZONE='Asia/Shanghai'  #并没有北京时区,与下面TIME_ZONE应该一致
BROKER_URL = 'redis://127.0.0.1:6379'  #最好为IP,否则容易出BUG
CELERY_RESULT_BACKEND = 'redis://127.0.0.1:6379'
CELERY_ACCEPT_CONTENT = ['application/json']
CELERY_TASK_SERIALIZER = 'json'
CELERY_RESULT_SERIALIZER = 'json'
②__init__.py中
'''
celery异步任务系统配置
'''
from __future__ import absolute_import
from .celery import app as celery_app
③celery.py中
from __future__ import absolute_import
import os
from celery import Celery
from django.conf import settings

# set the default Django settings module for the 'celery' program.
os.environ.setdefault('DJANGO_SETTINGS_MODULE', 'sinaDataVis_Server.settings')  # 注意替换项目名
app = Celery('sinaDataVis_Server')  # 注意替换项目名

# Using a string here means the worker will not have to
# pickle the object when using Windows.
app.config_from_object('django.conf:settings')
app.autodiscover_tasks(lambda: settings.INSTALLED_APPS)
④app的task.py中
# from __future__ import absolute_import
# from celery import task
# from celery import shared_task

from sinaDataVis_Server.celery import app
from celery import shared_task

import logging
import time
import json
import urllib
import urllib.request
import html
import random
import datetime
from bs4 import BeautifulSoup


@app.task
def celery_test(a, b):
    try:
        s = a + b
        time.sleep(5)
        logging.info("%d + %d = %d" % (a, b, s))
        return s
    except:
        logging.warning('has error')
        return 0


@shared_task
def startcrawler_yiqing():
    proxy_addr = '114.231.41.229:9999'

    # ****************** 定义页面打开函数 ******************
    def use_proxy(url, proxy_addr, code):
        print('当前使用的IP地址:' + proxy_addr)
        req = urllib.request.Request(url)

        # 通用请求头
        req.add_header("User-Agent", "Mozilla/5.0 (Windows NT 6.1; WOW64; rv:6.0) Gecko/20100101 Firefox/6.0")
        req.add_header("Referer", "https://m.weibo.cn/")
        req.add_header("Accept", "application/json, text/plain, */*")
        req.add_header("MWeibo-Pwa", "1")

        if code == 0:  # 0 为不携带cookie
            pass
        elif code == 1:
            # 1 为主题页面爬取的cookie
            req.add_header("cookie",
                           "ALF=1583573469; SCF=AhF10XjHfCA9zl13WcdO_gvxRrJ3tiRNqZPZ0sOVUttaISayAZznFJz1yC6DtqqpB8HrloNszl9kbodcc2A03SQ.; SUB=_2A25zP6yNDeRhGeBM7VcQ8ifEzz6IHXVQwzTFrDV6PUNbktAKLRnzkW1NRMTg3CpunkC8xo-GxSCM9xXJfxHPBG0y; SUBP=0033WrSXqPxfM725Ws9jqgMF55529P9D9Wh7yDH2lriyw59TqUcHpGrK5JpX5KzhUgL.FoqESo-peo.RShz2dJLoI79Gqg4.qJzt; SUHB=0JvgOSxgsacUak; _T_WM=94276300838; MLOGIN=1; WEIBOCN_FROM=1110006030; M_WEIBOCN_PARAMS=luicode%3D20000174%26uicode%3D20000174; XSRF-TOKEN=69fbd3")
        elif code == 2:
            # 2 为博文详情页面爬取的cookie
            req.add_header("cookie",
                           "ALF=1583573469; SCF=AhF10XjHfCA9zl13WcdO_gvxRrJ3tiRNqZPZ0sOVUttaISayAZznFJz1yC6DtqqpB8HrloNszl9kbodcc2A03SQ.; SUB=_2A25zP6yNDeRhGeBM7VcQ8ifEzz6IHXVQwzTFrDV6PUNbktAKLRnzkW1NRMTg3CpunkC8xo-GxSCM9xXJfxHPBG0y; SUBP=0033WrSXqPxfM725Ws9jqgMF55529P9D9Wh7yDH2lriyw59TqUcHpGrK5JpX5KzhUgL.FoqESo-peo.RShz2dJLoI79Gqg4.qJzt; SUHB=0JvgOSxgsacUak; _T_WM=94276300838; WEIBOCN_FROM=1110006030; MLOGIN=1; XSRF-TOKEN=63e09e; M_WEIBOCN_PARAMS=oid%3D4471167269869446%26luicode%3D20000061%26lfid%3D4471167269869446%26uicode%3D20000061%26fid%3D4471167269869446")
        else:
            # 其他为自行设置的cookie
            req.add_header("cookie", code)

        proxy = urllib.request.ProxyHandler({'http': proxy_addr})
        opener = urllib.request.build_opener(proxy, urllib.request.HTTPHandler)
        urllib.request.install_opener(opener)
        data = urllib.request.urlopen(req, timeout=3.0).read().decode('utf-8', 'ignore')

        return data

    # ****************** 爬虫正体 ******************
    i = 1
    back_result = []
    while i == 1:
        weibo_url = 'https://m.weibo.cn/api/feed/trendtop?containerid=102803_ctg1_600059_-_ctg1_600059&page=' + str(i)
        print('请求接口:' + weibo_url)
        # weibo_url = 'https://m.weibo.cn/api/feed/trendtop?containerid=102803_ctg1_600059_-_ctg1_600059'
        try:
            data = use_proxy(weibo_url, proxy_addr, 1)
            content = json.loads(data).get('data')
            statuses = content.get('statuses')
            if (len(statuses) > 0):
                for j in range(len(statuses)):
                    print("**********正在爬取第" + str((i - 1) * 10 + j + 1) + "条主题内容**********")
                    if j > 5:
                        break
                    # 外层数据
                    # 本条ID
                    blog_id = statuses[j].get('id')
                    # 发布时间
                    deliver_time = statuses[j].get('created_at')
                    # 点赞数
                    attitudes_count = statuses[j].get('attitudes_count')
                    # 评论数
                    comments_count = statuses[j].get('comments_count')
                    # 转发数
                    reposts_count = statuses[j].get('reposts_count')
                    # 原正文内容
                    original_content = html.escape(statuses[j].get('text'))
                    # 处理后的正文内容
                    deal_content = BeautifulSoup(statuses[j].get('text'), 'html.parser').get_text()  # bs4方式清洗
                    # 页面地址
                    page_url = 'https://m.weibo.cn/detail/' + str(blog_id)
                    print('博文链接:' + page_url)

                    # 深入获取全文内容
                    # 全文接口请求地址
                    detail_page_url = 'https://m.weibo.cn/statuses/extend?id=' + str(blog_id)
                    try:
                        data_detail = use_proxy(detail_page_url, proxy_addr, 2)
                        content_detail = json.loads(data_detail).get('data')
                        original_content = html.escape(content_detail.get('longTextContent'))
                        deal_content = BeautifulSoup(content_detail.get('longTextContent'),
                                                     'html.parser').get_text()  # bs4方式清洗
                    except Exception as e:
                        print(e)
                        # proxy_addr = get_ip.get_random_ip()
                        continue
                        pass

                    # 作者相关数据
                    author_info = statuses[j].get('user')
                    # 头像地址
                    avatar_hd = author_info.get('avatar_hd')
                    # 个人描述
                    description = author_info.get('description')
                    # 他的关注
                    follow_count = author_info.get('follow_count')
                    # 粉丝数
                    followers_count = author_info.get('followers_count')
                    # 性别
                    gender = author_info.get('gender')
                    # 作者ID
                    author_id = author_info.get('id')
                    # 作者姓名
                    author_name = author_info.get('screen_name')
                    # 个人主页地址
                    author_url = author_info.get('profile_url')

                    print(author_name + description)

                    back_result.append(author_info)
                    # 博文详情接口有频度限制,因此基于时间缓冲
                    time.sleep(3 + random.random() * 3)

                i += 1

                # 重新循环更新最新数据
                if i == 10:
                    i = 1
                '''休眠5s以免给服务器造成严重负担'''
                time.sleep(5)
            else:
                continue
        except Exception as e:
            print(e)
            pass

    return back_result
⑤app的view.py中
from django.shortcuts import render,HttpResponse,redirect
from django.shortcuts import render
# 导入异步任务
from .task import startcrawler_yiqing,celery_test

# 加载静态界面index首页
def index(request):
    return render(request,'index.html')


# 开始执行爬虫
def startcrawler(request):
    celery_test.delay(int(5), int(11))
    startcrawler_yiqing.delay()
    # return HttpResponse('{"status":"0","message":"爬虫开启成功","result": '+ str(back_result) +'}')
    return HttpResponse('{"status":"0","message":"爬虫开启成功","result": "null"}')
5.启动命令
# 启动redis  (cmd1)
redis-server
# 如果遇到错误无法启动,分别运行如下
reids-cli
shutdown
exit
redis-server

# 先到项目文件主目录 (cmd2)
# 启动Django
python manage.py runserver

# 启动celery (cmd3)  报错解决的方法是启动celery的时候添加参数 --pool=solo 这种启动方式会使得进程阻塞
celery -A sinaDataVis_Server worker --pool=solo -l info

# 安装gevent

celery -A sinaDataVis_Server worker -l info -P gevent

# 定时任务
celery -A sinaDataVis_Server beat -l info

# 启动Flower监控 (cmd4)
celery -A sinaDataVis_Server flower
6.使用django-celery-result获取运行结果
①安装
pip3 install django-celery-results ②settings.py 配置
CELERY_RESULT_BACKEND = 'django-db'


INSTALLED_APPS = [
    'django.contrib.admin',
    'django.contrib.auth',
    'django.contrib.contenttypes',
    'django.contrib.sessions',
    'django.contrib.messages',
    'django.contrib.staticfiles',
    'corsheaders',
    'django_celery_results',
    # 'djcelery',
    'app_crawler',

]
③基于ORM重做数据库
python manage.py makemigrations
python manage.py migrate
④在admin中查看
