Android N 通话界面_CallButtonFragment
本流程图基于MTK平台 Android 7.0,普通来电,本流程只作为沟通学习使用
前面介绍了一下 来电界面 的一些信息,接下来我们继续分析,看看通话界面中的 CallButtonFragment 的功能和作用。
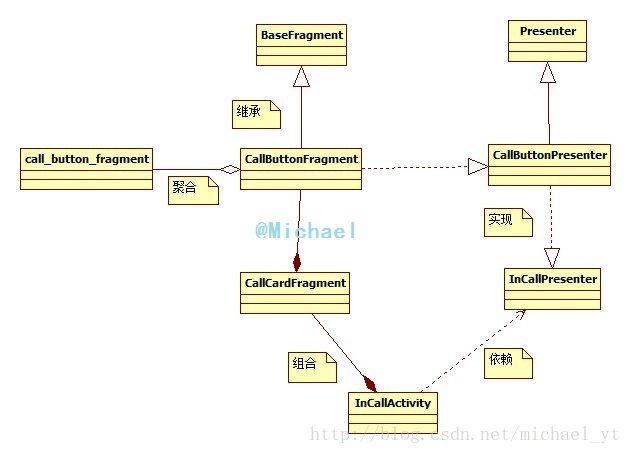
相关类图
说明:
- BaseFragment 是 incallUI 中所有 fragment 的基类,这个类里面主要是调用了相关presenter的一些UI相关的方法,和通过了createPresenter、getUi的接口
- Presenter 是incallUI中所有presenter的基类,这个类主要实现了几个方法,onUiReady 在fragment的onViewCreated执行后调用,onUiDestroy在fragment执行onDestroyView后调用,onUiUnready的接口,主要是提供给它的子类在fragment已经销毁但是UI还没有为null这段时间的一些listen的移除等
- CallButtonFragment 具体的界面实现类,控制着界面的显示和隐藏
- call_button_fragment 界面的布局文件
- CallButtonPresenter 界面的逻辑处理类,处理和这个界面相关的一些逻辑
- CallCardFragment 可以理解为一个界面容器,CallButtonFragment 就是显示在这个容器中
- InCallPresenter 监听call的一些状态并转发给相关的presenter,并控制着InCallActivity的显示和隐藏,越来越像一个状态机,以后可能会更名
- InCallActivity 所有fragment的容器,整个通话界面,负责控制显示哪个fragment,和一些按键事件的处理
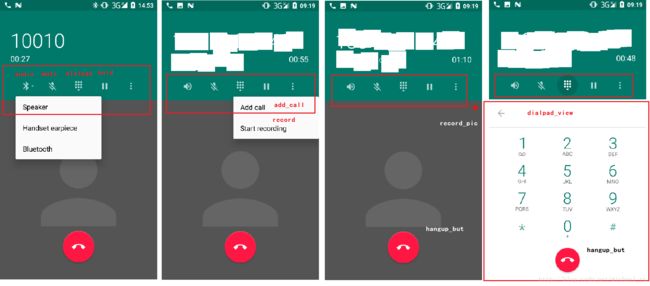
整体界面
上图红框中的部分就是本次讲解的界面 CallButtonFragment ,这里目前只考虑普通语音(voice)电话,我们可以看到其中包含了audio、mute、dialpad、hold、add_call、record等几个按钮,下面我们就会分别对它们的功能流程做介绍。
Audio
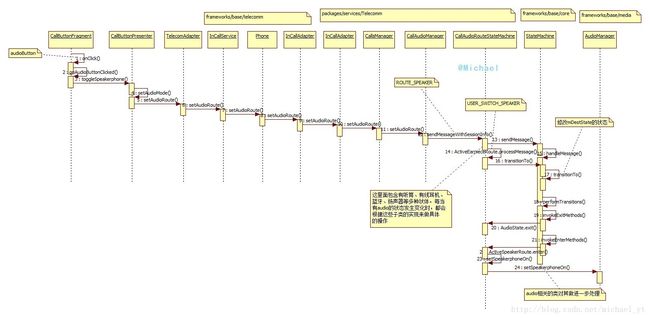
整体流程图
这里主要介绍了 audio 相关的流程,这里其实还是有点儿绕的,因为这里涉及到了多个状态,包括:通过蓝牙传递声音,通过有线耳机传递声音,通过扬声器传递声音,通过听筒传递声音等,在这个流程中,CallAudioRouteStateMachine 这个类很重要,因为这些状态的区分以及各自的逻辑都写在这个类里面,读者可以认真去看看这个类收获应该会很多。
我们这里就只画了从听筒变为扬声器的过程,最终会调用到 AudioManager 中去,audio相关的具体实现我这边没有具体详跟,有兴趣的同学可以自己再追下去看看。
部分细节方法
//CallAudioRouteStateMachine.ActiveSpeakerRoute.enter 设置一些状态
        public void enter() {
            Log.i("michael","ActiveSpeakerRoute enter");
            super.enter();
            mWasOnSpeaker = true;
            setSpeakerphoneOn(true); //打开speaker
            setBluetoothOn(false);
            CallAudioState newState = new CallAudioState(mIsMuted, ROUTE_SPEAKER,
                    mAvailableRoutes);
            setSystemAudioState(newState);
            updateInternalCallAudioState();
        }
Mute
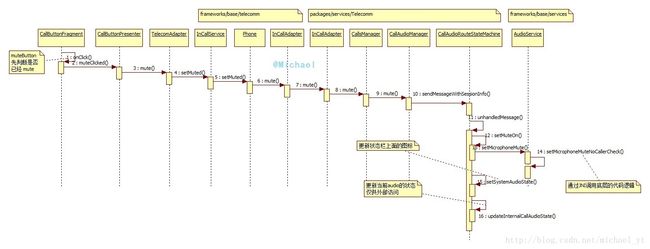
整体流程图
整体流程比较简单,通过上层一直调用到 AudioService 然后通过 JNI 的方法调用底层的具体实现。
部分细节方法
//CallAudioRouteStateMachine.setSystemAudioState 改变 statusbar 的图标和audio的状态
    private void setSystemAudioState(CallAudioState newCallAudioState) {
        ///M: ALPS02797725 @{
        // show mute and speaker icon in status bar
        mStatusBarNotifier.notifyMute(newCallAudioState.isMuted());
        mStatusBarNotifier.notifySpeakerphone(newCallAudioState.getRoute() ==
            CallAudioState.ROUTE_SPEAKER);
        /// @}
        setSystemAudioState(newCallAudioState, false);
    }
//CallAudioRouteStateMachine.updateInternalCallAudioState 改变audio的状态供外部使用
    /**
     * Updates the CallAudioState object from current internal state. The result is used for
     * external communication only.
     */
    private void updateInternalCallAudioState() {
        IState currentState = getCurrentState();
        if (currentState == null) {
            Log.e(this, new IllegalStateException(), "Current state should never be null" +
                    " when updateInternalCallAudioState is called.");
            mCurrentCallAudioState = new CallAudioState(
                    mIsMuted, mCurrentCallAudioState.getRoute(), mAvailableRoutes);
            return;
        }
        int currentRoute = mStateNameToRouteCode.get(currentState.getName());
        mCurrentCallAudioState = new CallAudioState(mIsMuted, currentRoute, mAvailableRoutes);
    }
Dialpad
整体流程图
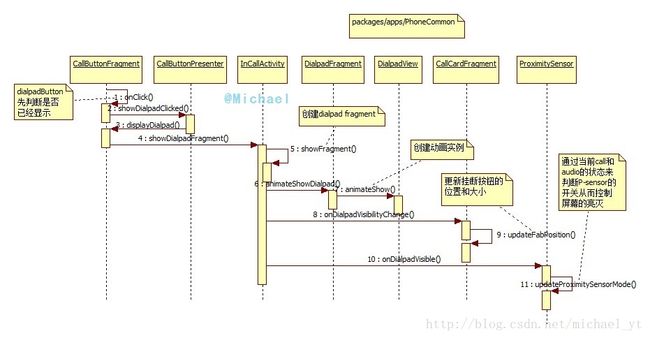
这个流程主要是显示 dialpadfragment 界面的过程,比较简单,但是里面涉及到的一些动画还是比较有趣的。
部分细节方法
//DialpadView.animateShow 创建动画
    public void animateShow() {
        // This is a hack; without this, the setTranslationY is delayed in being applied, and the
        // numbers appear at their original position (0) momentarily before animating.
        final AnimatorListenerAdapter showListener = new AnimatorListenerAdapter() {};

        for (int i = 0; i < mButtonIds.length; i++) {
            int delay = (int)(getKeyButtonAnimationDelay(mButtonIds[i]) * DELAY_MULTIPLIER);
            int duration =
                    (int)(getKeyButtonAnimationDuration(mButtonIds[i]) * DURATION_MULTIPLIER);
            final DialpadKeyButton dialpadKey = (DialpadKeyButton) findViewById(mButtonIds[i]);

            ViewPropertyAnimator animator = dialpadKey.animate();
            if (mIsLandscape) {
                // Landscape orientation requires translation along the X axis.
                // For RTL locales, ensure we translate negative on the X axis.
                dialpadKey.setTranslationX((mIsRtl ? -1 : 1) * mTranslateDistance);
                animator.translationX(0);
            } else {
                // Portrait orientation requires translation along the Y axis.
                dialpadKey.setTranslationY(mTranslateDistance);
                animator.translationY(0);
            }
            animator.setInterpolator(AnimUtils.EASE_OUT_EASE_IN)
                    .setStartDelay(delay)
                    .setDuration(duration)
                    .setListener(showListener)
                    .start();
        }
    }
//CallCardFragment.updateFabPosition 更新hangupbutton的大小和位置
    private void updateFabPosition() {
        /**
         * M: skip update Fab position with animation when FAB is not visible and size is 0X0,
         * hwui will throw exception when draw view size is 0 and hardware layertype. @{
         */
....省略部分代码
        mFloatingActionButtonController.align(
                FloatingActionButtonController.ALIGN_MIDDLE /* align base */,
                0 /* offsetX */,
                offsetY,
                true);
        mFloatingActionButtonController.resize(
                mIsDialpadShowing ? mFabSmallDiameter : mFabNormalDiameter, true);
    }
//ProximitySensor.updateProximitySensorMode  更新P-sensor的状态
 ....省略部分代码
            /// M: disable Proximity Sensor during VT Call
            if (mIsPhoneOffhook && !screenOnImmediately && !isVideoCall) {
                Log.d(this, "Turning on proximity sensor");
                // Phone is in use!  Arrange for the screen to turn off
                // automatically when the sensor detects a close object.

                /// M: for ALPS01275578 @{
                // when reject a incoming call, the call state is INCALL, but we should NOT
                // acquire wake lock in this case
                if (!shouldSkipAcquireProximityLock()) {
                    turnOnProximitySensor();
                }

            } else {
                Log.d(this, "Turning off proximity sensor");
                // Phone is either idle, or ringing.  We don't want any special proximity sensor
                // behavior in either case.

                /// M: For ALPS01769498 @{
                // Screen on immediately for incoming call, this give user a chance to notice
                // the new incoming call when speaking on an existed call.
                if (InCallPresenter.getInstance().getPotentialStateFromCallList(callList)
                        == InCallState.INCOMING) {
                    Log.d(this, "Screen on immediately for incoming call");
                    screenOnImmediately = true;
                }
                /// @}
                turnOffProximitySensor(screenOnImmediately);
            }
....省略部分代码
Hold
整体流程图
这个流程比较简单,从上层一层层的调用到 RILJ 然后执行hold操作。
部分细节方法
//CallsManager.holdCall 这里有个细节,如果存在两路通话,一个hold一个activity,并且是属于两个不同的phoneaccount,那么hold 其中一个,另外一个就会unhold

    public void holdCall(Call call) {
        if (!mCalls.contains(call)) {
            Log.d(this, "Unknown call (%s) asked to be put on hold", call);
        } else {
            Log.d(this, "Putting call on hold: (%s)", call);
            call.hold();
        }
        /// M: When have active call and hold call in different account, hold operation will
        // swap the two call.
        Call heldCall = getHeldCall();
        Log.i("michael"," call ="+call.getTargetPhoneAccount()+" "+" heldCall ="+heldCall.getTargetPhoneAccount());
        if (heldCall != null &&
                !Objects.equals(call.getTargetPhoneAccount(), heldCall.getTargetPhoneAccount())) {
            Log.i("michael"," into heldCall");
            heldCall.unhold();
        }
        /// @}
    }

//TelephonyConnection.performHold 如果存在一个call waiting 的来电,那么就不执行hold操作,让用户可以去接听来电
    public void performHold() {
        Log.v(this, "performHold");
        // TODO: Can dialing calls be put on hold as well since they take up the
        // foreground call slot?
        if (Call.State.ACTIVE == mConnectionState) {
            Log.v(this, "Holding active call");
            try {
                Phone phone = mOriginalConnection.getCall().getPhone();
                Call ringingCall = phone.getRingingCall();

                // Although the method says switchHoldingAndActive, it eventually calls a RIL method
                // called switchWaitingOrHoldingAndActive. What this means is that if we try to put
                // a call on hold while a call-waiting call exists, it'll end up accepting the
                // call-waiting call, which is bad if that was not the user's intention. We are
                // cheating here and simply skipping it because we know any attempt to hold a call
                // while a call-waiting call is happening is likely a request from Telecom prior to
                // accepting the call-waiting call.
                // TODO: Investigate a better solution. It would be great here if we
                // could "fake" hold by silencing the audio and microphone streams for this call
                // instead of actually putting it on hold.
                if (ringingCall.getState() != Call.State.WAITING) {
                    phone.switchHoldingAndActive();
                }
....省略部分代码- 1
- 2
- 3
- 4
- 5
- 6
- 7
- 8
- 9
- 10
- 11
- 12
- 13
- 14
- 15
- 16
- 17
- 18
- 19
- 20
- 21
- 22
- 23
- 24
- 25
- 26
- 27
- 28
- 29
- 30
- 31
- 32
- 33
- 34
- 35
- 36
- 37
- 38
- 39
- 40
- 41
- 42
- 43
- 44
- 45
- 46
- 1
- 2
- 3
- 4
- 5
- 6
- 7
- 8
- 9
- 10
- 11
- 12
- 13
- 14
- 15
- 16
- 17
- 18
- 19
- 20
- 21
- 22
- 23
- 24
- 25
- 26
- 27
- 28
- 29
- 30
- 31
- 32
- 33
- 34
- 35
- 36
- 37
- 38
- 39
- 40
- 41
- 42
- 43
- 44
- 45
- 46
Add_call 和 Record
整体流程图
Add_call
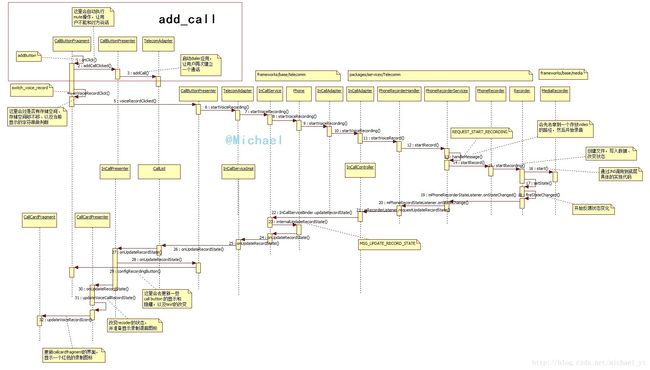
流程图中红色方框部分就是 addcall 按钮的执行过程,我们可以看到其实逻辑很简单,就是再次打开 dialer 应用让用户启动第二路通话MO流程
部分细节方法
//TelecomAdapter.addCall 具体实现启动dialer的过程
    void addCall() {
        if (mInCallService != null) {
            Intent intent = new Intent(Intent.ACTION_DIAL);//ACTION_DIAL = "android.intent.action.DIAL"
            intent.addFlags(Intent.FLAG_ACTIVITY_NEW_TASK);

            // when we request the dialer come up, we also want to inform
            // it that we're going through the "add call" option from the
            // InCallScreen / PhoneUtils.
            intent.putExtra(ADD_CALL_MODE_KEY, true);
            try {
                Log.d(this, "Sending the add Call intent");
                mInCallService.startActivity(intent);
            } catch (ActivityNotFoundException e) {
                // This is rather rare but possible.
                // Note: this method is used even when the phone is encrypted. At that moment
                // the system may not find any Activity which can accept this Intent.
                Log.e(this, "Activity for adding calls isn't found.", e);
            }
        }
    }
Record
上面流程图中,除了红色方框的部分其它都是 record 的流程逻辑,乍一看感觉比较复杂,其实还是很简单,只是跨越类很多,最终通过 MediaRecorder 类以 JNI 的形式调用底层 C/C++ 的具体实现代码,这里还画出了,当 record 的状态发生了变化通过一层层的 listener,最终通知fragment 显示 record 的红色录制图标,以及将button的text内容从“Start recording”变成“Stop recording”的过程。
部分细节方法
//StorageManagerEx.getDefaultPath 拿到默认存储录音的路径
    /**
     * Returns default path for writing.
     * @hide
     * @internal
     */
    public static String getDefaultPath() {
        String path = "";
        boolean deviceTablet = false;
        boolean supportMultiUsers = false;

        try {
            path = SystemProperties.get(PROP_SD_DEFAULT_PATH);
            //Log.i(TAG, "get path from system property, path=" + path);
        } catch (IllegalArgumentException e) {
            Log.e(TAG, "IllegalArgumentException when get default path:" + e);
        }

        // Property will be empty when first boot, should set to default
        // For OTA upgrade, path is invalid, need update default path
        if (path.equals("")
                || path.equals(STORAGE_PATH_SD1_ICS) || path.equals(STORAGE_PATH_SD1)
                || path.equals(STORAGE_PATH_SD2_ICS) || path.equals(STORAGE_PATH_SD2)) {
            //Log.i(TAG, "DefaultPath invalid! " + "path = " + path + ", set to default.");
            try {
                IMountService mountService =
                  IMountService.Stub.asInterface(ServiceManager.getService("mount"));
                if (mountService == null) {
                    Log.e(TAG, "mount service is not initialized!");
                    return "";
                }
                int userId = UserHandle.myUserId();
                VolumeInfo[] volumeInfos = mountService.getVolumes(0);
                for (int i = 0; i < volumeInfos.length; ++i) {
                    VolumeInfo vol = volumeInfos[i];
                    if (vol.isVisibleForWrite(userId) && vol.isPrimary()) {
                        path = vol.getPathForUser(userId).getAbsolutePath();
                        //Log.i(TAG, "Find primary and visible volumeInfo, "
                        //+ "path=" + path + ", volumeInfo:" + vol);
                        break;
                    }
                }
                setDefaultPath(path);
...省略部分代码
        return path;
    }

//Recorder.startRecording 创建文件,开始录音,并往里面写入数据
    public void startRecording(int outputfileformat, String extension) throws IOException {
        log("startRecording");

        SimpleDateFormat dateFormat = new SimpleDateFormat("yyyy-MM-dd_HH.mm.ss");
        String prefix = dateFormat.format(new Date());
        File sampleDir = new File(StorageManagerEx.getDefaultPath());
....省略部分代码
            mRecorder.prepare();
            mRecorder.start();
            mSampleStart = System.currentTimeMillis();
            setState(RECORDING_STATE);
....省略部分代码
    }

//CallCardFragment.updateVoiceRecordIcon  显示或者隐藏录音的红色图标,并带有一闪一闪的动画
    public void updateVoiceRecordIcon(boolean show) {
        mVoiceRecorderIcon.setVisibility(show ? View.VISIBLE : View.INVISIBLE);
        AnimationDrawable ad = (AnimationDrawable) mVoiceRecorderIcon.getDrawable();
        if (ad != null) {
            if (show && !ad.isRunning()) {
                ad.start();
            } else if (!show && ad.isRunning()) {
                ad.stop();
            }
        }
        /// M:[RCS] plugin API @{
        ExtensionManager.getRCSeCallCardExt().updateVoiceRecordIcon(show);
        /// @}
    }
//CallButtonFragment.configRecordingButton 更新button 和 button 的text 内容
    /**
     * M: configure recording button.
     */
    @Override
    public void configRecordingButton() {
        boolean isRecording = InCallPresenter.getInstance().isRecording();
        //update for tablet and CT require.
        mRecordVoiceButton.setSelected(isRecording);

        mRecordVoiceButton
                .setContentDescription(getString(isRecording ? R.string.stop_record
                        : R.string.start_record));

        if (mOverflowPopup == null) {
            return;
        }
        String recordTitle = isRecording ? getString(R.string.stop_record)
                : getString(R.string.start_record);
        updatePopMenuItemTitle(BUTTON_SWITCH_VOICE_RECORD, recordTitle);//更新button的text 内容

    }