Eclipse与Hadoop开发环境搭建
首先,配置环境变量步骤如下:
我的电脑右键–》属性-----》高级系统设置------》环境变量
—》在系统变量中增加新建:

![]()
![]()
这就完事了一部分
下面打开eclipse
在打开之前打开eclipse文件所在位置----》
将hadoop-eclipse-plugin-2.6.0.jar复制到eclipse的安装目录下的plugins
启动eclipse
core-site.xml 配置文件:
    fs.defaultFS


    hdfs://master:9000


The name of the default file system.
    hadoop.tmp.dir


        /usr/setup/hadoop/temp


    A base for other temporary         directories.
1 下载插件
hadoop-eclipse-plugin-2.5.1.jar
github上下载源码后需要自己编译。这里使用已经编译好的插件即可
2 配置插件
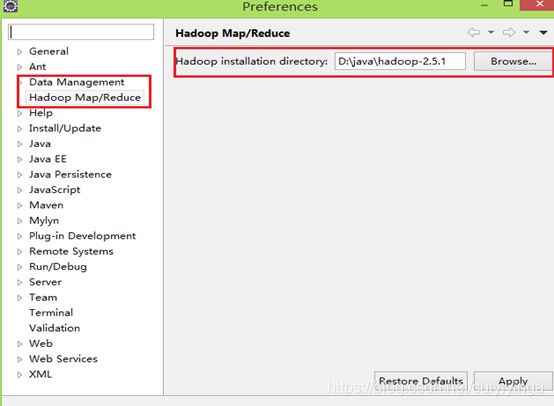
把插件放到…\eclipse\plugins目录下,重启eclipse,配置Hadoop installation directory ,
如果插件安装成功,打开Windows—Preferences后,在窗口左侧会有Hadoop Map/Reduce选项,点击此选项,在窗口右侧设置Hadoop安装路径。(windows下只需把hadoop-2.5.1.tar.gz解压到指定目录)
3 配置Map/Reduce Locations
打开Windows—Open Perspective—Other,选择Map/Reduce,点击OK,控制台会出现:
![]()
右键 new Hadoop location 配置hadoop:输入
Location Name,任意名称即可.
配置Map/Reduce Master和DFS Mastrer,Host和Port配置成与core-site.xml的设置一致即可。
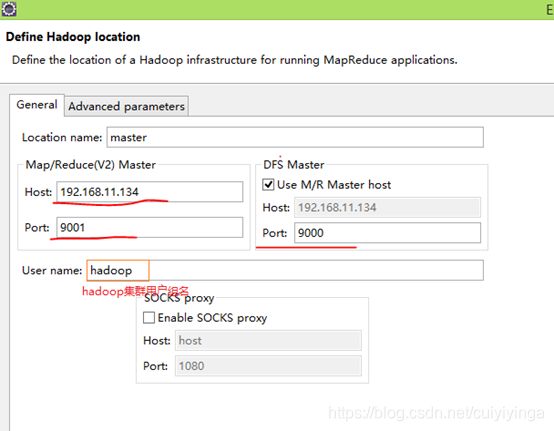
点击"Finish"按钮,关闭窗口。
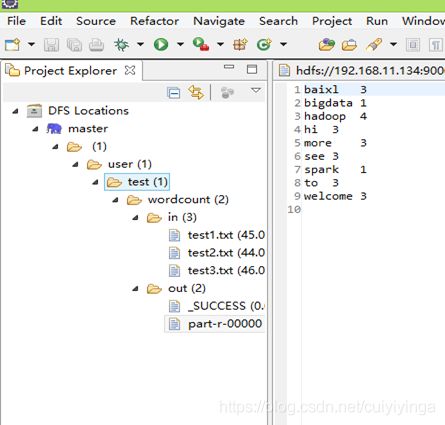
点击左侧的DFSLocations—>master (上一步配置的location name),如能看到user,表示安装成功
4 wordcount实例
File—>Project,选择Map/Reduce Project,输入项目名称WordCount等。在WordCount项目里新建class,名称为WordCount,代码如下:
import java.io.IOException;
import java.util.StringTokenizer;
import org.apache.hadoop.conf.Configuration;
import org.apache.hadoop.fs.Path;
import org.apache.hadoop.io.IntWritable;
import org.apache.hadoop.io.Text;
import org.apache.hadoop.mapreduce.Job;
import org.apache.hadoop.mapreduce.Mapper;
import org.apache.hadoop.mapreduce.Reducer;
import org.apache.hadoop.mapreduce.lib.input.FileInputFormat;
import org.apache.hadoop.mapreduce.lib.output.FileOutputFormat;
import org.apache.hadoop.util.GenericOptionsParser;
public class WordCount {
public static class TokenizerMapper extends Mapper{
private final static IntWritable one=new IntWritable(1);
private Text word =new Text();
public void map(Object key,Text value,Context context) throws IOException,InterruptedException{
StringTokenizer itr=new StringTokenizer(value.toString());
while (itr.hasMoreTokens()) {
word.set(itr.nextToken());
context.write(word, one);
}
}
}
public static class IntSumReducer extends Reducer {
private IntWritable result = new IntWritable();
public void reduce(Text key, Iterable values,Context context) throws IOException, InterruptedException {
int sum = 0;
for (IntWritable val : values) {
sum += val.get();
}
result.set(sum);
context.write(key, result);
}
}
public static void main(String[] args) throws Exception {
Configuration conf = new Configuration();
Job job = new Job(conf, "word count");
job.setJarByClass(WordCount.class);
job.setMapperClass(TokenizerMapper.class);
job.setCombinerClass(IntSumReducer.class);
job.setReducerClass(IntSumReducer.class);
job.setOutputKeyClass(Text.class);
job.setOutputValueClass(IntWritable.class);
FileInputFormat.addInputPath(job, new Path("hdfs://192.168.11.134:9000/in/test*.txt"));//路径1
FileOutputFormat.setOutputPath(job, new Path("hdfs://192.168.11.134:9000/output"));//输出路径
System.exit(job.waitForCompletion(true) ? 0 : 1);
}
}
上面的路径1 和路径2 由于在代码中已经定义,这不需要在配置文件中定义,若上面路径1和路径2 代码为:
FileInputFormat.addInputPath(job, new Path(otherArgs[0]));
FileOutputFormat.setOutputPath(job, new Path(otherArgs[1]));
这需要配置运行路径:类 右键 Run As—>Run Configurations
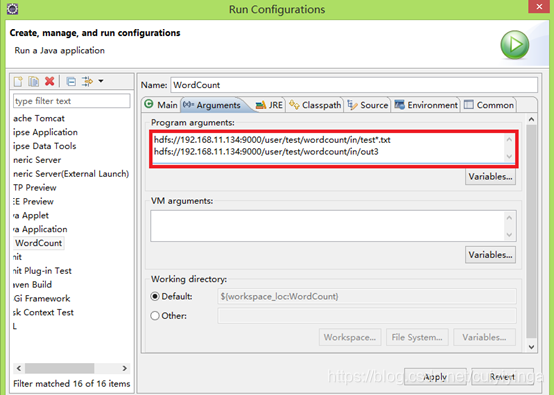
红色部分为配置的hdfs上文件路径,
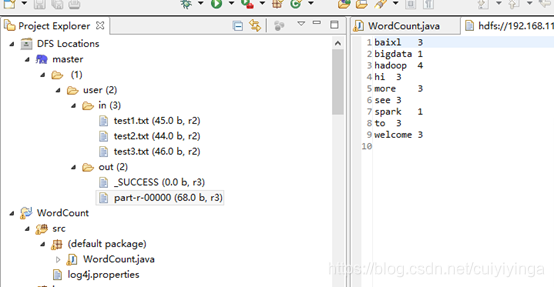
点击run 或或者:Run on Hadoop,运行结果会显示在DFS Locations。若运行中有更新,右键DFS Locations,点disconnect更新
运行结果:
package com.hpe.test;

import java.io.BufferedInputStream;
import java.io.File;
import java.io.FileInputStream;
import java.io.FileOutputStream;
import java.io.IOException;
import java.io.InputStream;

import org.apache.hadoop.conf.Configuration;
import org.apache.hadoop.fs.FSDataInputStream;
import org.apache.hadoop.fs.FSDataOutputStream;
import org.apache.hadoop.fs.FileSystem;
import org.apache.hadoop.fs.Path;
import org.apache.hadoop.io.IOUtils;
import org.junit.After;
import org.junit.Before;
import org.junit.Test;
import org.omg.Messaging.SyncScopeHelper;

public class TestHdfs {

	//引入配置文件
	Configuration conf=null;
	//创建文件流----引用的是hadoop内部封装的方法
	FileSystem fs=null;

	@Before
	public void conn() throws Exception{
		conf=new Configuration(true);//设置是否读取配置信息
		fs=FileSystem.get(conf);
	}
	@After
	public void close() throws Exception{
		fs.close();
	}

	//创建、删除、重命名、判断是否存在

	//创建文件
	@Test
	public void mkdir() throws Exception{
		Path f=new Path("/aaa");
		//判断是否存在
		if(fs.exists(f)){
			//删除
			fs.delete(f);
		}
		//创建
		fs.mkdirs(f);

	}
	//自己补充完成
	public void exist(){

	}
	//重命名
	@Test
	public void rn() throws Exception{
		Path p1 = new Path("/user/root/passwd");
		Path p2 = new Path("/user/root/haha.txt");
		boolean rename = fs.rename(p1, p2);
		System.out.println(rename);
	}


	//上传文件
	@Test
	public void uploadFile() throws Exception{

		//输出位置
		Path inputFile=new Path("/tmpDir/haha.txt");
		//相当于文件内容的输出
		FSDataOutputStream output = fs.create(inputFile);

		//输入位置,相当于文件内容的输入
		InputStream input=new BufferedInputStream(new FileInputStream(new File("d:\\124.txt")));

		IOUtils.copyBytes(input, output, conf, true);

	}
	//下载文件
	@Test
	public void downloadFile() throws Exception{


		//上传文件到HDFS
		Path src = new Path("/tmpDir/haha.txt");
		//输入源:将我集群中的文件作为输入
		FSDataInputStream input=fs.open(src);
		//输出位置
		FileOutputStream output=new FileOutputStream("F://aa.txt");


		IOUtils.copyBytes(input, output, conf, true);
	}
	//上传下载

}