Android基础第二篇
转载请标明出处:
http://blog.csdn.net/gj782128729/article/details/52328317;
本文出自:【高境的博客】
1. 测试相关概念
1.1. 测试的分类
按照是否知道源代码:
1.黑盒测试:不知道源代码
2.白盒测试:知道源代码
按照测试的粒度:
1.方法测试 function test
2.单元测试 unit test
3.集成测试 integration test
4.系统测试 system test
按照测试的暴力程度:
1.冒烟测试 smoke test
2.压力测试 pressure test
1.2. Android下monkey测试
monkey程序由Android系统自带,使用Java语言写成,在Android SDK中的存放路径是:/sdk/tools/lib/monkey.jar
monkey测试的原理就是利用socket通讯的方式来模拟用户的按键输入,触摸屏输入,手势输入等。
monkey常用指令:monkey -p packagename count;
例子:monkey -p com.android.email 300;
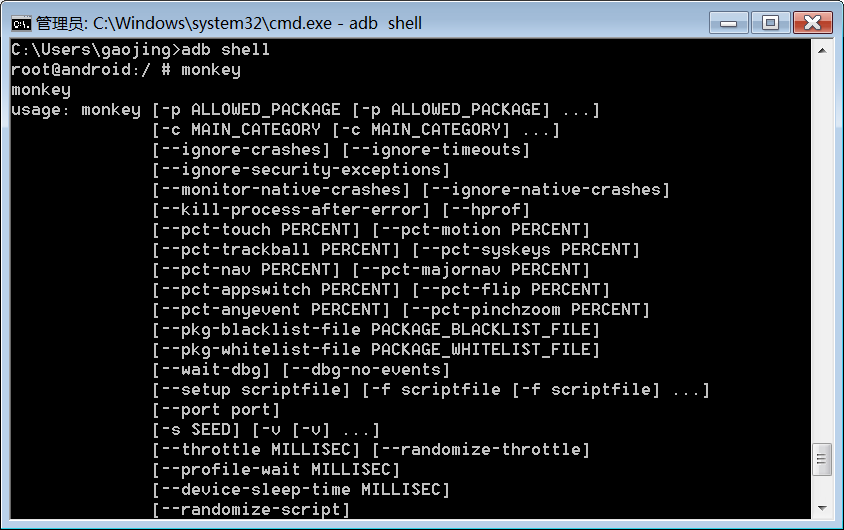
首先我们在命令行中输入adb shell,挂载到Linux空间,然后我们输入monkey命令,会显示可选参数:
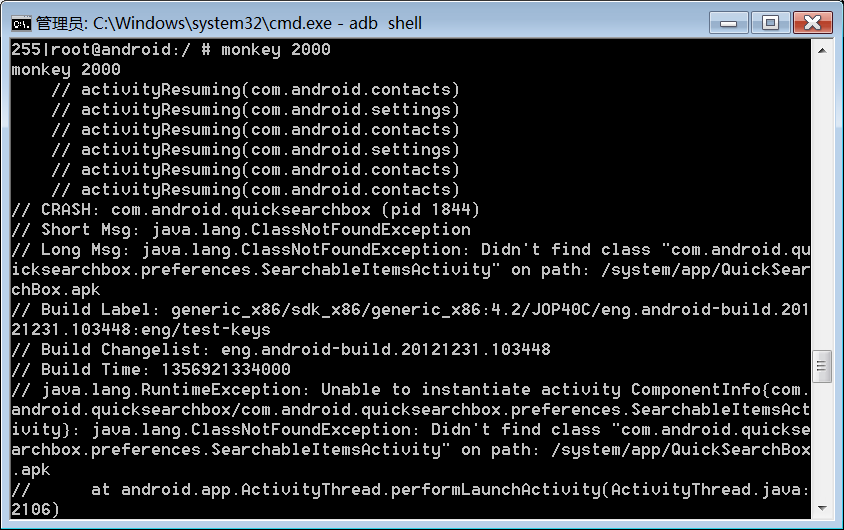
然后我们可以在后面加上count参数,例如monkey 2000
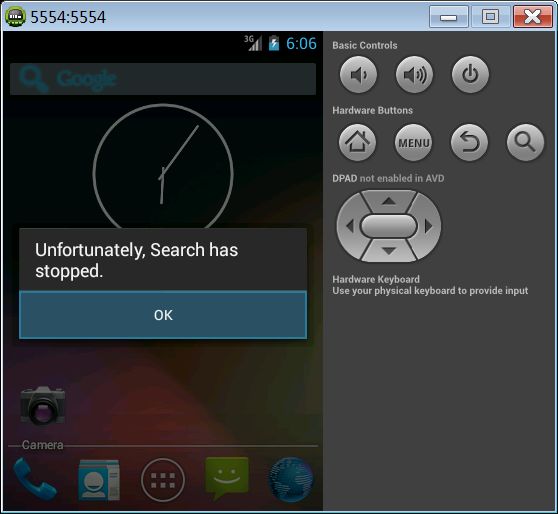
模拟器结果:由于我们使用monkey测试,当点击某个应用某些功能时程序崩溃,出现以下结果。
2. 单元测试
单元测试(unit test),是指对软件中的最小可测试单元进行检查和验证。
Android中单元测试的步骤:
1.写一个类继承AndroidTestCase
public class TestCalc extends AndroidTestCase{
      //需要写一个测试方法
      public void testAdd(){
          //想测试 计算器相加的方法
          Calc calc = new Calc();
          int result = calc.add(5, 6);
          //断言
          assertEquals(11,result);
      }
}
2.Androidmanifest中application节点下配置一个uses-library节点:
<uses-library android:name="android.test.runner" />3.androidmanifest中manifest节点下配置一个instrumentation:
<instrumentation android:name="android.test.InstrumentationTestRunner" android:targetPackage="com.gaojing.junit" />
注意:如果不知道如何配置androidmanifest可以右击新建一个android test project 的测试工程,会自动配置。
3. Logcat工具
1.可以按照tag ,packagename ,pid添加过滤器。
2.日志可以使用Log类来打印,有五种级别:e,w,i,d,v,如图:

3.一般公司开发打log需要封装一个工具类,通过一个开关来控制log什么时候打印。
4.logcat可以帮助我们分析程序运行的状况,帮助我们找到程序运行过程中出现的错误信息。
添加日志过滤器:
a) 点击“+”按钮
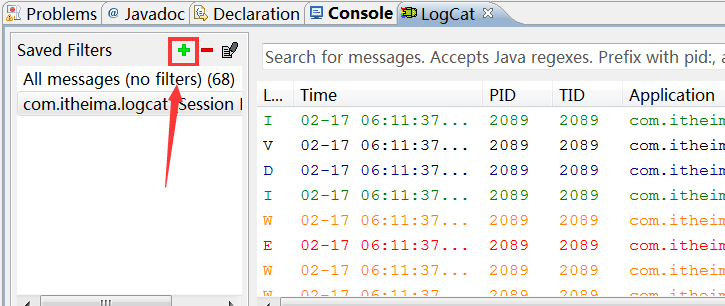
b) 填写过滤条件,第一行是自己起的名字,第二行是Tag的名称。这边按照打印输出这个标签来过滤日志。


4. 登录案例
4.1. 编写UI
整体布局是一个LinearLayout,最下面一行是相对布局。

上图UI布局文件代码如下:
<LinearLayout
 xmlns:android="http://schemas.android.com/apk/res/android"
    xmlns:tools="http://schemas.android.com/tools"
    android:layout_width="match_parent"
    android:layout_height="match_parent"
    android:orientation="vertical"
    tools:context=".MainActivity" >
    <EditText
        android:id="@+id/et_username"
        android:layout_width="match_parent"
        android:layout_height="wrap_content"
        android:hint="请输入用户名" />
    <EditText
        android:id="@+id/et_userpassword"
        android:layout_width="match_parent"
        android:layout_height="wrap_content"
        android:password="true"
        android:hint="请输入密码" />
    <RelativeLayout
        android:layout_width="match_parent"
        android:layout_height="match_parent"
        android:layout_marginTop="20dp"
        >
        <CheckBox
            android:id="@+id/cb_ischeck"
            android:layout_width="wrap_content"
            android:layout_height="wrap_content"
            android:text="记住用户名密码" />
        <Button
            android:layout_width="wrap_content"
            android:layout_height="wrap_content"
            android:onClick="login"
            android:layout_alignParentRight="true"
            android:text="登录" />
    RelativeLayout>
LinearLayout>
4.2. 业务逻辑
1.找到相关的控件对象
et_name = (EditText) findViewById(R.id.et_username);
et_userpassword = (EditText) findViewById(R.id.et_userpassword);
cb_ischeck = (CheckBox) findViewById(R.id.cb_ischeck);
2.定义登录按钮的点击事件
//写按钮的点击事件
public void login(View v){

}
3.当按钮发生点击时,需要获取用户输入的用户名,密码,是否记住密码
//获取用户名和密码
String name = et_name.getText().toString().trim();
String pwd = et_userpassword.getText().toString().trim();
4.验证用户名密码格式是否正确,是否为null,如果为空,提示给用户
if (TextUtils.isEmpty(name)||TextUtils.isEmpty(pwd)) {
    Toast.makeText(MainActivity.this, "用户名或密码不能为空", 1).show();
}else {
    //进行登录的逻辑
    System.out.println("连接服务器  进行登录 等我们讲到 第四天 网络 编程 在说");
}
不为空,提交用户名密码到服务器(默认登录成功)。
5.登录成功,判断是否记住密码,记住,需要保存用户名密码到本地。
if (cb_ischeck.isChecked()) {
    //把用户名和密码的数据给我存起来
    boolean result = UserInfoUtils.saveInfo(name, pwd);
    if (result) {
        Toast.makeText(MainActivity.this, "保存成功", 1).show();
    }else{
        Toast.makeText(MainActivity.this, "保存失败", 1).show();
    }
}else {
    Toast.makeText(MainActivity.this, "请勾选cb", 1).show();
}
在上述代码中,UserInforUtils是一个工具类,在该工具类中定义了方法saveInfo用来保存当前登录用户的用户名和密码。
// 保存用户名和密码的业务方法
public static boolean saveInfo(String username, String pwd) {
    try {
        String result = username + "##" + pwd;
        // 创建file类指定我们要把数据存储的位置
        File file = new File("/data/data/com.gaogao.login/info.txt");
        // 创建一个文件输出流
        FileOutputStream fos = new FileOutputStream(file);
        fos.write(result.getBytes());
        fos.close();
        return true;
    } catch (Exception e) {
        e.printStackTrace();
        return false;
    }
}
6.下次再进入该界面时,需要回显用户名密码
//读取 data/data 下  info.txt信息
Map<String, String> maps = UserInfoUtils.readInfo();
if (maps!=null) {
    //把name 和 pwd 取出来
    String name = maps.get("name");
    String pwd = maps.get("pwd");
    //把name 和pwd 显示到editText控件上
    et_name.setText(name);
    et_userpassword.setText(pwd);
}
7.方法readInfo具体实现如下:
// 读取用户的信息
public static Map<String, String> readInfo() {
    // 定义map
    try {
        Map<String, String> maps = new HashMap<String, String>();
        File file = new File("/data/data/com.gaogao.login/info.txt");
        FileInputStream fis = new FileInputStream(file);
        BufferedReader bufr = new BufferedReader(
                                           new InputStreamReader(fis));
        String content = bufr.readLine(); // 读取数据
        // 切割字符串 封装到map集合中
        String[] splits = content.split("##");
        String name = splits[0];
        String pwd = splits[1];
        // 把name 和 pwd 放入map中
        maps.put("name", name);
        maps.put("pwd", pwd);
        fis.close();
        return maps;
    } catch (Exception e) {
        e.printStackTrace();
        return null;
    }
}
5. Context上下文
在Android的API中对Context的描述是这样的:
Interface to global information about an application environment. This is an abstract class whose implementation is provided by the Android system. It allows access to application-specific resources and classes, as well as up-calls for application-level operations such as launching activities, broadcasting and receiving intents, etc
1.Context描述的是一个应用程序环境的信息,即上下文。
2.Context是一个抽象类,Android提供了该抽象类的具体实现类。
3.通过Context我们可以获取应用程序的资源和类,包括一些应用级别的操作,如启动一个Activity,发送广播,接受Intent信息等。
Context相关类的继承关系:

从上图可以看出Activity也是Context类,所以我们调用Toast弹出吐司的时候,第一个参数需要传入上下文,我们可以使用this。
6. Android存储方式
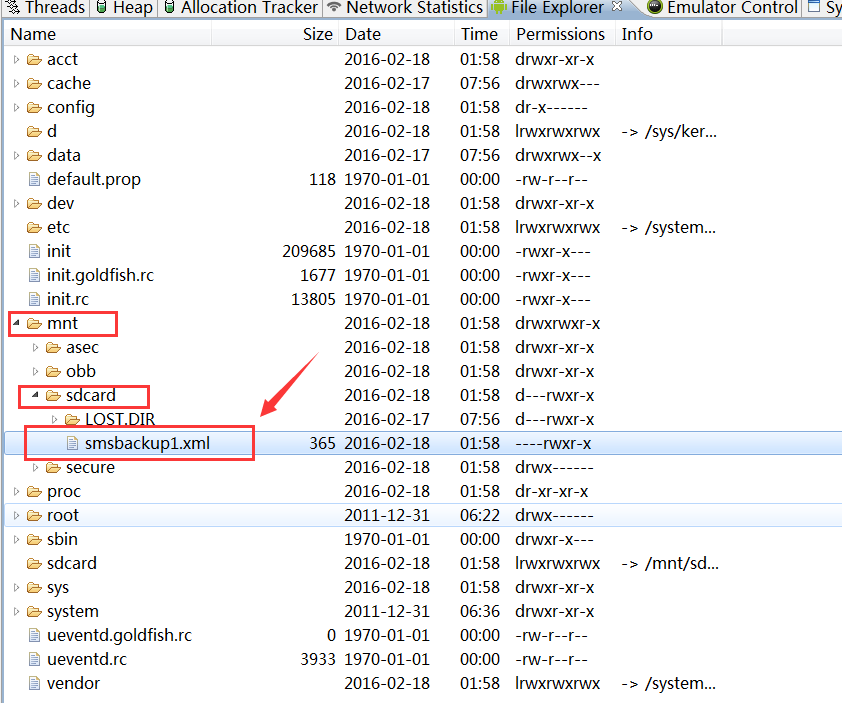
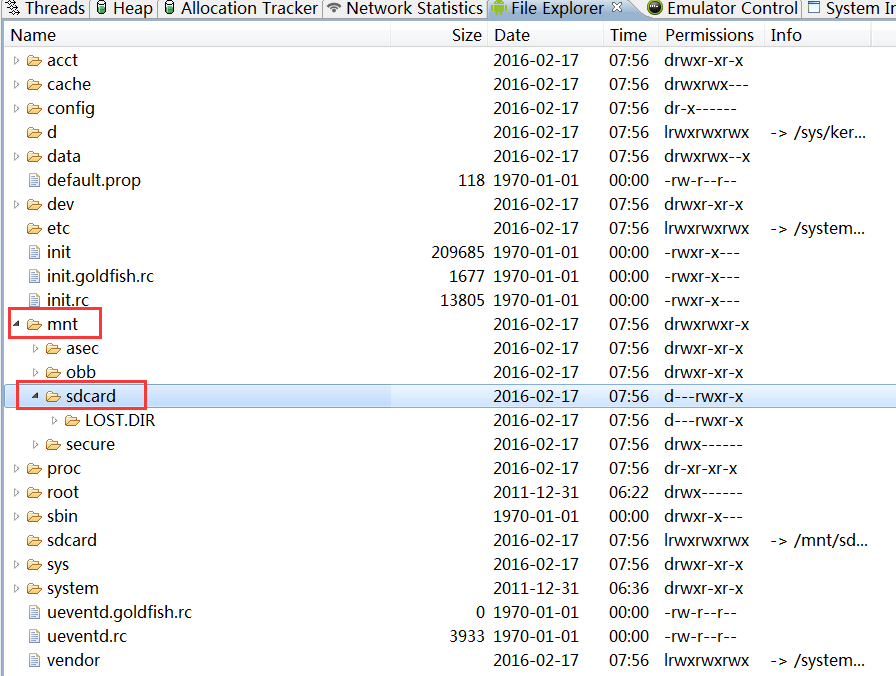
在Android中,分为内部存储空间和外部存储空间。我们通过DDMS中的File Explorer功能可以很容易的查看手机的文件体统。如下图:

内部存储空间指的是应用的内部存储空间,每一个应用安装到手机上,都会在手机data/data目录下面生成以应用包名命名的文件夹,这个文件夹存放的是关于这个应用的数据,也就是应用的内部存储空间。一旦应用被卸载了,该目录就会自动删除,如下图:

外部存储空间指的的是外部存储设备sd卡,该目录为/mnt/sdcard如下图:
6.1. 将数据存储到内部存储空间
public static boolean saveUserInfo(Context context, String username, String pwd) {
    String result = username + "##" + pwd;
    // 把当前数据保存到当前应用包中
    String path = context.getFilesDir().getPath();
    File file = new File(path, "info.txt");
    try {
        FileOutputStream fos = new FileOutputStream(file);
        fos.write(result.getBytes());
        fos.close();
        return true;
    } catch (IOException e) {
        e.printStackTrace();
        return false;
    }
}
第4行,通过上下文Context获取到内部存储空间文件夹,该目录在应用程序包名里面的files文件夹中。
6.2. 将数据存储到Sd卡
要操作sd卡,需要加入权限:
<uses-permission android:name="android.permission.WRITE_EXTERNAL_STORAGE"/>获取sd卡路径:
//通过Environment获取sdcard目录路径
String path = Environment.getExternalStorageDirectory().getPath();
sdcard状态问题:
在手机设置页面,点击进入存储设置,可以将sd卡卸载和挂载。


if(!Environment.getExternalStorageState().
equals(Environment.MEDIA_MOUNTED)){
    Toast.makeText(getApplicationContext(), "sdcard不存在或未挂载",
                                                                           0).show();
 return;
}
获取sdcard的大小:
File file = Environment.getExternalStorageDirectory();
//获取总空间
long totalSpace = file.getTotalSpace();
//格式化大小,该方法在api level 9以后才出现
String totalSpaceSize = Formatter.formatFileSize(MainActivity.this,totalSpace);
获取sdcard的可用空间:
long usableSpace = file.getUsableSpace();
String usableSpace_str = Formatter.formatFileSize(this, usableSpace);
7. 文件权限
1.使用Context对象获取一个私有目录的文件写入流
FileOutputStream fileOutputStream = context.openFileOutput("userinfo.txt", Context.MODE_PRIVATE);第1行,通过Context.openFileOutput()方法获取一个私有目录的文件写入流。其中参数的含义如下:
| 参数 | 含义 |
|---|---|
| Name | 有目录下的文件名称 |
| Mode | 文件模式 private append read write 用来控制文件的权限 |
使用context对象获取一个私有目录的文件读取流:
FileInputStream fileInputStream= context.openFileInput("userinfo.txt")Linux中一个文件的权限由10位标示,如图:
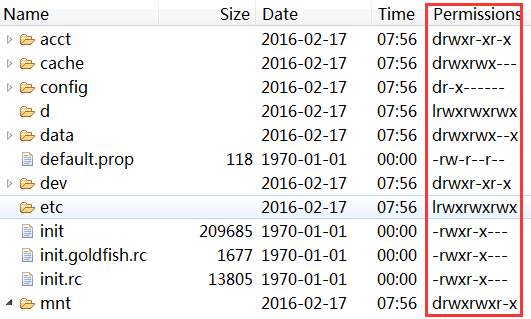
第1位代表文件的类型: d:文件夹 l:快捷方式 -:文件
第2-4位:文件所属用户对本文件的权限
第5-7: 文件所属用户组对本文件的权限
第8-10:其他用户对本文件的权限
8. SharedPreference存储数据
首先看下API文档中对SharedPreference的介绍:
The SharedPreferences class provides a general framework that allows you to save and retrieve persistent key-value pairs of primitive data types. You can use SharedPreferences to save any primitive data: booleans, floats, ints, longs, and strings. This data will persist across user sessions (even if your application is killed).
SharedPreference这个类提供了常用的框架来允许用户保存和提取持久化的私有的数据,这些数据是key-value(键值对)的形式。
1.sharedPreference文件是以xml的方式存储在/data/data/包名/shared_pres目录下
2.使用sharedPreference一般用于存放标记性或设置性的数据。
3.存储数据:
a) 使用Context获取SharedPreferenced对象
SharedPreferences sharedPreferences = context.getSharedPreferences("userinfo.txt", Context.MODE_PRIVATE);b) 使用SharedPreference对象获取一个Editor对象
Editor editor = sharedPreferences.edit();c) 向Editor对象中put键值对的数据
editor.putString("username", username);
editor.putString("password", password);
d) 提交Editor对象
editor.commit();4.读取数据:
使用Context获取SharedPreference对象 :
SharedPreferences sharedPreferences = context.getSharedPreferences ("userinfo.txt", Context.MODE_PRIVATE);SharedPreference对象获取存放的键值:
String username = sharedPreferences.getString("username", "admin");
String password = sharedPreferences.getString("password", "admin");
方法第二个参数表示如果没有获取到返回的默认值。
9. XML的生成和解析
9.1. StringBuffer生成XML
模拟备份短信到本地文件,将短信的信息转化成xml文件存到sdcard。
定义短信实体:
public class Sms {
    private String address;
    private String body;
    private String date;
    public String getAddress() {
        return address;
    }
    public void setAddress(String address) {
        this.address = address;
    }
    public String getBody() {
        return body;
    }
    public void setBody(String body) {
        this.body = body;
    }
    public String getDate() {
        return date;
    }
    public void setDate(String date) {
        this.date = date;
    }
}
准备备份的短信信息:
List smsLists = smsLists = new ArrayList();
for (int i = 0; i < 4; i++) {
    Sms sms = new Sms();
    sms.setAddress("beijing" + i);
    sms.setBody("nihao" + i);
    sms.setDate("201" + i);
    // 要把sms对象加入到 集合中
    smsLists.add(sms);
}
生成xml文件,并保存:
public void click(View v) {
StringBuffer sb = new StringBuffer();
//组拼xml的声明
sb.append("");
//添加节点
sb.append("" );
for (Sms sms : smsLists) {
//添加节点
sb.append("" );
sb.append("");
sb.append(sms.getAddress());
sb.append("");
sb.append("");
sb.append(sms.getBody());
sb.append("");
sb.append("" );
sb.append(sms.getDate());
sb.append("");
sb.append(" ");
}
sb.append(" ");
try {
File file = new
File(Environment.getExternalStorageDirectory().getPath(),
"smsbackup.xml");
FileOutputStream fos = new FileOutputStream(file);
fos.write(sb.toString().getBytes());
fos.close();
Toast.makeText(MainActivity.this, "备份成功", 1).show();
} catch (Exception e) {
e.printStackTrace();
}
}
9.2. XmlSerializer生成Xml
public void click(View v) {
    try {
        XmlSerializer serializer = Xml.newSerializer();
        File file = new File(Environment.getExternalStorageDirectory()
                                                .getPath(), "smsbackup1.xml");
        FileOutputStream fos = new FileOutputStream(file);
        serializer.setOutput(fos, "utf-8");
        serializer.startDocument("utf-8", true);
        serializer.startTag(null, "smss");
        for (Sms sms : smsLists) {
            serializer.startTag(null, "sms");
            serializer.startTag(null, "address");
            serializer.text(sms.getAddress());
            serializer.endTag(null, "address");
            serializer.startTag(null, "body");
            serializer.text(sms.getBody());
            serializer.endTag(null, "body");
            serializer.startTag(null, "date");
            serializer.text(sms.getDate());
            serializer.endTag(null, "date");
            serializer.endTag(null, "sms");
        }
        serializer.endTag(null, "smss");
        serializer.endDocument();
        fos.close();
    } catch (Exception e) {
        e.printStackTrace();
    }
}
第3行,初始化xml的序列化器对象;
第7行,设置序列化器的参数,生成xml的编码;
第8行,startDocument用来开始文档,有startDocument也有endDocument;
第9行,startTag用来写入开始标签,一个startTag对应一个endTag;
第10-22行,遍历集合,生成各个节点,第13行的text方法,作用是写入标签里面的文本。
运行结果:
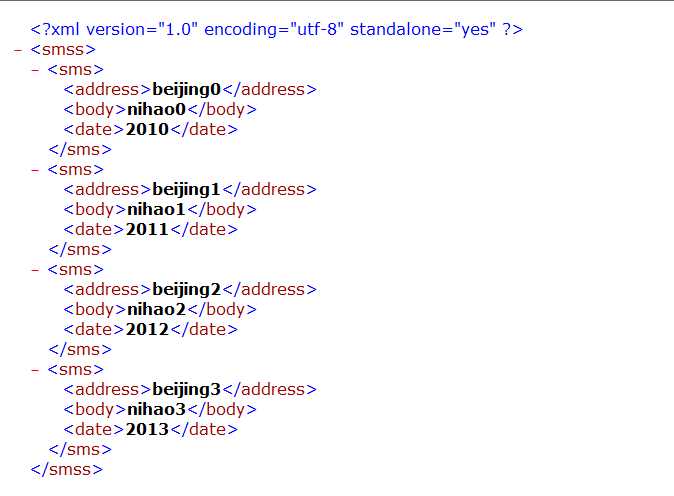
在SD卡上可以看到我们的备份文件,我们将该备份文件导出在浏览器中打开验证是否正确:
导出smsbackup1.xml文件,使用浏览器打开,能正确显示数据如下:
9.3. XmlPullParser解析Xml
利用一些开源的api,我们可以实现一些自己的应用,比如,有些公司会提供免费的天气api,一般返回的数据都是xml格式。现在需要解析这些xml:
<weather>
        <channel id ='1'>
             <city>北京city>
             <temp>25°temp>
             <wind>3wind>
             <pm250>300pm250>
        channel>
         <channel id ='2'>
             <city>郑州city>
             <temp>20°temp>
             <wind>4wind>
             <pm250>300pm250>
        channel>
        <channel id ='3'>
             <city>长春city>
             <temp>10°temp>
             <wind>4wind>
             <pm250>100pm250>
        channel>
        <channel id ='4'>
             <city>沈阳city>
             <temp>20°temp>
             <wind>1wind>
             <pm250>50pm250>
        channel>
weather>
定义天气的实体bean:
public class Channel {
    private String id;
    private String city;
    private String temp;
    private String wind;
    private String pm250;
    public String getId() {
        return id;
    }
    public void setId(String id) {
        this.id = id;
    }
    public String getCity() {
        return city;
    }
    public void setCity(String city) {
        this.city = city;
    }
    public String getTemp() {
        return temp;
    }
    public void setTemp(String temp) {
        this.temp = temp;
    }
    public String getWind() {
        return wind;
    }
    public void setWind(String wind) {
        this.wind = wind;
    }
    public String getPm250() {
        return pm250;
    }
    public void setPm250(String pm250) {
        this.pm250 = pm250;
    }
    @Override
    public String toString() {
        return "Channel [id=" + id + "城市" + city + "温度" + temp
                + "风" + wind + " pm250=" + pm250 + "]";
    }
}
解析xml文件:
public static List<Channel> parseXml(InputStream in) {
    List<Channel> weatherLists = null;
    Channel channel = null;
    //初始化 xmlpullparser解析器;
    XmlPullParser parser = Xml.newPullParser();
    try {
        //设置解析xml的输入流,以UTF-8格式;
        parser.setInput(in, "utf-8");
        //获取到解析的事件类型,根据类型做具体的操作;
        int type = parser.getEventType();
        //while语句,条件是如果是文档结尾就不循环,如果没有到文档结尾,就继续循环,文档结束标记为XmlPullParser.END_DOCUMENT;
        while (type != XmlPullParser.END_DOCUMENT) {
            //switch语句,就是用来分别针对解析到的事件类型做相应的处理,parser.nextText()获取标签中的文本内容。
            switch (type) {
            case XmlPullParser.START_TAG:
                if ("weather".equals(parser.getName())) {
                    weatherLists = new ArrayList<Channel>();
                } else if ("channel".equals(parser.getName())) {
                    channel = new Channel();
                    String id = parser.getAttributeValue(0);
                    channel.setId(id);
                } else if ("city".equals(parser.getName())) {
                    String city = parser.nextText();
                    channel.setCity(city);
                } else if ("temp".equals(parser.getName())) {
                    String temp = parser.nextText();
                    channel.setTemp(temp);
                } else if ("wind".equals(parser.getName())) {
                    String wind = parser.nextText();
                    channel.setWind(wind);
                } else if ("pm250".equals(parser.getName())) {
                    String pm250 = parser.nextText();
                    channel.setPm250(pm250);
                }
                break;
            case XmlPullParser.END_TAG:
                if ("channel".equals(parser.getName())) {
                    weatherLists.add(channel);
                }
                break;
            }
            //重新给type赋值,parser.next()会解析下一个事件。
            type = parser.next();
        }
        return weatherLists;
    } catch (Exception e) {
        e.printStackTrace();
        return null;
    }
}
| 事件类型 | 含义 |
|---|---|
| XmlPullParser.START_TAG | 开始标签 如 |
| XmlPullParser.END_TAG | 结束标签 如 |
