Android基础第八篇
转载请标明出处:
http://blog.csdn.net/gj782128729/article/details/52446725;
本文出自:【高境的博客】
1. 广播接受者BroadCastReceiver
(1) 生活中的广播:
电台:发送一定频率的广播消息,50mhz
(2)生活中的接收者:
收音机:调整到一定频道,接收广播消息
(3)安卓中的广播:
安卓应用程序里面的电台:系统内置的一个服务,会把事件(电量不足、电量充满、开机启动完成、拨打电话、短信到来、SD卡挂载)作为一个广播消息发送给其他的接受者。
(4)安卓应用程序里面的收音机:
自己写的一个广播接收者的一个类。
(5)为什么需要广播:
谷歌开发广播接受者,为了方便程序员开发应用。
2. IP拨号器案例
该案例实现,拨打外地号码时,在号码前面自动加上ip账号17951。
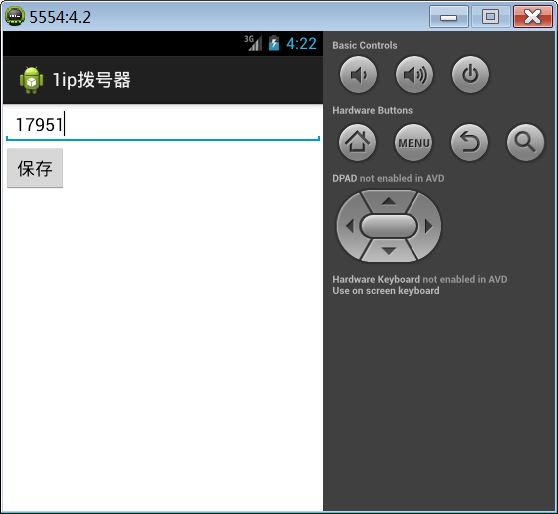
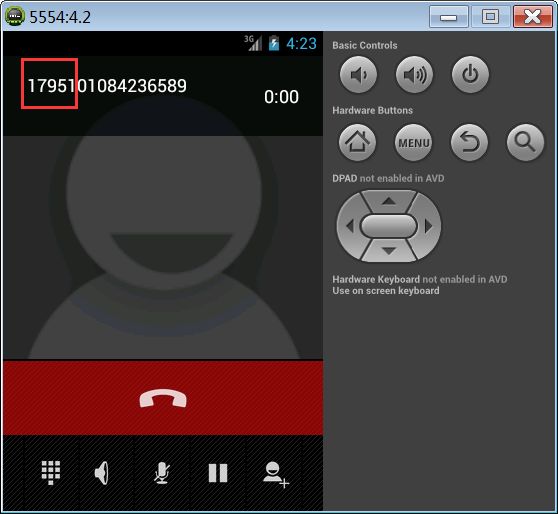
实现步骤:
(1)定义一个类继承BroadCastReceiver
(2)在清单文件中注册广播
(3)加上外拨电话的权限
点击保存按钮把我们输入的ip号码保存起来:
public class MainActivity extends Activity {
   private EditText et_number;
   private SharedPreferences sp;
   @Override
   protected void onCreate(Bundle savedInstanceState) {
       super.onCreate(savedInstanceState);
       setContentView(R.layout.activity_main);
       et_number = (EditText) findViewById(R.id.et_number);
       //获取SharedPareferences中的ipnumber,设置到EditText上
       sp = getSharedPreferences("config", 0);
       String number = sp.getString("ipnumber", "");
       et_number.setText(number);
   }
   public void click(View v) {
       //获取EditText中输入的ip号码,保存到SharedPreferences中
       String number = et_number.getText().toString().trim();
       sp.edit().putString("ipnumber", number).commit();
   }
}
定义广播接受者接收拨打电话的广播:
public class OutGoingCallReceiver extends BroadcastReceiver {
    //onReceive()方法当接收到外拨电话广播后执行该方法
    @Override
    public void onReceive(Context context, Intent intent) {
        //获取我们要拨打电话的号码
        String data = getResultData();
        //从SharedPreferences中获取到我们保存的ip号码,然后拼接成新的拨打号码
        SharedPreferences sp = context.getSharedPreferences("config", 0);
        String ipNumber = sp.getString("ipnumber", "");
        String newNumber = ipNumber + data;
        if (data.startsWith("0")) {
            //设置数据,通过调用setResultData()方法
            setResultData(newNumber);
        }
    }
}
在清单文件中注册广播接收者:
<receiver android:name="com.itheima.ipdail.OutGoingCallReceiver" >
      <intent-filter>
           //在intent-filter中加入action,注册外拨电话的事件。
           <action android:name="android.intent.action.NEW_OUTGOING_CALL" />
      intent-filter>
receiver>
由于这边使用了拨打电话,所以需要加上外拨电话的权限:
<uses-permission android:name="android.permission.PROCESS_OUTGOING_CALLS"/>
3. 短信监听器(重点)
本案例当接收到短信的时候,获取短信的发送者和短信内容。该案例分为两部分,第一部分是有界面的短信监听器,第二部分是没有见面的短信监听器。
3.1. 有界面短信监听器
定义一个广播接受者,用来接收短信到来的广播。
public class SmsReceiver extends BroadcastReceiver {
    @Override
    public void onReceive(Context context, Intent intent) {
        //通过intent.getExtras().get(“pdus”)方法获取短信数据集合
        //pdus:protocol data unit s 协议数据单元
        Object[] objects = (Object[]) intent.getExtras().get("pdus");
        for (Object object : objects) {
            //调用createFromPdu()方法得到SmsManage对象
            SmsMessage smsMessage = SmsMessage.createFromPdu((byte[])object);
            //获取短信的内容
            String messageBody = smsMessage.getMessageBody();
            //获取短信的发送者
            String smsSender = smsMessage.getOriginatingAddress();
            System.out.println("body:" + messageBody + "sms发送者:" + smsSender);
        }
    }
}
清单文件配置(高版本的adt中可能没有,需要手动加入):
<receiver android:name="com.itheima.smslistener.SmsReceiver" >
    <intent-filter>
         <action android:name="android.provider.Telephony.SMS_RECEIVED" />
    intent-filter>
receiver>
加入权限:
<uses-permission android:name="android.permission.RECEIVE_SMS" />如果将应用程序的进程给杀死,当收到应用程序中监听的广播时,应用的进程会自动开启。杀死应用程序进程如下图:
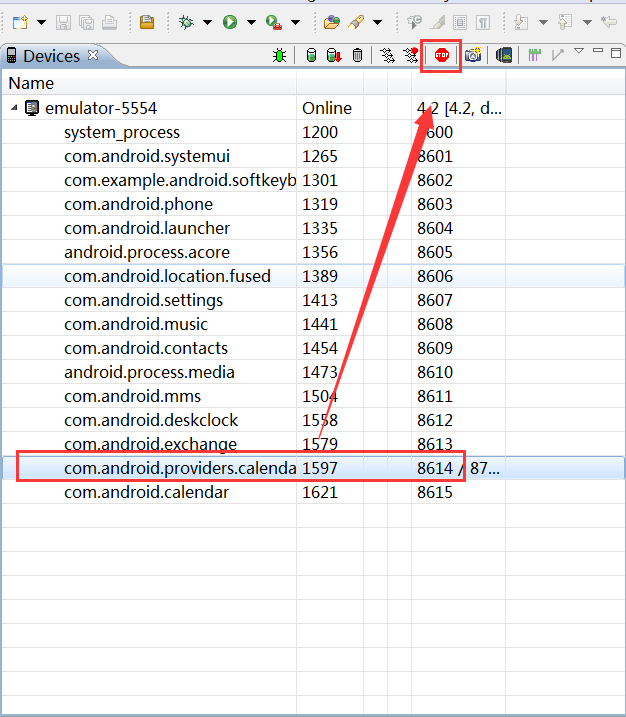
结论:即使广播接收者没有运行,当广播到达的时候,系统会自动启动广播接受者应用的进程,调用onReceive方法,接收广播。
3.2. 没有界面短信监听器
在清单文件中,将MainActivity的intent-filter配置删除掉,这样,系统就没有入口Activity(在应用程序设置页面可以查看到)。这时候发送短信,我们定义的广播接受者也会接收到广播,这样就非常的不安全。
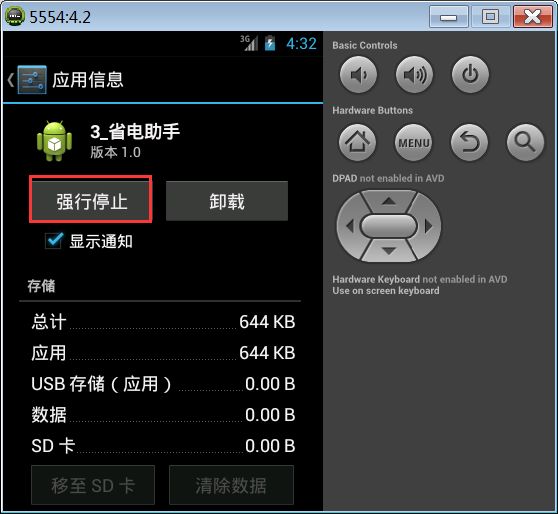
安卓4.0版本之后为了安全考虑,要求应用程序必须要有界面,必须被用户运行过一次,广播接受者才会生效。
安卓4.0版本的强行停止相当于冻结一个应用,一旦应用程序被用户强行停止了,广播接受者就不会生效了,直到用户手动打开这个应用程序为止。如下图:
4.0版本之前没有这样的安全设计。
4. SD卡状态监听
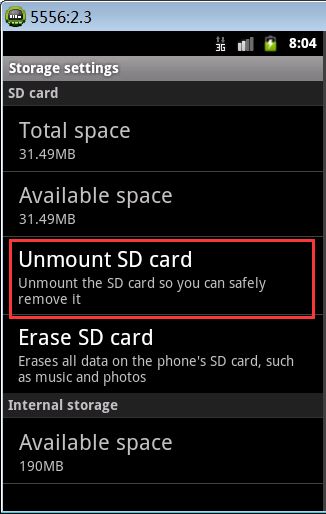
在设置页面Storage选项,点开之后会有Unmount SD card选项,当选择时会卸载SD card,当然之后选项会变成Mount SD card,选择之后会挂载SD卡。本案例实现监听SD卡挂载和卸载。

定义监听SD卡挂载和卸载的广播接收者:
public class SdCardStateReceiver extends BroadcastReceiver {
    @Override
    public void onReceive(Context context, Intent intent) {
        //intent.getAction()获取到当前广播类型。
        String action = intent.getAction();
        if ("android.intent.action.MEDIA_MOUNTED".equals(action)) {
            System.out.println("sd卡被挂载了..");
        } else if ("android.intent.action.MEDIA_UNMOUNTED".equals(action))
         {
            System.out.println("sd卡被卸载了!!!!!!");
        }
    }
}
清单文件注册:
<receiver android:name="com.itheima.sdcard.SdCardStateReceiver" >
    <intent-filter>
          <action android:name="android.intent.action.MEDIA_MOUNTED" />
          <action android:name="android.intent.action.MEDIA_UNMOUNTED" />
          <action android:name="android.intent.action.MEDIA_REMOVED" />

          <data android:scheme="file" />
     intent-filter>
receiver>
5. 开机启动
本案例实现对手机开机启动的广播的接收,当开启启动后,系统会发送开机启动的广播。
public class BootReceiver extends BroadcastReceiver {
    @Override
    public void onReceive(Context context, Intent intent) {
        Intent intent2 = new Intent(context,MainActivity.class);
        //告诉activity自己来维护任务栈,如果任务栈没有当前任务,就会重新创建一个任务放入任务栈
        intent2.setFlags(Intent.FLAG_ACTIVITY_NEW_TASK);
        context.startActivity(intent2);
    }
}
如不设置Intent的flats为新的任务栈,那么会出现如下错误:

清单文件注册
<receiver android:name="com.itheima.boot.BootReceiver" >
      <intent-filter>
            <action android:name="android.intent.action.BOOT_COMPLETED" />
      intent-filter>
receiver>
加入权限:
<uses-permission android:name="android.permission.RECEIVE_BOOT_COMPLETED"/>
场景:医院护士使用pad安装游戏,pad一重启就跳到自带软件应用。勒索软件,屏蔽掉按键。
6. 应用卸载安装
本案例实现接收应用程序卸载和安装的广播,当应用程序被卸载或者安装时,系统会发送响应的广播。
public class AppStateReceiver extends BroadcastReceiver {
    @Override
    public void onReceive(Context context, Intent intent) {
        //获取广播事件类型
        String action = intent.getAction();
        if ("android.intent.action.PACKAGE_ADDED".equals(action)) {
            System.out.println("有应用被安装了");
        }else if("android.intent.action.PACKAGE_REMOVED".equals(action)){
            System.out.println("应用卸载了");
        }
    }
}
清单文件注册
<receiver android:name="com.itheima.appstate.AppStateReceiver" >
     <intent-filter>
          <action android:name="android.intent.action.PACKAGE_REMOVED" />
          <action android:name="android.intent.action.PACKAGE_ADDED" />

          <data android:scheme="package" />
      intent-filter>
receiver>
7. 发送接收自定义广播
在开发中,开发人员常常需要根据需求自定义广播,当某些条件达到时发送自定义的广播,或者接收自定义的广播。
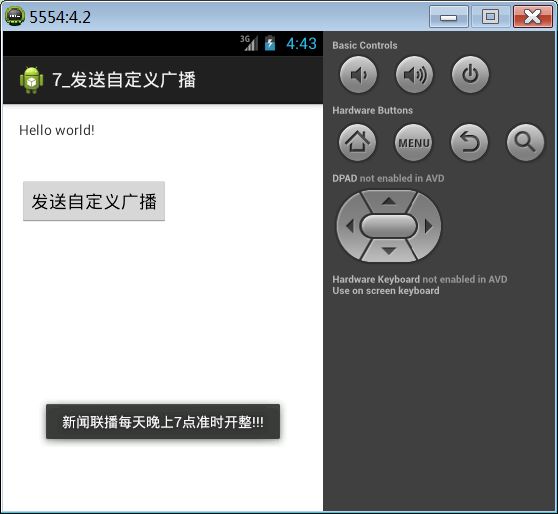
发送自定义广播:
public void click(View v) {
    Intent intent = new Intent();
    intent.setAction("com.itheima.custom");
    intent.putExtra("name", "新闻联播每天晚上7点准时开整!!!");
    // 调用Context对象的sendBroadcast()方法发送无序广播
    sendBroadcast(intent);
}
接收自定义广播:
public class CustomReceiver extends BroadcastReceiver {
    @Override
    public void onReceive(Context context, Intent intent) {
        String content = intent.getStringExtra("name");
        Toast.makeText(context, content, 1).show();
    }
}
在清单文件中注册:
<receiver android:name="com.itheima.receivecustombroadcast.CustomReceiver" >
   <intent-filter>
        <action android:name="com.itheima.custom" />
   intent-filter>
receiver>
8. 有序广播和无序广播
8.1. 有序广播
当广播把消息发送出去后,消息会根据广播接收者的优先级从高到低一级一级地下发消息。
可以拦截消息,也可以修改消息。
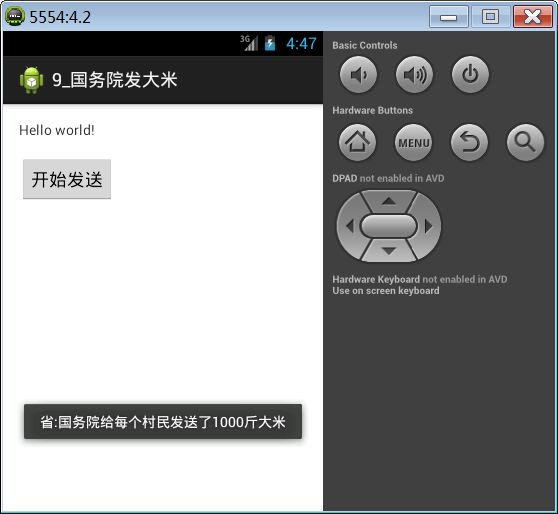
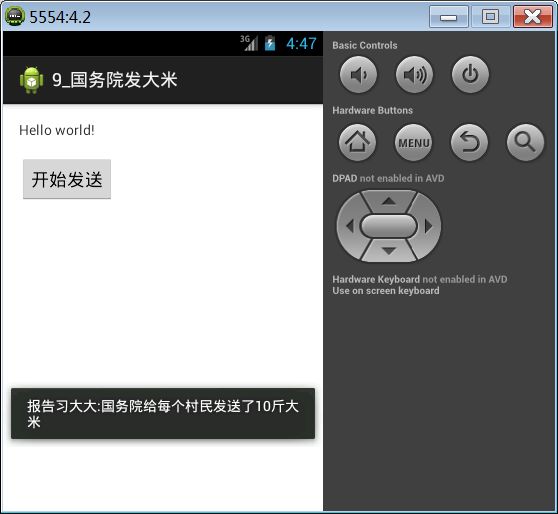
案例:模拟国务院发大米发送广播,下面各省市县接收大米。
public void click(View v){
    Intent intent = new Intent();
    intent.setAction("com.itheima.rice");
    //发送一条有序广播
    sendOrderedBroadcast(intent, null, new FinalReceiver(), null, 1, "国务院给每个村民发送了1000斤大米", null);
}
sendOrderedBroadcast()方法参数如下:
| 参数 | 含义 |
|---|---|
| intent | 意图 |
| receiverPermission | 接收的权限,如不需要权限传null |
| resultReceiver | 最终的接收者 |
| scheduler | 自定义的handler来执行最终接受者的回调,如果为null,则在主线程中执行。 |
| initialCode | 初始码,通常为Activity.RESULT_OK |
| initialData | 初始化的数据 |
| initialExtras | 初始化的结果的额外值,通常为null。 |
参数最终接受者FinalReceiver:
public class FinalReceiver extends BroadcastReceiver {
    @Override
    public void onReceive(Context context, Intent intent) {
        String resultData = getResultData();
        Toast.makeText(context, "报告习大大:"+resultData, 1).show();
    }
}
下面是省市县各级接收大米广播:
省的广播接收者:
public class ProvinceReceiver extends BroadcastReceiver {
    @Override
    public void onReceive(Context context, Intent intent) {
        String content = getResultData();
        Toast.makeText(context, "省:"+content, 0).show();
        //abortBroadcast()方法用来终止广播,如果调用了该方法,下面的广播接受者都不会接收到该广播
        //abortBroadcast();
        //设置结果数据,次数据会传递给接下来的广播接受者
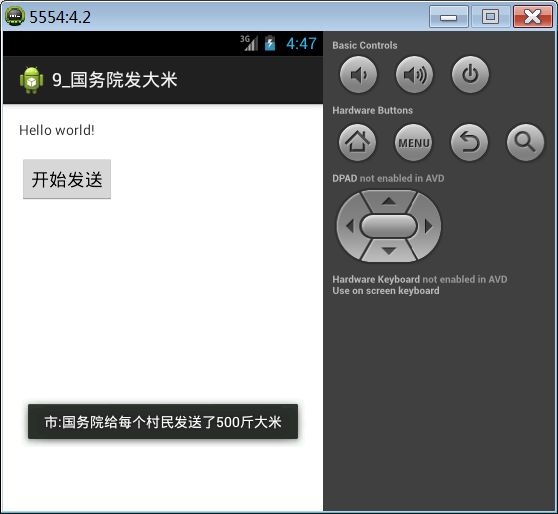
        setResultData("国务院给每个村民发送了500斤大米");
    }
}
注册清单文件:
<receiver android:name="com.itheima.receiverice.ProvinceReceiver" >
     <intent-filter android:priority="10000" >
           <action android:name="com.itheima.rice" />
     intent-filter>
receiver>
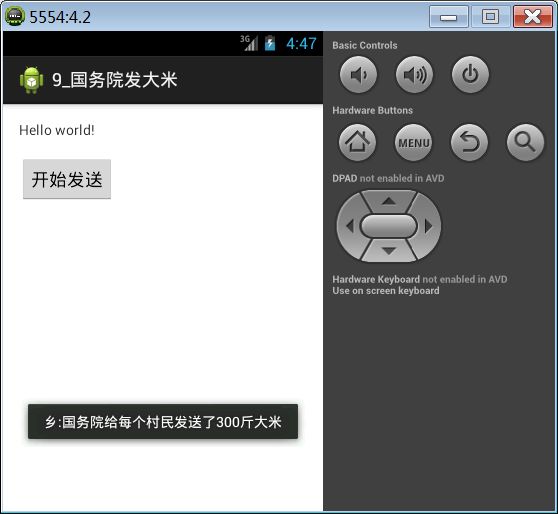
其余的市的广播接受者和县的广播接受者和省的广播接受者类似,不同之处在于清单文件中关于优先级的配置,优先级越高越先接收到广播。
<intent-filter android:priority="10000" >8.2. 无序广播
广播接收者只要注册接收相应的事件类型,就能接收到的广播。
//发送一个广播消息(无序广播)
sendBroadcast(intent);
9. Android样式和主题
共同点:定义的方式一样
不同点:作用范围不一样 主题给Application Activity设置,作用范围比较大
Style 作用范围比较窄,一般用在控件上,如TextView、Button。
9.1. 样式
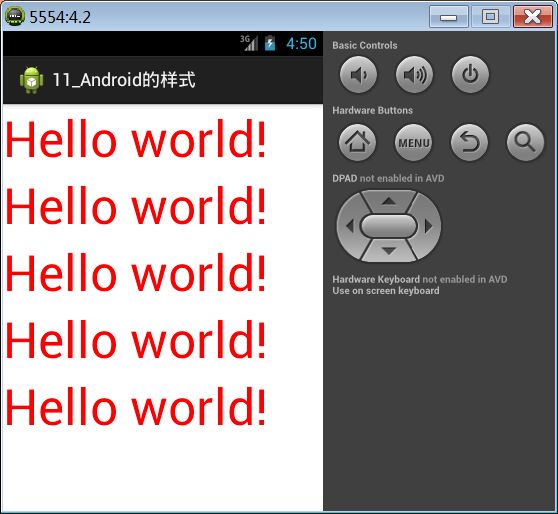
如果很多控件有相同的属性特点,比如说TextView的字体颜色,字体大小等属性一样,那么我们可以将这些相同的属性抽取出来变成Style样式。
"@style/mystyle"
      android:layout_width="wrap_content"
      android:layout_height="wrap_content"
      android:text="@string/hello_world" />
"@style/mystyle"
      android:layout_width="wrap_content"
      android:layout_height="wrap_content"
      android:text="@string/hello_world" />
"@style/mystyle"
      android:layout_width="wrap_content"
      android:layout_height="wrap_content"
      android:text="@string/hello_world" />
 "@style/mystyle"
      android:layout_width="wrap_content"
      android:layout_height="wrap_content"
      android:text="@string/hello_world" />
 "@style/mystyle"
      android:layout_width="wrap_content"
      android:layout_height="wrap_content"
      android:text="@string/hello_world" />
样式的定义我们需要在res目录下的values目录中的styles.xml文件中定义:
9.2. 主题
主题是给Application Activity使用的,首先查看默认的Application的主题:

可以看出应用程序默认使用的是AppTheme主题,我们继续查看AppTheme主题的具体内容:
<style name="AppTheme" parent="AppBaseTheme">

</style>
通过AppTheme可以看出,AppTheme的父类是AppBaseTheme,这时候我们可以继续查看AppBaseTheme:

继续往下看,我们就看到了android:Theme.Light主题,这是安卓系统自定义的主题,我们可以继续看:
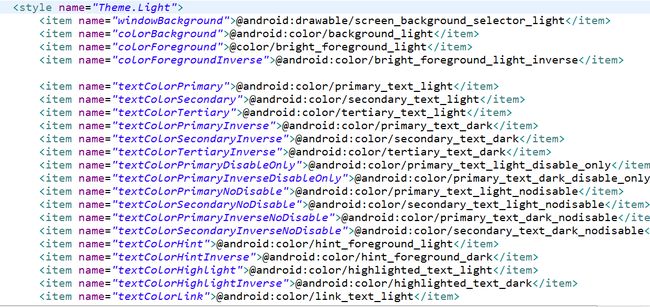
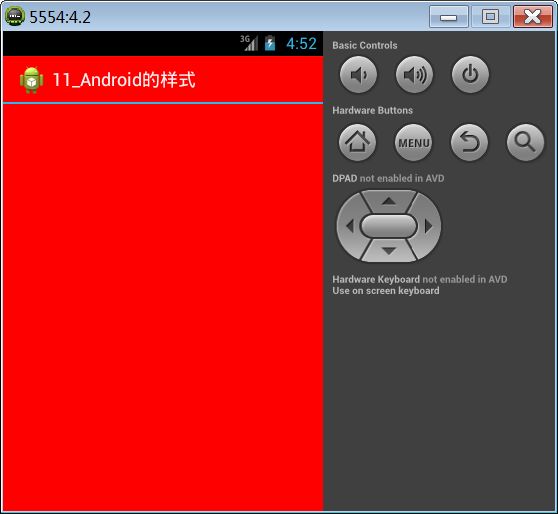
可以看到,在系统定义的android:Theme.Light主题中,对各种属性做了定义。所以我们也可以自定义我们喜欢的主题mytheme:
<style name="mytheme">
     <item name="android:background">#ff0000item>
style>
在我们的AndroidMainfest.xml中对application的theme做如下配置:
"true"
    android:icon="@drawable/ic_launcher"
    android:label="@string/app_name"
    android:theme="@style/mytheme" >
10. 应用程序国际化
应用程序国际化,通常简称I18n。国际化的目的就是为了让开发的应用尽可能被更多的用户使用。
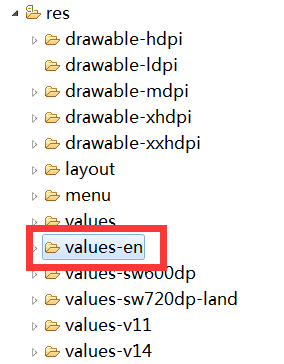
在res目录下创建每个国家国际化对应的文件夹,以英文为例。然后为每个string设置不同的语言。

11. 帧动画
看doc文档,Animation and Graphics中的Drawable Animation。其中介绍了如何使用帧动画。
步骤:
(1) 在res目录下创建res/drawable目录
(2) 在这个目录下创建一个xml文件,类型为animation-list
<animation-list xmlns:android="http://schemas.android.com/apk/res/android"
    android:oneshot="false">
    <item android:drawable="@drawable/girl_1" android:duration="200" />
    <item android:drawable="@drawable/girl_2" android:duration="200" />
    <item android:drawable="@drawable/girl_3" android:duration="200" />
    <item android:drawable="@drawable/girl_4" android:duration="200" />
    <item android:drawable="@drawable/girl_5" android:duration="200" />
    <item android:drawable="@drawable/girl_6" android:duration="200" />
    <item android:drawable="@drawable/girl_7" android:duration="200" />
    <item android:drawable="@drawable/girl_8" android:duration="200" />
    <item android:drawable="@drawable/girl_9" android:duration="200" />
    <item android:drawable="@drawable/girl_10" android:duration="200" />
    <item android:drawable="@drawable/girl_11" android:duration="200" />
animation-list>
参数drawable就是我们每一帧要显示的图片,duration参数代表间隔多长时间显示。
(3) 代码:
final ImageView iv = (ImageView) findViewById(R.id.iv);
iv.setBackgroundResource(R.drawable.anim);
    new Thread() {
        public void run() {
            try {
                Thread.sleep(50);
            } catch (InterruptedException e) {
                e.printStackTrace();
            }
            AnimationDrawable rocketAnimation = (AnimationDrawable)iv.getBackground();
            rocketAnimation.start();
        };
}.start();
在2.3手机上没有效果,因为AnimationDrawable rocketAnimation = (AnimationDrawable) iv.getBackground();是耗时操作,需要在子线程里面。
12. 补间动画
12.1. 透明动画
public void click1(View v){
    //第一个参数代表初始值,第二个参数代表结束值。1.0代表完全不透明,0.0代表完全透明,取值范围在0.0~1.0
    AlphaAnimation aa = new AlphaAnimation(1.0f, 0.0f);
    //设置动画的时间
    aa.setDuration(3000);
    //设置动画重复次数
    aa.setRepeatCount(1);
    //设置动画重复的模式
    aa.setRepeatMode(AlphaAnimation.REVERSE);
    //开启动画
    iv_icon.startAnimation(aa);
}
重复模式参数:
| 参数 | 含义 |
|---|---|
| RESTART | 动画重新开始 |
| REVERSE | 动画颠倒 |
12.2. 旋转动画
public void click2(View v){
    RotateAnimation ra = new RotateAnimation(0, 360,Animation.RELATIVE_TO_SELF, 0.5f, Animation.RELATIVE_TO_SELF, 0.5f);
    ra.setDuration(3000);
    ra.setRepeatCount(1);
    ra.setRepeatMode(AlphaAnimation.REVERSE);
    iv_icon.startAnimation(ra);
}
创建旋转动画;其中各个参数含义:
| 参数 | 含义 |
|---|---|
| fromDegrees | 初始的角度 |
| toDegrees | 旋转到的角度 |
| pivotXType | 指定x旋转参照 Animation.ABSOLUTE, Animation.RELATIVE_TO_SELF, Animation.RELATIVE_TO_PARENT |
| pivotXValue | 指定x旋转参照的值 |
| pivotYType | 指定y旋转参照 Animation.ABSOLUTE,Animation.RELATIVE_TO_SELF, Animation.RELATIVE_TO_PARENT |
| pivotYValue | 指定y旋转参照的值 |
12.3. 缩放动画
public void click3(View v){
    ScaleAnimation  sa = new ScaleAnimation(0.1f, 2.0f, 0.1f, 2.0f,Animation.RELATIVE_TO_SELF, 0.5f, Animation.RELATIVE_TO_SELF, 0.5f);
    sa.setDuration(3000);
    sa.setRepeatCount(1);
    sa.setRepeatMode(AlphaAnimation.REVERSE);
    iv_icon.startAnimation(sa);
}
创建缩放动画ScaleAnimation实例,参数的含义:
| 参数 | 含义 |
|---|---|
| fromX | 应用在动画开始水平方向的位置 |
| toX | 应用在动画结束水平方向的位置 |
| fromY | 应用在动画开始竖直方向的位置 |
| toY | 应用在动画开始竖直方向的位置 |
| pivotXType | 指定x缩放参照 Animation.ABSOLUTE, Animation.RELATIVE_TO_SELF, Animation.RELATIVE_TO_PARENT |
| pivotXValue | 指定x缩放参照的值 |
| pivotYType | 指定y缩放参照 Animation.ABSOLUTE, Animation.RELATIVE_TO_SELF, Animation.RELATIVE_TO_PARENT |
| pivotYValue | 指定y缩放参照的值 |
12.4. 位移动画
public void click4(View v){
    TranslateAnimation ta = new TranslateAnimation(Animation.RELATIVE_TO_PARENT, -0.5f,Animation.RELATIVE_TO_PARENT, 0.5f,Animation.RELATIVE_TO_PARENT, -0.5f, Animation.RELATIVE_TO_PARENT, 0.5f);
    ta.setDuration(3000);
    ta.setRepeatCount(1);
    ta.setRepeatMode(AlphaAnimation.REVERSE);
    iv_icon.startAnimation(ta);
}
创建位移动画TranslateAnimation的实例,参数的含义:
| 参数 | 含义 |
|---|---|
| fromXType | 指定fromXValue如何解释 |
| fromXValue | 在动画开始时应用在x坐标的变化 |
| toXType | 指定toXValue如何解释 Animation.ABSOLUTE Animation.RELATIVE_TO_SELF Animation.RELATIVE_TO_PARENT |
| toXValue | 在动画结束时应用在x坐标的变化 |
| fromYType | 指定fromYValue如何解释 Animation.ABSOLUTE Animation.RELATIVE_TO_SELF Animation.RELATIVE_TO_PARENT |
| fromYValue | 在动画开始时应用在y坐标的变化 |
| toYType | 指定toYValue如何解释 Animation.ABSOLUTE Animation.RELATIVE_TO_SELF Animation.RELATIVE_TO_PARENT |
| toYValue | 在动画开始时应用在y坐标的变化 |
12.5. 动画合集
动画合集就是一组动画组成的动画。如同时进行缩放、旋转、位移动画。
public void click5(View v){
    AnimationSet set = new AnimationSet(false);
    ScaleAnimation  sa = new ScaleAnimation(0.1f, 2.0f, 0.1f,2.0f,Animation.RELATIVE_TO_SELF,0.5f,Animation.RELATIVE_TO_SELF,0.5f);
    sa.setDuration(3000);
    sa.setRepeatCount(1);
    sa.setRepeatMode(AlphaAnimation.REVERSE);
    RotateAnimation ra = new RotateAnimation(0, 360,Animation.RELATIVE_TO_SELF,0.5f,Animation.RELATIVE_TO_SELF, 0.5f);
    ra.setDuration(3000);
    ra.setRepeatCount(1);
    ra.setRepeatMode(AlphaAnimation.REVERSE);
    TranslateAnimation ta = new TranslateAnimation(Animation.RELATIVE_TO_PARENT,-0.5f,Animation.RELATIVE_TO_PARENT,0.5f,Animation.RELATIVE_TO_PARENT,-0.5f,Animation.RELATIVE_TO_PARENT,0.5f);
    ta.setDuration(3000);
    ta.setRepeatCount(1);
    ta.setRepeatMode(AlphaAnimation.REVERSE);
    set.addAnimation(sa);
    set.addAnimation(ta);
    set.addAnimation(ra);
    iv_icon.startAnimation(set);
}
13. 对话框合集
13.1. 普通对话框
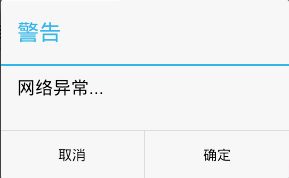
public void click1(View v) {
    //创建弹出对话框AlertDiaolog.Builder对象
    AlertDialog.Builder builder = new Builder(MainActivity.this);
    //设置对话框的标题
    builder.setTitle("警告");
    //设置对话框的提示消息
    builder.setMessage("网络异常...");
    //设置对话框的右边按钮,参数1代表按钮的文字,参数2代表点击按钮后的回调
    builder.setPositiveButton("确定", new OnClickListener() {
        @Override
        public void onClick(DialogInterface dialog, int which) {
            System.out.println("点击了确定按钮");
        }
    });
    //设置对话框的坐标按钮,参数1代表按钮的文字,参数2代表点击按钮后的回调
    builder.setNegativeButton("取消", new OnClickListener() {
        @Override
        public void onClick(DialogInterface dialog, int which) {
        }
    });
    //需要调用builder.show()方法才能将对话框显示
    builder.show();
}
注意1:普通对话框点击按钮后,会自动关闭对话框。
注意2:在创建对话框实例时,需要传入上下文,这里不能传getApplicationContext(),否则会报以下错误:
03-13 09:20:44.971: E/AndroidRuntime(2316): Caused by: android.view.WindowManager$BadTokenException: Unable to add window -- token null is not for an application那么这边this代表的Activity和this.getApplicationContext()有什么区别呢?
getApplicationContext()返回应用的上下文,生命周期是整个应用,应用摧毁它才会摧毁,而Activity.this的context返回的是当前activity的上下文,属于activity,activity销毁它就销毁。AlertDialot对象依赖于一个View,而View是和一个Activity对应的,AlertDialog的生命周期是和Activity想关联的,Activity销毁它也销毁,不会存在。但是如果传入getApplicationContext(),表示它的生命周期是整个应用程序,这显然超过了它的生命周期。
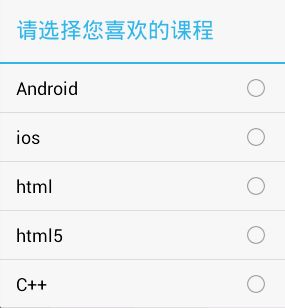
13.2. 单选对话框
public void click2(View v) {
    //创建弹出对话框AlertDiaolog.Builder对象
    AlertDialog.Builder builder = new Builder(MainActivity.this);
    //设置对话框的标题
    builder.setTitle("请选择您喜欢的课程");
    //定义出单选条目的数据
    final String[] items = { "Android", "ios", "html", "html5", "C++" };
    //设置单选对话框单选项,参数1位单选条目的数据,参数2是默认选择的条目(-1代表不选中任何一项),参数3是点击单选项条目后的回调
    builder.setSingleChoiceItems(items, -1, new OnClickListener() {
        @Override
        public void onClick(DialogInterface dialog, int which) {
            String content = items[which];
            Toast.makeText(getApplicationContext(), content, 1).show();
            // dialog.dismiss()方法用来关闭对话框
            dialog.dismiss();
        }
    });
    builder.show();
}
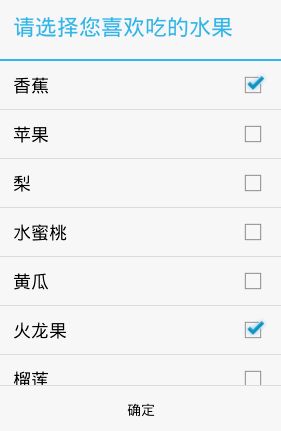
13.3. 多选对话框
public void click3(View v) {
    //创建弹出对话框AlertDiaolog.Builder对象
    AlertDialog.Builder builder = new Builder(MainActivity.this);
    //设置对话框的标题
    builder.setTitle("请选择您喜欢吃的水果");
    //设置多选对话框的选项数据
    final String[] items = { "香蕉", "苹果", "梨", "水蜜桃", "黄瓜", "火龙果", "榴莲" };
    //定义默认选择的选项
    final boolean[] checkedItems = { true, false, false, false, false, true, false };
    //设置多选项,参数1是多选项数据,参数2是默认选择的项,参数3传入多选项选择监听
    builder.setMultiChoiceItems(items, checkedItems, new
     OnMultiChoiceClickListener() {
        @Override
        public void onClick(DialogInterface dialog, int which, boolean
         isChecked) {
            checkedItems[which] = isChecked;
        }
    });
    //设置确定按钮,参数1是按钮文字,参数2是按钮点击监听
    builder.setPositiveButton("确定", new OnClickListener() {
        @Override
        public void onClick(DialogInterface dialog, int which) {
            StringBuffer sb = new StringBuffer();
            //遍历选择checkedItems,如果是true,那么说明这个选项是选择的,所以我们根据当前遍历的角标获取响应选项数据中的内容
            for (int i = 0; i < checkedItems.length; i++) {
                if (checkedItems[i]) {
                    String fruit = items[i];
                    sb.append(fruit + " ");
                }
            }
            Toast.makeText(getApplicationContext(), sb.toString(),1).show();
        }
    });
    builder.show();
}
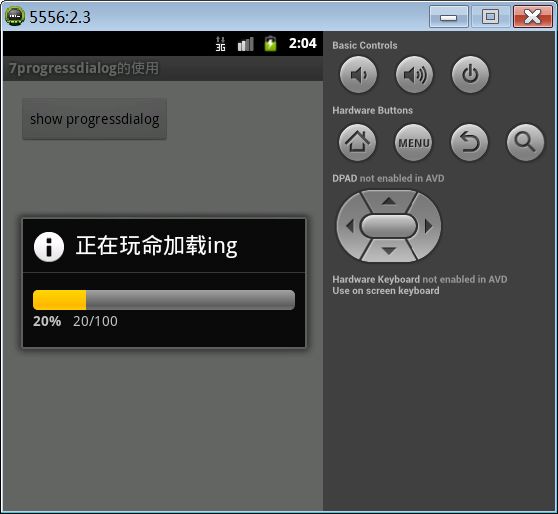
13.4. ProgressDialog
public class MainActivity extends Activity {
    @Override
    protected void onCreate(Bundle savedInstanceState) {
        super.onCreate(savedInstanceState);
        setContentView(R.layout.activity_main);
    }
    public void click(View v) {
        //创建ProgressDialog实例
        final ProgressDialog dialog = new ProgressDialog(MainActivity.this);
        //设置标题
        dialog.setTitle("正在玩命加载ing");
        //设置ProgressDialog的样式是横向的样式
        dialog.setProgressStyle(ProgressDialog.STYLE_HORIZONTAL);
        new Thread() {
            public void run() {
                //设置ProgressDialog的最大进度
                dialog.setMax(100);
                for (int i = 0; i <= 100; i++) {
                    try {
                        Thread.sleep(50);
                    } catch (InterruptedException e) {
                        e.printStackTrace();
                    }
                    //设置ProgressDialog的进度
                    dialog.setProgress(i);
                }
                // 关闭对话框
                dialog.dismiss();
            };
        }.start();
        dialog.show();
    }
}
ProgressDialog可以在子线程当中更新进度。
