背景
使用Visual Studio 2010 Test Project创建我们的automation test case时,预定义的TestClassAttribute可能会有以下局限:
假设某些automation test case要求在version 1.0下跑;某些要求在version 1.1下跑,或在不同的环境下执行不同的case,预定义的TestClassAttribute不能在运行中自动决定某些case是否可以run,某些是否不能run(至少现在我没找到解决方法)。
但Microsoft提供了一些类库可供我们自定义TestClassAttribute,从而实现以上目的。
[转]http://blogs.msdn.com/b/vstsqualitytools/archive/2009/09/04/extending-the-visual-studio-unit-test-type-part-1.aspx
代码下载地址:http://archive.msdn.microsoft.com/UnitTestExtendSample/Release/ProjectReleases.aspx?ReleaseId=4030
源blog以Visual Studio 2008为例,下面改成Visual Studio 2010. 源代码在VS2010上实验通过。
In Visual Studio 2010, if you wanted to create your own test type, or provide additional functionality that existing test types did not, one would have to create one from scratch. We provided a sample which was available in the Software Development Kit, but it was somewhat inconvenient and just plain hard to implement.
As part of new functionality that was introduced in the upcoming release of Visual Studio, we have provided the ability to extend the built-in unit test type.
The Finished Product
I want to begin, at the end, asking the question, “What can I do with this extensibility?”
1. The new Coded UI Test is a test type extension: As you look at what that test type is capable of, then you can imagine that “the sky is the limit”. You can create your own Sql Server Test Type, or even one that can run testing your use of many other applications such as Oracle®.
2. Add that extra functionality that doesn’t exist in Unit Test Type: You can write a test type that will provide a way to add a row of data and parameterize the test method function, look up the bug database to determine if a caught exception was already filed, or, as we will show in this example, perform impersonation.
Run As Extension : Test Class
This is the end result of our RunAs extension.
I have at the top a Traditional Test Class and Test Method. The test method calls a function that writes to my windows directory (c:\windows). Since I am an administrator to my machine, the test will pass.
My second test, I have a test class but the attribute for the test class is now a "[RunAsTestClass]”. This will call my test type extension and use the code I have written to execute the test. I create a test property called “RunAsNormalUser” and set it to “true”. Now, when I run the test, I get a failure.
Opening the results, I see that the highlighted text says that Access to the path ‘…’ is denied.
In the Debug Trace, we are creating an account called DemoUser. This account is a standard user. We then impersonate that user and execute the test. Since the user does not have permission to write to the c:\windows directory, the test fails, as expected!
On the flip side, we can do exactly the opposite. We could be running our test framework as a normal user, and then impersonate an administrator. You would need to pre-create the administrator account, but it is very possible to run tests in as an elevated user.
So lets see what I need to do to implement this.
Run As Extension : References
So with any extension, you need to add the correct references.
There are three assemblies that you need.
They are:
- Microsoft.VisualStudio.QualityTools.Common.dll
- Microsoft.VisualStudio.QualityTools.UnitTestFramework.dll
- Microsoft.VisualStudio.QualityTools.Vsip.dll (located in C:\Windows\Microsoft.Net\assembly\GAC_MSIL\Microsoft.VisualStudio.QualityTools.Vsip\v4.0_10.0.0.0__b03f5f7f11d50a3a)
The first two assemblies you need are found in the Add References dialog under the .NET tab
Once you have the assemblies referenced it should look something like this:
With your assemblies referenced, you can start creating your files.
Run As Test Type Extension : RunAsTestClassAttribute.cs file
The first file is the RunAsTestClassAttribute.cs file
This file does the following:
- Inherits from TestClassExtensionAttribute: This is the attribute that will replace the [TestClass] attribute in our test project (see Run As Extension : Test Class)
- Uniquely identifies this attribute with a Uri: We can give it any unique name, in our case, we return “urn:Microsoft.RunAsAttribute”.
- Returns the TestExtensionExecution implementation: This will hold the code we write to make the test do what we want. (see Run As Test Type Extension : RunAsTestExtensionExecution.cs file)
- Returns the ClientSide impementation: This will hold the code we write to provide UI for our test type. For interest of space on this blog, we will not implement this at this time and will do so in future blogs.
Full code for this class is at the end of the blog
Run As Test Type Extension : RunAsTestExtensionExecution.cs file
The second file is RunAsTestExtensionExecution.cs. Here is the screenshot of this file.
This file does the following:
- Inherits from TestExtensionExecution: This allows us to initialize our test and anything that we need for our test type extension to run. It also provides us a way to cleanup or dispose of any objects or environment items we create during initialize.
- Returns the ITestMethodInvoker implementation: This will return a class that will contain the code that will do the impersonation and execute the test (see Run As Test Type Extension : RunAsTestMethodInvoker.cs file)
Full code for this class is at the end of the blog
Run As Test Type Extension : RunAsTestMethodInvoker.cs file
The third file is RunAsTestMethodInvoker.cs. Here is the screenshot of this file.
This file does the following:
- Implements from ITestMethodInvoker: This will contain the code that will do the impersonation and execute the test. We will dive into this code in just a bit.
- Contains the constructor for the class that takes a TestMethodInvokerContext: This gives us information about and a pointer to the actual test being executed. We can also get test properties, and gather custom attributes from off the function using reflection.
- Implements the Invoke method: This is the function that will be called when a test is run and contains the code to impersonate the user and call the underlying test method.
- Contains some different member variables we will use in our invoke method.
Full code for this class is at the end of the blog
Lets take a look at the Invoke method
- First of all, we trace out a bit of information, beginning with the current WindowsIdentity.
- We look at the “RunAsNormalUser” test property which we set back in our unit test and get the value for that property.
- If the property is true, we create an account, using the member variables in the class, and impersonate the user, using some additional classes we have created. Full code for these classes are at the end of the blog.
- We then invoke the method and unimpersonate the user in a try…finally block.
And that is it.
Run As Test Type Extension : Registering your test type extension
To make it all work you now need to place your test type extension assembly in the correct location and register your test type in the registry.
Location: The location of your test type, and your PDB if you want, needs to be in the PrivateAssemblies location; the same one that contains the assemblies that we referenced in the beginning
Registry: The test type needs to be in the following key:
[HKEY_LOCAL_MACHINE\SOFTWARE\Microsoft\VisualStudio\10.0\EnterpriseTools\QualityTools\TestTypes\{13cdc9d9-ddb5-4fa4-a97d-d965ccfc6d4b}\TestTypeExtensions\DemoTestClassAttribute]
The registry entry is a string called “AttributeProvider” and will contain your attribute and the name of your assembly. "AttributeProvider"="DemoExtension.RunAs.RunAsTestClassAttribute, DemoExtension"
There is a second location that is usually populated when you start Visual Studio. It is located under the following key: (NOTE the bolded text for the differences in the two keys)
[HKEY_CURRENT_USER\SOFTWARE\Microsoft\VisualStudio\10.0_Config \EnterpriseTools\QualityTools\TestTypes\{13cdc9d9-ddb5-4fa4-a97d-d965ccfc6d4b}\TestTypeExtensions\DemoTestClassAttribute] "AttributeProvider"="DemoExtension.RunAs.RunAsTestClassAttribute, DemoExtension"
I place the second key in manually because sometimes it doesn’t do it for me straight away and I get impatient and cannot wait for the key to be updated. The full registry file can be found at the end of the blog as RunAsExtension.reg
FINAL REGISTRY NOTE: If you are on an x64 machine, the registry key will be under the Wow6432Node as in HKEY_LOCAL_MACHINE\SOFTWARE\Wow6432Node\Microsoft…
FINAL LOCATION NOTE: If you are on an x64 machine, the location key will be under the Program Files(x86) folder.
WORKING WITH VS NOTE: Because the test type is loaded within Visual Studio, developing the test type in addition to testing it poses problems when you need to update the test type extension assembly. To make this work so you can develop in one instance of Visual Studio and test in a separate instance of Visual Studio, you can use the Visual Studio Development Experimental Model found here
Summary
This is just the beginning. In future blogs we will show additional functionality including implementing a UI and parameterzing your test method. As it stands, you can start experimenting with the code and add different functionality. You can initialize anything you want in the TestExtensionExecution and your Invoke method can be customized to suit your needs.
回答开头提出的问题:如何在不同的version下执行不同的case? 下面列出一解决方案:
1. 在示例代码的基础上在RunAsTestClass里添加2个test case,并分别加属性[TestProperty("Version", "V1.0")], [TestProperty("Version", "V1.1")]
[TestMethod]
[TestProperty("Version", "V1.0")]
public void TestV10()
{
  //Add test code here
}

[TestMethod]
[TestProperty("Version", "V1.1")]
public void TestV11()
{
}
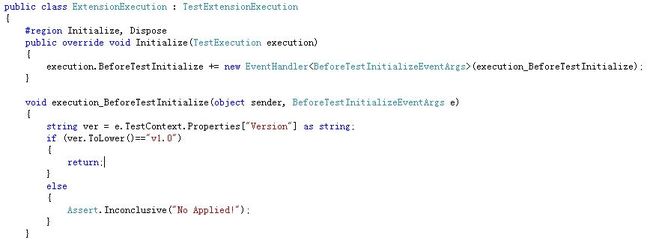
2. 在ExtensionExecution class的Initialize方法里添加execution_BeforeTestInitialize事件处理程序。在execution_BeforeTestInitialize方法里判断test case的Version属性值是不是V1.0, 如果是,则继续执行test case;若不是,则把这个case标记为Inconclusive
3. 执行结果如下:
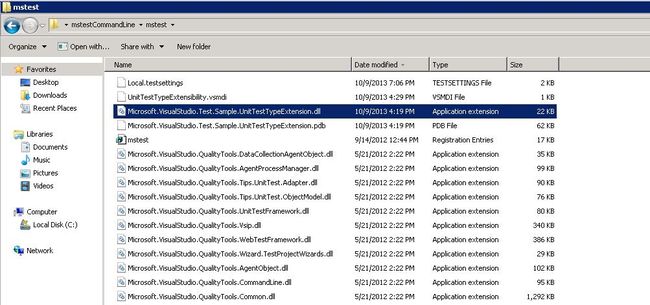
4. 若用mstest来执行这些case, 除了按照http://www.cnblogs.com/jenneyblog/archive/2012/09/14/mstestcommandline.html中列出的步骤外,还需要把UnitTestTypeExtension.dll与UnitTestTypeExtension.pdb放到C:\Users\UserName\Desktop\mstestCommandLine\mstest路径下
5. 示例代码中各个类、函数的执行顺序:
RunAsTestClassAttribute-----------------------------
private static readonly Uri m_uri
GetExecution()
GetExecution()
ExtensionExecution----------------------------------
Initialize()
XXXXXTestClass--------------------------------------
static parameters
ClassInitialize()
ExtensionExecution----------------------------------
execution_BeforeTestInitialize()
XXXXXTestClass--------------------------------------
TestInitialize()
RunAsTestClassAttribute-----------------------------
GetExecution()
GetExecution()
ExtensionExecution----------------------------------
CreateTestMethodInvoker()
ExtensionMethodInvoker------------------------------
ExtensionMethodInvoker()
ExtensionExecution----------------------------------
CreateTestMethodInvoker()
ExtensionMethodInvoker------------------------------
Invoke()
RunAsTestClassAttribute-----------------------------
GetExecution()
GetExecution()
ExtensionExecution----------------------------------
Dispose()


