uboot移植(五)移植 u-boot-spl.bin
u-boot-2014.04/arch/arm/cpu/armv7/start.S 开始,同时在链接脚本文件中指定了程序的入口函数


start.S 首先安装了异常向量表, 执行第 1 条指令,然后跳转到这里:

接在往下执行到: 
这里有个判断,如果没有定义 CONFIG_SKIP_LOWLEVEL_INIT 这个宏,则进行一些底层的初始化(不
跳过底层初始化),其中 cpu_init_crit 又调用了 lowlevel_init,这个函数在
u-boot-2014.04/board/samsung/smdkv210/lowlevel_init.S 中定义,我们可以在里面进行时钟、内存等
底层的初始化。
然后跳转到函数_main, 这个函数在 u-boot-2014.04/arch/arm/lib/crt0.S 中定义, crt 即 C Run-time 
ENTRY(_main)展开即为:
.globl _main;
ALIGN;
_main:
接着调用函数 board_init_f,这个函数在 u-boot-2014.04/arch/arm/lib/board.c 中定义, 进行一些基本
的硬件初始化,为进入 DRAM 内存运行做准备,然后继续往下执行 
这里调用 relocate_code,重定位,将 u-boot 搬运到 DRAM 内存

这里执行清 BSS 操作,然后把函数 board_init_r 的链接地址赋给 PC 指针,直接跳转到 DRAM 内存运
行,在 board_init_r 继续执行一些硬件初始化,最终执行到这里 
指定的延时时间内,没有用户按下按钮,则根据环境变量,从 SD 卡或 FLASH 拷贝内核镜像到 DRAM ,
然后跳转到 OS 起始地址执行 OS 。 这里只是大致分析了一下代码的走向,并没有详细分析。 具体可以根
据代码走向一步一步分析代码。
首先移植 u-boot-spl.bin
我们采用 SPL 方式,因此需要在单板配置文件 u-boot-2014.04/include/configs/smdkv210.h 中添加宏 
我们可以进行如下操作,只编译 u-boot-spl.bin

编译出错:

我们前面分析得知在 u-boot-2014.04/arch/arm/lib/board.c 中定义了一个函数 board_init_f,这个函数
进行了非常多的初始化操作,由于 u-boot-spl.bin 的最终目的只是把 BL2 从外部存储器(SD 卡、 NAND)
拷贝到 SDRAM,所以 u-boot-spl.bin 只需初始化时钟、 SDRAM、 NAND,然后调用一个拷贝函数,拷贝完
成后直接跳转到 SDRAM 执行 BL2,就完事了,我们可以修改 crt0.S,不让其调用 board_init_f。
首先在 u-boot-2014.04/arch/arm/include/asm/arch-s5pc1xx/cpu.h 中添加与 S5PV210 相关的寄存器定
义,后面会用到
/* S5PV210 add by JerryGoy */
#define S5PV210_PRO_ID		0xE0000000
#define S5PV210_CLOCK_BASE	0xE0100000
#define S5PV210_GPIO_BASE	0xE0200000
#define S5PV210_PWMTIMER_BASE	0xE2500000
#define S5PV210_WATCHDOG_BASE	0xE2700000
#define S5PV210_UART_BASE	0xE2900000
#define S5PV210_SROMC_BASE	0xE8000000
#define S5PV210_MMC_BASE	0xEB000000
#define S5PV210_DMC0_BASE	0xF0000000
#define S5PV210_DMC1_BASE	0xF1400000
#define S5PV210_VIC0_BASE	0xF2000000
#define S5PV210_VIC1_BASE	0xF2100000
#define S5PV210_VIC2_BASE	0xF2200000
#define S5PV210_VIC3_BASE 0xF2300000C 语言,再说 S5PV210 的性能如此之高,也不在乎损耗一点性能,将其修改为:
/* modied by JerryGou */

	.globl lowlevel_init
lowlevel_init:
	mov	r9, lr

#ifdef CONFIG_SPL_BUILD
	bl clock_init		/* 时钟初始化 */
	bl ddr_init		/* DDR初始化 */
#endif
	mov	pc, r9		/* 返回 */
u-boot-spl.bin 才会将这些初始化代码编译进 u-boot-spl.bin ,而编译 u-boot.bin 时就不会。
这里调用了两个函数, 我们在 u-boot-2014.04/board/samsung/smdkv210/smdkv210.c 中实现它,参照
裸机编程。 由于这两个函数只需要在 u-boot-spl.bin 中实现,而 u-boot.bin 不需要,同时 smdkv210.c
中的其他函数只需要在 u-boot.bin 中实现,前面分析过,编译 u-boot-spl.bin 时, spl/Makefile 会导出一个
宏 CONFIG_SPL_BUILD ,我们通过这个宏来控制代码是否被编译,下面列出修改后的框架:
/*
 *  Copyright (C) 2008-2009 Samsung Electronics
 *  Minkyu Kang
 *  Kyungmin Park
 *
 * SPDX-License-Identifier:	GPL-2.0+
 */

#include
#include
#include
#include
#include 		/* add by JerryGou */
#include 		/* add by JerryGou */
#include

#ifndef CONFIG_SPL_BUILD	/* add by JerryGou */

DECLARE_GLOBAL_DATA_PTR;

/*
 * Miscellaneous platform dependent initialisations
 */
static void smc9115_pre_init(void)
{
	u32 smc_bw_conf, smc_bc_conf;

	struct s5pc100_gpio *const gpio =
		(struct s5pc100_gpio *)samsung_get_base_gpio();

	/* gpio configuration GPK0CON */
	s5p_gpio_cfg_pin(&gpio->k0, CONFIG_ENV_SROM_BANK, GPIO_FUNC(2));

	/* Ethernet needs bus width of 16 bits */
	smc_bw_conf = SMC_DATA16_WIDTH(CONFIG_ENV_SROM_BANK);
	smc_bc_conf = SMC_BC_TACS(0x0) | SMC_BC_TCOS(0x4) | SMC_BC_TACC(0xe)
			| SMC_BC_TCOH(0x1) | SMC_BC_TAH(0x4)
			| SMC_BC_TACP(0x6) | SMC_BC_PMC(0x0);

	/* Select and configure the SROMC bank */
	s5p_config_sromc(CONFIG_ENV_SROM_BANK, smc_bw_conf, smc_bc_conf);
}

int board_init(void)
{
	smc9115_pre_init();

	gd->bd->bi_arch_number = MACH_TYPE_SMDKC100;
	gd->bd->bi_boot_params = PHYS_SDRAM_1 + 0x100;

	return 0;
}

int dram_init(void)
{
	gd->ram_size = get_ram_size((long *)PHYS_SDRAM_1, PHYS_SDRAM_1_SIZE);

	return 0;
}

void dram_init_banksize(void)
{
	gd->bd->bi_dram[0].start = PHYS_SDRAM_1;
	gd->bd->bi_dram[0].size = PHYS_SDRAM_1_SIZE;
}

#ifdef CONFIG_DISPLAY_BOARDINFO
int checkboard(void)
{
	printf("Board:\tSMDKC100\n");
	return 0;
}
#endif

int board_eth_init(bd_t *bis)
{
	int rc = 0;
#ifdef CONFIG_SMC911X
	rc = smc911x_initialize(0, CONFIG_SMC911X_BASE);
#endif
	return rc;
}

#else	/* CONFIG_SPL_BUILD (add by JerryGou) */

void clock_init(void)
{
	u32 val = 0;

	struct s5pv210_clock *const clock = (struct s5pv210_clock *)samsung_get_base_clock();

	/* 1.设置PLL锁定值 */
	writel(0xFFFF, &clock->apll_lock);
	writel(0xFFFF, &clock->mpll_lock);
	writel(0xFFFF, &clock->epll_lock);
	writel(0xFFFF, &clock->vpll_lock);

	/* 2.设置PLL的PMS值(使用芯片手册推荐的值),并使能PLL */
	/*	 	P	  	    M   		  S		     EN	*/
	writel((3  << 8) | (125 << 16) | (1 << 0) | (1 << 31), &clock->apll_con0);	/* FOUT_APLL = 1000MHz */
	writel((12 << 8) | (667 << 16) | (1 << 0) | (1 << 31), &clock->mpll_con); 	/* FOUT_MPLL = 667MHz */
	writel((3  << 8) | (48  << 16) | (2 << 0) | (1 << 31), &clock->epll_con0);	/* FOUT_EPLL = 96MHz */
	writel((6  << 8) | (108 << 16) | (3 << 0) | (1 << 31), &clock->vpll_con);	/* FOUT_VPLL = 54MHz */

	/* 3.等待PLL锁定 */
	while (!(readl(&clock->apll_con0) & (1 << 29)));
	while (!(readl(&clock->mpll_con) & (1 << 29)));
	while (!(readl(&clock->apll_con0) & (1 << 29)));
	while (!(readl(&clock->epll_con0) & (1 << 29)));
	while (!(readl(&clock->vpll_con) & (1 << 29)));

	/*
	** 4.设置系统时钟源,选择PLL为时钟输出 */
	/* MOUT_MSYS = SCLKAPLL = FOUT_APLL = 1000MHz
	** MOUT_DSYS = SCLKMPLL = FOUT_MPLL = 667MHz
	** MOUT_PSYS = SCLKMPLL = FOUT_MPLL = 667MHz
	** ONENAND = HCLK_PSYS
	*/
	writel((1 << 0) | (1 << 4) | (1 << 8) | (1 << 12), &clock->src0);

	/* 4.设置其他模块的时钟源 */

	/* 6.设置系统时钟分频值 */
	val = 	(0 << 0)  |	/* APLL_RATIO = 0, freq(ARMCLK) = MOUT_MSYS / (APLL_RATIO + 1) = 1000MHz */
			(4 << 4)  |	/* A2M_RATIO = 4, freq(A2M) = SCLKAPLL / (A2M_RATIO + 1) = 200MHz */
			(4 << 8)  |	/* HCLK_MSYS_RATIO = 4, freq(HCLK_MSYS) = ARMCLK / (HCLK_MSYS_RATIO + 1) = 200MHz */
			(1 << 12) |	/* PCLK_MSYS_RATIO = 1, freq(PCLK_MSYS) = HCLK_MSYS / (PCLK_MSYS_RATIO + 1) = 100MHz */
			(3 << 16) | /* HCLK_DSYS_RATIO = 3, freq(HCLK_DSYS) = MOUT_DSYS / (HCLK_DSYS_RATIO + 1) = 166MHz */
			(1 << 20) | /* PCLK_DSYS_RATIO = 1, freq(PCLK_DSYS) = HCLK_DSYS / (PCLK_DSYS_RATIO + 1) = 83MHz */
			(4 << 24) |	/* HCLK_PSYS_RATIO = 4, freq(HCLK_PSYS) = MOUT_PSYS / (HCLK_PSYS_RATIO + 1) = 133MHz */
			(1 << 28);	/* PCLK_PSYS_RATIO = 1, freq(PCLK_PSYS) = HCLK_PSYS / (PCLK_PSYS_RATIO + 1) = 66MHz */
	writel(val, &clock->div0);

	/* 7.设置其他模块的时钟分频值 */
}

void ddr_init(void)
{
	struct s5pv210_dmc0 *const dmc0 = (struct s5pv210_dmc0 *)samsung_get_base_dmc0();
	struct s5pv210_dmc1 *const dmc1 = (struct s5pv210_dmc1 *)samsung_get_base_dmc1();

	/* DMC0 */
	writel(0x00101000, &dmc0->phycontrol0);
	writel(0x00101002, &dmc0->phycontrol0);			/* DLL on */
	writel(0x00000086, &dmc0->phycontrol1);
	writel(0x00101003, &dmc0->phycontrol0);			/* DLL start */

	while ((readl(&dmc0->phystatus) & 0x7) != 0x7); /* wait DLL locked */

	writel(0x0FFF2350, &dmc0->concontrol);			/* Auto Refresh Counter should be off */
	writel(0x00202430, &dmc0->memcontrol);			/* Dynamic power down should be off */
	writel(0x20E01323, &dmc0->memconfig0);

	writel(0xFF000000, &dmc0->prechconfig);
	writel(0xFFFF00FF, &dmc0->pwrdnconfig);

	writel(0x00000618, &dmc0->timingaref);			/* 7.8us * 200MHz = 1560 = 0x618  */
	writel(0x19233309, &dmc0->timingrow);
	writel(0x23240204, &dmc0->timingdata);
	writel(0x09C80232, &dmc0->timingpower);

	writel(0x07000000, &dmc0->directcmd);			/* NOP */
	writel(0x01000000, &dmc0->directcmd);			/* PALL */
	writel(0x00020000, &dmc0->directcmd);			/* EMRS2 */
	writel(0x00030000, &dmc0->directcmd);			/* EMRS3 */
	writel(0x00010400, &dmc0->directcmd);			/* EMRS enable DLL */
	writel(0x00000542, &dmc0->directcmd);			/* DLL reset */
	writel(0x01000000, &dmc0->directcmd); 			/* PALL */
	writel(0x05000000, &dmc0->directcmd);			/* auto refresh */
	writel(0x05000000, &dmc0->directcmd);			/* auto refresh */
	writel(0x00000442, &dmc0->directcmd);			/* DLL unreset */
	writel(0x00010780, &dmc0->directcmd);			/* OCD default */
	writel(0x00010400, &dmc0->directcmd);			/* OCD exit */

	writel(0x0FF02030, &dmc0->concontrol);			/* auto refresh on */
	writel(0xFFFF00FF, &dmc0->pwrdnconfig);
	writel(0x00202400, &dmc0->memcontrol);

	/* DMC1 */
	writel(0x00101000, &dmc1->phycontrol0);
	writel(0x00101002, &dmc1->phycontrol0);			/* DLL on */
	writel(0x00000086, &dmc1->phycontrol1);
	writel(0x00101003, &dmc1->phycontrol0);			/* DLL start */

	while ((readl(&dmc1->phystatus) & 0x7) != 0x7); /* wait DLL locked */

	writel(0x0FFF2350, &dmc1->concontrol);			/* Auto Refresh Counter should be off */
	writel(0x00202430, &dmc1->memcontrol);			/* Dynamic power down should be off */
	writel(0x40E01323, &dmc1->memconfig0);

	writel(0xFF000000, &dmc1->prechconfig);
	writel(0xFFFF00FF, &dmc1->pwrdnconfig);

	writel(0x00000618, &dmc1->timingaref);			/* 7.8us * 200MHz = 1560 = 0x618  */
	writel(0x19233309, &dmc1->timingrow);
	writel(0x23240204, &dmc1->timingdata);
	writel(0x09C80232, &dmc1->timingpower);

	writel(0x07000000, &dmc1->directcmd);			/* NOP */
	writel(0x01000000, &dmc1->directcmd);			/* PALL */
	writel(0x00020000, &dmc1->directcmd);			/* EMRS2 */
	writel(0x00030000, &dmc1->directcmd);			/* EMRS3 */
	writel(0x00010400, &dmc1->directcmd);			/* EMRS enable DLL */
	writel(0x00000542, &dmc1->directcmd);			/* DLL reset */
	writel(0x01000000, &dmc1->directcmd); 			/* PALL */
	writel(0x05000000, &dmc1->directcmd);			/* auto refresh */
	writel(0x05000000, &dmc1->directcmd);			/* auto refresh */
	writel(0x00000442, &dmc1->directcmd);			/* DLL unreset */
	writel(0x00010780, &dmc1->directcmd);			/* OCD default */
	writel(0x00010400, &dmc1->directcmd);			/* OCD exit */

	writel(0x0FF02030, &dmc1->concontrol);			/* auto refresh on */
	writel(0xFFFF00FF, &dmc1->pwrdnconfig);
	writel(0x00202400, &dmc1->memcontrol);
}

void copy_bl2_to_ram(void)
{
/*
** ch:  通道
** sb:  起始块
** bs:  块大小
** dst: 目的地
** i: 	是否初始化
*/
#define CopySDMMCtoMem(ch, sb, bs, dst, i) \
	(((unsigned char(*)(int, unsigned int, unsigned short, unsigned int*, unsigned char))\
	(*((unsigned int *)0xD0037F98)))(ch, sb, bs, dst, i))

	unsigned int V210_SDMMC_BASE = *(volatile unsigned int *)(0xD0037488);	// V210_SDMMC_BASE
	unsigned char ch = 0;

	/* 参考S5PV210手册7.9.1 SD/MMC REGISTER MAP */
	if (V210_SDMMC_BASE == 0xEB000000)		// 通道0
		ch = 0;
	else if (V210_SDMMC_BASE == 0xEB200000)	// 通道2
		ch = 2;

	CopySDMMCtoMem(ch, 32, 10, (unsigned int *)CONFIG_SYS_SDRAM_BASE, 0);
}

#endif /* CONFIG_SPL_BUILD (add by JerryGou) */ u-boot-2014.04/arch/arm/include/asm/arch-s5pc1xx/clock.h 中添加 S5PV210 的时钟相关寄存器的定义
/* add by JerryGou */
struct s5pv210_clock {
	unsigned int	apll_lock;
	unsigned char	res1[0x04];
	unsigned int	mpll_lock;
	unsigned char	res2[0x04];
	unsigned int	epll_lock;
	unsigned char	res3[0x0C];
	unsigned int	vpll_lock;
	unsigned char	res4[0xdc];
	unsigned int	apll_con0;
	unsigned int	apll_con1;
	unsigned int	mpll_con;
	unsigned char	res5[0x04];
	unsigned int	epll_con0;
	unsigned int	epll_con1;
	unsigned char	res6[0x08];
	unsigned int	vpll_con;
	unsigned char	res7[0xdc];
	unsigned int	src0;
	unsigned int	src1;
	unsigned int	src2;
	unsigned int	src3;
	unsigned int	src4;
	unsigned int	src5;
	unsigned int	src6;
	unsigned char	res8[0x64];
	unsigned int	mask0;
	unsigned int	mask1;
	unsigned char	res9[0x78];
	unsigned int	div0;
	unsigned int	div1;
	unsigned int	div2;
	unsigned int	div3;
	unsigned int	div4;
	unsigned int	div5;
	unsigned int	div6;
	unsigned int	div7;
};在 clock_init 函数中使用到了一个宏 samsung_get_base_clock
struct s5pv210_clock *const clock = (struct s5pv210_clock *)samsung_get_base_clock();
这个宏在 u-boot-2014.04/arch/arm/include/asm/arch-s5pc1xx/cpu.h 中定义

这里首先判断 CPU 类型,这里只判断了 S5PC100A 和 S5PC110,这里判断 CPU 类型同样使用的是宏

这里判断了一个变量 s5p_cpu_id,这个变量通过 s5p_set_cpu_id 函数读取寄存器 PRO_ID 来设置
我们不用那么麻烦,直接修改 SAMSUNG_BASE 这个宏,让它直接返回 S5PV210_##base

clock_init 函数完成了,接下来需要实现 ddr_init,同样首先需要定义寄存器,仿照 clock.h,编写
u-boot-2014.04/arch/arm/include/asm/arch-s5pc1xx/dmc.h
/* add by JerryGou */

#ifndef __ASM_ARM_ARCH_DRAM_H_
#define __ASM_ARM_ARCH_DRAM_H_

#ifndef __ASSEMBLY__

struct s5pv210_dmc0 {
	unsigned int	concontrol;
	unsigned int	memcontrol;
	unsigned int	memconfig0;
	unsigned int	memconfig1;
	unsigned int	directcmd;
	unsigned int	prechconfig;
	unsigned int	phycontrol0;
	unsigned int	phycontrol1;
	unsigned char	res1[0x08];
	unsigned int	pwrdnconfig;
	unsigned char	res2[0x04];
	unsigned int	timingaref;
	unsigned int	timingrow;
	unsigned int	timingdata;
	unsigned int	timingpower;
	unsigned int	phystatus;
	unsigned int	chip0status;
	unsigned int	chip1status;
	unsigned int	arefstatus;
	unsigned int	mrstatus;
	unsigned int	phytest0;
	unsigned int	phytest1;
};

struct s5pv210_dmc1 {
	unsigned int	concontrol;
	unsigned int	memcontrol;
	unsigned int	memconfig0;
	unsigned int	memconfig1;
	unsigned int	directcmd;
	unsigned int	prechconfig;
	unsigned int	phycontrol0;
	unsigned int	phycontrol1;
	unsigned char	res1[0x08];
	unsigned int	pwrdnconfig;
	unsigned char	res2[0x04];
	unsigned int	timingaref;
	unsigned int	timingrow;
	unsigned int	timingdata;
	unsigned int	timingpower;
	unsigned int	phystatus;
	unsigned int	chip0status;
	unsigned int	chip1status;
	unsigned int	arefstatus;
	unsigned int	mrstatus;
	unsigned int	phytest0;
	unsigned int	phytest1;
};

#endif

#endif

现在就可以仿照 clock_init 实现 ddr_init 了,具体请看源码
接着执行到 u-boot-2014.04/arch/arm/lib/crt0.S 中的_main 函数 
这里在设置栈指针, 由于 u-boot-spl.bin 相当小,使用 SRAM 为其提供栈内存就够了,所以可以将这
里的栈指针设置代码屏蔽掉(为 u-boot-spl.bin 屏蔽,对 u-boot.bin 没有影响),如下 
这里调用了一个函数 copy_bl2_to_ram, 用于从 SD 卡或 NAND 拷贝 BL2 到 SDRAM
在 u-boot-2014.04/board/samsung/smdkv210/smdkv210.c 中实现它,拷贝完成后,直接跳转到 DDR
的起始地址执行 BL2。
CONFIG_SYS_SDRAM_BASE 在 u-boot-2014.04/include/configs/smdkv210.h 中定义,我们将其修改为我
们实际 DDR 的起始地址 0x20000000 ![]()
在 copy_bl2_to_ram 中我们实现从 SD 卡的扇区 32 拷贝 BL2 到 DDR 的起始地址 0x20000000
问:为什么是 32?
答:三星手册明确规定 BL1 的大小最大为 16KB,而每一个扇区为 512B, 16KB 刚好在扇区 32。 这不
是强制要求的, 只要这个数字乘以 512 小于你的 u-boot-spl.bin 就可以了 
由于现在我们还不知道 BL2 有多大,所以拷贝多大先暂时随便写个值。
现在执行 make spl/u-boot-spl.bin,出现错误 
分析 u-boot-2014.04/spl/Makefile 
如果定义了 CONFIG_SAMSUNG,就添加目标$(obj)/$(BOARD)-spl.bin
CONFIG_SAMSUNG 在 u-boot-2014.04/include/configs/smdkv210.h 中定义
$(obj)/$(BOARD)-spl.bin 展开为 spl/smdkv210-spl.bin
这里需要调用一个工具用来给 u-boot-spl.bin 添加头信息,我们将之前制作头信息的工具(addheader)
拷贝到
u-boot-2014.04/tools 里面,并更名为 mksmdkv210spl ![]()
然后修改 u-boot-2014.04/spl/Makefile

现在再次执行 make spl/u-boot-spl.bin 编译,最终生成 spl/smdkv210-spl.bin,已经添加了 16B 头信息 
测试一下 spl/smdkv210-spl.bin
使用 DD_For_Windows.exe 将 spl/smdkv210-spl.bin 烧写到 SD 的扇区 1,将裸机程序
tq210_NoOS/1-led_on_c 中的 led.bin 烧写到 SD 卡的扇区 32 
注意: 这里要取消“添加头信息”,因为 spl/smdkv210-spl.bin 已经添加了头信息, 如果烧写
spl/u-boot-spl.bin 就需要选中“添加头信息” 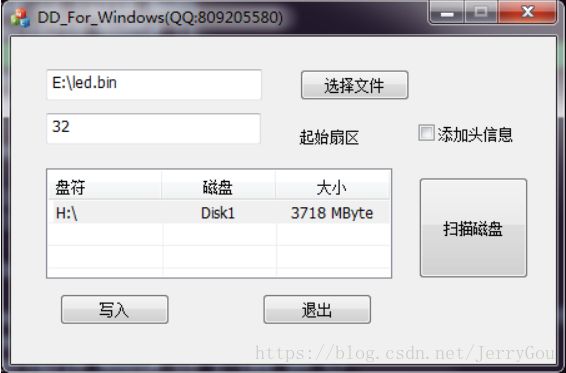
然后取下 SD 卡,将其插入开发板,可以看到 LED 流水灯效果。