用ECS做HexMap:利用RenderMesh为六边形涂色
基于Unity2019最新ECS架构开发MMO游戏笔记18
- 为六边形涂色
- 链接相邻单元
- 颜色混合
- 更新计划
- 作者的话
- ECS系列目录
- ECS官方示例1:ForEach
- ECS官方案例2:IJobForEach
- ECS官方案例3:IJobChunk
- ECS官方案例4:SubScene
- ECS官方案例5:SpawnFromMonoBehaviour
- ECS官方案例6:SpawnFromEntity
- ECS官方案例7:SpawnAndRemove
- ECS进阶:FixedTimestepWorkaround
- ECS进阶:Boids
- ECS进阶:场景切换器
- ECS进阶:MegaCity0
- ECS进阶:MegaCity1
- UnityMMO资源整合&服务器部署
- UnityMMO选人流程
- UnityMMO主世界
- UnityMMO网络同步
- 用ECS做HexMap:自动生成地图系统
- 用ECS做HexMap:利用RenderMesh绘制六边形
- 用ECS做HexMap:利用RenderMesh为六边形涂色
- 用ECS做HexMap:六边形单元的颜色混合
- 用ECS做HexMap:重构地图系统
- 用ECS做HexMap:鼠标点击六边形单元涂色
为六边形涂色
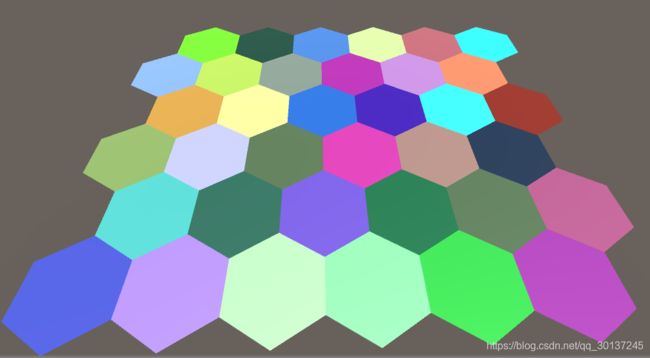
上一篇中为我们已经画好了六边形,接下来我们要给六边形上色,如图所示:
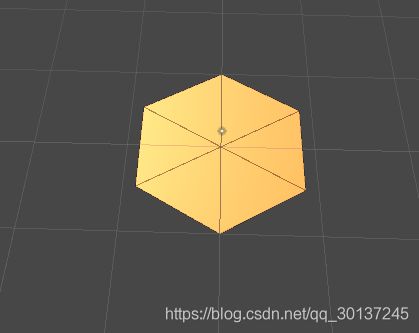
其实只需改动少量的代码即可完成这个功能,我们在HexCellData六边形单元数据中已经有字段来保存颜色数据了:
/// 因此不需要额外新增数据,并且我们在创建六边形单元(CreateHexCellSystem)时已经为其赋值:
    //4.设置每个单元的数据
    CommandBuffer.SetComponent(index, instance, new HexCellData
    {
        X = x - z / 2,
        Y = 0,
        Z = z,
        color = createrData.Color,

    });
这时每个六边形单元都有颜色数据了,我们只需要调动RenderMesh来渲染即可,打开CreateHexMapSystem:
- 新增颜色的原生数组,来获取六边形单元的颜色数据:
    var colors = new NativeArray<Color>(HexMetrics.HexCelllCount, Allocator.TempJob);
    //获取六边形单元实体的数据
      var getDataJob = new GetHexCellDataForRenderMeshJob
      {
          Vertices = vertices,
          Colors=colors

      }.Schedule(hexCells, inputDeps);
      getDataJob.Complete();
    //这个必须要在使用完后手动释放内存
      colors.Dispose();
- 在Job中得到颜色数据
/// - 把数据交给网格组件进行渲染:
            var Colors= new NativeList<Color>(HexMetrics.HexCelllCount*18, Allocator.TempJob);
            for (int i = 0; i < vertices.Length; i++)
            {
                Vector3 center = vertices[i];
                for (int j = 0; j < 6; j++)
                {
                    int verticesIndex = Vertices.Length;
                    Vertices.Add(center);
                    Vertices.Add(center + HexMetrics.corners[j]);
                    Vertices.Add(center + HexMetrics.corners[j + 1]);
                    Triangles.Add(verticesIndex);
                    Triangles.Add(verticesIndex + 1);
                    Triangles.Add(verticesIndex + 2);
                    Colors.Add(colors[i]);
                    Colors.Add(colors[i]);
                    Colors.Add(colors[i]);
                }
            }

            var renderMesh = EntityManager.GetSharedComponentData<RenderMesh>(meshEntity);

            renderMesh.mesh.vertices = Vertices.ToArray();
            renderMesh.mesh.triangles = Triangles.ToArray();
            renderMesh.mesh.colors = Colors.ToArray();
            renderMesh.mesh.RecalculateNormals();
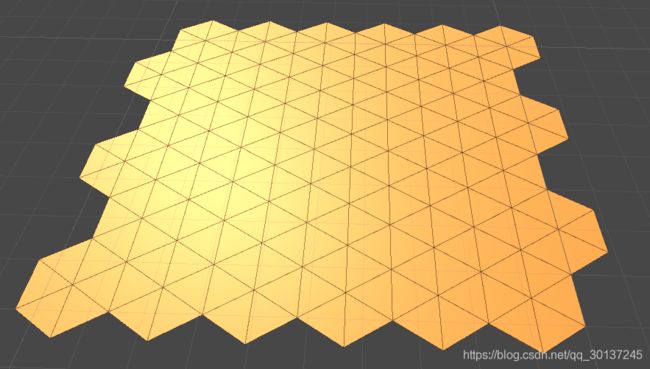
如上图所示,所有六边形单元都有颜色了,原本想用鼠标点击六边形单元来单独上色,但是ECS还没有对应的物理引擎,所以没有办法响应点击事件。如果非要实现这个功能,也是可以做到的,只需要在生成的六边形实体上面重合一个空碰撞器(OOP)即可。也就是说点击了空碰撞器后,去找对应位置的实体,再进行渲染。
我仔细想了一下,还是没有必要那么做,因为ECS的碰撞器迟早会出来的,等到那个时候再实现也是可行的。
于是就不适用鼠标点击变色了,使用随机生成的颜色:
//实例化随机类,需要引用:using Random = Unity.Mathematics.Random;
Random random= new Random(1208905299U);
   //在循环的时候,随机产生一种颜色
   CommandBuffer.SetComponent(index, instance, new HexCellData
   {
       X = x - z / 2,
       Y = 0,
       Z = z,
       color = new Color(random.NextFloat(), random.NextFloat(), random.NextFloat())

   });
再把颜色交给RenderMesh渲染:
protected override JobHandle OnUpdate(JobHandle inputDeps)
    {

        var vertices = new NativeArray<Vector3>(HexMetrics.HexCelllCount, Allocator.TempJob);
        var colors = new NativeArray<Color>(HexMetrics.HexCelllCount, Allocator.TempJob);
        var getDataJob = new GetHexCellDataForRenderMeshJob
        {
            Vertices = vertices,
            Colors=colors

        }.Schedule(hexCells, inputDeps);
        getDataJob.Complete();

        var Vertices = new NativeList<Vector3>(HexMetrics.HexCelllCount*18, Allocator.TempJob);
        var Triangles = new NativeList<int>(HexMetrics.HexCelllCount * 18, Allocator.TempJob);
        var Colors= new NativeList<Color>(HexMetrics.HexCelllCount*18, Allocator.TempJob);

        for (int i = 0; i < vertices.Length; i++)
        {//Todo:this is too slow,should do it in a Job with Burst
            Vector3 center = vertices[i];
            Color color = colors[i];

            for (int j = 0; j < 6; j++)
            {
                int verticesIndex = Vertices.Length;
                Vertices.Add(center);
                Vertices.Add(center + HexMetrics.corners[j]);
                Vertices.Add(center + HexMetrics.corners[j + 1]);
                Triangles.Add(verticesIndex);
                Triangles.Add(verticesIndex + 1);
                Triangles.Add(verticesIndex + 2);
                Colors.Add(color);
                Colors.Add(color);
                Colors.Add(color);
            }
        }

        var renderMesh = EntityManager.GetSharedComponentData<RenderMesh>(meshEntity);

        renderMesh.mesh.vertices = Vertices.ToArray();
        renderMesh.mesh.triangles = Triangles.ToArray();
        renderMesh.mesh.colors = Colors.ToArray();
        renderMesh.mesh.RecalculateNormals();
        //目前ECS还没有物理引擎支持,所以MeshCollider无效!Todo:添加物理特性
        //var meshColider = EntityManager.GetSharedComponentData(meshEntity);
        //meshColider.HexMeshCollider.sharedMesh = renderMesh.mesh;
        vertices.Dispose();
        colors.Dispose();
        Vertices.Dispose();
        Triangles.Dispose();
        Colors.Dispose();
        hexMeshTag.bIfNewMap = false;
        bIfNewMap = false;

        return getDataJob;

    }
链接相邻单元
单元之间有对应的相邻关系,如下图所示:

因此我们需要一个组件来保存这种相邻关系,便于后面的开发:
/// 原本只需要一行代码来储存位置关系数据,但是组件并不支持数组和列表,虽然官方推荐我使用IBufferElementData,但是我看了半天官方文档,也还是不知道怎么用。也许是我的悟性不够,如果有大佬能看明白,请留言指教。
如果把六个实体保存在一个组件里,在赋值的时候必须一次性赋值六个,否则会被空值覆盖。这也是我不得不使用六个组件的原因,这显然是一种浪费!
接下来我们就为这些单元添加上这些关系组件,为了保留所有单元的集合,这里申请了一个数组:
	//把所有单元的实体缓存在这个数组中,使用后进行释放
   NativeArray<Entity> entities = new NativeArray<Entity>(createrData.Height* createrData.Width, Allocator.Temp);
   //代码生成预设,这样可以优化性能
   Entity hexCellPrefab = CommandBuffer.CreateEntity(index);
   CommandBuffer.AddComponent<HexCellData>(index, hexCellPrefab);
   CommandBuffer.AddComponent< Translation >(index, hexCellPrefab);
   //Todo:把六个相对位置关系组件合成一个不覆盖的组件
   CommandBuffer.AddComponent<NeighborNE>(index, hexCellPrefab);
   CommandBuffer.AddComponent<NeighborE>(index, hexCellPrefab);
   CommandBuffer.AddComponent<NeighborSE>(index, hexCellPrefab);
   CommandBuffer.AddComponent<NeighborSW>(index, hexCellPrefab);
   CommandBuffer.AddComponent<NeighborW>(index, hexCellPrefab);
   CommandBuffer.AddComponent<NeighborNW>(index, hexCellPrefab);
在生成六边形单元的循环里为关系组件赋值,逻辑参考英文&逻辑参考中文:
//6.设置单元关联
//单元之间的位置是相对的:W <-0-> E
if (x > 0)
{
    //上一个单元就是本单元的西:W
    Entity W = entities[i - 1];
    CommandBuffer.SetComponent(index, instance, new NeighborW
    {
        W=W
    });
    //本单元就是上一个单元的东:E
    CommandBuffer.SetComponent(index, W, new NeighborE
    {
        E = instance
    });
}

if (z>0)
{
    if ((z & 1) == 0)//按位与运算判断==0偶数
    {
        // SE <-0-> NW
        Entity SE = entities[i - createrData.Width];
        CommandBuffer.SetComponent(index, instance, new NeighborSE
        {
            SE = SE
        });
        CommandBuffer.SetComponent(index, SE, new NeighborNW
        {
            NW = instance
        });

        if (x>0)
        {
            // SW <-0-> NE
            Entity SW = entities[i - createrData.Width - 1];
            CommandBuffer.SetComponent(index, instance, new NeighborSW
            {
                SW = SW
            });
            CommandBuffer.SetComponent(index, SW, new NeighborNE
            {
                NE = instance
            });
        }
    }
    else//奇数行
    {
        // SW <-0-> NE
        Entity SW = entities[i - createrData.Width];
        CommandBuffer.SetComponent(index, instance, new NeighborSW
        {
            SW = SW
        });
        CommandBuffer.SetComponent(index, SW, new NeighborNE
        {
            NE = instance
        });
        if (x < createrData.Width - 1)
        {
            // SE <-0-> NW
            Entity SE = entities[i - createrData.Width+1];
            CommandBuffer.SetComponent(index, instance, new NeighborSE
            {
                SE = SE
            });
            CommandBuffer.SetComponent(index, SE, new NeighborNW
            {
                NW = instance
            });
        }
关于CommandBuffer.SetComponent空值覆盖的问题,这里举个例子:
//原本是这样设计的
public struct Neighbors : IComponentData {
	public Entity E;
	public Entity NE;
	public Entity SE;
	public Entity W;
	public Entity NW;
	public Entity SW;
}
//但是在设置数据时如果不能一次性全部设置,剩下的没有赋值的都是空
CommandBuffer.SetComponent(index, instance, new Neighbors
{
   NW = NW
});
//在生成的时候不可能一次性获取所有组件的关系,所以只能拆分成六个组件
尝试过的解决方案:
 //用一个类似字典的哈希表来保存单元之间的关系,再在最后统一赋值
NativeHashMap<int, NativeArray<Entity>> nativeHashMap=new NativeHashMap<int, NativeArray<Entity>>(createrData.Height * createrData.Width, Allocator.Temp);
结果会报错:
ArgumentException: Unity.Collections.NativeArray`1[Unity.Entities.Entity] used in native collection is not blittable, not primitive, or contains a type tagged as NativeContainer
显然在Job里面不支持这样的操作,如果哪位大佬有办法优化,请留言。
颜色混合

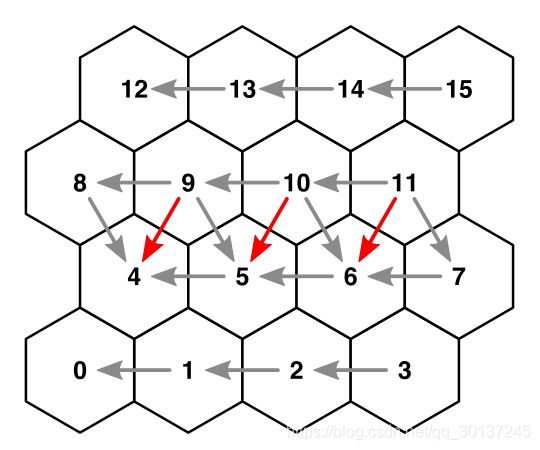
之前那六个组件和关系,我觉得太冗余,于是弃用了。根据以上两个关系图,我又推理写了下面更加冗余的代码来做颜色混合:
			//当前单元所在行数
            int currHeight = i==0?0:(i / width);
            //判断当前所在行是否为偶数
            bool ifEven = (currHeight & 1) == 0;

            //添加颜色:自身
            Color color = colors[i];
            //邻居的颜色
            Color neighbor;
            //0=东北:NE
            if (currHeight == (height - 1))
            {
                neighbor = color;
            }
            else
            {
                if (ifEven)//偶数行
                {
                    neighbor=colors[i + width];
                }
                else
                {
                    neighbor=(colors[i + width + 1]);
                }
            }
            Colors.Add(color);
            Colors.Add(neighbor);
            Colors.Add(neighbor);
            //颜色混合1 东:E
            if ((i + 1) % width == 0)
            {
                //如果可以被宽度整除,说明在地图边缘位置,没有东邻居
                neighbor = color;
            }
            else
            {
                neighbor = (colors[i+1]);
            }
            Colors.Add(color);
            Colors.Add(neighbor);
            Colors.Add(neighbor);
            //东南2:SE
            if (ifEven)
            {
                if (i>width-1)
                {

                    neighbor = (colors[i - width +1]);
                }
                else
                {
                    neighbor = color;
                }
            }
            else
            {
                if (i<width)
                {
                    neighbor = color;
                }
                else
                {
                    if (i==(currHeight+1)*width)
                    {
                        neighbor = color;
                    }
                    else
                    {
                        neighbor = (colors[i - width]);
                    }
                }
            }
            Colors.Add(color);
            Colors.Add(neighbor);
            Colors.Add(neighbor);
            //西南3:SW
            if (ifEven)
            {
                if (i<width)
                {
                    neighbor = color;
                }
                else
                {
                    neighbor = (colors[i - width - 1]);
                }
            }
            else
            {
                if (i < width)
                {
                    neighbor = color;
                }
                else
                {
                    if (i==currHeight*width)//奇数行的起始位置
                    {
                        neighbor = color;
                    }
                    else
                    {
                        neighbor = (colors[i - width]);
                    }
                }
            }
            Colors.Add(color);
            Colors.Add(neighbor);
            Colors.Add(neighbor);
            //西4:W
            if (i==0||i%width==0)
            {
                //如果可以被宽度整除,说明在地图起始位置,没有西邻居
                neighbor = color;
            }
            else
            {
                neighbor = (colors[i - 1]);
            }
            Colors.Add(color);
            Colors.Add(neighbor);
            Colors.Add(neighbor);
            //5西北:NW
            if (ifEven)
            {
                if (i == currHeight * width)
                {
                    neighbor = color;
                }
                else
                {
                    neighbor = (colors[i + width - 1]);
                }
            }
            else
            {
                if (i >= (height-1) * width)
                {
                    neighbor = color;
                }
                else
                {
                    neighbor = (colors[i + width]);
                }
            }
            Colors.Add(color);
            Colors.Add(neighbor);
            Colors.Add(neighbor);
代码非常冗余,肯定有更好的办法,先看看效果吧:
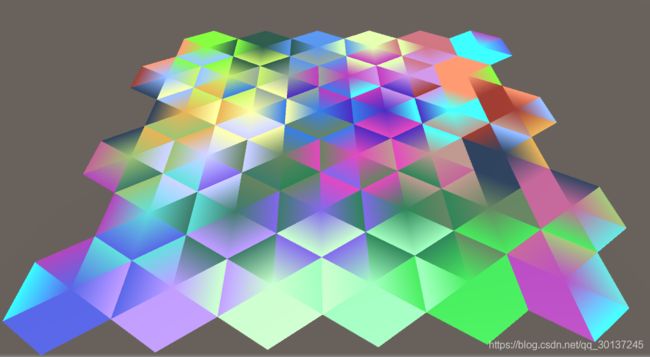
如上图所示,效果非常花哨,却是错误的。重新梳理逻辑:
            //当前单元所在行数
            int currHeight = i==0?0:(i / width);

            //判断当前所在行是否为偶数
            bool ifEven = (currHeight & 1) == 0;
            //是否处于行尾
            bool ifEnd = (i + 1) == (currHeight + 1) * width;
            //是否处于行首
            bool ifStart = i == currHeight * width;
            //Debug.Log("当前单元:"+i+"处于行首:"+ifStart+" |处于行尾:"+ifEnd+" |当前行数:"+currHeight+"是偶数行:"+ifEven);
            //添加颜色:自身
            Color color = colors[i];
            //邻居的颜色
            Color neighbor;
            //0=东北:NE
            if (currHeight == (height - 1))
            {
                neighbor = color;
            }
            else
            {
                if (ifEven)//偶数行
                {
                    neighbor=colors[i + width];
                }
                else
                {
                    if (ifEnd)//最末尾没有相邻的单元
                    {
                        neighbor = color;
                    }
                    else
                    {
                        neighbor = (colors[i + width + 1]);
                    }
                }
            }

            Colors.Add(color);
            Colors.Add(neighbor);
            Colors.Add(neighbor);
            //颜色混合1 东:E
            if (ifEnd)
            {
                //如果在地图边缘位置,没有东邻居
                neighbor = color;
            }
            else
            {
                neighbor = (colors[i+1]);
            }
            //if (i == 5)
            //{
            //    Debug.Log(color + "  E:  " + neighbor);
            //}
            Colors.Add(color);
            Colors.Add(neighbor);
            Colors.Add(neighbor);
            //东南2:SE
            if (i<width)
            {
                neighbor = color;
            }
            else
            {
                if (ifEven)
                {
                    neighbor = (colors[i - width ]);
                }
                else
                {
                    if (ifEnd)
                    {
                        neighbor = color;
                    }
                    else
                    {
                        neighbor = (colors[i - width+1]);
                    }
                }
            }
            //if (i == 5)
            //{
            //    Debug.Log(color + "  SE:  " + neighbor);
            //}
            Colors.Add(color);
            Colors.Add(neighbor);
            Colors.Add(neighbor);
            //西南3:SW
            if (i < width) neighbor = color;
            else
            {
                if (ifEven)
                {
                    if (ifStart) neighbor = color;
                    else
                        neighbor = (colors[i - width - 1]);
                }
                else
                    neighbor = (colors[i - width]);
            }

            Colors.Add(color);
            Colors.Add(neighbor);
            Colors.Add(neighbor);
            //西4:W
            if (ifStart)
            {
                //如果在地图起始位置,没有西邻居
                neighbor = color;
            }
            else
            {
                neighbor = (colors[i - 1]);
            }
            Colors.Add(color);
            Colors.Add(neighbor);
            Colors.Add(neighbor);
            //5西北:NW
            if (currHeight == (height - 1))
            {
                neighbor = color;
            }
            else
            {
                if (ifEven)
                {
                    if (ifStart)
                    {
                        neighbor = color;
                    }
                    else
                    {
                        neighbor = (colors[i + width - 1]);
                    }
                }
                else
                {
                    neighbor = (colors[i + width]);
                }
            }

            Colors.Add(color);
            Colors.Add(neighbor);
            Colors.Add(neighbor);
逻辑做了修正,打印出来的颜色参数也符合逻辑,但是渲染出来的结果如下图所示,有一部分不正确,原因不明!
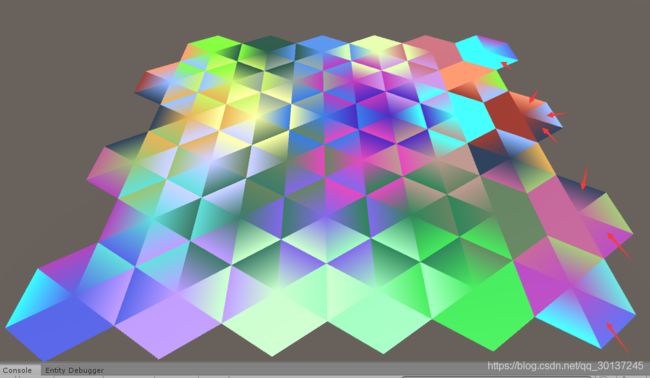
箭头所指的三角区域应该显示该单元自身的颜色,对应的值也是其自身颜色,就是渲染不对。如果有大佬知道原因,请留言告知,非常感谢!我反复打印,反复查找资料,无果,浪费了打量时间!Orz跪了!
今天因为这个颜色渲染不正确而耽误了进度,明天继续做颜色处理,已经把项目上传到Github,有兴趣的朋友可以看看:HexMapMadeInUnity2019ECS
更新计划
作者的话
![]()
如果喜欢我的文章可以点赞支持一下,谢谢鼓励!如果有什么疑问可以给我留言,有错漏的地方请批评指证!
如果有技术难题需要讨论,可以加入开发者联盟:566189328(付费群)为您提供有限的技术支持,以及,心灵鸡汤!
当然,不需要技术支持也欢迎加入进来,随时可以请我喝咖啡、茶和果汁!( ̄┰ ̄*)
