关于 Android 中 TabLayout 下划线适配文字长度解析(附清晰详细的源码解析)
温故而知新 坚持原创 请多多支持
一、问题背景
假期在做项目的时候,当时遇到了一个需求就是需要使用 TabLayout + ViewPager 来实现一个上部导航栏的动态效果,并且希望下划线的长度等于或者小于导航栏中文字的宽度,当时从网上查询资料的时候是发现目前大概是有这么三种思路来实现,第一种比较简单,就是直接通过自定义 CustomView 并在代码中动态设置给 Tab 即可,而另一种思路相对复杂一些,即利用反射的方式来进行设置(当时其实还不太知道可以直接通过 TabLayout.setTabIndicatorFullWidth(false) 来设置下划线宽度等于导航栏中文字的宽度),最后一种方法就是通过直接拷贝一份 TabLayout 代码并修改其中的部分代码逻辑(想让下划线长度小于文字长度好像只有这种办法)。
但是这三种设置的方式设置出来的效果还是有挺大区别的,这个区别主要体现在动画的效果上面,即通过第一种方式设置后的下划线虽然长度虽然可以同文字相匹配,但是却丧失了下划线滑动的效果,同时如果我们需要设置其长度与文字的长度适配等长,那么也意味着对于不同长度的文字我们需要编写特定的 CustomView ,这样的话其实工作量和代码的重复还是挺高的,但是对于后二种解决的方案就不存在这种问题。
因为当时的项目赶的比较急,并且当时的 Android 方面的基础也不是特别的扎实,所以当时是在简单的尝试过第二种方式后就选择放弃了,然后选择了第一种较为简单的实现方式。后来发现之所以网上的代码不能够直接拿过来就是用的原因一方面是随着 SDK 的不断更新,不同版本的变量名和一些类名等都已经发生了改变,同时如果你不是真的理解了其背后的原理,那么只是照搬照抄是无济于事的,因此当我在做完项目并通过一定的技术积累之后,我又返回到了这里,希望能够通过自己的技术积累来解决这个问题。
因为第一种方式比较简单,所以我就不在这里赘述了,直接分析第二、三种解决这个问题的方案。同时本篇文章我将会从源码的角度,带领大家一步一步的从浅到深的去解析 TabLayout 的部分源码,梳理 TabLayout 背后的代码逻辑,让大家能够更加清晰的真正了解了为什么可以通过反射的方式来处理这个问题。
写这篇文章的目的主要是有两方面,一方面是因为现在网络上有很多的类似博文,但是都已经过期了,即其中的很多代码逻辑已经不适用于当前的 SDK 版本了,这样的话其实反而会对初学者造成一定的误导和困扰,另一方面,我觉得当我们在解决一个问题的时候,最重要的不是得到解决这个问题的答案,问题是无穷无尽的,答案也是无穷无尽的,我觉得更重要的是对于求解问题过程中我们所能够学习到的更多的东西,以及在这个过程中对自己的提升,因为我也建议大家在看完我的这篇博文之后,自己去点开 TabLayout 的源码,自己去切身的走一遍解决这个问题的逻辑,阅读相关的代码。
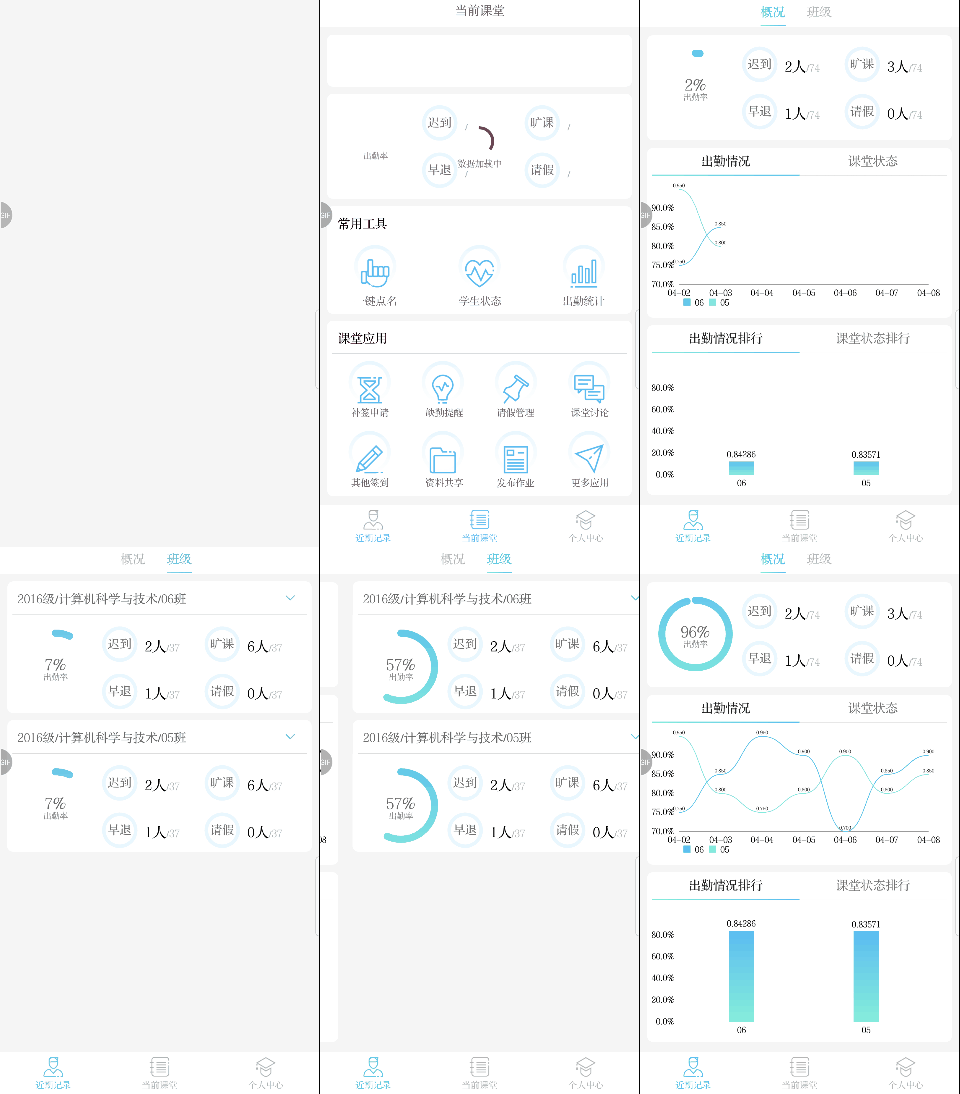
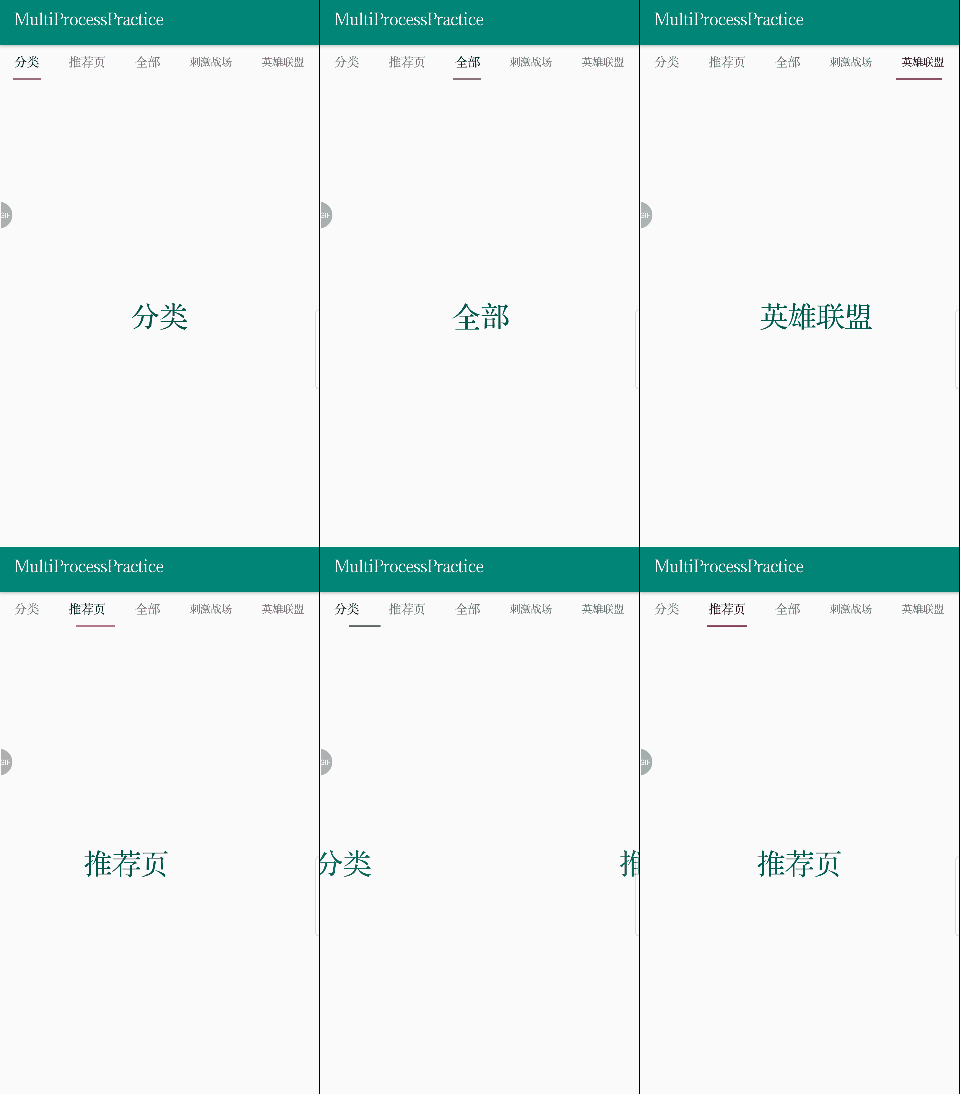
最后,在开始分析之前,先上图,第一幅图是我寒假自己做的一个学生课堂状态实时监测系统的移动端,其整个项目的源码我已经进行了开源,其是使用第一种方式来进行实现的。第二幅图是我后来再次自己尝试,没有使用 TabLayout.setTabIndicatorFullWidth(false) ,而是通过反射来达到的效果。
二、源码解析
(一)结构分析
从这里开始我将带大家跟随我探索时的思路,来从源码的角度一步一步的捋清 TabLayout 中部分代码的逻辑。首先我们需要捋清 TabLayout 视图的内部结构,这样我们才能更加清晰的阅读后面的源码。在这里我首先要讲的就是关于 TabLayout 中的三个比较主要的类,也即 TabLayout 三大内部结构。
1)SlidingTabIndicator(继承自 LinearLayout)
2)TabView(继承自 LinearLayout)
3)Tab(静态内部类)
为什么说这三个类是最主要的类呢,这里我们先通过源码中的成员变量来分析一下它们各自的功能。
(1)SlidingTabIndicator
    private class SlidingTabIndicator extends LinearLayout {

        // 下划线的高度
        private int selectedIndicatorHeight;

        // 下划线的画笔
        private final Paint selectedIndicatorPaint;

        // 默认的下划线
        private final GradientDrawable defaultSelectionIndicator;

        int selectedPosition = -1;
        float selectionOffset;
        private int layoutDirection = -1;

        // 下划线左右坐标( 这个很关键 )
        private int indicatorLeft = -1;
        private int indicatorRight = -1;

        // 下划线动画
        private ValueAnimator indicatorAnimator;

        ...
    }
首先这个类是继承自 LinearLayout 的一个 View,同时它是 TabLayout 的直接子 View,也就是直接位于 TabLayout 下面的子 View,当我们阅读源码的时候,我们就会发现其实 TabLayout 就是一个 HorizontalScrollView ,因此其是可以进行水平滑动的,而其只有一个子 View 即 SlidingTabIndicator 这个 LinearLayout。对于这点,我们先不从源码探究,先从代码中来进行简单的验证。直接编写上面这两句代码,通过运行的结果我们可以发现 TabLayout 确实只含有一个子 View,并且那个子 View 确实就是 SlidingTabIndicator。
Log.i("TAB", "The num of tabLayout is " + String.valueOf(mTabLayout.getChildCount()));
Log.i("TAB", "The child view is " + String.valueOf(mTabLayout.getChildAt(0).getClass()));![]()
而这个视图或者说这个类的主要作用就是作为一个底部的容器,装载着每一个 Item ,这里的 Item 也就是 TabView,其最常见的存在方式就是一行文字或者一行图片然后加上一个下划线,这样的组合就称为一个 Item。其次通过上面的成员变量我们还可以获取到的一个信息就是,TabView 是仅包含与图标和文字的,并不包含下划线,下划线是在 SlidingTabIndicator 中我们通过画笔画上去的,因此这个类其实也就是我们下面的切入点。
(2)TabView
   class TabView extends LinearLayout {

        // 数据存储
        private TabLayout.Tab tab;

        // title and icon
        private TextView textView;
        private ImageView iconView;

        // CustomView
        private View customView;
        private TextView customTextView;
        private ImageView customIconView;

        @Nullable
        private Drawable baseBackgroundDrawable;
        private int defaultMaxLines = 2;

        ...
    }
这个类也是一个继承自 LinearLayout 的视图,同时它就是我们上面所说的 Item ,作为子项目存在于 SlidingTabIndicator 容器中。通过它的成员变量我们也可以大概了解其作用,首先我们可以发现它其中会保存一个 Tab 实例,这个实例的作用主要就是用于存储图标地址和标题等信息,关于这个类详细讲解我们放在下面。接着是一个 TextView 和一个 ImageView ,从变量名我们也可以猜出,它们就是导航栏中的标题和图标。再往下的话是 CustomView ,也就是我们在上面提到的第一种解决方案中自定义的 CustomView。再往下最后的就是默认的背景图和最大行数了,这个暂时对我们的用处不太大。
那么 TabView 是在什么时候被添加到 SlidingTabIndicator 中的呢,当我们阅读源码的时候,在前半部分会发现下面这样的一段代码,我们会发现不管是调用哪个 addTab 方法,最终都会调用 configureTab 和 addTabView 这两个方法。
    public void addTab(@NonNull TabLayout.Tab tab) {
        this.addTab(tab, this.tabs.isEmpty());
    }

    public void addTab(@NonNull TabLayout.Tab tab, int position) {
        this.addTab(tab, position, this.tabs.isEmpty());
    }

    public void addTab(@NonNull TabLayout.Tab tab, boolean setSelected) {
        this.addTab(tab, this.tabs.size(), setSelected);
    }

    public void addTab(@NonNull TabLayout.Tab tab, int position, boolean setSelected) {
        if (tab.parent != this) {
            throw new IllegalArgumentException("Tab belongs to a different TabLayout.");
        } else {
            this.configureTab(tab, position);
            this.addTabView(tab);
            if (setSelected) {
                tab.select();
            }

        }
    }
所以下面我们再接着来看这两个方法,首先对于 configureTab 没什么好说的,就是将当前的 tab 保存到 tabs 里面,便于后面的方法调用(比如外部通过 getTabAt 方法来获取指定位置的 Tab),在这个方法的后面我们看到了 addTabView 方法,我们发现正是再这个方法中完成了将当前 Item 的 TabView 添加到 中,而哪个 addView 方法,就已经是 ViewGroup 中的方法了。
    private void configureTab(TabLayout.Tab tab, int position) {
        tab.setPosition(position);
        this.tabs.add(position, tab);
        int count = this.tabs.size();

        for(int i = position + 1; i < count; ++i) {
            ((TabLayout.Tab)this.tabs.get(i)).setPosition(i);
        }

    }

    private void addTabView(TabLayout.Tab tab) {
        TabLayout.TabView tabView = tab.view;
        this.slidingTabIndicator.addView(tabView, tab.getPosition(), this.createLayoutParamsForTabs());
    }
(3)Tab
    public static class Tab {

        public static final int INVALID_POSITION = -1;
        private Object tag;

        // 图标信息
        private Drawable icon;
        // 标题信息
        private CharSequence text;

        private CharSequence contentDesc;
        private int position = -1;

        // customView
        private View customView;

        // 记录TabLayout
        public TabLayout parent;

        // 绑定的 TabView
        public TabLayout.TabView view;

        ...
    }
对于 Tab 类,正如我们上面所说的,他主要是一个信息存储的类,并且其会持有一个 TabView 的引用,这样的话其实我们就可以发现 TabView 和 Tab 是互相持有的一个关系,TabView 主要负责视图展示,而 Tab 主要负责信息的存储和更新等,类似于 model 和 presenter 的一个作用。
同时我们发现这个类是一个静态的内部类,这也就说明它可以被外部进行引用,至于其具体的应用如果你仔细回忆一下就会想到,当我给 TabView 来设置视图的时候,不管是设置 TextView 的 text 还是设置 Icon 还是设置 CustomView,其实我们都是先获取的一个 TabLayout.Tab 对象,然后来对其进行操作,当数据改变后就会映射到 TabView 上面。所以我们可以理解这个类主要就是用于开放给用户来进行相关的数据设置和更新视图等。
(4)总结
所以最后总结来说,TabLayout 的结构关系就是 TabLayout 是最外层的容器,并且是一个可以支持横向滑动的 HorizontalScrollView ,然后 SlidingTabIndicator 是位于 TabLayout 中的一个水平的 LinearLayout 容器,所有的 TabView 都是存在于这个容器之中的,并且我们还可以的到的一个重要信息就是下划线是独立于 TabView 的,最后对于 TabView 就是最核心的导航中的单个子项目,并且是一个 LinearLayout ,同时其与 Tab 是一种相互持有的关系,它通过 Tab 来接受外界对于视图中数据的更新。
(二)流程分析
介绍完了 TabLayout 的内部结构,接下来我们就来梳理在 TabLayout 中,下划线到底是怎样来设置的。为了便于读者理解,所以这里我采用和我当时分析时相同的逆推的分析方式,从后向前对其进行推导。
首先我们开始的时候如果毫无头绪,这里我提供一个思路,就是我们可以先从外界找一个入口,比如通过 TabLayout.setSelectTabIndicatorColor 这个设置下划线颜色的方式开始来进入到下划线的相关设置代码中。这个方法的代码很清晰,它直接调用了 slidingTabIndicator 的 setSelectedIndicator 方法,因此我们直接跟进去。
    public void setSelectedTabIndicatorColor(@ColorInt int color) {
        this.slidingTabIndicator.setSelectedIndicatorColor(color);
    }
进到这个方法里面我们会发现这里就没有什么营养了,它只是简单的调用的画笔的颜色设置方法,但是在这里我们得到了一个新的思路,也就是我们大概可以明白原来下划线是通过这个 selectedIndicatorPaint 画笔画出来的,这样我们就可以去选择跟踪这个画笔。
        void setSelectedIndicatorColor(int color) {
            if (this.selectedIndicatorPaint.getColor() != color) {
                this.selectedIndicatorPaint.setColor(color);
                ViewCompat.postInvalidateOnAnimation(this);
            }

        }
因为通过上面的代码,我们基本已经可以确定下划线的绘制是在 selectedIndicatorPaint 中完成的了并且其是一个 LinearLayout,所以我们直接从这个视图的 onMeasure 来捋顺逻辑。
对于 onMeasure 方法我们可以发现它大概的测量流程是这样的,首先其通过调用父类(LinearLayout)的 onMeasure 方法来对其子 View(TabView)来进行递归测量,其次其通过遍历求取列表中的 TabView 的最宽宽度并保存,然后它又通过一个遍历将列表中所有的 TabView 的宽度都设定为最大值,最后进行重绘。
其实从下面的主要流程我们已经可以明白为什么 TabLayout 中所有的 TabView 的宽度都是相同的了,接着我们继续往下走。
        protected void onMeasure(int widthMeasureSpec, int heightMeasureSpec) {

            // 1.测量子视图
            super.onMeasure(widthMeasureSpec, heightMeasureSpec);
            if (MeasureSpec.getMode(widthMeasureSpec) == 1073741824) {
                if (TabLayout.this.mode == 1 && TabLayout.this.tabGravity == 1) {
                    int count = this.getChildCount();
                    int largestTabWidth = 0;
                    int gutter = 0;

                    // 2.获取列表中最大的宽度
                    for(int z = count; gutter < z; ++gutter) {
                        View child = this.getChildAt(gutter);
                        if (child.getVisibility() == 0) {
                            largestTabWidth = Math.max(largestTabWidth, child.getMeasuredWidth());
                        }
                    }

                    if (largestTabWidth <= 0) {
                        return;
                    }

                    gutter = TabLayout.this.dpToPx(16);
                    boolean remeasure = false;
                    if (largestTabWidth * count > this.getMeasuredWidth() - gutter * 2) {
                        TabLayout.this.tabGravity = 0;
                        TabLayout.this.updateTabViews(false);
                        remeasure = true;
                    } else {

                        // 3.通过遍历将所有的 TabView 的宽度都设置为最大宽度
                        for(int i = 0; i < count; ++i) {
                            android.widget.LinearLayout.LayoutParams lp = (android.widget.LinearLayout.LayoutParams)this.getChildAt(i).getLayoutParams();
                            if (lp.width != largestTabWidth || lp.weight != 0.0F) {
                                lp.width = largestTabWidth;
                                lp.weight = 0.0F;
                                remeasure = true;
                            }
                        }
                    }

                    // 4.如果求得新的最大宽度则重新测量所有 TabView
                    if (remeasure) {
                        super.onMeasure(widthMeasureSpec, heightMeasureSpec);
                    }
                }

            }
        }
接下来被调用的就应该是 onLayout 布局方法,这个方法的主要作用就是对已经测量好的视图进行布局放置,从源码中我们可以看到,它依然先调用了父类的 onLayout 方法来对其列表中的 TabView 来进行递归布局放置,然后其判断了当前视图是正在播放动画,如果在播放动画就停止通话后再调用方法进行布局。
这里其实我们通过上下两个方法的名称已经可以明白,其实这个当前类重写的就是对于下划线的布局放置,并且上面的 animateIndicatorToPosition 方法就是对于下划线动画的设置,而下面的 updateIndicatorPostion 方法就是对于下划线的一个布局放置了,所以我们直接跟进下面的方法。
        protected void onLayout(boolean changed, int l, int t, int r, int b) {
            super.onLayout(changed, l, t, r, b);
            if (this.indicatorAnimator != null && this.indicatorAnimator.isRunning()) {
                this.indicatorAnimator.cancel();
                long duration = this.indicatorAnimator.getDuration();
                this.animateIndicatorToPosition(this.selectedPosition, Math.round((1.0F - this.indicatorAnimator.getAnimatedFraction()) * (float)duration));
            } else {
                this.updateIndicatorPosition();
            }

        }
对于这个 updateIndicatorPosition 方法整个流程是稍微有一点复杂,但是我们需要看比较主要的部分,即当不设置偏移和自定义 CustomView 的情况下,这时的话正常来说 selectedTitle 应该是 TabView 类型的,并且当前 left 和 right 就应当是 selectedTitle 的 left 和 right 坐标,也就是 TabView 的左右坐标,也就是说默认情况下下划线的宽度会等于 TabView 的宽度。最后再通过 setIndicatorPosition 方法将求得左右坐标值赋给下划线的左右坐标,并刷新视图。
这里需要强调的是我们可以在外界通过 TabLayout.setTabIndicatorFullWidth 这个方法来将 tabIndicatorFullWidth 设置为 false,这时的下划线模式就会按照 TabView 中文字的长度来设置了,所以我们接下来可以看一下这里面的 calculateTabViewContentBounds 方法的具体实现,看看它是怎么做的。
        private void updateIndicatorPosition() {

            // 获取当前被选中的子项目
            View selectedTitle = this.getChildAt(this.selectedPosition);

            int left;
            int right;

            if (selectedTitle != null && selectedTitle.getWidth() > 0) {

                // 获取被选中子项目的左右坐标
                left = selectedTitle.getLeft();
                right = selectedTitle.getRight();

                // 如果当前视图的 tabIndicatorFullWidth 被设置为 true(默认为 true)
                // 同时当前子项目是 TabView 类型的
                if (!TabLayout.this.tabIndicatorFullWidth && selectedTitle instanceof TabLayout.TabView) {

                    // 调用方法重新计算子项目的左右坐标
                    this.calculateTabViewContentBounds((TabLayout.TabView)selectedTitle, TabLayout.this.tabViewContentBounds);
                    left = (int)TabLayout.this.tabViewContentBounds.left;
                    right = (int)TabLayout.this.tabViewContentBounds.right;
                }

                // 如果设置了偏移量并且当前所选中的子项目有效
                // 那么再次重新计算左右坐标值
                if (this.selectionOffset > 0.0F && this.selectedPosition < this.getChildCount() - 1) {

                    // 获取下个项目的信息
                    View nextTitle = this.getChildAt(this.selectedPosition + 1);
                    int nextTitleLeft = nextTitle.getLeft();
                    int nextTitleRight = nextTitle.getRight();

                    // 这一步的判断同上
                    if (!TabLayout.this.tabIndicatorFullWidth && nextTitle instanceof TabLayout.TabView) {
                        this.calculateTabViewContentBounds((TabLayout.TabView)nextTitle, TabLayout.this.tabViewContentBounds);
                        nextTitleLeft = (int)TabLayout.this.tabViewContentBounds.left;
                        nextTitleRight = (int)TabLayout.this.tabViewContentBounds.right;
                    }

                    // 计算左右坐标
                    // 公式中抛去偏移量其实也就是前一个的的坐标加上
                    left = (int)(this.selectionOffset * (float)nextTitleLeft + (1.0F - this.selectionOffset) * (float)left);
                    right = (int)(this.selectionOffset * (float)nextTitleRight + (1.0F - this.selectionOffset) * (float)right);
                }
            } else {
                right = -1;
                left = -1;
            }

            this.setIndicatorPosition(left, right);
        }

        void setIndicatorPosition(int left, int right) {
            if (left != this.indicatorLeft || right != this.indicatorRight) {
                this.indicatorLeft = left;
                this.indicatorRight = right;
                ViewCompat.postInvalidateOnAnimation(this);
            }

        }
我们可以看到,这里它先通过 getContentWidth 方法获取了内容的宽度,然后获取内容的中心,并设置下下划线的左右坐标分别为中心点向左向右分别增加内容宽度的一半,这样也就实现了下划线和标题文字宽度相等的目的。
        private void calculateTabViewContentBounds(TabLayout.TabView tabView, RectF contentBounds) {
            int tabViewContentWidth = tabView.getContentWidth();
            if (tabViewContentWidth < TabLayout.this.dpToPx(24)) {
                tabViewContentWidth = TabLayout.this.dpToPx(24);
            }

            int tabViewCenter = (tabView.getLeft() + tabView.getRight()) / 2;
            int contentLeftBounds = tabViewCenter - tabViewContentWidth / 2;
            int contentRightBounds = tabViewCenter + tabViewContentWidth / 2;
            contentBounds.set((float)contentLeftBounds, 0.0F, (float)contentRightBounds, 0.0F);
        }

        private int getContentWidth() {
            boolean initialized = false;
            int left = 0;
            int right = 0;
            View[] var4 = new View[]{this.textView, this.iconView, this.customView};
            int var5 = var4.length;

            for(int var6 = 0; var6 < var5; ++var6) {
                View view = var4[var6];
                if (view != null && view.getVisibility() == 0) {
                    left = initialized ? Math.min(left, view.getLeft()) : view.getLeft();
                    right = initialized ? Math.max(right, view.getRight()) : view.getRight();
                    initialized = true;
                }
            }

            return right - left;
        }
最后我们来看一下 draw 方法,在这个方法中下划线完成了最后的绘制。对于 draw 这个方法没有什么太多需要讲的,与正常视图的 draw 方法的区别不大,需要注意的就是它是通过 Drawable.setBounds 这个方法来完成绘制的,对于这个方法作用就是绘制一个指定区域内的矩形。这样的话其实也就为我们提供了一个思路,那就是直接通过这个方法来设置我们想要的下划线长度。
        public void draw(Canvas canvas) {
            int indicatorHeight = 0;
            if (TabLayout.this.tabSelectedIndicator != null) {
                indicatorHeight = TabLayout.this.tabSelectedIndicator.getIntrinsicHeight();
            }

            if (this.selectedIndicatorHeight >= 0) {
                indicatorHeight = this.selectedIndicatorHeight;
            }

            int indicatorTop = 0;
            int indicatorBottom = 0;

            // 下划线模式判断
            switch(TabLayout.this.tabIndicatorGravity) {
            case 0:
                // 默认是位于 TabView 的底部的
                indicatorTop = this.getHeight() - indicatorHeight;
                indicatorBottom = this.getHeight();
                break;
            case 1:
                indicatorTop = (this.getHeight() - indicatorHeight) / 2;
                indicatorBottom = (this.getHeight() + indicatorHeight) / 2;
                break;
            case 2:
                indicatorTop = 0;
                indicatorBottom = indicatorHeight;
                break;
            case 3:
                indicatorTop = 0;
                indicatorBottom = this.getHeight();
            }

            // 如果下划线左坐标大于零并且右坐标大于左坐标
            // 说明当前的下划线坐标合法有效
            if (this.indicatorLeft >= 0 && this.indicatorRight > this.indicatorLeft) {
                Drawable selectedIndicator = DrawableCompat.wrap((Drawable)(TabLayout.this.tabSelectedIndicator != null ? TabLayout.this.tabSelectedIndicator : this.defaultSelectionIndicator));

                // 绘制下划线
                selectedIndicator.setBounds(this.indicatorLeft, indicatorTop, this.indicatorRight, indicatorBottom);

                if (this.selectedIndicatorPaint != null) {
                    if (VERSION.SDK_INT == 21) {
                        selectedIndicator.setColorFilter(this.selectedIndicatorPaint.getColor(), android.graphics.PorterDuff.Mode.SRC_IN);
                    } else {
                        DrawableCompat.setTint(selectedIndicator, this.selectedIndicatorPaint.getColor());
                    }
                }

                selectedIndicator.draw(canvas);
            }

            super.draw(canvas);
        }
    }
三、解决方案
对于不同的情况有不同的解决方案,如果你仅仅是需要下划线的长度等于文字的长度,以前的话是只能通过反射来进行设置,而现在的话可以直接通过 TabLayout.setTabIndicatorFullWidth(false) 这个方法来进行设置,并且对于其原理我们也已经进行过了相应的分析。
如果你需要下划线的长度小于文字的长度的话,那么暂时还没有太好的解决方案,这里提供一个思路,因为源代码是不允许修改的,我们可以拷贝一份,然后对其进行修改,然后再进行替换。至于修改的方法其实就是我们上面最后提到的 draw 中的 Drawable.setBounds 方法,通过它来直接将我们设置的下划线长度设置给下划线。
但是需要注意的是,我们必须要先获取 TabView 的水平中点,然后再从中点分别向两侧延长二分之一长度的设置值,这么做是为了保证下划线位于 TabView 的水平中心处。具体的代码逻辑如下,直接重写 SlidingTabIndicator 的 draw 方法中这部分的逻辑即可(新增的代码就是我添加注释下面的两行)。
            if (this.indicatorLeft >= 0 && this.indicatorRight > this.indicatorLeft) {
                Drawable selectedIndicator = DrawableCompat.wrap((Drawable)(TabLayout.this.tabSelectedIndicator != null ? TabLayout.this.tabSelectedIndicator : this.defaultSelectionIndicator));

                // 求 TabView 的水平中心点后并绘制下划线
                int indictorCenter = (this.indicatorLeft+this.indicatorRight)/2;
                selectedIndicator.setBounds( indictorCenter-indictorWidth/2, indicatorTop, indictorCenter+indictorWidth/2, indicatorBottom);

                if (this.selectedIndicatorPaint != null) {
                    if (VERSION.SDK_INT == 21) {
                        selectedIndicator.setColorFilter(this.selectedIndicatorPaint.getColor(), android.graphics.PorterDuff.Mode.SRC_IN);
                    } else {
                        DrawableCompat.setTint(selectedIndicator, this.selectedIndicatorPaint.getColor());
                    }
                }

                selectedIndicator.draw(canvas);
最后我们还需要给外界留一个方法,使用户可以从外界对下划线的长度进行设置(这个方法设置在 SlidingTabIndicator 类外部就可以了)。
    int indictorWidth = 0;

    public int getIndictorWidth() {
        return  indictorWidth;
    }

    public void setIndictorWidth(int indictorWidth) {

        this.indictorWidth = dpToPx(indictorWidth);
    }

