编写MTK6737平台的GPIO驱动例程(二)
第二部 按pinctrl的方式编写GPIO的驱动程序
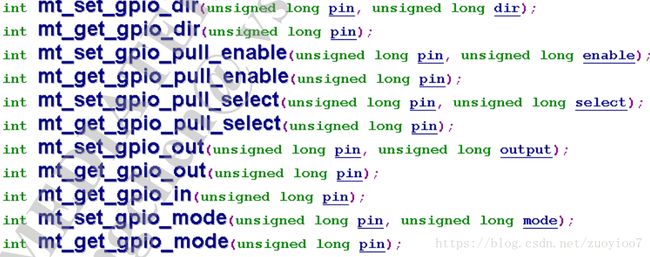
1、先说点废话,之前的MT65xx系列平台上所使用GPIO控制函数,在MT67xx平台上API均没有了。
怀念之前在任意一个设备中任意控制GPIO的时候。
随之而来的是使用Pinctrl的替代。在kernel中引入Pinctrl子系统,是linux系统为了统一各SOC厂家pin管理,目的是为了减少SOC厂家系统移植工作量。通常通过设备树初始化pinctrl,并提供调用io接口。
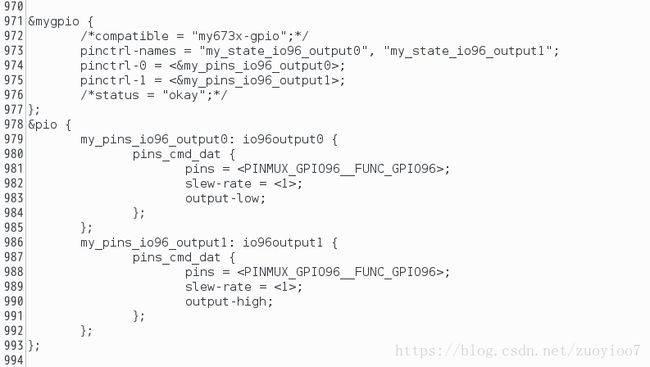
在对应的proj.dts文件中填充之前的mygpio设备节点。kernel-3.18/arch/arm64/boot/dts/Projxxx.dts(别天真的认为Projxxx是实际的名称):
就是一个编号为96的GPIO,两个名为:"my_state_io96_output0", "my_state_io96_output1"状态。一个输出高点评,一个输出低电平。
#include
#include
#include
#include
#include
#include
#include
#include
#include
#include
#include
#include
#include
#include
#include
#include
#include
#include
#include

#include "mt-plat/mtgpio.h"
#include
#include
#include
#include

/* 生命函数定义 */
static int mygpio_probe(struct platform_device *pdev);
static int mygpio_remove(struct platform_device *pdev);

struct pinctrl *pinctrlio96;
struct pinctrl_state *pio96_output0, *pio96_output1;


static const struct of_device_id mygpio_of_match[] = {
	{ .compatible = "mykgpio", },
	{},
};

static struct platform_driver mygpio_driver = {
	.remove = mygpio_remove,
	.probe = mygpio_probe,
	.driver = {
			.name = "myGPIO",
			.owner = THIS_MODULE,
			.of_match_table = mygpio_of_match,
	},
};

/* 设置管教的状态  level=1 输出高电平 level=0 输出低电平*/
void my673x_gpio_output(int level)
{
	printk("[myGPIO]my673x_gpio_output level = %d\n", level);

	/* 设置名字为"my_state_io96_output0"这个pinctrl对应引脚的pin state */
	if (level)
		pinctrl_select_state(pinctrlio96, pio96_output1);
	else
		pinctrl_select_state(pinctrlio96, pio96_output0);
}

static int mygpio_misc_open(struct inode *inode, struct file *file)
{
	printk("MyGPIO OPen. \r\n");

	return 0;
}


static int mygpio_misc_release(struct inode *inode, struct file *file)
{
	printk("MyGPIO Release. \r\n");

	return 0;
}

static long mygpio_unlocked_ioctl(struct file *file, unsigned int cmd, unsigned long arg)
{
	printk("MyGPIO Ioctl. \r\n");

	printk("MyGPIO cmd=%d \r\n", cmd);

	/* 根据命令执行相应的操作 */
	switch(cmd) {
		/* 输出GPIO96高电平 */
		case 1:
			my673x_gpio_output(1);
			break;

		/* 输出GPIO96低电平 */
		case 0:
			my673x_gpio_output(0);
			break;

		default:
			return -EINVAL;
	}


	return 0;
}

static const struct file_operations mygpio_fops = {
 /* .owner = THIS_MODULE, */
	.open = mygpio_misc_open,
	.release = mygpio_misc_release,
	.unlocked_ioctl = mygpio_unlocked_ioctl,
};


static struct miscdevice mygpio_misc_device = {
	.minor = MISC_DYNAMIC_MINOR,		//动态设备号
	.name = "myGPIO",
	.fops = &mygpio_fops,
};


/* My GPIO probe */
static int mygpio_probe(struct platform_device *pdev)
{
	int ret = 0;

	printk("MyGPIO Probe. \r\n");

	/* 注册一个misc设备 */
	ret = misc_register(&mygpio_misc_device);
	if (ret != 0 )
		printk("myGPIO: mygpio_device register failed\n");

	/* 获取pin control state holder 的句柄 */
	pinctrlio96 = devm_pinctrl_get(&pdev->dev);
	if (IS_ERR(pinctrlio96)) {
		ret = PTR_ERR(pinctrlio96);
		printk("fwq Cannot find mygpio pinctrlio96!\n");
		return ret;
	}

	/* dts中 pinctrl-names = "my_state_io96_output0", "my_state_io96_output1"; */
	/* 得到设备树中名字为 my_state_io96_output0和 my_state_io96_output1对应的pin state */
	pio96_output0 = pinctrl_lookup_state(pinctrlio96, "my_state_io96_output0");
	if (IS_ERR(pio96_output0)) {
		ret = PTR_ERR(pio96_output0);
		printk("fwq Cannot find touch pinctrl my_state_io96_output0!\n");
		return ret;
	}
	pio96_output1 = pinctrl_lookup_state(pinctrlio96, "my_state_io96_output1");
	if (IS_ERR(pio96_output1)) {
		ret = PTR_ERR(pio96_output1);
		printk("fwq Cannot find touch pinctrl my_state_io96_output1!\n");
		return ret;
	}

	return ret;
}


static int mygpio_remove(struct platform_device *pdev)
{
	int err;

	printk("MyGPIO remove. \r\n");

	err = misc_deregister(&mygpio_misc_device);
	if (err)
		printk("deregister gpio\n");

	return err;
}

static int __init my_gpio_init(void)
{
	int ret = 0;

	printk("Register MyGPIO platform_driver. \r\n");

	ret = platform_driver_register(&mygpio_driver);
	if(ret != 0 )
		printk("unable to register MyGPIO driver.\n");

	return ret;
}

/*---------------------------------------------------------------------------*/
static void __exit my_gpio_exit(void)
{
	platform_driver_unregister(&mygpio_driver);
}

subsys_initcall(my_gpio_init);
/*module_init(my_gpio_init);*/
module_exit(my_gpio_exit);

MODULE_AUTHOR("zue");
MODULE_DESCRIPTION("MY General Purpose Driver (GPIO)");
MODULE_LICENSE("GPL v2"); 主要核心数据结构体就是:![]()
![]()
主要使用 devm_pinctrl_get函数获取DTS中的设备节点;使用 pinctrl_lookup_state获取dts中pinctrl的设置;使用 pinctrl_select_state函数设置pinctrl的设置。
3、只有驱动并不知道这个驱动是否能使用,好需要写一个驱动测试程序。
#include
#include
#include
#include
#include
#include
#include

#define DEVICE_NAME	"/dev/myGPIO"	//所对应的设备名


int binstr_to_int(char *binstr)
{
	int ret = 0;
	int i = 0;
	char bnum[2];
	memset(bnum,'0',1);
	int len = strlen(binstr);
	if(len > 1)
		strcpy(bnum,binstr + len - 1);
	else
		strcpy(bnum + 1 - len,binstr);
	for(i = 0;i < 1;i ++)	{
		ret <<= 1;
		ret += (bnum[i] == '0' ? 1 : 0);
	}

	return ret;

}


int main(int argc, char **argv)
{
	int fd=0,arg=0;


	printf("myGPIO argc: %d.\n",argc);

	printf("myGPIO argv[1]: %s.\n",argv[1]);

	arg = binstr_to_int(argv[1]);

	printf("myGPIO arg: %d.\n",arg);

	/* 打印用法 */
	if(argc > 2)	{
		printf("Usage: %s \n"
			"example: %s -- Will turn on 0, and turn off 1.\n",argv[0],argv[1]);
		_exit(EXIT_FAILURE);
	}

	/* 打开设备 */
	if((fd = open(DEVICE_NAME, O_RDWR)) == -1)	{
		printf("Open dev error!\n");
		_exit(EXIT_FAILURE);
	}


	//输出高电平
	if(arg == 1)
	{
		ioctl(fd,1,&arg);
		printf("myGPIO dat: %d.\n",arg);
	}

	//输出低电平
	if(arg == 0)
	{
		ioctl(fd,0,&arg);
		printf("myGPIO dat: %d.\n",arg);
	}

	_exit(EXIT_SUCCESS);

}
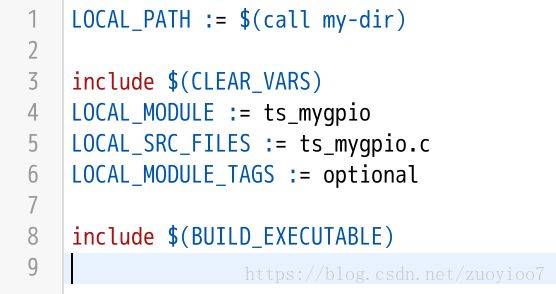
测试程序很简单,首先打开我们之前注册的杂项设备,所在路径/dev/myGPIO,剩下的只要使用 ioctl函数,向cmd参数中传入控制字节就可以了。在Android中编译应用已经不能简单使用make或者gcc命令了,当然最终还是它们干活。有更简单的工具了,那就是mmm。在使用mmm工具时,要先写一个Android.mk文件,这样mmm才能按图索骥的编译好我们的测试程序。
将其存在项目根目录下的packages/apps/TsMyGPIO/(TsMyGPIO是我创建的目录)
在工程根目录下执行 mmm packages/apps/TsMyGPIO命令即可。
至于输出的可执行程序就别在本目录下找了,输出所在的目录
out/target/product/Projxxx/system/bin
3、执行测试程序测试。
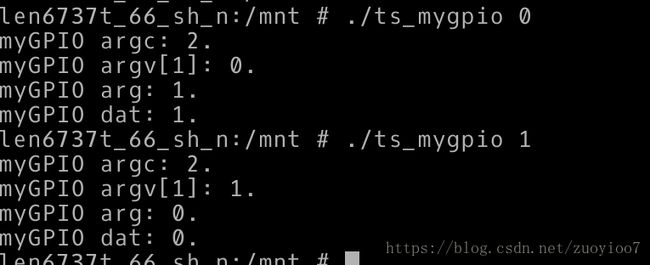
可以使用adb push命令将测试程序上传到开发板上,可以使用chmod命令赋予可执行权限。
参数是0的时候接到96编号的GPIO的LED是灭的,反之,参数是1的时候接到96编号的GPIO的LED是亮的。LED接法是上拉接法。


