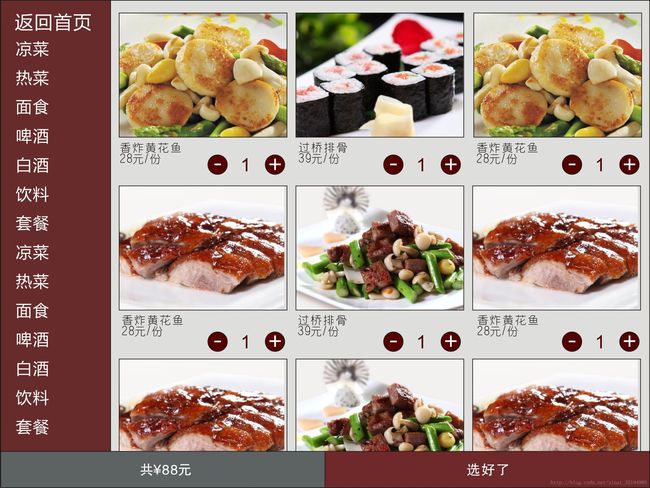
使用 RecyclerView 做点餐列表联动页面
使用 RecyclerView 做点餐列表联动页面
- 版权声明:本文为博主原创文章,未经博主允许不得转载。
最近刚换了工作,来到一家做了11年餐饮软件管理的公司,开发平板端点餐安卓端原生app。因为之前一直没做过类似的软件,对于我来说是一个全新的开始,所以打算写博客记录下来我从头开发的整个过程。
平板设置横屏属性就可以横屏在平板上显示,不用担心切换横竖屏会导致activity的生命周期改变。代码如下:
android:launchMode="singleTask" android:screenOrientation="landscape"
之后就开始做点餐界面,因为主界面就是专门用来点餐的,所以直接开始做点餐界面。产品经理说整个app是不需要联网就可以进行的,所有的资料是从后台下载下来之后存储下来,然后再取出来。之前一直没涉及到数据库的知识,所以这也是我学习的重点。
最先开始呢就是先做二级列表菜单页面,我用的是 RecyclerView ,很多知识可以从鸿洋的博客学习,我做的这个很大程度上也是从上面学习的
http://blog.csdn.net/lmj623565791/article/details/45059587
还有一部分是从
http://blog.csdn.net/w804518214/article/details/51570975
上面学习的,不过很大程度上改进了,根据我的需求在他的基础上做了很多改变。
效果图来看不复杂内容并没多少,值得介绍一下的知识点也就下面几个吧
- 左右列表滑动时联动
- 添加商品时的抛物线动画
- 底部弹出购物车清单
- 数据的同步
左右列表联动
联动主要有两个效果
- 左侧列表点击选择分类,右侧列表滑动到对应分类
- 右侧列表滑动过程中左侧列表高亮的分类跟随变化
第一个效果简单,左侧列表item添加点击事件,事件中调用右侧列表的setSelection(int positon) 方法。
第二个效果要给右侧列表添加ScrollListener,根据列表中显示的第一条数据设置左侧选中的分类
listView.setOnScrollListener(new RecyclerView.OnScrollListener(){

            public void onScrollStateChanged(RecyclerView view, int scrollState) {

            }

            public void onScrolled(RecyclerView view, int firstVisibleItem, int visibleItemCount) {
                //根据firstVisibleItem获取分类ID,根据分类id获取左侧要选中的位置
                GoodsItem item = dataList.get(firstVisibleItem);
                if(typeAdapter.selectTypeId != item.typeId) {
                    typeAdapter.selectTypeId = item.typeId;
                    typeAdapter.notifyDataSetChanged();
                    //左侧列表是个RecyclerView 所以使用smoothScrollToPosition(int position) 使当对应position的item可以滚动显示出来
                    rvType.smoothScrollToPosition(getSelectedGroupPosition(item.typeId));
                }
            }
        });
添加商品的动画
添加商品一共有三个动画
- 当商品从0到1 旋转左移显示出减号按钮
- 当商品从1到0 减号按钮旋转右移消失
- 添加商品时抛物线动画添加到购物车图标
前两个动画很简单可以分解成三个补间动画 旋转、平移、透明度。
/**
         * 点击加号显示减号的动画
         * @return
         */
        private Animation getShowAnimation(){
            AnimationSet set = new AnimationSet(true);
            RotateAnimation rotate = new RotateAnimation(0,720,RotateAnimation.RELATIVE_TO_SELF,0.5f,RotateAnimation.RELATIVE_TO_SELF,0.5f);
            set.addAnimation(rotate);
            TranslateAnimation translate = new TranslateAnimation(
                    TranslateAnimation.RELATIVE_TO_SELF,2f
                    ,TranslateAnimation.RELATIVE_TO_SELF,0
                    ,TranslateAnimation.RELATIVE_TO_SELF,0
                    ,TranslateAnimation.RELATIVE_TO_SELF,0);
            set.addAnimation(translate);
            AlphaAnimation alpha = new AlphaAnimation(0,1);
            set.addAnimation(alpha);
            set.setDuration(500);
            return set;
        }

        /**
         * 隐藏减号的动画
         * @return
         */
        private Animation getHiddenAnimation(){
            AnimationSet set = new AnimationSet(true);
            RotateAnimation rotate = new RotateAnimation(0,720,RotateAnimation.RELATIVE_TO_SELF,0.5f,RotateAnimation.RELATIVE_TO_SELF,0.5f);
            set.addAnimation(rotate);
            TranslateAnimation translate = new TranslateAnimation(
                    TranslateAnimation.RELATIVE_TO_SELF,0
                    ,TranslateAnimation.RELATIVE_TO_SELF,2f
                    ,TranslateAnimation.RELATIVE_TO_SELF,0
                    ,TranslateAnimation.RELATIVE_TO_SELF,0);
            set.addAnimation(translate);
            AlphaAnimation alpha = new AlphaAnimation(1,0);
            set.addAnimation(alpha);
            set.setDuration(500);
            return set;
        }
    }
抛物线动画和上面的差不多可以分解成两个平移动画,不过两个平移动画的差值器一个线性一个加速而已,因为动画界面跨度比较大所以需要在根部局内写,不能写在列表的item中(这样会显示不全)。
代码中的anim_mask_layout 即为整个布局文件的根布局,这里是一个RelativeLayout
实现过程
1、首先点击加号图标,拿到控件在屏幕上的绝对坐标,回调activity显示动画
 int[] loc = new int[2];
    v.getLocationInWindow(loc);
    activity.playAnimation(loc);
2、创建动画的控件并添加到根部局并在动画结束后移除动画view
    public void playAnimation(int[] start_location){
        ImageView img = new ImageView(this);
        img.setImageResource(R.drawable.button_add);
        setAnim(img,start_location);
    }
    //创建动画 平移动画直接传递偏移量
    private Animation createAnim(int startX,int startY){
        int[] des = new int[2];
        imgCart.getLocationInWindow(des);

        AnimationSet set = new AnimationSet(false);

        Animation translationX = new TranslateAnimation(0, des[0]-startX, 0, 0);
        //线性插值器 默认就是线性
        translationX.setInterpolator(new LinearInterpolator());
        Animation translationY = new TranslateAnimation(0, 0, 0, des[1]-startY);
        //设置加速插值器
        translationY.setInterpolator(new AccelerateInterpolator());
        Animation alpha = new AlphaAnimation(1,0.5f);
        set.addAnimation(translationX);
        set.addAnimation(translationY);
        set.addAnimation(alpha);
        set.setDuration(500);

        return set;
    }
    //计算动画view在根部局中的坐标 添加到根部局中
    private void addViewToAnimLayout(final ViewGroup vg, final View view,
                                     int[] location) {

        int x = location[0];
        int y = location[1];
        int[] loc = new int[2];
        vg.getLocationInWindow(loc);
        view.setX(x);
        view.setY(y-loc[1]);
        vg.addView(view);
    }
    //设置动画结束移除动画view
    private void setAnim(final View v, int[] start_location) {

        addViewToAnimLayout(anim_mask_layout, v, start_location);
        Animation set = createAnim(start_location[0],start_location[1]);
        set.setAnimationListener(new Animation.AnimationListener() {
            @Override
            public void onAnimationStart(Animation animation) {

            }

            @Override
            public void onAnimationEnd(final Animation animation) {
                //直接remove可能会因为界面仍在绘制中成而报错
                mHanlder.postDelayed(new Runnable() {
                    @Override
                    public void run() {
                        anim_mask_layout.removeView(v);
                    }
                },100);
            }

            @Override
            public void onAnimationRepeat(Animation animation) {

            }
        });
        v.startAnimation(set);
    }
底部弹出购物车清单
底部弹出的效果大家一定都很熟悉了,几回每个项目中都会用的到,官方没有提供简单的控件实现,一般都需要自己写,不过要做到简单流畅,便于移植推荐使用第三方库,这里向大家推荐一个
bottomsheet
集成简单,效果多样这里简单介绍一下使用方法
集成
compile 'com.flipboard:bottomsheet-core:1.5.1'xml中使用BottomSheetLayout包裹弹出view时候的背景布局,BottomSheetLayout继承自帧布局
<com.flipboard.bottomsheet.BottomSheetLayout
    xmlns:android="http://schemas.android.com/apk/res/android"
    android:id="@+id/bottomSheetLayout"
    android:layout_width="match_parent"
    android:layout_height="match_parent">
    "horizontal"
        android:layout_width="match_parent"
        android:layout_height="match_parent">

        .support.v7.widget.RecyclerView
            android:layout_width="100dp"
            android:id="@+id/typeRecyclerView"
            android:layout_height="match_parent">
        .support.v7.widget.RecyclerView>

        .emilsjolander.stickylistheaders.StickyListHeadersListView
            android:layout_width="match_parent"
            android:background="#fff"
            android:id="@+id/itemListView"
            android:layout_height="match_parent">
        .emilsjolander.stickylistheaders.StickyListHeadersListView>

com.flipboard.bottomsheet.BottomSheetLayout>
代码中使用很简单
 //弹出View  bottomSheet即是要弹出的view
    bottomSheetLayout.showWithSheetView(bottomSheet);

    //代码隐藏view (点击弹出view以外的地方可以隐藏弹出的view,向下滑动也可以)
    bottomSheetLayout.dismissSheet();
数据的同步
同步数据,控制界面刷新应该是新手最容易绕弯的地方了,其实只要仔细一点也不难,这里简单提供一种思路(并不一定适合你的项目).
 //商品列表
    private ArrayList dataList;
    //分类列表
    private ArrayList typeList;
    //已选择的商品
    private SparseArray selectedList;
    //用于记录每个分组选择的数目
    private SparseIntArray groupSelect;
SparseArray这个类其实就是 HashMap< Integer,Object >
不过SparseArray既可以根据key查找Value,也可以根据位置查找value,性能比HashMap高,是官方推荐的替代类,
同样SparseIntArray 其实是HashMap< Integer,Integer> 的替代者。
Activity里实现了下面几个方法,用于数据统一管理
列表中显示的商品购买数量统一从activity获取,商品的加减统一调用Activity的方法然后notifiDatasetChanged,由于代码不少具体的还是看源码吧
 /**
     * Item代表商品的购买数量加一
     * @param item
     * @param refreshGoodList 是否刷新商品list
     */
    public void add(GoodsItem item,boolean refreshGoodList){

        int groupCount = groupSelect.get(item.typeId);
        if(groupCount==0){
            groupSelect.append(item.typeId,1);
        }else{
            groupSelect.append(item.typeId,++groupCount);
        }

        GoodsItem temp = selectedList.get(item.id);
        if(temp==null){
            item.count=1;
            selectedList.append(item.id,item);
        }else{
            temp.count++;
        }
        update(refreshGoodList);
    }
    /**
     * Item商品的购买数量减一
     * @param item
     * @param refreshGoodList 是否刷新商品list
     */
    public void remove(GoodsItem item,boolean refreshGoodList){

        int groupCount = groupSelect.get(item.typeId);
        if(groupCount==1){
            groupSelect.delete(item.typeId);
        }else if(groupCount>1){
            groupSelect.append(item.typeId,--groupCount);
        }

        GoodsItem temp = selectedList.get(item.id);
        if(temp!=null){
            if(temp.count<2){
                selectedList.remove(item.id);
            }else{
                item.count--;
            }
        }
        update(refreshGoodList);
    }

    /**
     * 刷新界面 总价、购买数量等
     * @param refreshGoodList 是否刷新商品list
     */
    private void update(boolean refreshGoodList){
        ...
    }

    //根据商品id获取当前商品的采购数量
    public int getSelectedItemCountById(int id){
        GoodsItem temp = selectedList.get(id);
        if(temp==null){
            return 0;
        }
        return temp.count;
    }
    //根据类别Id获取属于当前类别的数量
    public int getSelectedGroupCountByTypeId(int typeId){
        return groupSelect.get(typeId);
    }
这个页面改动的地方不是很多,但是我还是做了好几天的时间才做出来,左右列表都是用的 RecyclerView 做的,需要匹配的地方有很。
