UI设计—Material Design实战之 Toolbar
UI设计—Material Design实战之 Toolbar
Toolbar是我们接触的第一个Material控件,那么我们先新建一个MaterialText项目。首先任何一个项目在新建时都是会显示ActionBar的,我们可以打开AndroidManifest.xml文件看一下,如下所示:
<manifest xmlns:android="http://schemas.android.com/apk/res/android"
    package="com.example.materialtext">

    <application
        android:allowBackup="true"
        android:icon="@mipmap/ic_launcher"
        android:label="@string/app_name"
        android:roundIcon="@mipmap/ic_launcher_round"
        android:supportsRtl="true"
        android:theme="@style/AppTheme">
        <activity android:name=".MainActivity">
            <intent-filter>
                <action android:name="android.intent.action.MAIN" />

                <category android:name="android.intent.category.LAUNCHER" />
            intent-filter>
        activity>
    application>

manifest>
这里的android:theme属性指定了一个AppTheme的主题。该主题在res/values/sysles.xml文件中,代码如下:
<resources>
<style name="AppTheme" parent="Theme.AppCompat.Light.DarkActionBar">
- "colorPrimary"
>@color/colorPrimary
- "colorPrimaryDark">@color/colorPrimaryDark
- "colorAccent">@color/colorAccent
style>
resources>
这里定义了一个AppThme的主题,其中它指定parent主题是Theme.AppCompat.Light.DarkActionBar这个叫.DarkActionBar的是一个深色的ActionBar主题。但是我们现在要使用Toolbar来替代ActionBar,因此我们要使用Theme.AppCompat.Light.NoActionBar代替它其表示为淡色主题,如下所示:
<resources>
<style name="AppTheme" parent="Theme.AppCompat.Light.NoActionBar">
- "colorPrimary"
>@color/colorPrimary
- "colorPrimaryDark">@color/colorPrimaryDark
- "colorAccent">@color/colorAccent
style>
resources>
现在我们已经将ActionBar隐藏起来了,接下来我们看看如何使用Toolbar代替ActionBar。修改activity_main.xml中的代码。
<FrameLayout xmlns:android="http://schemas.android.com/apk/res/android"
    xmlns:app="http://schemas.android.com/apk/res-auto"
    xmlns:tools="http://schemas.android.com/tools"
    android:layout_width="match_parent"
    android:layout_height="match_parent"
    tools:context=".MainActivity">

    <android.support.v7.widget.Toolbar
        android:id="@+id/toolbar"
        android:layout_width="match_parent"
        android:layout_height="?attr/actionBarSize"
        android:background="?attr/colorPrimary"
        android:theme="@style/ThemeOverlay.AppCompat.Dark.ActionBar"
        app:popupTheme="@style/ThemeOverlay.AppCompat.Light"/>

FrameLayout>
这里我们需要定义一个Toolbar的控件,它是由appcompat-v7库提供的。在这里我们给它定义了一个id。使用 android:theme属性将Toolbar的主题指定成了ThemeOverlay.AppCompat.Dark.ActionBar。app:popupTheme属性单独将弹出的菜单选项指定成淡色主题。
写完布局,接下来我们修改MainActiyit,代码如下:
package com.example.materialtext;

import android.support.v7.app.AppCompatActivity;
import android.os.Bundle;
import android.support.v7.widget.Toolbar;

/**
 * @author J.Min
 */
public class MainActivity extends AppCompatActivity {

    @Override
    protected void onCreate(Bundle savedInstanceState) {
        super.onCreate(savedInstanceState);
        setContentView(R.layout.activity_main);
        Toolbar toolbar = findViewById(R.id.toolbar);
        setSupportActionBar(toolbar);
    }
}
这里通过findViewById()得到Toolbar的实例,然后调用setSupportActionBar()方法将Toolbar的实例传入。接下来修改AndroidManifest.xml中标题栏上面显示的内容
<manifest xmlns:android="http://schemas.android.com/apk/res/android"
    package="com.example.materialtext">

    <application
        android:allowBackup="true"
        android:icon="@mipmap/ic_launcher"
        android:label="@string/app_name"
        android:roundIcon="@mipmap/ic_launcher_round"
        android:supportsRtl="true"
        android:theme="@style/AppTheme">
        <activity android:name=".MainActivity"
            android:label="Fruits">
            <intent-filter>
                <action android:name="android.intent.action.MAIN" />

                <category android:name="android.intent.category.LAUNCHER" />
            intent-filter>
        activity>
    application>

manifest>
这里添加了一个android:label=“Fruits”,Fruits是我们应用的名称。
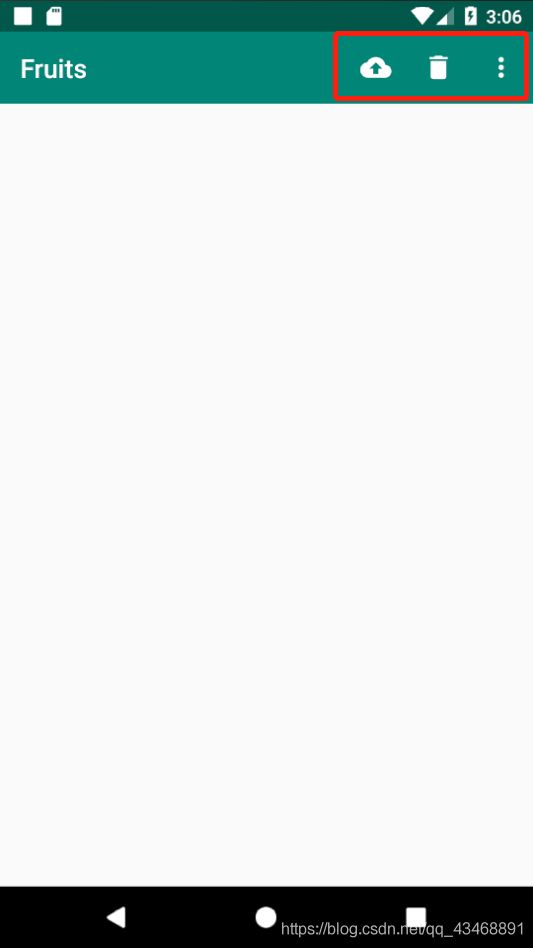
下一步我们添加一些action按钮来丰富一下Toolbar将它们放在drawable目录下,现在我们右击res目录→New→Directory,创建一个menu文件夹。然后右击menu文件夹→New→Menu resource file,创建一个toolbar.xml文件,下面的效果图中的图标就是我们需要引用的,并编写如下代码:

<menu xmlns:android="http://schemas.android.com/apk/res/android"
    xmlns:app="http://schemas.android.com/apk/res-auto">
    <item
        android:id="@+id/backup"
        android:icon="@drawable/backup"
        android:title="Backup"
        app:showAsAction="always"/>

    <item
        android:id="@+id/delete"
        android:icon="@drawable/delete"
        android:title="Delete"
        app:showAsAction="always"/>

    <item
        android:id="@+id/settings"
        android:icon="@drawable/settings"
        android:title="Settings"
        app:showAsAction="always"/>
menu>
继续修改MainActiyit中的代码
package com.example.materialtext;

import android.os.Bundle;
import android.support.v7.app.AppCompatActivity;
import android.support.v7.widget.Toolbar;
import android.view.Menu;
import android.view.MenuItem;
import android.widget.Toast;

/**
 * @author J.Min
 */
public class MainActivity extends AppCompatActivity {

    @Override
    protected void onCreate(Bundle savedInstanceState) {
        super.onCreate(savedInstanceState);
        setContentView(R.layout.activity_main);
        Toolbar toolbar = findViewById(R.id.toolbar);
        setSupportActionBar(toolbar);
    }
    @Override
    public boolean onCreateOptionsMenu(Menu menu){
        getMenuInflater().inflate(R.menu.toolbar,menu);
        return true;
    }
    @Override
    public boolean onOptionsItemSelected(MenuItem item){
        switch (item.getItemId()) {
            case R.id.backup:
                Toast.makeText(this, "You clicked Backup", Toast.LENGTH_LONG).show();
            case R.id.delete:
                Toast.makeText(this, "You clicked Delete", Toast.LENGTH_LONG).show();
            case R.id.settings:
                Toast.makeText(this, "You clicked Settings", Toast.LENGTH_LONG).show();
                break;
            default:
        }
        return true;
    }

}
非常简单,我们在onCreateOptionsMenu()方法中加载了toolbar.xml菜单文件,然后用onOptionsItemSelected()方法处理各个按钮的点击事件。关于Toolbar的内容就在这里结束了,当然Toolbar还有更多功能在后面会深刻挖掘。
这节内容就到这里了,下一节内容UI设计—Material Design实战(2)之滑动菜单https://blog.csdn.net/qq_43468891/article/details/90623986