一文入门 Spring Boot
文章目录
- No.1 创建 Spring Boot 的三种方式
- 1、在线创建
- 2、使用开发工具创建
- 3、Maven 创建
- No.2 纯 Java 搭建 SSM 环境
- 1、创建工程
- 2、添加 Spring 配置
- 3、添加 Spring MVC 配置
- 4、静态资源过滤
- 5、视图解析器
- 6、路径映射
- 7、JSON 配置
- 8、配置 web.xml
- No.3 深入了解 parent
- 1、基本功能
- 2、源码分析
- No.4 application.properties
- 1、位置问题
- 2、文件名问题
- 3、普通的属性注入
- 4、类型安全的属性注入
- No.5 静态资源到底要放到哪里
- 1、SSM 中的配置
- 2、Spring Boot 中的配置
- 3、Spring Boot 中的静态资源到底是怎样配置的呢
- 4、自定义配置
- 4.1 application.properties
- 4.2 Java 代码定义
- No.6 Spring Boot 整合 Thymeleaf
- 1、Thymeleaf 简介
- 2、整合
- 2.1 创建项目
- 2.2 创建 Controller
- 2.3 创建 Thymeleaf
- 3、手动渲染
- No. 7 异常处理的套路
- 1、统一异常处理
- 2、静态异常页面
- 3、动态异常页面
- 4、自定义异常数据
- 5、自定义异常视图
- 6、全局异常处理
- 6.1 全局异常处理
- 6.2 全局数据绑定
- 6.3 全局数据预处理
- No. 8 通过 CORS 跨域问题
- 1、同源策略
- 2、实践
- 3、存在的问题
- No.9 Spring Boot 整合 Redis
- 1、Spring Data Redis
- 2、Spring Cache
- No.10 Session 解决方案
- No.11 Spring Boot 整合 Ehcache
- No.12 Spring Boot 定义系统启动任务
- 1、CommandLineRunner
- 2、ApplicationRunner
- No.13 Spring Boot 整合 MyBatis
- No.14 Spring Boot 多数据源配置之 JdbcTemplate
- No.15 Spring Boot 整合 MyBatis 多数据源
No.1 创建 Spring Boot 的三种方式
1、在线创建
这是官方提供的一个创建方式,实际上,如果我们使用开发工具去创建 Spring Boot 项目的话(即第二种方案),也是从这个网站上创建的,只不过这个过程开发工具帮助我们完成了,我们只需要在开发工具中进行简单的配置即可
首先打开 https://start.spring.io 这个网站,如下:
这里要配置的按顺序分别如下:
- 项目构建工具是 Maven 还是 Gradle ?Gradle 在 Java 后端中使用的还是比较少,Gradle 在 Android 中使用较多,Java 后端,目前来看还是 Maven 为主,因此这里选择第一项。
- 开发语言,这个当然是选择 Java 了
- Spring Boot 版本,可以看到,目前最新的稳定版是 2.1.6 ,这里我们就是用最新稳定版。
- 既然是 Maven 工程,当然要有项目坐标,项目描述等信息了,另外这里还让输入了包名,因为创建成功后会自动创建启动类。
- Packing 表示项目要打包成 jar 包还是 war 包,Spring Boot 的一大优势就是内嵌了 Servlet 容器,打成 jar 包后可以直接运行,所以这里建议打包成 jar 包,当然,开发者根据实际情况也可以选择 war 包。
- 然后选选择构建的 JDK 版本。
- 最后是选择所需要的依赖,输入关键字如 web ,会有相关的提示,这里我就先加入 web 依赖。
所有的事情全部完成后,点击最下面的 GenerateProject 按钮,或者点击 Alt+Enter 按键,此时会自动下载项目,将下载下来的项目解压,然后用 IntelliJ IDEA 或者 Eclipse 打开即可进行开发。
2、使用开发工具创建
这里以 IntelliJ IDEA 为例,需要注意的是,IntelliJ IDEA 只有 ultimate 版才有直接创建 Spring Boot 项目的功能,社区版是没有此项功能的
3、Maven 创建
首先创建一个普通的 Maven 项目,以 IntelliJ IDEA 为例,创建步骤如下:
创建完成后,在 pom.xml 加入如下依赖:
<parent>
    <groupId>org.springframework.bootgroupId>
    <artifactId>spring-boot-starter-parentartifactId>
    <version>2.1.6.RELEASEversion>
    <relativePath/>
parent>
<dependencies>
    <dependency>
        <groupId>org.springframework.bootgroupId>
        <artifactId>spring-boot-starter-webartifactId>
    dependency>
dependencies>
添加成功后,再在 java 目录下创建包,包中创建一个名为 App 的启动类,如下:
@SpringBootApplication
public class App {

    public static void main(String[] args) {
        SpringApplication.run(ProviderApplication.class, args);
    }

}
No.2 纯 Java 搭建 SSM 环境
1、创建工程
创建一个普通的 Maven 工程,并添加 Spring MVC 依赖,同时还需要使用到 Servlet,所以还要引入 Servlet 依赖,最终 pom.xml 如下:
<project xmlns="http://maven.apache.org/POM/4.0.0"
         xmlns:xsi="http://www.w3.org/2001/XMLSchema-instance"
         xsi:schemaLocation="http://maven.apache.org/POM/4.0.0 http://maven.apache.org/xsd/maven-4.0.0.xsd">
    <modelVersion>4.0.0modelVersion>

    <groupId>com.kernelgroupId>
    <artifactId>ssmartifactId>
    <version>1.0-SNAPSHOTversion>
    <packaging>warpackaging>

    <dependencies>
        <dependency>
            <groupId>org.springframeworkgroupId>
            <artifactId>spring-webmvcartifactId>
            <version>5.1.6.RELEASEversion>
        dependency>
        <dependency>
            <groupId>javax.servletgroupId>
            <artifactId>javax.servlet-apiartifactId>
            <version>4.0.1version>
            <scope>providedscope>
        dependency>
    dependencies>
project>
2、添加 Spring 配置
工程创建成功后,首先添加 Spring 配置文件,如下:
@Configuration
@ComponentScan(basePackages = "com.kernel", useDefaultFilters = true, excludeFilters = {@ComponentScan.Filter(type = FilterType.ANNOTATION, classes = Controller.class)})
public class SpringConfig {
}
- @Configuration 表示这个类是一个配置类
- @ComponentScan 表示配置扫包范围
- useDefaultFilters 是否使用默认的过滤器
- excludeFilters 表示去掉的注解
- includeFilters 表示包含的注解
3、添加 Spring MVC 配置
@Configuration
@ComponentScan(basePackages = "com.kernel",useDefaultFilters = false,includeFilters = {@ComponentScan.Filter(type = FilterType.ANNOTATION,classes = Controller.class)})
public class SpringMVCConfig {
}
4、静态资源过滤
在 Java 配置的 SSM 环境中,如果要配置静态资源过滤,需要让 Spring MVC 的配置继承 WebMvcConfigurationSupport ,进而重写 WebMvcConfigurationSupport 中的 addResourceHandlers 方法,如下:
@Configuration
@ComponentScan(basePackages = "com.kernel",useDefaultFilters = false,includeFilters = {@ComponentScan.Filter(type = FilterType.ANNOTATION,classes = Controller.class)})
public class SpringMVCConfig extends WebMvcConfigurationSupport {
    @Override
    protected void addResourceHandlers(ResourceHandlerRegistry registry) {
        registry.addResourceHandler("/js/**").addResourceLocations("classpath:/");
    }
}
5、视图解析器
如果开发者使用了 jsp,需要引入 jsp 的依赖,如下:
<project xmlns="http://maven.apache.org/POM/4.0.0"
         xmlns:xsi="http://www.w3.org/2001/XMLSchema-instance"
         xsi:schemaLocation="http://maven.apache.org/POM/4.0.0 http://maven.apache.org/xsd/maven-4.0.0.xsd">
    <modelVersion>4.0.0modelVersion>

    <groupId>com.kernelgroupId>
    <artifactId>ssmartifactId>
    <version>1.0-SNAPSHOTversion>
    <packaging>warpackaging>

    <dependencies>
        <dependency>
            <groupId>org.springframeworkgroupId>
            <artifactId>spring-webmvcartifactId>
            <version>5.1.6.RELEASEversion>
        dependency>
        <dependency>
            <groupId>javax.servletgroupId>
            <artifactId>javax.servlet-apiartifactId>
            <version>4.0.1version>
            <scope>providedscope>
        dependency>
        <dependency>
            <groupId>javax.servlet.jspgroupId>
            <artifactId>javax.servlet.jsp-apiartifactId>
            <version>2.3.1version>
        dependency>
        <dependency>
            <groupId>com.alibabagroupId>
            <artifactId>fastjsonartifactId>
            <version>1.2.49version>
        dependency>
    dependencies>
project>
在 Java 配置的 SSM 环境中,如果要配置视图解析器,需要让 Spring MVC 的配置继承 WebMvcConfigurationSupport ,进而重写 WebMvcConfigurationSupport 中的 configureViewResolvers 方法,如下:
@Configuration
@ComponentScan(basePackages = "com.kernel",useDefaultFilters = false,includeFilters = {@ComponentScan.Filter(type = FilterType.ANNOTATION,classes = Controller.class)})
public class SpringMVCConfig extends WebMvcConfigurationSupport {
    @Override
    protected void addResourceHandlers(ResourceHandlerRegistry registry) {
        registry.addResourceHandler("/js/**").addResourceLocations("classpath:/");
    }

    @Override
    protected void configureViewResolvers(ViewResolverRegistry registry) {
        registry.jsp("/jsp/", ".jsp");
    }
}
6、路径映射
在 Java 配置的 SSM 环境中,如果要配置路径映射,需要让 Spring MVC 的配置继承 WebMvcConfigurationSupport ,进而重写 WebMvcConfigurationSupport 中的 addViewControllers 方法,如下:
@Configuration
@ComponentScan(basePackages = "com.kernel",useDefaultFilters = false,includeFilters = {@ComponentScan.Filter(type = FilterType.ANNOTATION,classes = Controller.class)})
public class SpringMVCConfig extends WebMvcConfigurationSupport {
    @Override
    protected void addResourceHandlers(ResourceHandlerRegistry registry) {
        registry.addResourceHandler("/js/**").addResourceLocations("classpath:/");
    }

    @Override
    protected void configureViewResolvers(ViewResolverRegistry registry) {
        registry.jsp("/jsp/", ".jsp");
    }

    @Override
    protected void addViewControllers(ViewControllerRegistry registry) {
        registry.addViewController("/index").setViewName("/hello");
    }
}
7、JSON 配置
Spring MVC 可以接收 JSON 参数,也可以发送 JSON 参数,这一切依赖于 HttpMessageConverter
HttpMessageConverter 可以将 JSON 转换成字符串,也可以将字符串转换成 JSON
所有的 JSON 库要在 Spring MVC 自动接收和发送 JSON,都必须提供相关的 HttpMessageConverter
如果开发者使用了 fastjson,需要引入 fastjson 的依赖,如下:
<project xmlns="http://maven.apache.org/POM/4.0.0"
         xmlns:xsi="http://www.w3.org/2001/XMLSchema-instance"
         xsi:schemaLocation="http://maven.apache.org/POM/4.0.0 http://maven.apache.org/xsd/maven-4.0.0.xsd">
    <modelVersion>4.0.0modelVersion>

    <groupId>com.kernelgroupId>
    <artifactId>ssmartifactId>
    <version>1.0-SNAPSHOTversion>
    <packaging>warpackaging>

    <dependencies>
        <dependency>
            <groupId>org.springframeworkgroupId>
            <artifactId>spring-webmvcartifactId>
            <version>5.1.6.RELEASEversion>
        dependency>
        <dependency>
            <groupId>javax.servletgroupId>
            <artifactId>javax.servlet-apiartifactId>
            <version>4.0.1version>
            <scope>providedscope>
        dependency>
        <dependency>
            <groupId>javax.servlet.jspgroupId>
            <artifactId>javax.servlet.jsp-apiartifactId>
            <version>2.3.1version>
        dependency>
        <dependency>
            <groupId>com.alibabagroupId>
            <artifactId>fastjsonartifactId>
            <version>1.2.49version>
        dependency>
    dependencies>
project>
在 Java 配置的 SSM 环境中,需要显式配置 HttpMessageConverter,需要让 Spring MVC 的配置继承 WebMvcConfigurationSupport ,重写 WebMvcConfigurationSupport 中的 configureMessageConverters 方法,如下:
@Configuration
@ComponentScan(basePackages = "com.kernel",useDefaultFilters = false,includeFilters = {@ComponentScan.Filter(type = FilterType.ANNOTATION,classes = Controller.class)})
public class SpringMVCConfig extends WebMvcConfigurationSupport {
    @Override
    protected void addResourceHandlers(ResourceHandlerRegistry registry) {
        registry.addResourceHandler("/js/**").addResourceLocations("classpath:/");
    }

    @Override
    protected void configureViewResolvers(ViewResolverRegistry registry) {
        registry.jsp("/jsp/", ".jsp");
    }

	@Override
    protected void configureMessageConverters(List<HttpMessageConverter<?>> converters) {
        FastJsonHttpMessageConverter converter = new FastJsonHttpMessageConverter();
        converter.setDefaultCharset(Charset.forName("UTF-8"));
        FastJsonConfig fastJsonConfig = new FastJsonConfig();
        fastJsonConfig.setCharset(Charset.forName("UTF-8"));
        converter.setFastJsonConfig(fastJsonConfig);
        converters.add(converter);
    }
}
8、配置 web.xml
此时,我们并没有 web.xml 文件,这时,我们可以使用 Java 代码去代替 web.xml 文件,这里会用到 WebApplicationInitializer,具体定义如下:
public class WebInit implements WebApplicationInitializer {
    public void onStartup(ServletContext servletContext) throws ServletException {
        //首先来加载 SpringMVC 的配置文件
        AnnotationConfigWebApplicationContext ctx = new AnnotationConfigWebApplicationContext();
        ctx.register(SpringMVCConfig.class);
        // 添加 DispatcherServlet
        ServletRegistration.Dynamic springmvc = servletContext.addServlet("springmvc", new DispatcherServlet(ctx));
        // 给 DispatcherServlet 添加路径映射
        springmvc.addMapping("/");
        // 给 DispatcherServlet 添加启动时机
        springmvc.setLoadOnStartup(1);
    }
}
WebInit 的作用类似于 web.xml,这个类需要实现 WebApplicationInitializer 接口,并实现接口中的方法,当项目启动时,onStartup 方法会被自动执行,我们可以在这个方法中做一些项目初始化操作
No.3 深入了解 parent
上面介绍了三种创建 Spring Boot 的方式,但是无论是哪种方式,pom.xml 中必然会引入一个依赖:
<parent>
    <groupId>org.springframework.bootgroupId>
    <artifactId>spring-boot-starter-parentartifactId>
    <version>2.1.6.RELEASEversion>
    <relativePath/>
parent>
1、基本功能
当我们创建一个 Spring Boot 工程时,可以继承一个 spring-boot-starter-parent,也可以不继承它
- 定义了 Java 编译版本为 1.8
- 使用 UTF-8 格式编码
- 继承自 spring-boot-dependencies,这个里面定义了依赖的版本,也正是因为继承了这个依赖,所以我们在写依赖时不需要写版本号
- 执行打包操作的配置
- 自动化的资源过滤
- 自动化的插件配置
- 针对 application.properties 和 application.yml 的资源过滤,包括通过 profile 定义的不同环境的配置文件
2、源码分析
我们可以看到,它继承自 spring-boot-dependencies ,这里保存了基本的依赖信息,另外我们也可以看到项目的编码格式,JDK 的版本等信息,当然也有我们前面提到的数据过滤信息。最后,我们再根据它的 parent 中指定的 spring-boot-dependencies 位置,来看看 spring-boot-dependencies 中的定义:
在这里我们发现里面放置了版本号信息以及 dependencyManagement 节点
No.4 application.properties
1、位置问题
当我们创建一个 Spring Boot 项目的时候,默认的 resource 目录下会生成一个 application.properties 文件,改文件存放项目的配置信息,但是这个文件并非唯一的配置文件,在 Spring Boot 项目中,一共有四个地方可以存放application.properties,按优先级排列,如下:
- 当前项目根目录下的 config 目录下
- 当前项目的根目录下
- resources 目录下的 config 目录下
- resources 目录下
这四个目录是默认位置,也就是说默认情况下 Spring Boot 启动时会从这四个位置查找配置文件,我们也可以在项目启动前自定义配置文件位置,使用 spring.config.loaction 来指定目录位置
如下项目已经打包成 jar,在启动命令中加入位置参数即可:
java -jar properties-0.0.1-SNAPSHOT.jar --spring.config.location=classpath:/dir/
2、文件名问题
对于 application.proerties,文件名并非一定要叫 application,但是项目默认加载的文件名是 application,如果我们的配置文件名字不叫 application,也是可以的,但是要通过 spring.config.name 配置
如下项目已经打包成 jar,在启动命令中加入位置参数即可:
java -jar properties-0.0.1-SNAPSHOT.jar --spring.config.name=test
3、普通的属性注入
由于 Spring Boot 源自 Spring ,所以 Spring 中存在的属性注入,在 Spring Boot 中一样也存在。由于 Spring Boot 中,默认会自动加载 application.properties 文件,所以简单的属性注入可以直接在这个配置文件中写
@Component
public class Book {
    @Value("${book.id}")
    private Long id;
    @Value("${book.name}")
    private String name;
    @Value("${book.author}")
    private String author;
}
然后在 application.properties 文件中定义属性
book.name=三国演义
book.author=罗贯中
book.id=1
一般来说,我们在 application.properties 文件中主要存放系统配置,这种自定义配置不建议放在该文件中,可以自定义 properties 文件来存在自定义配置
在 resource 目录下, 创建 book.properties 文件
在 Java 配置中,可以通过 @PropertySource 来引入配置:
@Component
@PropertySource("classpath:book.properties")
public class Book {
    @Value("${book.id}")
    private Long id;
    @Value("${book.name}")
    private String name;
    @Value("${book.author}")
    private String author;
}
4、类型安全的属性注入
Spring Boot 引入了类型安全的属性注入,如果采用 Spring 中的配置方式,当配置的属性非常多的时候,工作量就很大了,而且容易出错
使用类型安全的属性注入,可以有效的解决这个问题
@Component
@PropertySource("classpath:book.properties")
@ConfigurationProperties(prefix = "book")
public class Book {
    private Long id;
    private String name;
    private String author;
}
No.5 静态资源到底要放到哪里
1、SSM 中的配置
在 Java 代码中配置,如果在Java代码中配置的话,我们只需要自定义一个类,继承 WebMvcConfigurationSupport 并重写 addResourceHandlers 方法即可:
@Configuration
@ComponentScan(basePackages = "com.kernel.ssm")

public class SpringMVCConfig extends WebMvcConfigurationSupport {

    @Override
    protected void addResourceHandlers (ResourceHandlerRegistry registry){
        registry.addResourceHandler("/**").addResourceLocations("/");
    }
}
2、Spring Boot 中的配置
在 Spring Boot 中,默认情况下,一共有5个位置可以存放静态资源,按优先级分别是:
- classpath:/META-INF/resources/
- classpath:/resources/
- classpath:/static/
- classpath:/public/
- /
前四个目录对应了 resources 目录下的不同目录,第五个其实就是 webapp
3、Spring Boot 中的静态资源到底是怎样配置的呢
首先我们在 WebMvcAutoConfiguration 类中看到了 SpringMVC 自动化配置的相关的内容,找到了静态资源拦截的配置,如下:

这里静态资源的配置和前面的 SSM 配置非常相似,其中,this.mvcProperties.getStaticPathPattern() 方法对应的值是"/**",this.resourceProperties.getStaticLocations()方法返回了四个位置,分别是:“classpath:/META-INF/resources/”, “classpath:/resources/”,“classpath:/static/”, “classpath:/public/”,然后在getResourceLocations方法中,又添加了“/”,因此这里返回值一共有5个,这就是为什么静态资源请求路径中不需要 /static,因为在路径映射中已经自动的添加上了 /static 了
4、自定义配置
当然了,这个是系统默认配置,如果我们不想讲静态资源放到以上五个目录中,也可以自定义静态资源位置和映射,自定义的方式也有两种,可以通过 application.properties 来定义,也可以在 Java 代码中来定义
4.1 application.properties
spring.resources.static-locations=classpath:/
spring.mvc.static-path-pattern=/**
第一行配置表示定义资源位置,第二行配置表示定义请求 URL 规则,上面标示可以将静态资源存放到 resources 目录下的任意目录,我们访问的时候当然也要写完整路径
4.2 Java 代码定义
@Configuration
public  class WebMVCConfig  implements WebMvcConfigurer {
    @Override
    public void addResourceHandlers (ResourceHandlerRegistry registry) {
        registry.addResourceHandler("/**").addResourceLocations("classpath:/aaa/");
    }
}
No.6 Spring Boot 整合 Thymeleaf
1、Thymeleaf 简介
Thymeleaf 是新一代 Java 模板引擎,它类似于 Velocity、FreeMarker 等传统 Java 模板引擎,但是与传统 Java 模板引擎不同的是,Thymeleaf 支持 HTML 原型。
它既可以让前端工程师在浏览器中直接打开查看样式,也可以让后端工程师结合真实数据查看显示效果,同时,Spring Boot 提供了 Thymeleaf 自动化配置解决方案,因此在 Spring Boot 中使用 Thymeleaf 非常方便。
事实上, Thymeleaf 除了展示基本的 HTML ,进行页面渲染之外,也可以作为一个 HTML 片段进行渲染,例如我们在做邮件发送时,可以使用 Thymeleaf 作为邮件发送模板。
另外,由于 Thymeleaf 模板后缀为 .html,可以直接被浏览器打开,因此,预览时非常方便。
2、整合
2.1 创建项目
Spring Boot 中整合 Thymeleaf 非常容易,只需要创建项目时添加 Thymeleaf 即可
当然,Thymeleaf 不仅仅能在 Spring Boot 中使用,也可以使用在其他地方,只不过 Spring Boot 针对 Thymeleaf 提供了一整套的自动化配置方案,这一套配置类的属性在 org.springframework.boot.autoconfigure.thymeleaf.ThymeleafProperties 中,部分源码如下:
@ConfigurationProperties(prefix = "spring.thymeleaf")

public class ThymeleafProperties {
    private static final Charset DEFAULT_ENCODING = StandardCharsets.UTF_8;
    public static final String DEFAULT_PREFIX = "classpath:/templates/";
    public static final String DEFAULT_SUFFIX = ".html";
    private boolean checkTemplate = true;
    private boolean checkTemplateLocation = true;
    private String prefix = DEFAULT_PREFIX;
    private String suffix = DEFAULT_SUFFIX;
    private String mode = "HTML";
    private Charset encoding = DEFAULT_ENCODING;
    private boolean cache = true;
}
首先通过 @ConfigurationProperties 注解,将 application.properties 中前缀为 spring.thymeleaf 的属性和 ThymeleafProperties 绑定
- 前三个static 配置了默认编码、视图解析器的前缀和后缀
- 从前三行来看,thymeleaf 模板的默认位置在 classpath:/templates/ 目录,默认后缀是 .html
- 这些配置是默认配置,如需改变,使用 spring.thymeleaf 为前缀
Spring Boot 为 Thymeleaf 提供的自动化配置类,则是org.springframework.boot.autoconfigure.thymeleaf.ThymeleafAutoConfiguration,部分源码如下:
@Configuration
@EnableConfigurationProperties(ThymeleafProperties.class)
@ConditionalOnClass({ TemplateMode.class, SpringTemplateEngine.class })
@AutoConfigureAfter({ WebMvcAutoConfiguration.class, WebFluxAutoConfiguration.class })
public class ThymeleafAutoConfiguration {
}
可以看到,首先导入 ThymeleafProperties,然后 @ConditionalOnClass 注解表示当前系统中存在 TemplateMode、SpringTemplateEngine 类时,此自动化配置类才生效,即只有引入了 thymeleaf 依赖,此配置类生效
2.2 创建 Controller
@Controller
public class IndexController {
    @GetMapping("/index")
    public String index(Model model) {
        List<User> users = new ArrayList<>();
        for (int i = 0; i < 10; i++) {
            User u = new User();
            u.setId((long) i);
            u.setName("kernel:" + i);
            u.setAddress("深圳:" + i);
            users.add(u);
        }
        model.addAttribute("users", users);
        model.addAttribute("username", "李四");
        return "index";
    }
}
2.3 创建 Thymeleaf
<html lang="en" xmlns:th="http://www.thymeleaf.org">
<head>
    <meta charset="UTF-8">
    <title>Titletitle>
head>
<body>
<table border="1">
    <tr>
        <td>编号td>
        <td>用户名td>
        <td>地址td>
    tr>
    <tr th:each="user : ${users}">
        <td th:text="${user.id}">td>
        <td th:text="${user.name}">td>
        <td th:text="${user.address}">td>
    tr>
table>
body>
html>
3、手动渲染
前面我们说的是返回一个 Thymeleaf 模板,我们也可以手动渲染 Thymeleaf 模板,这个一般在邮件发送时候有用,例如我在 resources/templates 目录下新建一个邮件模板,如下:
<html lang="en" xmlns:th="http://www.thymeleaf.org">
    <head>
        <meta charset="UTF-8">
        <title>Titletitle>
    head>
    <body>
        <p>hello 欢迎 <span th:text="${username}">span>加入 XXX 集团,您的入职信息如下:p>
        <table border="1">
            <tr>
                <td>职位td>
                <td th:text="${position}">td>
            tr>
            <tr>
                <td>薪水td>
                <td th:text="${salary}">td>
            tr>
        table>
        <img src="http://www.javaboy.org/images/sb/javaboy.jpg" alt="">
    body>
html>
我们要将这个 HTML 模板渲染成一个 String 字符串,再把这个字符串通过邮件发送出去,那么如何手动渲染呢?
@Autowired
TemplateEngine templateEngine;

@Test
public void fun() throws MessagingException {
    Context context = new Context();
    context.setVariable("username", "javaboy");
    context.setVariable("position", "Java工程师");
    context.setVariable("salary", 99999);
    String mail = templateEngine.process("mail", context);
}
- 渲染时,我们需要首先注入一个 TemplateEngine 对象,这个对象就是在 Thymeleaf 的自动化配置类中配置的
- 然后构造一个 Context 对象用来存放变量
- 调用 process 方法进行渲染,该方法的返回值就是渲染后的 HTML 字符串,然后我们将这个字符串发送出去
No. 7 异常处理的套路
1、统一异常处理
在 Spring Boot 中,异常统一处理,可以使用 @ControllerAdvice 来处理,也可以使用自定义异常处理方案
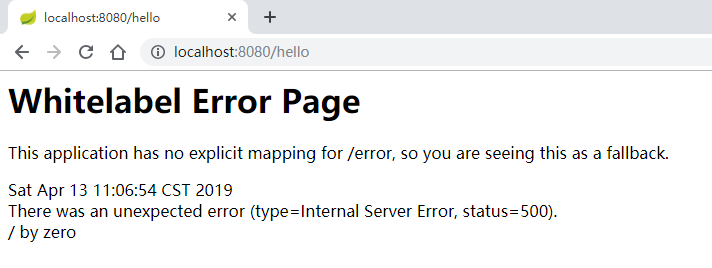
默认情况下,Spring Boot 的异常页面是这样的:
从这个异常中,可以看到,之所以出现这个页面,是因为开发者没有提供 /error 对应的页面,Spring Boot 本身在处理异常时,当所有条件都不满足时,才会去找 /error 路径
在 Spring Boot 中,自定义 error 页面,主要可以分为静态页面和动态页面
2、静态异常页面
自定义静态异常页面又分为两种,一种是用 HTTP 响应码命令,例如 404.html、405.html、500.html,还有一种直接就是以 4xx.html、5xx.html 命名,包括 400-499 和 500-599 的所有异常
默认是在 classpath:/static/error/ 目录下定义相关页面
此时,启动项目,如果发生 500 错误,项目中存在 5xx.html 和 500.html,会优先展示 500.html
3、动态异常页面
动态的异常页面定义方式和静态的基本 一致,可以采用的页面模板有 jsp、freemarker、thymeleaf。动态异常页面,也支持 404.html 或者 4xx.html ,但是一般来说,由于动态异常页面可以直接展示异常详细信息,所以就没有必要挨个枚举错误了 ,直接定义 4xx.html 或者 5xx.html 即可
动态页面模板,不需要开发者去定义控制器,直接定义异常页面就可以,Spring Boot 自带的异常处理器会自动查找异常页面
4、自定义异常数据
默认情况下,在Spring Boot 中,所有的异常数据定义在 org.springframework.boot.web.reactive.error.DefaultErrorAttributes 类中,具体定义在 getErrorAttributes 方法中 :
@Override
public Map<String, Object> getErrorAttributes(WebRequest webRequest, boolean includeStackTrace) {
    Map<String, Object> errorAttributes = new LinkedHashMap<>();
    errorAttributes.put("timestamp", new Date());
    addStatus(errorAttributes, webRequest);
    addErrorDetails(errorAttributes, webRequest, includeStackTrace);
    addPath(errorAttributes, webRequest);
    return errorAttributes;
}
DefaultErrorAttributes 类本身则是在org.springframework.boot.autoconfigure.web.servlet.error.ErrorMvcAutoConfiguration 异常自动配置类中定义的,如果开发者没有自己提供一个 ErrorAttributes 的实例的话,那么 Spring Boot 将自动提供一个ErrorAttributes 的实例,也就是 DefaultErrorAttributes
基于此 ,开发者自定义 ErrorAttributes 有两种方式 :
- 直接实现 ErrorAttributes 接口
- 继承 DefaultErrorAttributes(推荐),因为 DefaultErrorAttributes 中对异常数据的处理已经完成,开发者可以直接使用
具体定义如下:
@Component
public class MyErrorAttribute extends DefaultErrorAttributes {
    @Override
    public Map<String, Object> getErrorAttributes(WebRequest webRequest, boolean includeStackTrace) {
        Map<String, Object> map = super.getErrorAttributes(webRequest, includeStackTrace);
        if ((Integer) map.get("status") == 500) {
            map.put("message", "服务器内部错误!");
        }
        return map;
    }
}
5、自定义异常视图
默认的异常视图加载逻辑在 org.springframework.boot.autoconfigure.web.servlet.error.BasicErrorController 类的 errorHtml 方法中,这个方法用来返回异常页面+数据,还有另外一个 error 方法,这个方法用来返回异常数据(如果是 ajax 请求,则该方法会被触发)
@RequestMapping(produces = MediaType.TEXT_HTML_VALUE)
public ModelAndView errorHtml(HttpServletRequest request, HttpServletResponse response) {
    HttpStatus status = getStatus(request);
    Map<String, Object> model = Collections
        .unmodifiableMap(getErrorAttributes(request, isIncludeStackTrace(request, MediaType.TEXT_HTML)));
    response.setStatus(status.value());
    ModelAndView modelAndView = resolveErrorView(request, response, status, model);
    return (modelAndView != null) ? modelAndView : new ModelAndView("error", model);
}
在该方法中 ,首先会通过 getErrorAttributes 方法去获取异常数据,然后调用 resolveErrorView 去创建一个 ModelAndView ,如果这里创建失败,那么用户将会看到默认的错误提示页面
正常情况下, resolveErrorView 方法会来到 DefaultErrorViewResolver 类的 resolveErrorView 方法中:
protected ModelAndView resolveErrorView(HttpServletRequest request, HttpServletResponse response, HttpStatus status,
                                        Map<String, Object> model) {
    for (ErrorViewResolver resolver : this.errorViewResolvers) {
        ModelAndView modelAndView = resolver.resolveErrorView(request, status, model);
        if (modelAndView != null) {
            return modelAndView;
        }
    }
    return null;
}
在这里,首先以异常响应码作为视图名分别去查找动态页面和静态页面,如果没有查找到,则再以 4xx 或者 5xx 作为视图名再去分别查找动态或者静态页面
要自定义异常视图解析,也很容易 ,由于 DefaultErrorViewResolver 是在 ErrorMvcAutoConfiguration 类中提供的实例,即开发者没有提供相关实例时,会使用默认的 DefaultErrorViewResolver ,开发者提供了自己的 ErrorViewResolver 实例后,默认的配置就会失效,因此,自定义异常视图,只需要提供 一个 ErrorViewResolver 的实例即可:
@Component
public class MyErrorViewResolver extends DefaultErrorViewResolver {

    public MyErrorViewResolver(ApplicationContext applicationContext, ResourceProperties resourceProperties) {
        super(applicationContext, resourceProperties);
    }

    @Override
    public ModelAndView resolveErrorView(HttpServletRequest request, HttpStatus status, Map<String, Object> model) {
        ModelAndView modelAndView = new ModelAndView("test/5xx",model);
        return modelAndView;
    }
}
到此,异常视图就自定义成功了
6、全局异常处理
@ControllerAdvice,这是一个增强的 Controller,可以实现三个功能:
- 全局异常处理
- 全局数据绑定
- 全局数据预处理
6.1 全局异常处理
使用 @ControllerAdvice 实现全局异常处理,只需要定义类,添加该注解即可定义方式如下:
@ControllerAdvice
public class MyGlobalExceptionHandler {
	@ExceptionHandler(Exception.class)
    public ModelAndView customerException(Exception e) {
        ModelAndView modelAndView = new ModelAndView();
        modelAndView.addObject("message", e.getMessage());
        modelAndView.setViewName("error");
        return modelAndView;
    }
}
在该类中,可以定义多个方法,不同的方法处理不同的异常,也可以在统一方法处理所有异常
@ExceptionHandler 注解用来指明异常的处理类型
6.2 全局数据绑定
全局数据绑定功能可以用来做一些初始化的数据操作,我们可以将一些公共的数据定义在添加了 @ControllerAdvice 注解的类中,这样,在每个 Controller 中都能访问这些数据
@ControllerAdvice
public class MyGlobalExceptionHandler {
    @ModelAttribute(name = "md")
    public Map<String, Object> mydata() {
        HashMap<String, Object> map = new HashMap<>();
        map.put("age", 99);
        map.put("gender", "男");
        return map;
    }
}
使用 @ModelAttribute 注解标记该方法的返回数据是一个全局数据,默认情况下,这个全局数据的 key 就是返回的变量名,value 就是方法返回值,当然开发者可以通过 @ModelAttribute 注解的 name 属性去重新指定 key
定义完成后,任意 Controller 的接口都能获取到定义的全局数据:
@RestController
public class HelloController {
    @GetMapping("/hello")
    public String hello(Model model) {
        Map<String, Object> map = model.asMap();
        System.out.println(map);
        int i = 1 / 0;
        return "hello";
    }
}
6.3 全局数据预处理
考虑我有两个实体类,Book 和 Author
此时,如果我定义一个数据添加接口,如下:
@PostMapping
public void addBook(Book book, Author author) {
    System.out.println(book);
    System.out.println(author);
}
这个时候,添加操作就是出现问题,因为这两个实体类都存在一个 name 属性,所以无法区分,此时,通过全局数据预处理可以解决这个问题
步骤如下:
给接口中的变量取别名
@PostMapping
public void addBook(@ModelAttribute("b") Book book, @ModelAttribute("a") Author author) {
    System.out.println(book);
    System.out.println(author);
}
进行请求数据预处理
@InitBinder("b")
public void b(WebDataBinder binder) {
    binder.setFieldDefaultPrefix("b.");
}

@InitBinder("a")
public void a(WebDataBinder binder) {
    binder.setFieldDefaultPrefix("a.");
}
No. 8 通过 CORS 跨域问题
1、同源策略
如果两个页面的协议,端口(如果有指定)和主机都相同,则两个页面具有相同的源,所谓同源是指协议、域名以及端口要相同。
同源策略是基于安全方面的考虑提出来的,这个策略本身没问题,但是我们在实际开发中,由于各种原因又经常有跨域的需求,传统的跨域方案是JSONP,JSONP虽然能解决跨域但是有一个很大的局限性,那就是只支持GET请求,不支持其他类型的请求,而今天我们说的CORS(跨域源资源共享)(CORS,Cross-origin resource sharing)是一个W3C标准,它是一份浏览器技术的规范,提供了Web服务从不同网域传来沙盒脚本的方法,以避开浏览器的同源策略,这是JSONP模式的现代版。
下表给出了相对http://store.company.com/dir/page.html同源检测的示例:
| URL | 结果 | 原因 |
|---|---|---|
http://store.company.com/dir2/other.html |
成功 | 只有路径不同 |
http://store.company.com/dir/inner/another.html |
成功 | 只有路径不同 |
https://store.company.com/secure.html |
失败 | 不同协议 ( https和http ) |
http://store.company.com:81/dir/etc.html |
失败 | 不同端口 ( http:// 80是默认的) |
http://news.company.com/dir/other.html |
失败 | 不同域名 ( news和store ) |
2、实践
首先创建两个 Spring Boot 项目,一个 provider 提供服务,一个 customer 请求服务,第一个端口配置为 8080,第二个配置为 8089,然后在 provider 提供两个 hello 接口,分别为 get 和 post 方式,如下:
@RestController
public class HelloController {

    @GetMapping("/hello")
    public String hello() {
        return "hello";
    }

    @PostMapping("/hello")
    public String hello2() {
        return "hello";
    }
}
在 customer 的 resources/static 创建一个 html 文件,发送简单的 ajax 请求,如下:
<html lang="en">
<head>
    <meta charset="UTF-8">
    <title>Titletitle>
    <script src="https://cdn.staticfile.org/jquery/1.10.2/jquery.min.js">script>
head>
<body>
    <div id="app">div>
    <input type="button" onclick="btnClick()" value="get_button">
    <input type="button" onclick="btnClick2()" value="post_button">
    <script>
        function btnClick() {
            $.get('http://localhost:8080/hello',function (msg) {
                $("#app").html(msg);
            })
        }

        function btnClick2() {
            $.post('http://localhost:8080/hello', function (msg) {
                $("#app").html(msg);
            })
        }
    script>
body>
html>
然后启动项目,发送请求,观察控制台如下:
Access to XMLHttpRequest at 'http://localhost:8080/hello' from origin 'http://localhost:8089' has been blocked by CORS policy: No 'Access-Control-Allow-Origin' header is present on the requested resource.
可以看到,由于同源策略的原因,请求无法发送
在 Spring Boot 中,提供了一个注解,可以解决同源策略的问题
@RestController
public class HelloController {

    @CrossOrigin(value = "http://127.0.0.1:8089")
    @GetMapping("/hello")
    public String hello() {
        return "hello";
    }

    @CrossOrigin(value = "http://127.0.0.1:8089")
    @PostMapping("/hello")
    public String hello2() {
        return "hello";
    }
}
这个注解表示这两个接口的接收来自 http://127.0.0.1:8089 地址的请求,配置完成后就可以接收到数据了
可以看到响应头中多了一个信息,表示服务端愿意接收来自 http://127.0.0.1:8089 的请求,即浏览器不会再限制本次请求的跨域了
每一个方法上都去加注解未免太麻烦了,在Spring Boot中,还可以通过全局配置一次性解决这个问题,全局配置只需要在配置类中重写 addCorsMappings方法即可,如下:
public class WebMvcConfig implements WebMvcConfigurer {
    @Override
    public void addCorsMappings(CorsRegistry registry) {
        registry.addMapping("/**")
                .allowedOrigins("http://127.0.0.1:8089")
                .allowedMethods("*")
                .allowedHeaders("*");
    }
}
/** 表示本应用的所有方法都会去处理跨域请求,allowedMethods 表示允许通过的请求数,allowedHeaders 则表示允许的请求头,经过这样的配置之后,就不必在每个方法上单独配置跨域了。
3、存在的问题
了解了整个CORS的工作过程之后,我们通过Ajax发送跨域请求,虽然用户体验提高了,但是也有潜在的威胁存在,常见的就是CSRF(Cross-site request forgery)跨站请求伪造。跨站请求伪造也被称为one-click attack 或者 session riding,通常缩写为CSRF或者XSRF,是一种挟制用户在当前已登录的Web应用程序上执行非本意的操作的攻击方法,举个例子:
假如一家银行用以运行转账操作的URL地址如下:
http://icbc.com/aa?bb=cc,那么,一个恶意攻击者可以在另一个网站上放置如下代码:,如果用户访问了恶意站点,而她之前刚访问过银行不久,登录信息尚未过期,那么她就会遭受损失。
基于此,浏览器在实际操作中,会对请求进行分类,分为简单请求,预先请求,带凭证的请求等,预先请求会首先发送一个options探测请求,和浏览器进行协商是否接受请求,默认情况下跨域请求是不需要凭证的,但是服务端可以配置要求客户端提供凭证,这样就可以有效避免 CSRF 攻击
No.9 Spring Boot 整合 Redis
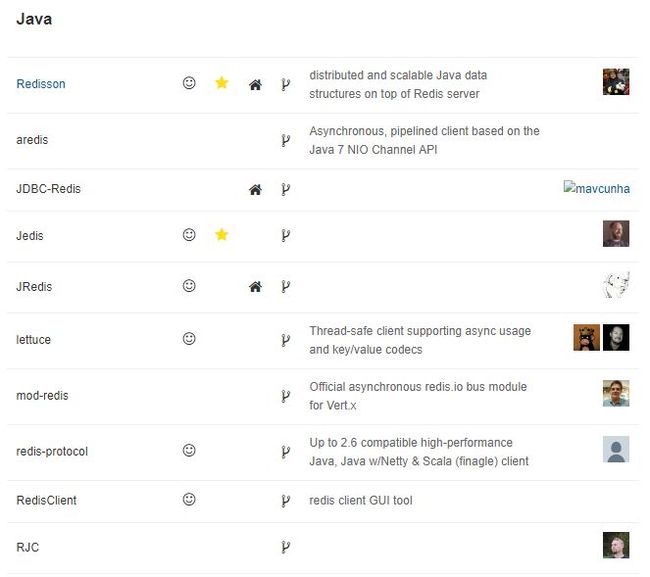
使用 Java 操作 Redis 的方案有很多,Jedis 是目前最流行的方式,除了 Jedis 还有很多其他的解决方案,如下:
在传统的 SSM 中,需要开发者手动配置 Spring Data Redis,这个配置比较繁琐,主要配置三个东西:连接池、连接器信息以及 key 和 value 的序列化方案;
在 Spring Boot 中,默认集成的 Redis 就是 Spring Data Redis,默认的底层连接池采用的是 lettuce;
Spring Data Redis 针对 Redis 提供了非常方便的操作模板 Redis Template;
1、Spring Data Redis
配置 Redis 信息,如下:
spring:
  redis:
    database: 0
    password:
    port: 6379
    host: 192.168.142.128
    lettuce:
      pool:
        min-idle: 5
        max-idle: 10
        max-active: 8
        max-wait: 1
        time-between-eviction-runs: 1000
当开发者引入了 Spring Data Redis 的依赖后,并且同时配置了 Redis 信息,此时的配置就会生效,结果就是提供两个 bean:RedisTemplate 和 StringRedisTemplate,其中 StringRedisTemplate 是 RedisTemplate 的子类,两者的区别在于 StringRedisTemplate 的 key 和 value 都是 String,而 RedisTemplate 的 key 和 value 都是 Object,这就意味着 StringRedisTemplate 只能操作 String。
实践:
@Autowired
RedisTemplate redisTemplate;
public void hello() {
    redisTemplate.setKeySerializer(new StringRedisSerializer());
    ValueOperations ops = redisTemplate.opsForValue();
    ops.set("k1", "v1");
    Object k1 = ops.get("k1");
    System.out.println(k1);
}

@Autowired
StringRedisTemplate stringRedisTemplate;
public void hello2() {
    ValueOperations ops = stringRedisTemplate.opsForValue();
    ops.set("k2", "v2");
    Object k1 = ops.get("k2");
    System.out.println(k1);
}
2、Spring Cache
基本配置:
spring.redis.port=6380
spring.redis.host=192.168.66.128
spring.cache.cache-names=c1
开启缓存:
@EnableCaching
@SpringBootApplication
public class RedisApplication {
    public static void main(String[] args) {
        SpringApplication.run(RedisApplication.class, args);
    }
}
完成这些配置后,Spring Boot 会自动帮我们在后台配置一个 RedisCacheManager 的 bean,这个 bean 间接实现了 Spring 的 Cache 接口,有了这个 bean,我们就可以直接使用 Spring 中的缓存注解和接口,而缓存数据会直接被写入到 Redis 中
核心注解:
@CacheConfig 该注解标注在类上,用来描述该类所有方法使用的缓存名称
@Cacheable 这个注解一般标注在查询方法上,将返回值缓存起来,默认情况下,缓存的 key 就是方法的参数,缓存的 value 就是方法的返回值
当有多个参数时,默认以多个参数 [var1,var2,…] 的形式作为 key,如果只需要某一个参数作为 key,则需要在该注解中指定,如果对key有复杂的要求,可以自定义keyGenerator。当然,Spring Cache中提供了root对象,可以在不定义keyGenerator的情况下实现一些复杂的效果:
@CachePut 这个注解一般标注在更新方法上,当数据库的数据更新后,缓存中的数据也跟着更新,使用该注解,将方法的返回值更新到缓存中去
@CacheEvict 这个注解一般标注在删除方法上,当数据库的数据删除后,相关的缓存数据也要删除,使用该数据,将按照条件删除缓存中的数据
No.10 Session 解决方案
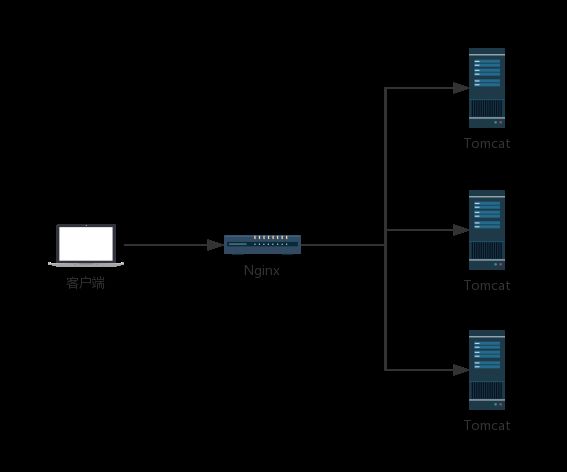
在这样的一个架构中,会出现一些但服务架构不存在的问题,那就是客户端发起一个请求,被 Nginx 转发到 Tomcat A 上,然后 Tomcat A 往 session 中写入了一份数据,下次来了一个请求,被 Nginx 转发到 Tomcat B 上,此时在去 session 中获取数据,发现 session 是空的,这个问题的解决方案就是将 Tomcat 和 Redis 打通。
所有的 Tomcat 向 session 中写数据都向 redis 中写,从 session 中读数据都从 redis 里面读,这样,不同的服务就可以共享同一 session 了。
Spring Boot 提供的了一个简化的方案就是使用 Spring Session 来实现这一功能,Spring Session 就是使用 Spring 中的代理过滤器,将所有的 Session 操作拦截下来,自动的将数据 同步到 Redis 中,或者自动的从 Redis 中读取数据。
对于开发者来说,所有关于 Session 同步的操作都是透明的,开发者使用 Spring Session,一旦配置完成后,具体的用法就像使用一个普通的 Session 一样。
配置 Redis
spring:
  redis:
    database: 0
    password:
    port: 6379
    host: 192.168.142.128
    lettuce:
      pool:
        min-idle: 5
        max-idle: 10
        max-active: 8
        max-wait: 1
        time-between-eviction-runs: 1000
  cache:
    cache-names: c1

server:
  port: 8080
实践
@Value("${server.port}")
Integer port;
@GetMapping("/set")
public String set(HttpSession session) {
    session.setAttribute("user", "kernel");
    return String.valueOf(port);
}

@GetMapping("/get")
public String get(HttpSession session) {
    return session.getAttribute("user") + ":" + port;
}
修改 nginx.conf
upstream kernel.org{
	server 127.0.0.1:8081 weight=1;
	server 127.0.0.1:8082 weight=2;
}
server
{
	listen 80;
	server_name localhost;
	index index.html index.htm index.php;
	root  /www/server/phpmyadmin;

	#error_page   404   /404.html;
	include enable-php.conf;

	location / {
		proxy_pass http://kernel.org;
		proxy_redirect default;
	}
}
在这段配置中:
- upstream 表示配置上游服务器
- javaboy.org 表示服务器集群的名字,这个可以随意取名字
- upstream 里边配置的是一个个的单独服务
- weight 表示服务的权重,意味者将有多少比例的请求从 Nginx 上转发到该服务上
- location 中的 proxy_pass 表示请求转发的地址, / 表示拦截到所有的请求,转发转发到刚刚配置好的服务集群中
- proxy_redirect 表示设置当发生重定向请求时,nginx 自动修正响应头数据(默认是 Tomcat 返回重定向,此时重定向的地址是 Tomcat 的地址,我们需要将之修改使之成为 Nginx 的地址)。
配置完成后,将项目打包上传到 Linux 并分别运行:
java -jar redis-0.0.1-SNAPSHOT.jar --server.port=8081 &
java -jar redis-0.0.1-SNAPSHOT.jar --server.port=8081 &
访问 192.168.142.128/set 表示向 session 中保存数据,这个请求首先会到达 Nginx 上,再由 Nginx 转发给某一个实例
No.11 Spring Boot 整合 Ehcache
引入 Ehcache 依赖
添加 Ehcache 配置
<ehcache>
    <diskStore path="java.io.tmpdir/springboot-sample"/>
    <defaultCache
            maxElementsInMemory="10000"
            eternal="false"
            timeToIdleSeconds="120"
            timeToLiveSeconds="120"
            overflowToDisk="false"
            diskPersistent="false"
            diskExpiryThreadIntervalSeconds="120"
    />
    <cache name="user"
           maxElementsInMemory="10000"
           eternal="true"
           overflowToDisk="true"
           diskPersistent="true"
           diskExpiryThreadIntervalSeconds="600"
    />
ehcache>
配置含义:
- name:缓存名称
- maxElementsInMemory:缓存最大个数
- eternal:对象是否永久有效,一但设置了,timeout 将不起作用
- timeToIdleSeconds:设置对象在失效前的允许闲置时间
- timeToLiveSeconds:设置对象在失效前允许存活时间
- overflowToDisk:当内存中对象数量达到 maxElementsInMemory 时,Ehcache 将会对象写到磁盘中
- diskSpoolBufferSizeMB:这个参数设置 DiskStore(磁盘缓存)的缓存区大小,默认是30MB,每个Cache都应该有自己的一个缓冲区
- maxElementsOnDisk:硬盘最大缓存个数
- diskPersistent:是否缓存虚拟机重启期数据
- diskExpiryThreadIntervalSeconds:磁盘失效线程运行时间间隔,默认是120秒
- memoryStoreEvictionPolicy:当达到 maxElementsInMemory 限制时,Ehcache 将会根据指定的策略去清理内存,默认策略是LRU,可以设置为 FIFO 或是 LFU
- clearOnFlush:内存数量最大时是否清除
开启缓存
@EnableCaching
@SpringBootApplication
public class EhcacheApplication {
    public static void main(String[] args) {
        SpringApplication.run(EhcacheApplication.class, args);
    }
}
具体使用方法和 Redis 类似
No.12 Spring Boot 定义系统启动任务
在传统 Java Web 项目中,如果设计到系统任务(只在项目启动时运行的任务),一般用会用到 Listener,定义一个 ServletContextListener,通过这对象就可以监控到项目的启动和销售,做出对应的操作。
1、CommandLineRunner
使用 CommandLineRunner 时,首先自定义 MyCommandLineRunner1 并且实现 CommandLineRunner 接口:
@Component
@Order(100)
public class MyCommandLineRunner1 implements CommandLineRunner {
    @Override
    public void run(String... args) throws Exception {
        for (String s: args) {
            System.out.print(s + " ");
        }
        System.out.println();
    }
}
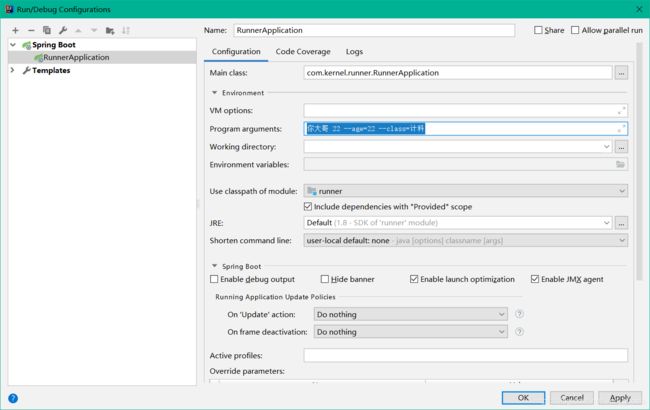
首先通过 @Componment 注解将 MyCommandLineRunner1 注册为 Spring 容器的一个 bean,@Order 表示启动的优先级,值越小优先级越高,run 方法的参数来自于项目的启动参数
IDEA 通过如下方式传递参数
另一种方式,则是将项目打包,在命令行中启动项目,然后启动时在命令行传入参数,如下:
java -jar runner-0.0.1-SNAPSHOT.jar 大哥 22
2、ApplicationRunner
ApplicationRunner 和 CommandLineRunner 功能一致,用法也基本一致,唯一的区别主要体现在对参数的处理上,ApplicationRunner 可以接收更多类型的参数(ApplicationRunner 除了可以接收 CommandLineRunner 的参数之外,还可以接收 key/value形式的参数)。
使用 ApplicationRunner ,自定义类实现 ApplicationRunner 接口即可,组件注册以及组件优先级的配置都和 CommandLineRunner 一致,如下:
@Component
@Order(98)
public class MyCommandLineRunner2 implements ApplicationRunner {
    @Override
    public void run(ApplicationArguments args) throws Exception {
        System.out.println(args.getNonOptionArgs());
        System.out.println(args.getOptionNames());
        System.out.println(args.getOptionValues("age"));
        for (String s: args.getSourceArgs()) {
            System.out.print(s + " ");
        }
        System.out.println();
    }
}
关于参数:
- args.getNonOptionArgs(); 可以用来获取命令行的无 key 参数
- args.getOptionNames(); 获取 key/value 形式的参数的 key 的集合
- args.getOptionValues(key)); 根据 key 获取 key/value 形式的参数的 value
- args.getSourceArgs(); 获取命令行中的所有参数
No.13 Spring Boot 整合 MyBatis
创建项目,引入 web、mybatis、mysql、druid
配置 application.properties
spring.datasource.url=jdbc:mysql:///test?serverTimezone=GMT
spring.datasource.username=root
spring.datasource.password=123456
spring.datasource.type=com.alibaba.druid.pool.DruidDataSource
创建 Mapper:
@Repository
public interface UserMapper {
    @Results({
            @Result(property = "id", column = "id"),
            @Result(property = "userName", column = "user_name"),
            @Result(property = "password", column = "password"),
            @Result(property = "telPhone", column = "tel_phone")
    })
    @Select("select * from user")
    public List<User> findAll();

    @Select("select * from user where id  = #{id}")
    public User findUserById(Long id);

    @Update("update user set user_name=#{userName}, password = #{password}, tel_phone=#{telPhone} where id = #{id}")
    public Integer updateUserById(User user);

    @Insert("insert into user(user_name, password, tel_phone) values(#{userName}, #{password}, #{telPhone})")
    public Long insertUser(User user);
}
配置好 UserMapper 之后还需要配置 Mapper 扫描,可以在该类上标注 @Mapper,将该类标注为一个 Mapper 接口,当然更优雅的方式是在启动类上配置,如下:
@MapperScan(basePackages = "com.kernel.mapper")
@SpringBootApplication
public class MybatisApplication {
    public static void main(String[] args) {
        SpringApplication.run(MybatisApplication.class, args);
    }
}
No.14 Spring Boot 多数据源配置之 JdbcTemplate
创建项目,引入 web、jdbc、mysql、druid
创建 Bean:
public class User {
    private Long id;
    private String userName;
    private String password;
    private String telPhone;
}
配置 application.yml
spring:
  datasource:
    one:
      url: jdbc:mysql///test
      username: root
      password: 123456
      type: com.alibaba.druid.pool.DruidDataSource
    two:
      url: jdbc:mysql///test
        username: root
        password: 123456
        type: com.alibaba.druid.pool.DruidDataSource
这里对数据源的名字进行了区分,但是这样的话就没法手动配置了,所以需要手动配置一下,我们创建一个 DataSourceConfig:
@Configuration
public class DataSourceConfig {
    @Bean
    @ConfigurationProperties(prefix = "spring.datasource.one")
    DataSource dataSource1() {
        return DruidDataSourceBuilder.create().build();
    }

    @Bean
    @ConfigurationProperties(prefix = "spring.datasource.two")
    DataSource dataSource2() {
        return DruidDataSourceBuilder.create().build();
    }
}
配置 JdbcTemplate 实例
@Configuration
public class JdbcTemplateConfig {
    @Bean
    JdbcTemplate jdbcTemplateOne(@Qualifier("dataSource1")DataSource dataSource) {
        return new JdbcTemplate(dataSource);
    }

    @Bean
    JdbcTemplate jdbcTemplateTwo(@Qualifier("dataSource2")DataSource dataSource) {
        return new JdbcTemplate(dataSource);
    }
}
每个 JdbcTemplate 的创建都需要 DataSource ,我们项目中提供了两个 DataSource,如果按照类型自动注入会报错,所以使用 @Qualifier 按名称查找
至此,JdbcTemplate 多数据源就配置完成了
No.15 Spring Boot 整合 MyBatis 多数据源
创建项目,引入 web、mybatis、mysql、druid
配置 application.properties
spring.datasource.one.url=jdbc:mysql:///test?serverTimezone=GMT
spring.datasource.one.username=root
spring.datasource.one.password=123456
spring.datasource.one.type=com.alibaba.druid.pool.DruidDataSource
spring.datasource.two.url=jdbc:mysql:///test?serverTimezone=GMT
spring.datasource.two.username=root
spring.datasource.two.password=123456
spring.datasource.two.type=com.alibaba.druid.pool.DruidDataSource
提供两个 DataSource,如下:
@Configuration
public class DataSourceConfig {
    @Bean
    @ConfigurationProperties(prefix = "spring.datasource.one")
    DataSource dsOne() {
        return DruidDataSourceBuilder.create().build();
    }

    @Bean
    @ConfigurationProperties(prefix = "spring.datasource.two")
    DataSource dsTwo() {
        return DruidDataSourceBuilder.create().build();
    }
}
配置 数据源:
@Configuration
@MapperScan(basePackages = "com.kernel.mybatis.mapper1", sqlSessionFactoryRef = "sqlSessionFactoryOne", sqlSessionTemplateRef = "sqlSessionTemplateOne")
public class MyBatisConfigOne {
    @Resource(name = "dsOne")
    DataSource dataSource;

    @Bean
    SqlSessionFactory sqlSessionFactoryOne() {
        SqlSessionFactory sqlSessionFactory = null;
        try {
            SqlSessionFactoryBean bean = new SqlSessionFactoryBean();
            bean.setDataSource(dataSource);
            sqlSessionFactory = bean.getObject();
        } catch (Exception e) {
            e.printStackTrace();
        }
        return sqlSessionFactory;
    }

    @Bean
    SqlSessionTemplate sqlSessionTemplateOne() {
        return new SqlSessionTemplate(sqlSessionFactoryOne());
    }
}
首先这是个配置类,配置要扫描的包的范围,配置 sqlSessionFactory 和 sqlSessionTemplate
根据上面配置第二个数据源:
@Configuration
@MapperScan(basePackages = "com.kernel.mybatis.mapper2", sqlSessionFactoryRef = "sqlSessionFactoryTwo", sqlSessionTemplateRef = "sqlSessionTemplateTwo")
public class MyBatisConfigTwo {
    @Resource(name = "dsTwo")
    DataSource dataSource;

    @Bean
    SqlSessionFactory sqlSessionFactoryTwo() {
        SqlSessionFactory sqlSessionFactory = null;
        try {
            SqlSessionFactoryBean bean = new SqlSessionFactoryBean();
            bean.setDataSource(dataSource);
            sqlSessionFactory = bean.getObject();
        } catch (Exception e) {
            e.printStackTrace();
        }
        return sqlSessionFactory;
    }

    @Bean
    SqlSessionTemplate sqlSessionTemplateTwo() {
        return new SqlSessionTemplate(sqlSessionFactoryTwo());
    }
}


