python-web框架flask:快速搭建
参考:快速上手
与 python-web框架flask:搭建一个完整程序 配合服用,效果更佳。
文章目录
- 1、flask全局应用对象
- 1、创建一个flask全局应用对象。
- 2、启动和端口监听
- 2、路由
- 1、静态路由
- 2、带参数路由
- 3、路由重定向
- 4、构建URL
- 1、模拟请求
- 2、访问静态文件
- 5、Http请求方法
- 3、渲染模板
- 1、应用是一个模块
- 2、应用只有一个包
- 3、模板渲染
- 4、请求数据
- 1、请求对象
- 2、文件上传
- 3、Cookies
- 5、响应
- 1、重定向
- 2、错误(状态码)处理
- json格式化处理
- 6、会话
- 1、利用flask生成秘匙
- 2、会话处理
1、flask全局应用对象
1、创建一个flask全局应用对象。
app = Flask(__name__)
创建一个全局对象非常简单,name 指定这个全局对象的 应用模块或者包的名称。
我们可以点开Flask这个方法,里面可以配置一些参数,我们重点讲几个参数的意思。也是正常我们会用到的:
	 def __init__(
	        self,
	        import_name,
	        static_url_path=None,
	        static_folder="static",
	        static_host=None,
	        host_matching=False,
	        subdomain_matching=False,
	        template_folder="templates",
	        instance_path=None,
	        instance_relative_config=False,
	        root_path=None,
	    ):
看一下static_folder,这个参数,默认是static,这个参数是我们加载静态资源的相对路径, 有时候我们的目录机构可能不叫static,这个时候如果还是使用默认配置就找不到我们的静态资源了,不要慌,我们只需要修改这个路径既可。
然后还有一个同样配置的参数我们需要看一下就是 template_folder,这个是配置我们的html模板的相对地址,和上面的static的配置类似。
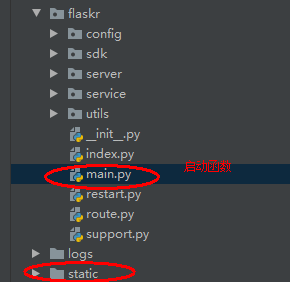
注意:这边的相对路径是相对于当前的启动的py文件,比如说当前的目录结构是这样的:

那么我们的static_folder就应该配置为 . ./static,因为这个路径是相对于启动函数
2、启动和端口监听
我们的程序既然有了全局应用对象,那么怎么去启动呢,有两种方式,如果在我们的ide:pyCharm中启动,我们可以用run方法来实现:
	 app.run(
	        host='127.0.0.1',
	        port=8082,
	        debug=True
	    )
非常简单,我们就可以启动一个应用,当然这只是最简单的,还有很多拓展工作没做
在shell机器下面我们的启动比较麻烦,命令如下:
$env:FLASK_APP = "main.py"
因为没有真实尝试过,所以具体还是以官方文档为主:It`s 官方文档-部署
2、路由
1、静态路由
正常情况下,像我们的欢迎页之类的都是静态路由,不携带动态参数,我们来看一下他的书写方式(注:app是我们的flask全局应用对象),这边采用route方法:
	@app.route('/')
	def index():
    return 'Index Page'
2、带参数路由
如果我们的一个路径需要携带参数怎么办呢,不要慌,flask拥有对应的参数匹配规则
这边的参数传递有两种方式,一种是原始的参数传递
@app.route('/user/' )
def show_user_profile(username):
# show the user profile for that user
return 'User %s' % escape(username)
@app.route('/post/' )
def show_post(post_id):
# show the post with the given id, the id is an integer
return 'Post %d' % post_id
@app.route('/path/' )
def show_subpath(subpath):
# show the subpath after /path/
return 'Subpath %s' % escape(subpath)
第一个是普通的参数传递,可以看到我们在函数入参里面直接使用,第二三个是转换后的参数,对应的转换规则如下:
| 转换关键字 | 作用 |
|---|---|
| string | (缺省值) 接受任何不包含斜杠的文本 |
| int | 接受正整数 |
| float | 接受正浮点数 |
| path | 类似 string ,但可以包含斜杠 |
| uuid | 接受 UUID 字符串 |
3、路由重定向
其实我感觉这个没啥可说的,但是可能在开发的过程中会误写一些东西,导致我们的程序运行出错,所以还是这边解释一下,看一下下面两个路径,不同之处在于是否使用尾部的斜杠:
	@app.route('/projects/')
	def projects():
	    return 'The project page'

	@app.route('/about')
	def about():
	    return 'The about page'
第一个路径的写法,当你访问一个没有斜杠结尾的 URL 时 Flask 会自动进行重定向,帮你在尾部加上一个斜杠。
第二个路径的写法,如果访问这个 URL 时添加了尾部斜杠就会得到一个 404 错误。
官方的说法是:这样可以保持 URL 唯一,并帮助搜索引擎避免重复索引同一页面。
4、构建URL
1、模拟请求
url_for() 函数用于构建指定函数的 URL,我的理解就是说,通过这个函数可以模拟一个对应的http请求,而且可以加上相应的入参等,我们来看一下下面的代码和输出:
app = Flask(__name__)
@app.route('/')
def index():
return 'index'
@app.route('/login')
def login():
return 'login'
@app.route('/user/' )
def profile(username):
return '{}\'s profile'.format(escape(username))
# 全局应用对象自带方法
with app.test_request_context():
print(url_for('index'))
print(url_for('login'))
print(url_for('login', next='/'))
print(url_for('profile', username='John Doe'))
输出:
		/
		/login
		/login?next=/
		/user/John%20Doe
2、访问静态文件
理想情况下你的服务器已经配置好了为你的提供静态文件的服务。只要在你的包或模块旁边创建一个名为 static 的文件夹就行了。 静态文件位于应用的 /static 中。
使用特定的 ‘static’ 端点就可以生成相应的 URL:
url_for('static', filename='style.css')
这个静态文件在文件系统中的位置应该是 static/style.css 。
5、Http请求方法
可以使用 route() 装饰器的 methods 参数来处理不同的 HTTP 方法,如下:
	from flask import request

	@app.route('/login', methods=['GET', 'POST'])
	def login():
	    if request.method == 'POST':
	        return do_the_login()
	    else:
	        return show_the_login_form()
如果当前使用了 GET 方法, Flask 会自动添加 HEAD 方法支持,并且同时还会 按照 HTTP RFC 来处理 HEAD 请求。同样, OPTIONS 也会自动实现。
3、渲染模板
使用 render_template() 方法可以渲染模板,你只要提供模板名称和需要 作为参数传递给模板的变量就行了。Flask 自动为你配置 Jinja2 模板引擎。
Flask 会在 templates 文件夹内寻找模板。 因此你的模板和应用会有两种体现方式:
1、应用是一个模块
如果应用是一个模块的话,那么可能存在多个模块和模板对应,所以模板作为单独一个包实现,目录结构如下:
	/application.py
	/templates
		 /我的模板.html
2、应用只有一个包
如果你的应用知识一个包的话,那么可以直接把模板放在包下面,但是记住要加上templates的外层包:
   /application
	  /__init__.py
	  /templates
 			   /我的模板.html
我感觉就是其实没有那么多死板的规定,你只要记住Jinja2 模板引擎 可以查找templates包下面的模板,剩下的就是自我发挥了
3、模板渲染
看一下一个小例子:
from flask import render_template
@app.route('/hello/')
@app.route('/hello/' )
def hello(name=None):
return render_template('hello.html', name=name)
	<title>Hello from Flasktitle>
	{% if name %}
	  <h1>Hello {{ name }}!h1>
	{% else %}
	  <h1>Hello, World!h1>
	{% endif %}
模板可以继承使用,比如说一些公共的部分,可以参考:模板继承
自动转义默认开启。因此,如果 name 包含 HTML ,那么会被自动转义。如果你可以 信任某个变量,且知道它是安全的 HTML (例如变量来自一个把 wiki 标记转换为 HTML 的模块),那么可以使用 Markup 类把它标记为安全的,或者在模板 中使用 |safe 过滤器。这个具体可以参考:Jinja2模板
4、请求数据
1、请求对象
- 通过使用 method 属性可以操作当前请求方法
- 通过使用 form 属性处理表单数据(在 POST 或者 PUT 请求 中传输的数据)
- 要操作 URL (如 ?key=value )中提交的参数可以使用 args 属性
我们来看一下例子:
	@app.route('/login', methods=['POST', 'GET'])
	def login():
	    error = None
	    if request.method == 'POST':
	        if valid_login(request.form['username'],
	                       request.form['password']):
	            return log_the_user_in(request.form['username'])
	        else:
	            error = 'Invalid username/password'

		searchword = request.args.get('key', '')
		print(searchword)

	    # the code below is executed if the request method
	    # was GET or the credentials were invalid
	    return render_template('login.html', error=error)
当 form 属性中不存在这个键时会引发一个 KeyError 。 如果不像捕捉一个标准错误一样捕捉 KeyError ,那么会显示一个 HTTP 400 Bad Request 错误页面。
2、文件上传
文件上传的前提是: 在HTML 表单中设置 enctype=“multipart/form-data” 属性
已上传的文件被储存在内存或文件系统的临时位置。
操作方式如下:
- 通过请求对象 files 属性来访问上传的文件。
- save() 方法用于把上传文件保存到服务器的文件系统中的
看一下例子(secure_filename函数返回真实的客户端文件名):
	from flask import request
	from werkzeug.utils import secure_filename

	@app.route('/upload', methods=['GET', 'POST'])
	def upload_file():
	    if request.method == 'POST':
	        f = request.files['the_file']
	        f.save('/var/www/uploads/' + secure_filename(f.filename))
3、Cookies
要访问 cookies ,可以使用 cookies 属性。可以使用响应 对象 的 set_cookie 方法来设置 cookies 。请求对象的 cookies 属性是一个包含了客户端传输的所有 cookies 的字典。
在 Flask 中,如果使用 会话 ,那么就不要直接使用 cookies ,因为 会话 比较安全一些。
读取 cookies:
	from flask import request

	@app.route('/')
	def index():
	    username = request.cookies.get('username')
储存 cookies:
	from flask import make_response

	@app.route('/')
	def index():
	    resp = make_response(render_template(...))
	    resp.set_cookie('username', 'the username')
	    return resp
5、响应
1、重定向
使用 redirect() 函数可以重定向。
	from flask import abort, redirect, url_for

	@app.route('/')
	def index():
    	return redirect(url_for('login'))

	@app.route('/login')
	def login():
		return “”
2、错误(状态码)处理
使用 errorhandler() 装饰器可以定制出错页面:
	from flask import render_template

	@app.errorhandler(404)
	def page_not_found(error):
	    return render_template('page_not_found.html'), 404
json格式化处理
JSON 格式的响应是常见的,用 Flask 写这样的 API 是很容易上手的。如果从视图 返回一个 dict (键值对形式),那么它会被转换为一个 JSON 响应。
	@app.route("/me")
	def me_api():
	    user = get_current_user()
	    return {
	        "username": user.username,
	        "theme": user.theme,
	        "image": url_for("user_image", filename=user.image),
	    }
如果 dict 还不能满足需求,还需要创建其他类型的 JSON 格式响应,可以使用 jsonify() 函数。该函数会序列化任何支持的 JSON 数据类型。
	@app.route("/users")
	def users_api():
	    users = get_all_users()
	    return jsonify([user.to_json() for user in users])
6、会话
1、利用flask生成秘匙
生成随机数的关键在于一个好的随机种子,因此一个好的密钥应当有足够的随机性。
使用下面的命令 可以快捷的为 Flask.secret_key ( 或者 SECRET_KEY )生成值:
	$ python -c 'import os; print(os.urandom(16))'

	b'_5#y2L"F4Q8z\n\xec]/'
2、会话处理
session对象:允许你在不同请求 之间储存信息。这个对象相当于用密钥签名加密的 cookie ,即用户可以查看你的 cookie ,但是如果没有密钥就无法修改它。
使用示例:
	from flask import Flask, session, redirect, url_for, escape, request

	app = Flask(__name__)

	# Set the secret key to some random bytes. Keep this really secret!
	app.secret_key = b'_5#y2L"F4Q8z\n\xec]/'

	# 获取session的key对应的值
	@app.route('/')
	def index():
	    if 'username' in session:
	        return 'Logged in as %s' % escape(session['username'])
	    return 'You are not logged in'

	# session的存储
	@app.route('/login', methods=['GET', 'POST'])
	def login():
	    if request.method == 'POST':
	        session['username'] = request.form['username']
	        return redirect(url_for('index'))
	    return '''


	    '''

	# session移除某个key
	@app.route('/logout')
	def logout():
	    # remove the username from the session if it's there
	    session.pop('username', None)
	    return redirect(url_for('index'))