springboot-shiro中的问题
一:shiro认证流程图
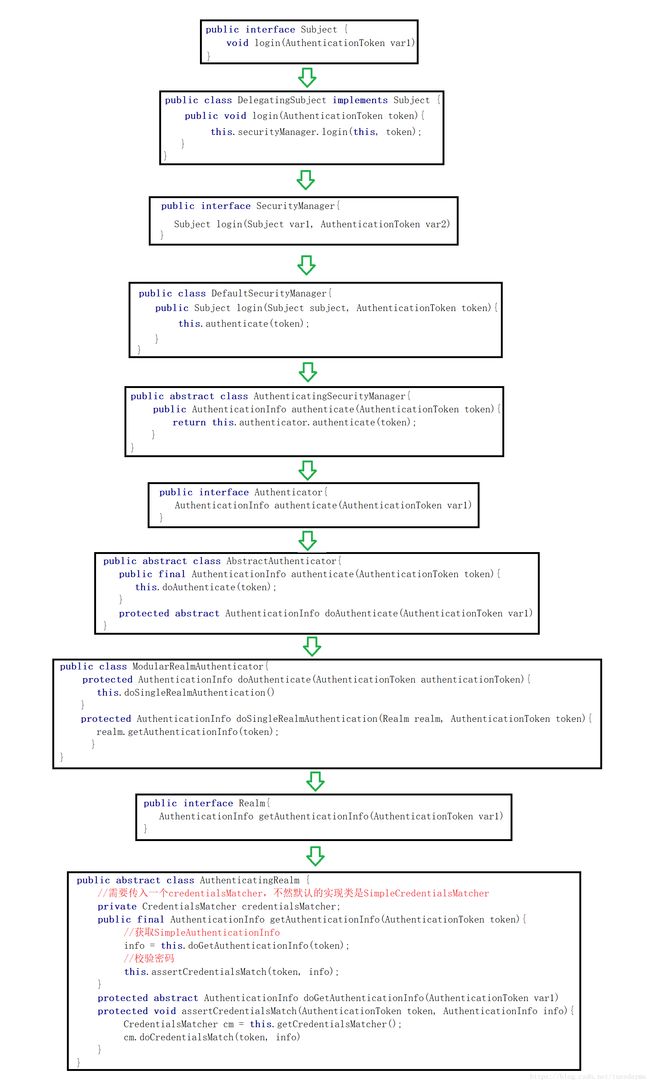
说明:我们可以看到AuthenticatingRealm这个类的getAuthenticationInfo方法进行了两个操作:doGetAuthenticationInfo和assertCredentialsMatch。
那么doGetAuthenticationInfo这个方法是不是很眼熟呢?是的,我们自己写的XXX_Realm实现的就是这个方法,即获取:从UsernamePasswordToken中获取用户名,从数据库中获取用户名对应的密码,盐值加密和Realm的名字组成的SimpleAuthenticationInfo对象。
 @Override
    //UserRealm继承了AuthenticatingRealm这个接口,这个接口中有getAuthenticationInfo这个方法
    //这个方法中有doGetAuthenticationInfo方法和assertCredentialsMatch方法
    //其中assertCredentialsMatch方法用于将doGetAuthenticationInfo返回的AuthenticationInfo对象进行比对,即密码的比对
    //UserRealm重写了doGetAuthenticationInfo方法
    protected AuthenticationInfo doGetAuthenticationInfo(AuthenticationToken token) throws AuthenticationException {
        //1. 把 AuthenticationToken 转换为 UsernamePasswordToken
        UsernamePasswordToken upToken = (UsernamePasswordToken) token;
        //2. 从 UsernamePasswordToken 中来获取 username
        String account = upToken.getUsername();
        //3. 调用数据库的方法, 从数据库中查询 username 对应的用户记录
        List<User> list = commonService.select_userbyaccount(account);
        if (list == null || list.size() == 0) {
            throw new UnknownAccountException("用户不存在!");
        }
        //AuthenticatingRealm
        User user = list.get(0);
        String password_from_db = user.getPassword();
        SimpleAuthenticationInfo authenticationInfo = new SimpleAuthenticationInfo(
                account,
                password_from_db,
                // salt=username+salt,盐值加密
                ByteSource.Util.bytes(account),
                getName()
        );
        return authenticationInfo;
    }
其实我们也可以不妨点开我们写的realm继承的类,我们会发现AuthorizingRealm实际上继承的其中一个类就是AuthenticatingRealm这个类,那么看到这里是不是就有点豁然开朗呢?
问题一:
描述:在shiro中配置了CredentialsMatcher的实现类但是不起作用
   /**
     * HashedCredentialsMatcher,这个类是为了对密码进行编码的,
     * 防止密码在数据库里明码保存,当然在登陆认证的时候,
     * 这个类也负责对form里输入的密码进行编码。
     * 可以扩展凭证匹配器,实现 输入密码错误次数后锁定等功能,下一次
     */
    @Bean(name = "credentialsMatcher")
    public HashedCredentialsMatcher hashedCredentialsMatcher() {
        HashedCredentialsMatcher hashedCredentialsMatcher = new HashedCredentialsMatcher();
        //散列算法:这里使用MD5算法;
        hashedCredentialsMatcher.setHashAlgorithmName("MD5");
        //散列的次数,比如散列两次,相当于 md5(md5(""));
        hashedCredentialsMatcher.setHashIterations(2);
        //storedCredentialsHexEncoded默认是true,此时用的是密码加密用的是Hex编码;false时用Base64编码
        hashedCredentialsMatcher.setStoredCredentialsHexEncoded(true);
        return hashedCredentialsMatcher;

}分析:最开始我以为是 @Bean(name = “credentialsMatcher”)中的名字写错了,应该要写成hashedCredentialsMatcher,但是改了之后发现没什么用,我看网上写的配置文件都是这样的,感觉很奇怪。(毕竟shiro是自学的,很多东西都在摸索)
解决:我们的自定义Realm中需要提供一个构造方法,然后再shiro的配置文件中需要在MyRealm的bean配置中将hashedCredentialsMatcher写入MyRealm的构造方法中,不然credentialsMatcher默认实现的类永远都是SimpleCredentialsMatcher,从而无法实现md5加密和盐值加密
public MyRealm(CredentialsMatcher matcher) {
        super(matcher);
}
@Bean
@DependsOn("lifecycleBeanPostProcessor")
public MyRealm userRealm() {
MyRealm myRealm = new MyRealm(hashedCredentialsMatcher());
return myRealm;
}这里有需要提出来一点,网上大批量的例子是没有写这个的,但是为什么他们的sql脚本中的密码也是加密过的,不是很想吐槽。。。(抄代码都不自己试一下再发布的吗???)
问题二:
描述: shiro继承进来之后,发现用户登入所在的CommonService这个类脱离了aop管理了,原本在这类中被调用的select、insert、update和delete开头的方法都会进行日志处理,但是自从这个类注入到自定义的realm中之后就不被aop所管理了
public class MyRealm extends AuthorizingRealm {
    private Logger logger = LoggerFactory.getLogger(MyRealm.class);
    @Autowired
    private CommonService commonService;
分析: 一脸懵逼中。。。我想静静。。。
解决: 擦边球的解决方法就是将shiro所用到的方法写在单独的一个service中,或者所有shiro用到的service将手动加上本来在aop中处理的东西(0.0)
问题三:
描述: 配上shiro之后,发现原来的swagger不能用了,打开链接之后发现被shiro拦截了

分析: 我们可以在XssFilter中将swagger需要访问的url打印出来,然后配到shiro配置文件中
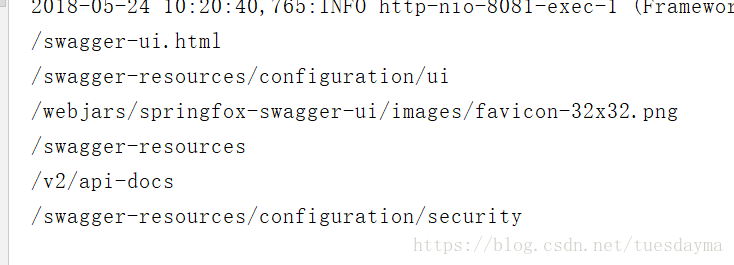
解决: 将这些路径配置到shiro拦截中,配成匿名访问
    @Bean(name = "shiroFilter")
    public ShiroFilterFactoryBean shiroFilterFactoryBean(SecurityManager securityManager) {
        ShiroFilterFactoryBean shiroFilterFactoryBean = new ShiroFilterFactoryBean();
        //Shiro的核心安全接口,这个属性是必须的
        shiroFilterFactoryBean.setSecurityManager(securityManager);
        Map<String, Filter> filterMap = new LinkedHashMap<>();
        filterMap.put("authc", new AjaxPermissionsAuthorizationFilter());
        shiroFilterFactoryBean.setFilters(filterMap);
        Map<String, String> filterChainDefinitionMap = new LinkedHashMap<>();
        //============================swagger====================================
        filterChainDefinitionMap.put("/swagger*/**", "anon");
        filterChainDefinitionMap.put("/webjars/**", "anon");
        filterChainDefinitionMap.put("/v2/**", "anon");
        //============================druid====================================
        filterChainDefinitionMap.put("/druid/**", "anon");
        //============================登入====================================
        filterChainDefinitionMap.put(baseuri + "login.do", "anon");
        //============================退出====================================
        filterChainDefinitionMap.put("/login/logout", "anon");
        filterChainDefinitionMap.put("/**", "authc");
        shiroFilterFactoryBean.setFilterChainDefinitionMap(filterChainDefinitionMap);
        return shiroFilterFactoryBean;
    }
问题四:缓存问题
描述: shiro中的缓存默认值问题
分析:
1、cachingEnabled:默认值是true,总体缓存的开关,如果设置为false就所有缓存都没了!

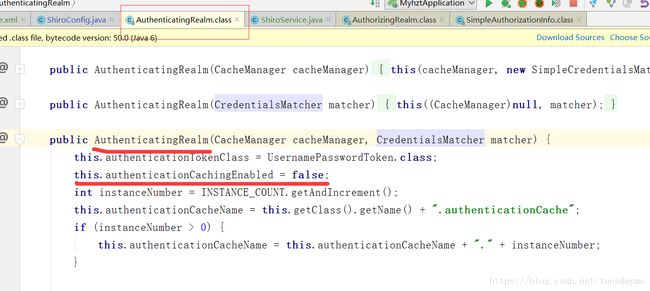
2、authenticationCachingEnabled:默认值是false,即默认是不缓存AuthenticationInfo信息的

虽然boolean默认值就是false,单单这个地方并不能证明他的值默认值就是false,因为后面还会有AuthenticatingRealm的初始化(调用构造方法),但是很遗憾,AuthenticatingRealm初始化的时候任然给他的值是false
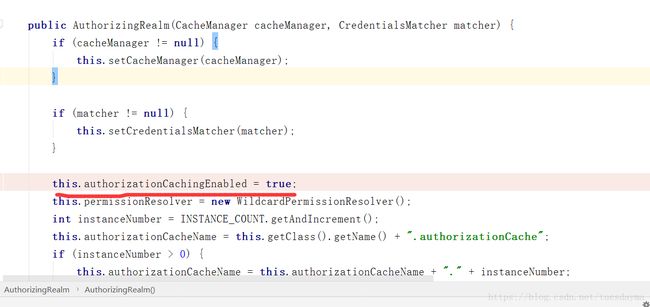
3、authorizationCachingEnabled:表示权限缓存,默认值是true(这里需要说明一下,网上基本都说这个默认值是false,但是本人亲自测了一下,认为他的默认值应该是true,于是去看了一下源码,毕竟需要用事实说话)

没错,authorizationCachingEnabled是AuthorizingRealm的一个boolean类型的成员变量,这里说他的默认值是false也没什么毛病,但是AuthorizingRealm初始化(调用构造方法)的时候,就将他赋值为true,事实实验结果也是true
描述:
1、自定义shiro缓存文件,defaultCache是必须要的,不然就会报错,让你加一个默认缓存
![]()
2、缓存名字和我设置的名字不一致竟然也不报错,也能进行缓存,一脸懵逼。。这可能就是默认缓存必须要配置的原因
 <defaultCache
            maxElementsInMemory="10000"
            eternal="false"
            timeToIdleSeconds="3600"
            timeToLiveSeconds="0"
            overflowToDisk="false"
            diskPersistent="false"
            diskExpiryThreadIntervalSeconds="120"/>


    <cache
            name="authenticationCache"
            maxEntriesLocalHeap="2000"
            eternal="false"
            timeToIdleSeconds="3600"
            timeToLiveSeconds="0"
            overflowToDisk="false"
            statistics="true"/>


    <cache
            name="authorizationCache"
            maxEntriesLocalHeap="2000"
            eternal="false"
            timeToIdleSeconds="3600"
            timeToLiveSeconds="0"
            overflowToDisk="false"
            statistics="true"/>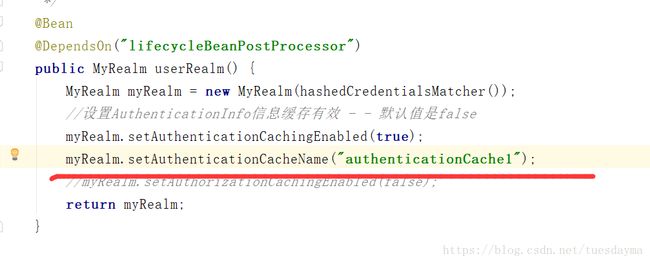
3、一定要将自定义的EhCacheManager配置进入SecurityManager中
    @Bean(name = "securityManager")
    public SecurityManager securityManager() {
        DefaultWebSecurityManager securityManager = new DefaultWebSecurityManager();
        //设置缓存
        securityManager.setCacheManager(getEhCacheManager());
        securityManager.setRealm(userRealm());
        return securityManager;
    }
@Bean
public EhCacheManager getEhCacheManager() {
EhCacheManager em = new EhCacheManager();
//获取自定义的缓存配置文件(默认是classpath:org/apache/shiro/cache/ehcache/ehcache.xml)
em.setCacheManagerConfigFile("classpath:Ehcache.xml");
return em;
}
github地址:https://github.com/mzd123/springboot_shiro (更新中,有兴趣的小伙伴可以下载下来看一看)
