走进绚烂多彩的属性动画-Property Animation之TimeInterpolator和TypeEvaluator(下篇)
转载请注明出处(万分感谢!):
http://blog.csdn.net/javazejian/article/details/52334098
出自【zejian的博客】
关联文章:
走进绚烂多彩的属性动画-Property Animation(上篇)
走进绚烂多彩的属性动画-Property Animation之Interpolator和TypeEvaluator(下篇)
属性动画-Property Animation之ViewPropertyAnimator 你应该知道的一切
Android布局动画之animateLayoutChanges与LayoutTransition
上一篇中,我们已经介绍了属性动画的基本使用,至少在动画应用上问题不大,而本篇我们将来了解插值器(Interpolator)和类型估算器(TypeEvaluator)的内部实现原理,并分别提供一个自定义Interpolator和自定义TypeEvaluator的案例,看完本篇后至少我们可以完全明白插值器和估值器存在的意义以及其内部原理,当然同时也掌握了自定义插值器和估值器的方法。本篇更多从原理层面分析,至于动画效果如何,依各人的数学思维能力而异了,哈~。
1.插值器(Interpolator)原理简要概述与类型估算器(TypeEvaluator)简单入门
在开始前,我们先来全局的角度了解一下Interpolator与TypeEvaluator,以便我们后面更好的理解和学习。在我们现实的生活中,时间是线性匀速地一秒一秒逝去,在设置完动画运动时间后,动画也是按时间线性匀速化进行的,但如果现在想让动画加速或者减速前进的话,我们就需要插值器-Interpolator帮忙了,它的任务就是修改动画进行的节奏,也就是说Interpolator的作用是控制动画过程速度快慢,这也就是Interpolator存在的意义了,当然单有Interpolator还是不足以完成任务的,我们还需要TypeEvaluator的协助,那么TypeEvaluator又是干嘛的呢?其实TypeEvaluator的作用是控制整个动画过程的运动轨迹,通俗地讲就是这条路往哪里走由TypeEvaluator说了算。最终Interpolator和TypeEvaluator的处理效果会体现在ValueAnimator上,我们应该还记得上一篇文章中提到过ValueAnimator本身没有动画效果,它只是对一个数值做“运动”,而在这里我们要说明白的是,ValueAnimator内部对数值做“运动”就是通过Interpolator和TypeEvaluator来实现的。好~,到这里我们也就大概了解了Interpolator和TypeEvaluator的作用了,如果还不理解,那也没关系,下面我们会详细分析它们。
2.插值器(Interpolator)原理简要概述
插值器的顶级父类是TimeInterpolator,又称为时间插值器,TimeInterpolator是在Android 3.0时加入的,android 3.0之前类是Interpolator,而现在Interpolator继承自TimeInterpolator,我们不妨查看一下源码:
TimeInterpolator如下,
package android.animation;
/**
 * A time interpolator defines the rate of change of an animation. This allows animations
 * to have non-linear motion, such as acceleration and deceleration.
 */
public interface TimeInterpolator {
    /**
     * Maps a value representing the elapsed fraction of an animation to a value that represents
     * the interpolated fraction. This interpolated value is then multiplied by the change in
     * value of an animation to derive the animated value at the current elapsed animation time.
     *
     * @param input A value between 0 and 1.0 indicating our current point
     *        in the animation where 0 represents the start and 1.0 represents
     *        the end
     * @return The interpolation value. This value can be more than 1.0 for
     *         interpolators which overshoot their targets, or less than 0 for
     *         interpolators that undershoot their targets.
     */
    float getInterpolation(float input);
}
Interpolator如下:
package android.view.animation;
import android.animation.TimeInterpolator;
/**
 * An interpolator defines the rate of change of an animation. This allows
 * the basic animation effects (alpha, scale, translate, rotate) to be
 * accelerated, decelerated, repeated, etc.
 */
public interface Interpolator extends TimeInterpolator {
    // A new interface, TimeInterpolator, was introduced for the new android.animation
    // package. This older Interpolator interface extends TimeInterpolator so that users of
    // the new Animator-based animations can use either the old Interpolator implementations or
    // new classes that implement TimeInterpolator directly.
}
其实从源码中可以看出Interpolator继承自TimeInterpolator,但Interpolator也只是单纯的继承罢了,鉴于这点Google官方考虑更多是兼容旧版本,毕竟旧版本的动画插值器实现的还是Interpolator,当然我们这里也没必要深究这个问题。从源码可以看出插值器接口只有一个抽象方法:
float getInterpolation(float input);这个方法的返回值就是当前属性值改变的百分比,也可以理解为前面所说的速度快慢,而参数input则表示时间流逝的百分比,那什么是时间流逝的百分比呢?我们举个例子,我们执行的动画全部时间需要4秒钟,而现在时间过了2秒,那么时间流逝的百分比就是2/4=0.5。了解完这两个知识点后,我们用一个比较专业性的话来概述TimeInterpolator的作用,TimeInterpolator的作用是根据时间流逝的百分比来计算出当前属性值改变的百分比。因此根据时间的百分比我们就可以计算出当前属性值改变的百分比,这个属性改变的百分比最终会传递给TyleEvaluator用于计算我们动画属性值的实际变化(后面会分析),这里为更加直白表现出插值器的工作原理,我们引入数学的函数表达式,我们把时间流逝的百分比设置为t,t的取值范围是[0,1],0表示动画开始,1表示动画结束。当前属性值改变的百分比设置x,假设TimeInterpolator是函数:x=f(t),这个函数代表的就是插值器内部做的事,而实际上TimeInterpolator是一个顶级接口,因此每个实现该接口的子类都可以看成不同函数公式,为什么这么说呢,接着我们来验证一下这个问题,先来看看线性插值器LinearInterpolator的源码:
package android.view.animation;

import android.content.Context;
import android.util.AttributeSet;

import com.android.internal.view.animation.HasNativeInterpolator;
import com.android.internal.view.animation.NativeInterpolatorFactory;
import com.android.internal.view.animation.NativeInterpolatorFactoryHelper;

/**
 * An interpolator where the rate of change is constant
 */
@HasNativeInterpolator
public class LinearInterpolator extends BaseInterpolator implements NativeInterpolatorFactory {

    public LinearInterpolator() {
    }

    public LinearInterpolator(Context context, AttributeSet attrs) {
    }
    //直接返回传递进来的时间流逝的百分比,显然我们函数可以变形为x=t,
    //也就是线性匀速的函数,返回值代表当前属性值改变的百分比x
    public float getInterpolation(float input) {
        return input;
    }

    /** @hide */
    @Override
    public long createNativeInterpolator() {
        return NativeInterpolatorFactoryHelper.createLinearInterpolator();
    }
} BaseInterpolator类继承自Interpolator接口,内部只是一些配置改变的操作,这点不用深究,我们还是看看LinearInterpolator的实现,其中最重要的方法就是getInterpolation(float input),该方法直接返回传递进来的时间流逝的百分比,显然我们函数可以变形为x=t,也就是线性匀速的函数,所以线性插值器LinearInterpolator代表就是一种线性匀速的动画速度,下面我们通过给动画设置LinearInterpolator演示这个效果,代码如下:
ObjectAnimator objectAnimator=ObjectAnimator.ofFloat(image,"translationY",0f,250);

objectAnimator.setDuration(5000);

objectAnimator.setInterpolator(new LinearInterpolator());

objectAnimator.start();
效果图和线性插值器LinearInterpolator代表的函数图像如下:
到这里我们就明白了,线性插值器内部的实现其实就代表着一个函数公式x=t,而这个函数公式的值代表当前属性值改变的百分比,也是控制动画播放的速度。LinearInterpolator只不过是其中一种插值器,除此之外系统还为我们提供其他插值器,其中常用的有LinearInterpolator(线性插值器:匀速动画,刚分析过),AccelerateDecelerateInterpolator(加速减速器:动画开头和结束慢,中间快,默认插值器),DecelerateInterpolator(减速插值器:动画越来越慢)、BounceInterpolator (弹跳插值器)、AnticipateInterpolator (回荡秋千插值器)、CycleInterpolator (正弦周期变化插值器)等等,它们各自都代表着一种函数表达式,这些插值器我们留在后面分析,现在我们思考一个问题,插值器计算出来的当前属性改变的百分比x,这个值最终会传递给类型估算器(TypeEvaluator),然后由类型估值器来计算属性改变后的属性的实际变化值,那么TypeEvaluator内部又是如何工作的呢?接下来,我们就来了解一下类型估算器(TypeEvaluator)。
3.类型估算器(TypeEvaluator)原理简要概述
TypeEvaluator翻译为类型估值算法,又称估值器,它的作用是通过起始值、结束值以及插值器返回值来计算在该时间点的属性值应该是多少,也就是控制动画实际运动轨迹,系统给我们提供IntEvaluator(针对整型属性)、FloatEvaluator(针对浮点型属性)以及ArgbEvaluator(针对Color属性)。我们不妨来看看TypeEvaluator接口的源码:
/**
 * Interface for use with the {@ link ValueAnimator#setEvaluator(TypeEvaluator)} function. Evaluators
 * allow developers to create animations on arbitrary property types, by allowing them to supply
 * custom evaluators for types that are not automatically understood and used by the animation
 * system.
 */
public interface TypeEvaluator<T> {
    /**
     * This function returns the result of linearly interpolating the start and end values, with
     * fraction representing the proportion between the start and end values. The
     * calculation is a simple parametric calculation: result = x0 + t * (x1 - x0),
     * where x0 is startValue, x1 is endValue,
     * and t is fraction.
     */
    public T evaluate(float fraction, T startValue, T endValue);
} 显然从注释中可以看到,我们通过下ValueAnimator#setEvaluator(TypeEvaluator)来为动画设置不同的估值器,而TypeEvaluator接口也只有一个方法:
public T evaluate(float fraction, T startValue, T endValue);第一个参数是估值小数,也就是插值器计算出来的当前属性改变的百分比,第二个参数是动画开始值,第三个参数是动画的结束值。那么估算器是怎么工作的呢?我们现在来看看IntEvaluator的源码:
package android.animation;

/**
 * This evaluator can be used to perform type interpolation between int values.
 */
public class IntEvaluator implements TypeEvaluator<Integer> {

    /**
     * This function returns the result of linearly interpolating the start and end values, with
     * fraction representing the proportion between the start and end values. The
     * calculation is a simple parametric calculation: result = x0 + t * (v1 - v0),
     * where x0 is startValue, x1 is endValue,
     * and t is fraction.
     *
     * @param fraction   The fraction from the starting to the ending values
     * @param startValue The start value; should be of type int or
     *                   Integer
     * @param endValue   The end value; should be of type int or Integer
     * @return A linear interpolation between the start and end values, given the
     *         fraction parameter.
     */
    public Integer evaluate(float fraction, Integer startValue, Integer endValue) {
        int startInt = startValue;
        return (int)(startInt + fraction * (endValue - startInt));
    }
}
我们主要看一下IntEvaluator的函数实现,通过初始值startInt不断去累加每个时刻属性变化的数值,从而控制对象属性变化最后达到所谓的动画效果。也可以看出TypeEvaluator确实是通过插值器的计算值和开始值以及结束值来实现对动画过程的控制的。同样的到道理,我们也可以通过一个函数表达式来表示TypeEvaluator的工作原理,如下:
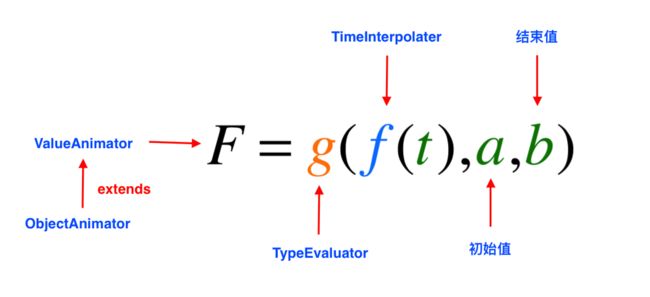
最终可以转换为:
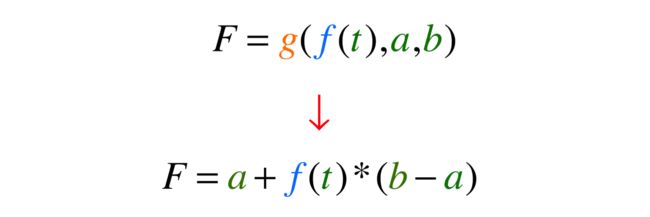
这也就和我们的IntEvaluator内部计算原理一样了,所以本本质上来说每个TypeEvaluator衍生子类也代表着不同种类的函数表达式罢了,上面表达式中的F代表ValueAnimator的主要原因是,ValueAnimator本身没有任何动画效果,它只对一个数值进行做”运动”,而内部则是通过Interpolator和TypeEvaluator相结合来实现对数值做”运动”的,因此通过上面函数表达式我们也就明白了ValueAnimator、TimeInterpolator和TypeEvaluator间的关系了。我们很容易得出这样的结论:每一个ValueAnimator就是一个TimeInterpolator和一个TypeEvaluator的结合体。从数学的函数角度来说,ValueAnimator就是由TimeInterpolator和TypeEvaluator这两个简单函数组合而成的一个复合函数。至于ValueAnimator的代码内部是如何去实现的,这个我们还是放在动画源码分析篇再详细谈吧,这里就先不深入了。为了更好的理解TimeInterpolator和TypeEvaluator,我们来看一个简单的代码案例吧
4.借助应用案例加深理解
如下图,表示一个匀速的动画,采用的是线性插值器和整型估值器算法,在40ms内,View的x属性值实现从0到40的变换:

上一篇我们提到过动画的默认刷新率为10ms/帧,也就是说该动画将分5帧进行,我们考虑第3帧(也就是x=20,t=20ms),当时间t=20ms时,计算出时间流逝的百分比为20/40=0.5,那么x应该改变多少呢,如我们前面所说的动画的播放时由插值器和估值器一起控制的,由于现在我们使用的是线性插值器,根据我们前面分析过的线性插值器源码,最终f(t)=t(为了防止符号冲突我们改为f(t)代替),也就是进线性插值器直接返回传入的时间流逝的百分比,也就意味着当前属性变化的百分比为0.5,这个时候线性插值器的工作就完成了,具体x该移动多少,这个就需要估值器来确定了,我们再一次看看IntEvaluator的源码:
package android.animation;
public class IntEvaluator implements TypeEvaluator<Integer> {

    public Integer evaluate(float fraction, Integer startValue, Integer endValue) {
        int startInt = startValue;
        return (int)(startInt + fraction * (endValue - startInt));
    }
}
根据我们之前分析,很显然fraction=0.5,startInt=0,endValue=40,那么整型估值器的最后返回的结果显然就是0.5*(40-0)=20,也就是当t=20ms时,x需要移动的距离为20。
结合前面所有的分析以及上面的案例,我们对TimeInterpolator和TypeEvaluator应该有很清晰的概念了,说白了每一个TimeInterpolator和TypeEvaluator都是一个函数计算公式,只不过TimeInterpolator控制的是动画的速度,而TypeEvaluator控制的是动画的过程,毕竟最终如何运动是要通过TypeEvaluator计算出来的,而TimeInterpolator和TypeEvaluator两者结合的效果最终体现ValueAnimator对象上,再通过该对象(或者其子类ObjectValue)作用到我们需要执行动画的对象上,也就达到我们所想要的预期动画效果。现在我们再回头看看下面的函数公式,应该一幕了然了吧。

好~TimeInterpolator和TypeEvaluator的工作原理就分析到这里。接着我们来了解一下系统为我们提供的Interpolator。
5.各种Interpolator深入分析
AccelerateDecelerateInterpolator
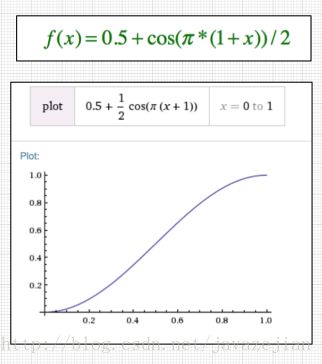
AccelerateDecelerateInterpolator,又称加速减速器,特点动画开头和结束慢,中间快,属性动画默认插值器。其源码如下:
public class AccelerateDecelerateInterpolator extends BaseInterpolator
        implements NativeInterpolatorFactory {
    public AccelerateDecelerateInterpolator() {
    }

    @SuppressWarnings({"UnusedDeclaration"})
    public AccelerateDecelerateInterpolator(Context context, AttributeSet attrs) {
    }

    public float getInterpolation(float input) {
        return (float)(Math.cos((input + 1) * Math.PI) / 2.0f) + 0.5f;
    }

    /** @hide */
    @Override
    public long createNativeInterpolator() {
        return NativeInterpolatorFactoryHelper.createAccelerateDecelerateInterpolator();
    }
} 结合源码中的getInterpolation(float input)方法和前面对插值器的分析,可以知道该函数方法等如下函数公式,其函数公式在坐标系的图像(右图)以及该插值器函数的动画应该是开头慢中间开始变快的效果(左图):
AccelerateInterpolator
AccelerateInterpolator,又称加速器插值器,其特点是开始很慢后面越来越快。其源码如下(去掉了一些没必要看的代码):
public class AccelerateInterpolator extends BaseInterpolator implements NativeInterpolatorFactory {
    private final float mFactor;
    private final double mDoubleFactor;

    public AccelerateInterpolator() {
        mFactor = 1.0f;
        mDoubleFactor = 2.0;
    }

    /**
     * Constructor
     *  将factor设置为1.0f会产生一条y=x^2的抛物线。
     *  增加factor 到 1.0f 后,开头更加慢,结尾更加快
     * @param factor Degree to which the animation should be eased. Seting
     *        factor to 1.0f produces a y=x^2 parabola. Increasing factor above
     *        1.0f  exaggerates the ease-in effect (i.e., it starts even
     *        slower and ends evens faster)
     */
    public AccelerateInterpolator(float factor) {
        mFactor = factor;
        mDoubleFactor = 2 * mFactor;
    }

    public AccelerateInterpolator(Context context, AttributeSet attrs) {
        this(context.getResources(), context.getTheme(), attrs);
    }

    /** @hide */
    public AccelerateInterpolator(Resources res, Theme theme, AttributeSet attrs) {
        TypedArray a;
        if (theme != null) {
            a = theme.obtainStyledAttributes(attrs, R.styleable.AccelerateInterpolator, 0, 0);
        } else {
            a = res.obtainAttributes(attrs, R.styleable.AccelerateInterpolator);
        }

        mFactor = a.getFloat(R.styleable.AccelerateInterpolator_factor, 1.0f);
        mDoubleFactor = 2 * mFactor;
        setChangingConfiguration(a.getChangingConfigurations());
        a.recycle();
    }

    public float getInterpolation(float input) {
        if (mFactor == 1.0f) {
            return input * input;
        } else {
            return (float)Math.pow(input, mDoubleFactor);
        }
    }
}
从源码可以看出该插值器有一个factor的变量,这个参数实际上是个阀值,用于控制加速的快慢度,从getInterpolation(float input)方法可以看出当factor=1时与factor!=1时选择的内部计算方式是不一样的。我们分别来分析一下,直接上图:
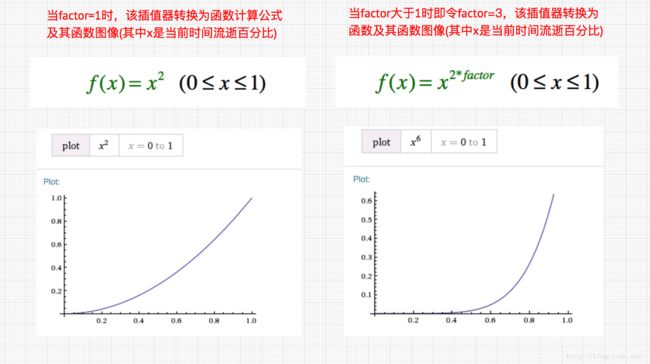
当factor=1(左图)以及当factor !=1时(假设factor=3时,也就是y=x^6,右图) ,其动画效果如下:
从上面的图像和动画看来,无论factor等于1或者大于1,动画都呈现加速趋势。只不过factor的值影响加速快慢罢了。当factor大于1而且越大时,开始加速就越小,但结尾加速更加快,这就是AccelerateInterpolator插值器带来的效果。
DecelerateInterpolator
DecelerateInterpolator,又称减速插值器,特点开头快,结尾慢。其源码如下:
public class DecelerateInterpolator extends BaseInterpolator implements NativeInterpolatorFactory {
    public DecelerateInterpolator() {
    }
   /**
     * Constructor
     *  将factor值设置为1.0f时,是一条从上向下的y=x^2抛物线。
     *   增加factor大于1.0f以后开头更快,结尾更慢
     *   @param factor Degree to which the animation should be eased. Setting factor to 1.0f produces
     *                 an upside-down y=x^2 parabola. Increasing factor above 1.0f makes exaggerates the ease-out effect
     *                 (i.e., it starts even faster and ends evens slower)
     *  */
    public DecelerateInterpolator(float factor) {
        mFactor = factor;
    }

    public DecelerateInterpolator(Context context, AttributeSet attrs) {
        this(context.getResources(), context.getTheme(), attrs);
    }

    public DecelerateInterpolator(Resources res, Theme theme, AttributeSet attrs) {
        TypedArray a;
        if (theme != null) {
            a = theme.obtainStyledAttributes(attrs, R.styleable.DecelerateInterpolator, 0, 0);
        } else {
            a = res.obtainAttributes(attrs, R.styleable.DecelerateInterpolator);
        }

        mFactor = a.getFloat(R.styleable.DecelerateInterpolator_factor, 1.0f);
        setChangingConfiguration(a.getChangingConfigurations());
        a.recycle();
    }

    public float getInterpolation(float input) {
        float result;
        if (mFactor == 1.0f) {
            result = (float)(1.0f - (1.0f - input) * (1.0f - input));
        } else {
            result = (float)(1.0f - Math.pow((1.0f - input), 2 * mFactor));
        }
        return result;
    }
    private float mFactor = 1.0f;
}
factor的变量,默认值为1,这个参数同样是个阀值,用于控制加速的快慢度,分别分析其取值不同。以下是当factor为1和不为1时,其getInterpolation(float input) 代表的函数公式(其中x是当前时间流逝百分比)及其图像如下:
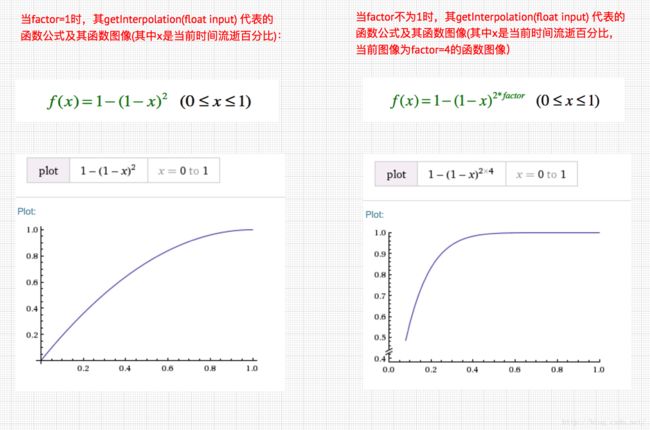
当factor为1(左图)和当factor不为1且factor=4时(右图),它们的动画效果如下:
从函数图像和动画看,无论factor为1或者大于1,DecelerateInterpolator都是开头快,结尾慢的特点,而且当factor的值越大时,开头就显得越快,当然结尾也就显得越慢了,也就是说DecelerateInterpolator代表的是一种开头快速的运动,而结尾平滑过渡的效果。
AnticipateInterpolator
AnticipateInterpolator,又称回荡插值器,特点慢速反向运动然后加速会往回落,先来看看其源码实现:
public class AnticipateInterpolator extends BaseInterpolator implements NativeInterpolatorFactory {
    private final float mTension;

    public AnticipateInterpolator() {
        mTension = 2.0f;
    }

    /**
     *  可以翻译为绷紧程度,当绷紧程序为0.0f时,也就没有了反向作用力,默认值为2.0f,插值器将退化成一个y=x^3的加速插值器。
     * @param tension Amount of anticipation. When tension equals 0.0f, there is
     *                no anticipation and the interpolator becomes a simple
     *                acceleration interpolator.
     */
    public AnticipateInterpolator(float tension) {
        mTension = tension;
    }

    public AnticipateInterpolator(Context context, AttributeSet attrs) {
        this(context.getResources(), context.getTheme(), attrs);
    }

    /** @hide */
    public AnticipateInterpolator(Resources res, Theme theme, AttributeSet attrs) {
        TypedArray a;
        if (theme != null) {
            a = theme.obtainStyledAttributes(attrs, R.styleable.AnticipateInterpolator, 0, 0);
        } else {
            a = res.obtainAttributes(attrs, R.styleable.AnticipateInterpolator);
        }

        mTension = a.getFloat(R.styleable.AnticipateInterpolator_tension, 2.0f);
        setChangingConfiguration(a.getChangingConfigurations());
        a.recycle();
    }

    public float getInterpolation(float t) {
        // a(t) = t * t * ((tension + 1) * t - tension)
        return t * t * ((mTension + 1) * t - mTension);
    }
}
源码中有个变量tension,这个代表是绷紧程度,它大小决定动画开始时反向运动的大小,现在我们分别来看看tension=0,tension=2,tension=8时的函数公式及其图像变换其中tension=2为默认值
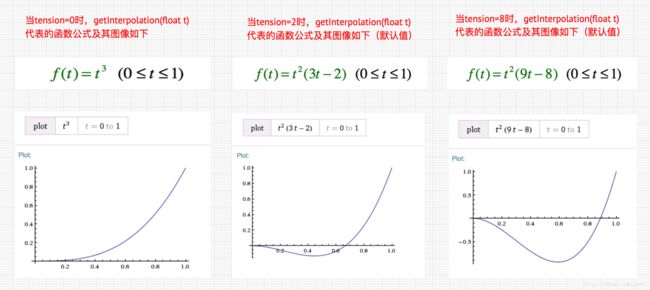
当tension=0(左图)、当tension=2时(中图)、当tension=8时(右图):
实际上当tension=0,AnticipateInterpolator插值器没有任何回弹的效果,而当tension=2时的动画效果是回弹了一下,然后加速下滑了,最后的tension=8时的动画效果,我们发现当tension增大后反向弹的速度和距离也变得大了。从上面的图像和动画效果看来显然在纵坐标下方的部分代表着AnticipateInterpolator插值器回弹的效果,我们或许有个疑问,前面说过插值器只控制速度,怎么现在连轨迹也变化了?其实插值器还是控制速度的,这是因为从坐标下方代表着负值,所以此时速度便也是负值,最终通过估值器计算出来的自然也是负值,因此在动画体现出来的就是反向运动效果,这就是轨迹发生变化的原因。到此我们AnticipateInterpolator的理解应该比较清晰了,哈~。
CycleInterpolator
CycleInterpolator,又称正弦周期插值器,特点以指定的周期重复动画,变化率曲线为正弦,其源码如下:
public class CycleInterpolator extends BaseInterpolator implements NativeInterpolatorFactory {
    public CycleInterpolator(float cycles) {
        mCycles = cycles;
    }

    public CycleInterpolator(Context context, AttributeSet attrs) {
        this(context.getResources(), context.getTheme(), attrs);
    }

    /** @hide */
    public CycleInterpolator(Resources resources, Theme theme, AttributeSet attrs) {
        TypedArray a;
        if (theme != null) {
            a = theme.obtainStyledAttributes(attrs, R.styleable.CycleInterpolator, 0, 0);
        } else {
            a = resources.obtainAttributes(attrs, R.styleable.CycleInterpolator);
        }

        mCycles = a.getFloat(R.styleable.CycleInterpolator_cycles, 1.0f);
        setChangingConfiguration(a.getChangingConfigurations());
        a.recycle();
    }

    public float getInterpolation(float input) {
        return (float)(Math.sin(2 * mCycles * Math.PI * input));
    }

    private float mCycles;
}
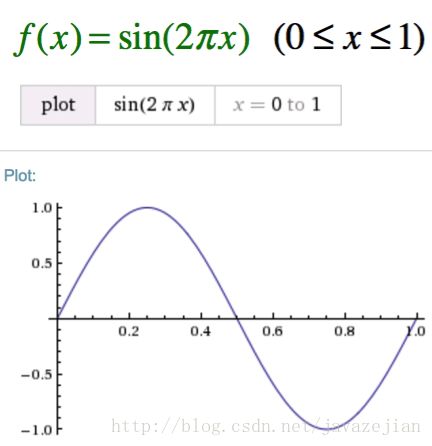
从源码可以看到一个变量mCycles,该变量就是控制正弦周期的,我们上面演示的正弦动画传入的mCycles=1,所以刚好是一个完整的正弦周期,当mCycles=1时,其正弦函数以及图像如下:
这个比较简单,轨迹变化的原因跟前面说的是一样的,这里不过多分析了。好~对于系统的插值器就分析到此,其他的插值器就不一一分析了,因为它们的都是一样的套路,这里小结一下插值器(没有提到的自行查阅官方文档哈~):
| Interpolator | Dircription |
|---|---|
| LinearInterpolator | 线性插值器,匀速动画 |
| AccelerateDecelerateInterpolator | 加速减速器,动画开头和结束慢,中间快,默认插值器 |
| AccelerateInterpolator | 又称加速器插值器,其特点是开始很慢后面越来越快,构造函数可以传递一个factor的变量,默认值为1, 这个参数同样是个阀值,用于控制加速的快慢度,当factor为1和不为1时,其getInterpolation(float input) 代表的函数公式是不同的,且当factor大于1而且越大时,开始加速就越小,但结尾加速更加快。 |
| DecelerateInterpolator | 减速插值器,特点开头快,结尾慢,构造函数可以传递一个factor的变量,默认值为1,这个参数同样是个阀值, 用于控制加速的快慢度。当factor为1和不为1时,其getInterpolation(float input)方法代表的函数公式是不同的,且当factor的值越大时,开头就显得越快,当然结尾也就显得越慢了。 |
| AnticipateInterpolator | 又称回荡插值器,特点慢速反向运动然后加速会往回落,构造函数可传递一个变量tension,这个代表是绷紧程度, 它大小决定动画开始时反向运动的大小,默认值为2,且tension值越大后反向弹的速度和距离也变得越大 |
| CycleInterpolator | 又称正弦周期插值器,特点以指定的周期重复动画,变化率曲线为正弦。构造函数需要传递一个变量mCycles, 该变量就是控制正弦周期的,mCycles值越大,动画的周期就越多。 |
| BounceInterpolator | 弹跳插值器,特点是动画结尾,呈弹跳状态。 |
| AnticipateOvershootInterpolator | 特点开始向上推,然后向下荡,荡过最低线。然后再回到最低线。 |
OK,通过以上各类插值器的源码分析,我们已经对Interpolator的内部实现机制有了比较清楚的认识了,那么接下来我们就开始尝试编写一个自定义的Interpolator。
6.自定义Interpolator和自定义TypeEvaluator简单实现
通过前面的分析我们知道编写自定义Interpolator最主要都是在于数学计算方面的,所这里我们就来编写一个非常简单f(x)=cos(2πx)的函数,该函数图像如下:
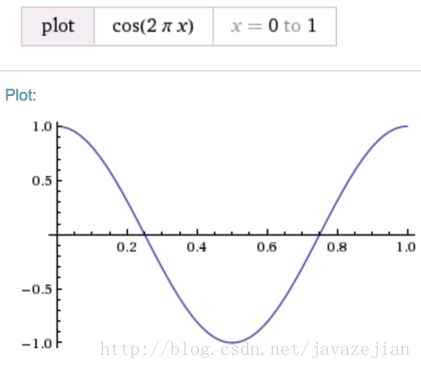
我们自定义一个类,命名为MyInterpolator,实现TimeInterpolator接口,代码如下:
package com.zejian.animator;

import android.animation.TimeInterpolator;
import android.annotation.TargetApi;
import android.os.Build;

/**
 * Created by zejian
 * Time 16/8/25.
 * Description:
 */
@TargetApi(Build.VERSION_CODES.HONEYCOMB)
public class MyInterpolator implements TimeInterpolator {
    private float mCycles;

    /**
     * 通过构造函数传递周期数
     * @param cycles
     */
    public MyInterpolator(float cycles) {
        mCycles = cycles;
    }
    @Override
    public float getInterpolation(float input) {
        return (float) (Math.cos(2 * mCycles*Math.PI * input));
    }
}
调用代码如下:
ObjectAnimator objectAnimator=ObjectAnimator.ofFloat(image,"translationY",0f,240);
objectAnimator.setDuration(5000);
objectAnimator.setInterpolator(new MyInterpolator(1));
objectAnimator.start();
效果如下:

跟我们前面的函数图像运动轨迹是一样的,纵坐标负方向运动(向上运动)完,再从纵坐标正方向运动(向下运动)。哈~,这个案例比较简单,如果需要特别绚丽的效果就得靠大家发挥牛逼的数学才华了。ok~,自定义Interpolator就到这里。至于自定义TpyeEvaulator,则需要实现TpyeEvaulator接口即可,官方提供的都是简单类型,那我们就来简单地自定义一个对象类型的TpyeEvaulator,让我们图片水平方向是一个简单的一个函数,竖直方向是一个3次方的抛物线,代码如下:
package com.zejian.animator;

import android.animation.TypeEvaluator;
import android.annotation.TargetApi;
import android.graphics.PointF;
import android.os.Build;

/**
 * Created by zejian
 * Time 16/8/26.
 * Description:
 */

@TargetApi(Build.VERSION_CODES.HONEYCOMB)
public class MyEvalutor implements TypeEvaluator<PointF> {

    public PointF evaluate(float fraction, PointF startValue, PointF endValue) {
        PointF point = new PointF();
        //x方向移动函数,线性轨迹,匀速移动
        point.x = 300*fraction;
        // y方向移动函数,抛物线轨迹,加速移动
        point.y = 500 * fraction * fraction * fraction;
        return point;
    }
}
调用代码如下:
final ImageView image= (ImageView) findViewById(R.id.image);

ValueAnimator valueAnimator = new ValueAnimator();
valueAnimator.setDuration(3000);
//PointF数值为float,Point数值为int,我们这里选择PointF
valueAnimator.setObjectValues(new PointF(0, 0));
//设置自定义的估值器
valueAnimator.setEvaluator(new MyEvalutor());
valueAnimator.start();
valueAnimator.addUpdateListener(new ValueAnimator.AnimatorUpdateListener() {
    @Override
    public void onAnimationUpdate(ValueAnimator animation) {
        PointF point = (PointF) animation.getAnimatedValue();
        //设置动画
        image.setX(point.x);
        image.setY(point.y);
    }
});
看看其运动效果:

效果很明显,其运动轨迹就是我们自定义的x方向线性运行,而y方向抛物线运行。其实从整篇的分析来看插值器和估值器的工作原理并不难,而自定义插值器和估值器的代码实现也非常简单,唯一的难点是我们如何利用数学知识定义出我们所需要的函数路径,这点也就是我们开头所说的关于动画效果的实现,依各人的数学思维能力而异了,哈~。
最后这里来个小结吧,每个TimeInterpolator和TypeEvaluator的衍生类都是代表着一个数学中的函数公式,而每一个ValueAnimator也不过是一个TimeInterpolator和一个TypeEvaluator的结合体。从数学的函数角度来说,ValueAnimator就是由TimeInterpolator和TypeEvaluator这两个简单函数组合而成的一个复合函数,ValueAnimator而就是通过TimeInterpolator和TypeEvaluator相结合的方式来对一个数值作运动的。当然系统提供了不少TimeInterpolator和TypeEvaluator,而我们也可以通过实现TimeInterpolator或者TypeEvaluator接口来自定义插值器和估值器,自定义插值器的过程也是设置函数计算的过程,而在估值器中我们可以自定义任意对象类型作为返回值,如前面的PointF也可以是自定义类型的对象。这就是属性动画的TimeInterpolator和TypeEvaluator工作过程以及他们的原理,哈~,本篇到此结束。
剩余的属性动画的知识点如ofObject,ViewPropertyAnimator以及如何实现对任意没有set或者get方法的对象做动画,布局动画等,我们都将放在下篇(也就完结篇)分析,欢迎继续关注。
关联文章:
走进绚烂多彩的属性动画-Property Animation(上篇)
走进绚烂多彩的属性动画-Property Animation之Interpolator和TypeEvaluator(下篇)
属性动画-Property Animation之ViewPropertyAnimator 你应该知道的一切
Android布局动画之animateLayoutChanges与LayoutTransition
主要参考资料:
https://developer.android.com
http://android.jobbole.com/83348/
《android开发艺术探索》


