Fragment
1.Fragment是什么?
fragment它的中文意思:碎片;
一个可以将activity拆分成几个完全独立封装的可重用的组件,每个组件有自己的生命周期和ui布局。
2.Fragment静态加载怎么用
静态加载
1、继承Fragment,重写onCreateView决定Fragemnt的布局
2、在Activity中声明此Fragment,就当和普通的View一样
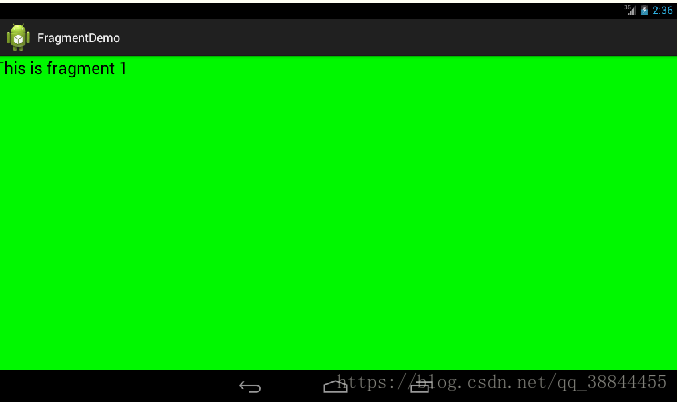
布局文件:fragment1.xml
<LinearLayout xmlns:android="http://schemas.android.com/apk/res/android"
    android:layout_width="match_parent"
    android:layout_height="match_parent"
    android:background="#00ff00" >

    <TextView
        android:layout_width="wrap_content"
        android:layout_height="wrap_content"
        android:text="This is fragment 1"
        android:textColor="#000000"
        android:textSize="25sp" />

LinearLayout>
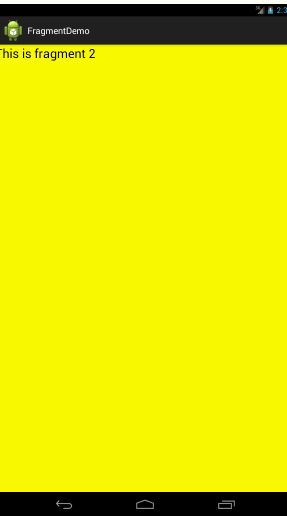
再新建一个fragment2.xml :
<LinearLayout xmlns:android="http://schemas.android.com/apk/res/android"
    android:layout_width="match_parent"
    android:layout_height="match_parent"
    android:background="#ffff00" >

    <TextView
        android:layout_width="wrap_content"
        android:layout_height="wrap_content"
        android:text="This is fragment 2"
        android:textColor="#000000"
        android:textSize="25sp" />

LinearLayout>
然后新建一个类Fragment1,这个类是继承自Fragment的:
public class Fragment1 extends Fragment {
    @Override
    public View onCreateView(LayoutInflater inflater, ViewGroup container, Bundle savedInstanceState) {
        return inflater.inflate(R.layout.fragment1, container, false);
    }
}
在onCreateView()方法中加载了fragment1.xml的布局。同样fragment2.xml也是一样的做法,再新建一个Fragment2类:
public class Fragment2 extends Fragment {
    @Override
    public View onCreateView(LayoutInflater inflater, ViewGroup container, Bundle savedInstanceState) {
        return inflater.inflate(R.layout.fragment2, container, false);
    }
}
然后打开或新建activity_main.xml作为主Activity的布局文件,在里面加入两个Fragment的引用,使用android:name前缀来引用具体的Fragment:
<LinearLayout xmlns:android="http://schemas.android.com/apk/res/android"
    android:layout_width="match_parent"
    android:layout_height="match_parent"
    android:baselineAligned="false" >

    <fragment
        android:id="@+id/fragment1"
        android:name="com.example.fragmentdemo.Fragment1"
        android:layout_width="0dip"
        android:layout_height="match_parent"
        android:layout_weight="1" />

    <fragment
        android:id="@+id/fragment2"
        android:name="com.example.fragmentdemo.Fragment2"
        android:layout_width="0dip"
        android:layout_height="match_parent"
        android:layout_weight="1" />

LinearLayout>
最后新建MainActivity作为程序的主Activity
public class MainActivity extends Activity {
    @Override
    protected void onCreate(Bundle savedInstanceState) {
        super.onCreate(savedInstanceState);
        setContentView(R.layout.activity_main);
    }
}
3.Fragment动态加载怎么用
动态用法
上面仅仅是Fragment简单用法,它真正强大部分是在动态地添加到Activity中,那么动态用法又是如何呢?
还是在静态用法代码的基础上修改,打开activity_main.xml,将其中对Fragment的引用都删除,只保留最外层的LinearLayout,并给它添加一个id,因为我们要动态添加Fragment,不用在XML里添加了,删除后代码如下:
<LinearLayout xmlns:android="http://schemas.android.com/apk/res/android"
    android:id="@+id/main_layout"
    android:layout_width="match_parent"
    android:layout_height="match_parent"
    android:baselineAligned="false" >

LinearLayout>
然后打开MainActivity,修改其中的代码如下所示:
public class MainActivity extends Activity {

    @Override
    protected void onCreate(Bundle savedInstanceState) {
        super.onCreate(savedInstanceState);
        setContentView(R.layout.activity_main);
        Display display = getWindowManager().getDefaultDisplay();
        if (display.getWidth() > display.getHeight()) {
            Fragment1 fragment1 = new Fragment1();
            getFragmentManager().beginTransaction().replace(R.id.main_layout, fragment1).commit();
        } else {
            Fragment2 fragment2 = new Fragment2();
            getFragmentManager().beginTransaction().replace(R.id.main_layout, fragment2).commit();
        }
    }

}
4.viewpager+fragment实现页卡滑动切换页面
main.xml
"1.0" encoding="utf-8"?>
"http://schemas.android.com/apk/res/android"
    android:layout_width="fill_parent"
    android:layout_height="fill_parent"
    android:orientation="vertical" >

    "match_parent"
        android:layout_height="wrap_content"
        android:background="@color/white"
        android:orientation="vertical" >

        "@+id/include1"
            layout="@layout/title_layout" />

        "@+id/linearLayout1"
            android:layout_width="fill_parent"
            android:layout_height="wrap_content"
            android:paddingBottom="5dip"
            android:paddingTop="10dip" >

            "@+id/yifukuan_tv"
                android:layout_width="fill_parent"
                android:layout_height="fill_parent"
                android:layout_weight="1.0"
                android:gravity="center"
                android:text="已付款"
                android:textColor="@color/red"
                android:textSize="16sp" />

            "@+id/weifukuan_tv"
                android:layout_width="fill_parent"
                android:layout_height="fill_parent"
                android:layout_weight="1.0"
                android:gravity="center"
                android:text="未付款"
                android:textColor="@color/gray_black"
                android:textSize="16sp" />

            "@+id/tuihuochuli_tv"
                android:layout_width="fill_parent"
                android:layout_height="fill_parent"
                android:layout_weight="1.0"
                android:gravity="center"
                android:text="退货处理"
                android:textColor="@color/gray_black"
                android:textSize="16sp" />


        "fill_parent"
            android:layout_height="wrap_content"
            android:layout_gravity="bottom"
            android:orientation="vertical" >

            "@+id/iv_bottom_line"
                android:layout_width="110dip"
                android:layout_height="2dip"
                android:scaleType="matrix"
                android:src="@color/red" />


    "@+id/vPager"
        android:layout_width="fill_parent"
        android:layout_height="fill_parent"
        android:layout_gravity="center"
        android:layout_weight="1.0"
        android:flipInterval="30"
        android:persistentDrawingCache="animation" />


MyOrderFragmentActivity

import java.util.ArrayList;

import android.content.Intent;
import android.content.res.Resources;
import android.os.Bundle;
import android.support.v4.app.Fragment;
import android.support.v4.view.ViewPager;
import android.support.v4.view.ViewPager.OnPageChangeListener;
import android.util.DisplayMetrics;
import android.util.Log;
import android.view.View;
import android.view.View.OnClickListener;
import android.view.Window;
import android.view.animation.Animation;
import android.view.animation.TranslateAnimation;
import android.widget.ImageView;
import android.widget.LinearLayout;
import android.widget.TextView;

import com.llkj.hanneng.R;
import com.llkj.hanneng.view.adapter.OrderFragmentAdapter;
import com.llkj.hanneng.view.homepage.BaseFragmentActivity;

public class MyOrderFragmentActivity extends BaseFragmentActivity implements
        OnClickListener {
    private ViewPager mPager;
    private ArrayList fragmentsList;
    private ImageView ivBottomLine;
    private TextView yifukuan_tv, weifukuan_tv, tuihuochuli_tv;// 页卡头标

    private int currIndex = 0;
    private int bottomLineWidth;
    private int offset = 0;
    private int position_one;
    private int position_two;
    private Resources resources;

    private LinearLayout.LayoutParams params;

    @Override
    public void onCreate(Bundle savedInstanceState) {
        super.onCreate(savedInstanceState);
        requestWindowFeature(Window.FEATURE_NO_TITLE);
        setContentView(R.layout.main);
        resources = getResources();
        InitWidth();
        InitTextView();
        InitViewPager();
        setListener();
    }

    private void InitTextView() {
        initTitle(true, true, false, false, false, R.drawable.back_btn, "订单中心",
                -1, "", "");
        yifukuan_tv = (TextView) findViewById(R.id.yifukuan_tv);
        weifukuan_tv = (TextView) findViewById(R.id.weifukuan_tv);
        tuihuochuli_tv = (TextView) findViewById(R.id.tuihuochuli_tv);

        yifukuan_tv.setOnClickListener(new MyOnClickListener(0));
        weifukuan_tv.setOnClickListener(new MyOnClickListener(1));
        tuihuochuli_tv.setOnClickListener(new MyOnClickListener(2));
    }

    private void InitViewPager() {
        mPager = (ViewPager) findViewById(R.id.vPager);
        fragmentsList = new ArrayList();

        YiFuKuanFragment yiFuKuanFragment = new YiFuKuanFragment();
        WeiFuKuanOrderFragment weiFuKuanOrderFragment = new WeiFuKuanOrderFragment();
        TuiHuoChuLiFragment tuiHuoChuLiFragment = new TuiHuoChuLiFragment();

        fragmentsList.add(yiFuKuanFragment);
        fragmentsList.add(weiFuKuanOrderFragment);
        fragmentsList.add(tuiHuoChuLiFragment);

        mPager.setAdapter(new OrderFragmentAdapter(getSupportFragmentManager(),
                fragmentsList));
        mPager.setCurrentItem(0);
        mPager.setOnPageChangeListener(new MyOnPageChangeListener());
    }

    private void InitWidth() {
        DisplayMetrics dm = new DisplayMetrics();
        getWindowManager().getDefaultDisplay().getMetrics(dm);
        int screenW = dm.widthPixels;
        params = new LinearLayout.LayoutParams(screenW / 3, 5);
        ivBottomLine = (ImageView) findViewById(R.id.iv_bottom_line);
        ivBottomLine.setLayoutParams(params);
        bottomLineWidth = ivBottomLine.getLayoutParams().width;

        offset = (int) ((screenW / 3.0 - bottomLineWidth) / 2);
        Log.i("MainActivity", "offset=" + offset);

        position_one = (int) (screenW / 3.0);
        position_two = position_one * 2;
    }

    public class MyOnClickListener implements View.OnClickListener {
        private int index = 0;

        public MyOnClickListener(int i) {
            index = i;
        }

        @Override
        public void onClick(View v) {
            mPager.setCurrentItem(index);
        }
    };

    public class MyOnPageChangeListener implements OnPageChangeListener {

        @Override
        public void onPageSelected(int arg0) {
            Animation animation = null;
            switch (arg0) {
            case 0:
                if (currIndex == 1) {
                    animation = new TranslateAnimation(position_one, 0, 0, 0);
                    weifukuan_tv.setTextColor(resources
                            .getColor(R.color.gray_black));
                } else if (currIndex == 2) {
                    animation = new TranslateAnimation(position_two, 0, 0, 0);
                    tuihuochuli_tv.setTextColor(resources
                            .getColor(R.color.gray_black));
                }
                yifukuan_tv.setTextColor(resources.getColor(R.color.red));
                break;
            case 1:
                if (currIndex == 0) {
                    animation = new TranslateAnimation(offset, position_one, 0,
                            0);
                    yifukuan_tv.setTextColor(resources
                            .getColor(R.color.gray_black));
                } else if (currIndex == 2) {
                    animation = new TranslateAnimation(position_two,
                            position_one, 0, 0);
                    tuihuochuli_tv.setTextColor(resources
                            .getColor(R.color.gray_black));
                }
                weifukuan_tv.setTextColor(resources.getColor(R.color.red));
                break;
            case 2:
                if (currIndex == 0) {
                    animation = new TranslateAnimation(offset, position_two, 0,
                            0);
                    yifukuan_tv.setTextColor(resources
                            .getColor(R.color.gray_black));
                } else if (currIndex == 1) {
                    animation = new TranslateAnimation(position_one,
                            position_two, 0, 0);
                    weifukuan_tv.setTextColor(resources
                            .getColor(R.color.gray_black));
                }
                tuihuochuli_tv.setTextColor(resources.getColor(R.color.red));
                break;

            }
            currIndex = arg0;
            animation.setFillAfter(true);
            animation.setDuration(300);
            ivBottomLine.startAnimation(animation);
        }

        @Override
        public void onPageScrolled(int arg0, float arg1, int arg2) {
        }

        @Override
        public void onPageScrollStateChanged(int arg0) {
        }
    }

    private void setListener() {
        left_iv.setOnClickListener(this);

    }

    @Override
    public void onClick(View v) {
        Intent intent;
        switch (v.getId()) {
        case R.id.left_iv:
            finish();
            break;

        default:
            break;
        }
    }
}
5.Fragment生命周期
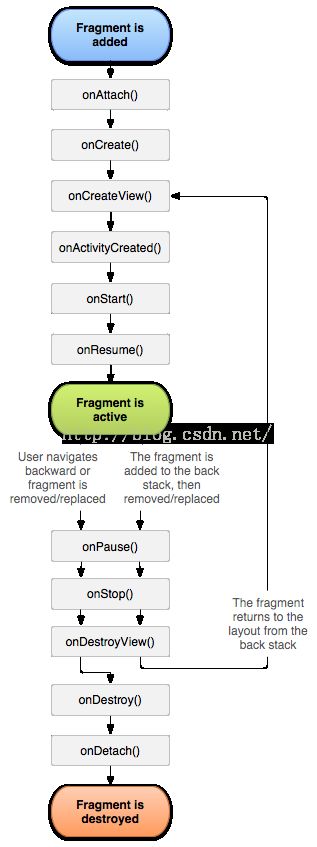
Fragment每个生命周期方法的意义、作用
setUserVisibleHint():
设置Fragment可见或者不可见时会调用此方法。在该方法里面可以通过调用getUserVisibleHint()获得Fragment的状态是可见还是不可见的,如果可见则进行懒加载操作。
onAttach():
执行该方法时,Fragment与Activity已经完成绑定,该方法有一个Activity类型的参数,代表绑定的Activity,这时候你可以执行诸如mActivity = activity的操作。
onCreate():
初始化Fragment。可通过参数savedInstanceState获取之前保存的值。
onCreateView():
初始化Fragment的布局。加载布局和findViewById的操作通常在此函数内完成,但是不建议执行耗时的操作,比如读取数据库数据列表。
onActivityCreated():
执行该方法时,与Fragment绑定的Activity的onCreate方法已经执行完成并返回,在该方法内可以进行与Activity交互的UI操作,所以在该方法之前Activity的onCreate方法并未执行完成,如果提前进行交互操作,会引发空指针异常。
onStart():执行该方法时,Fragment由不可见变为可见状态。
onResume():执行该方法时,Fragment处于活动状态,用户可与之交互。
onPause():执行该方法时,Fragment处于暂停状态,但依然可见,用户不能与之交互。
onSaveInstanceState():保存当前Fragment的状态。该方法会自动保存Fragment的状态,比如EditText键入的文本,即使Fragment被回收又重新创建,一样能恢复EditText之前键入的文本。
onStop():执行该方法时,Fragment完全不可见。
onDestroyView():销毁与Fragment有关的视图,但未与Activity解除绑定,依然可以通过onCreateView方法重新创建视图。通常在ViewPager+Fragment的方式下会调用此方法。
onDestroy():销毁Fragment。通常按Back键退出或者Fragment被回收时调用此方法。
onDetach():解除与Activity的绑定。在onDestroy方法之后调用。
Fragment生命周期执行流程
Fragment创建:setUserVisibleHint()->onAttach()->onCreate()->onCreateView()->onActivityCreated()->onStart()->onResume();
Fragment变为不可见状态(锁屏、回到桌面、被Activity完全覆盖):onPause()->onSaveInstanceState()->onStop();
Fragment变为部分可见状态(打开Dialog样式的Activity):onPause()->onSaveInstanceState();
Fragment由不可见变为活动状态:onStart()->OnResume();
Fragment由部分可见变为活动状态:onResume();
退出应用:onPause()->onStop()->onDestroyView()->onDestroy()->onDetach()(注意退出不会调用onSaveInstanceState方法,因为是人为退出,没有必要再保存数据);
Fragment被回收又重新创建:被回收执行onPause()->onSaveInstanceState()->onStop()->onDestroyView()->onDestroy()->onDetach(),重新创建执行onAttach()->onCreate()->onCreateView()->onActivityCreated()->onStart()->onResume()->setUserVisibleHint();
横竖屏切换:与Fragment被回收又重新创建一样。


