LNMP架构的搭建--源码编译(MYSQL,PHP,nginx)
1、基础知识
1. LNMP架构: LNMP是指一组通常一起使用来运行动态网站或者服务器的自由软件名称首字母缩写。L指Linux,N指Nginx,M一般指MySQL,也可以指MariaDB,P一般指PHP,也可以指Perl或Python。
2. LNMP代表的就是: Linux系统下Nginx+MySQL+PHP这种网站服务器架构。
3. Linux是一类Unix计算机操作系统的统称,是目前最流行的免费操作系统。代表版本有:debian、centos、ubuntu、fedora、gentoo等。
Nginx是一个高性能的HTTP和反向代理服务器,也是一个IMAP/POP3/SMTP代理服务器。
Mysql是一个小型关系型数据库管理系统。
PHP是一种在服务器端执行的嵌入HTML文档的脚本语言。
这四种软件均为免费开源软件,组合到一起,成为一个免费、高效、扩展性强的网站服务系统。
4. 优点: 作为 Web 服务器:相比 Apache,Nginx 使用更少的资源,支持更多的并发连接,体现更高的效率。
作为负载均衡服务器: Nginx 既可以在内部直接支持Rails和PHP,也可以支持作为 HTTP代理服务器对外进行服务。Nginx 用C编写,不论是系统资源开销还是CPU使用效率都比Perlbal要好的多。
作为邮件代理服务器: Nginx同时也是一个非常优秀的邮件代理服务器(最早开发这个产品的目的之一也是作为邮件代理服务器),Last/fm 描述了成功并且美妙的使用经验。
Nginx 安装非常的简单, 配置文件非常简洁(还能够支持perl语法)。Nginx支持平滑加载新的配置,还能够在不间断服务的情况下进行软件版本的升级。
5. 工作原理: 浏览器发送http request请求到服务器(Nginx),服务器响应并处理web请求,将一些静态资源(CSS,图片,视频等)保存服务器上,然后将php脚本通过接口传输协议(网关协议)PHP-FCGI(fast-cgi)传输给PHP-FPM(进程管理程序),PHP-FPM不做处理,然后PHP-FPM调用PHP解析器进程,PHP解析器解析php脚本信息。PHP解析器进程可以启动多个,进行并发执行。然后将解析后的脚本返回到PHP-FPM,PHP-FPM再通过fast-cgi的形式将脚本信息传送给Nginx.服务器再通过Http response的形式传送给浏览器。浏览器再进行解析与渲染然后进行呈现。
6. 我们为什么需要它?
编译安装需要输入大量的命令,如果是配置生产环境需要耗费大量的时间。不会Linux的站长或Linux新手想使用Linux作为生产环境……
7. 它的优势和功能
无需一个一个的输入命令,无需值守,编译安装优化编译参数,提高性能,解决不必要的软件间依赖,特别针对配置自动优化。
支持自定义Nginx、PHP编译参数及网站和数据库目录、支持生成LetseEcrypt证书、LNMP模式支持多PHP版本、支持单独安装Nginx/MySQL/MariaDB/Pureftpd服务器,同时提供一些实用的辅助工具如:虚拟主机管理、FTP用户管理、Nginx、MySQL/MariaDB、PHP的升级、常用缓存组件Redis/Xcache等的安装、重置MySQL root密码、502自动重启、日志切割、SSH防护DenyHosts/Fail2Ban、备份等许多实用脚本。
2、PHP源码编译
实验环境:
| 主机 | ip | 服务 |
|---|---|---|
| server1 | 172.25.10.1 | lnmp |
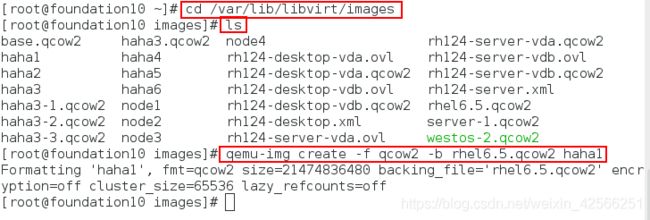
1.为了实验环境的纯净,重新建立快照为server1,此时会覆盖之前的server1
cd /var/lib/libvirt/images
ls
qemu-img create -f qcow2 -b rhel6.5.qcow2 haha1
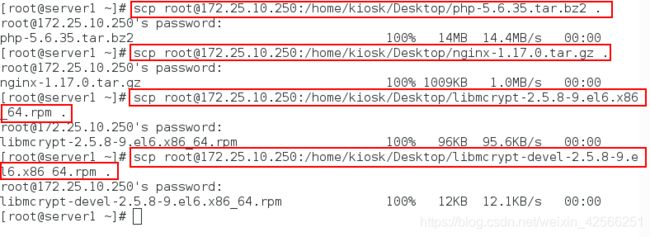
2.从物理机上传一个php的安装包到server1的虚拟主机,如下所示:
3.将得到的php源码包进行解压(#加强系统对支持字符编码转换的功能)
[root@server1 ~]# ls
[root@server1 ~]# tar jxf php-5.6.35.tar.bz2
[root@server1 ~]# ls

4.进入解压目录创造预编译环境
<1>解决依赖性简单的步骤如下:
编译前需要解决的依赖性:
[root@server1 php-5.6.35]# yum install gcc -y
[root@server1 php-5.6.35]# yum install libxml2-devel -y
[root@server1 php-5.6.35]# yum install libcurl-devel -y
[root@server1 php-5.6.35]# yum install libjpeg-turbo-devel-1.2.1-1.el6.x86_64 -y
[root@server1 php-5.6.35]# yum install libjpeg-turbo-devel-1.2.1-1.el6.x86_64 -y
[root@server1 php-5.6.35]# yum install 2:libpng-devel-1.2.49-1.el6_2.x86_64 -y
[root@server1 php-5.6.35]# yum install freetype-devel -y
[root@server1 php-5.6.35]# yum install gmp-devel-4.3.1-7.el6_2.2.x86_64 -y
[root@server1 ~]# yum install libmcrypt-* -y
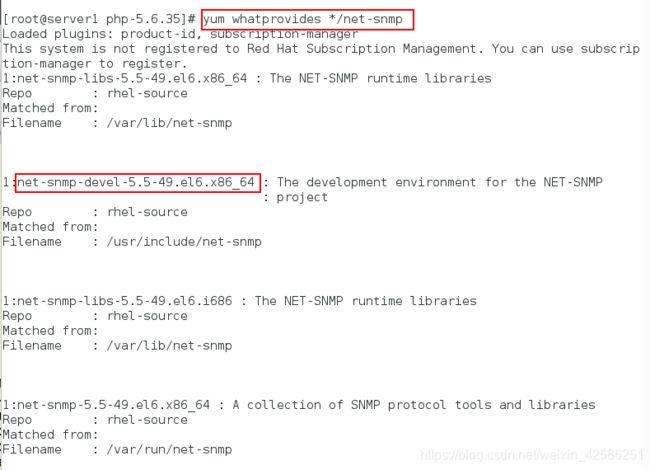
[root@server1 php-5.6.35]# yum install net-snmp-devel -y
编译:
./configure --prefix=/usr/local/lnmp/php #安装的位置
--with-config-file-path=/usr/local/lnmp/php/etc #php配置文件的位置
--with-openssl #支持openssl加密
--with-snmp
--with-gd
--with-zlib
--with-curl
--with-libxml-dir #支持libxml函数
--with-png-dir #php处理图片的格式
--with-jpeg-dir
--with-freetype-dir
--with-gmp
--with-gettext
--with-pear
--enable-mysqlnd #支持mysql数据库之间建立联系
--enable-inline-optimization -
-enable-soap
--enable-ftp
--enable-sockets
--enable-mbstring
--enable-fpm 	#开启fpm模式(nginx等服务用的)
--with-fpm-user=nginx #对php服务的限制通过nginx用户来实现)
--with-fpm-group=nginx #php以nginx用户组身份运行
--with-mcrypt #提供了对多种块算法的支持,主要用来实现加密等算法
--with-mhash	#加密算法
<2>解决依赖性具体的步骤如下:
第一次编译:
[root@server1 ~]# cd php-5.6.35
[root@server1 php-5.6.35]# ./configure --prefix=/usr/local/lnmp/php --with-config-file-path=/usr/local/lnmp/php/etc --with-openssl --with-snmp --with-gd --with-zlib --with-curl --with-libxml-dir --with-png-dir --with-jpeg-dir --with-freetype-dir --with-gmp --with-gettext --with-pear --enable-mysqlnd --enable-inline-optimization --enable-soap --enable-ftp --enable-sockets --enable-mbstring --enable-fpm --with-fpm-user=nginx --with-fpm-group=nginx --with-mcrypt --with-mhash
[root@server1 php-5.6.35]# yum install gcc -y
[root@server1 php-5.6.35]# ./configure --prefix=/usr/local/lnmp/php --with-config-file-path=/usr/local/lnmp/php/etc --with-openssl --with-snmp --with-gd --with-zlib --with-curl --with-libxml-dir --with-png-dir --with-jpeg-dir --with-freetype-dir --with-gmp --with-gettext --with-pear --enable-mysqlnd --enable-inline-optimization --enable-soap --enable-ftp --enable-sockets --enable-mbstring --enable-fpm --with-fpm-user=nginx --with-fpm-group=nginx --with-mcrypt --with-mhash
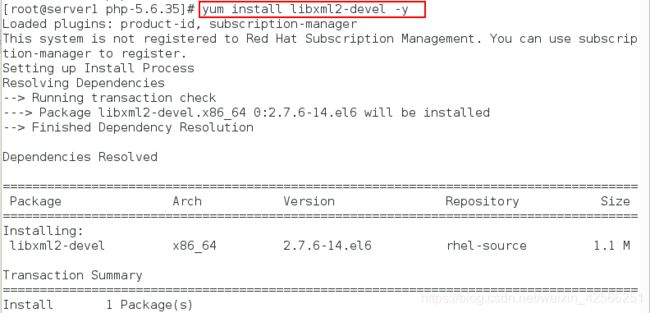
[root@server1 php-5.6.35]# yum install libxml2-devel -y
[root@server1 php-5.6.35]# ./configure --prefix=/usr/local/lnmp/php --with-config-file-path=/usr/local/lnmp/php/etc --with-openssl --with-snmp --with-gd --with-zlib --with-curl --with-libxml-dir --with-png-dir --with-jpeg-dir --with-freetype-dir --with-gmp --with-gettext --with-pear --enable-mysqlnd --enable-inline-optimization --enable-soap --enable-ftp --enable-sockets --enable-mbstring --enable-fpm --with-fpm-user=nginx --with-fpm-group=nginx --with-mcrypt --with-mhash
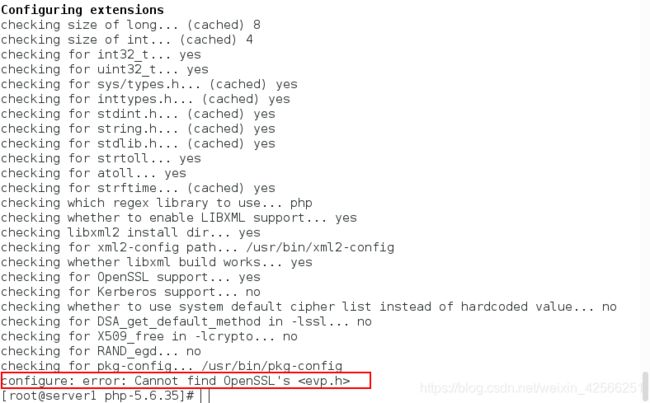
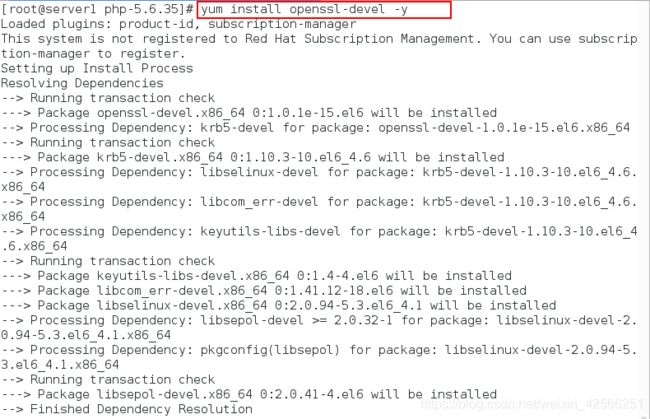
[root@server1 php-5.6.35]# yum install openssl-devel -y
[root@server1 php-5.6.35]# ./configure --prefix=/usr/local/lnmp/php --with-config-file-path=/usr/local/lnmp/php/etc --with-openssl --with-snmp --with-gd --with-zlib --with-curl --with-libxml-dir --with-png-dir --with-jpeg-dir --with-freetype-dir --with-gmp --with-gettext --with-pear --enable-mysqlnd --enable-inline-optimization --enable-soap --enable-ftp --enable-sockets --enable-mbstring --enable-fpm --with-fpm-user=nginx --with-fpm-group=nginx --with-mcrypt --with-mhash
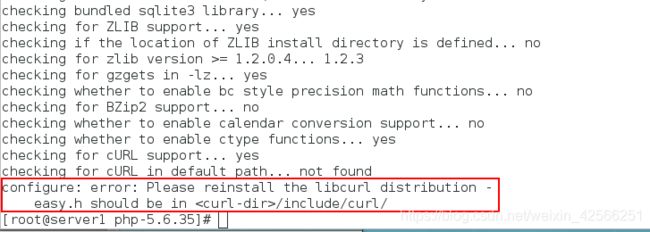
[root@server1 php-5.6.35]# yum install libcurl-devel -y
[root@server1 php-5.6.35]# ./configure --prefix=/usr/local/lnmp/php --with-config-file-path=/usr/local/lnmp/php/etc --with-openssl --with-snmp --with-gd --with-zlib --with-curl --with-libxml-dir --with-png-dir --with-jpeg-dir --with-freetype-dir --with-gmp --with-gettext --with-pear --enable-mysqlnd --enable-inline-optimization --enable-soap --enable-ftp --enable-sockets --enable-mbstring --enable-fpm --with-fpm-user=nginx --with-fpm-group=nginx --with-mcrypt --with-mhash
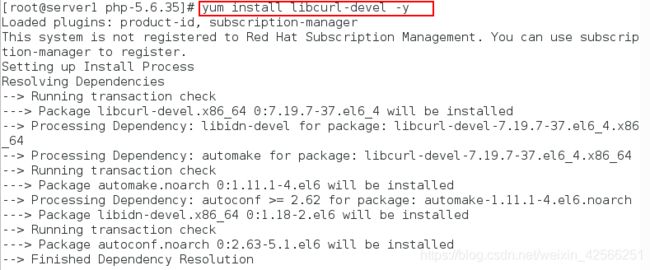

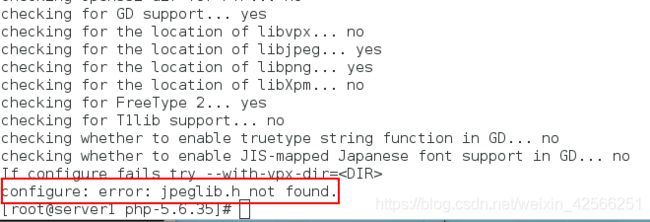
第六次编译(安装libjpeg-turbo-devel-1.2.1-1.el6.x86_64):
[root@server1 php-5.6.35]# yum whatprovides */jpeglib.h
[root@server1 php-5.6.35]# yum install libjpeg-turbo-devel-1.2.1-1.el6.x86_64 -y
[root@server1 php-5.6.35]# ./configure --prefix=/usr/local/lnmp/php --with-config-file-path=/usr/local/lnmp/php/etc --with-openssl --with-snmp --with-gd --with-zlib --with-curl --with-libxml-dir --with-png-dir --with-jpeg-dir --with-freetype-dir --with-gmp --with-gettext --with-pear --enable-mysqlnd --enable-inline-optimization --enable-soap --enable-ftp --enable-sockets --enable-mbstring --enable-fpm --with-fpm-user=nginx --with-fpm-group=nginx --with-mcrypt --with-mhash
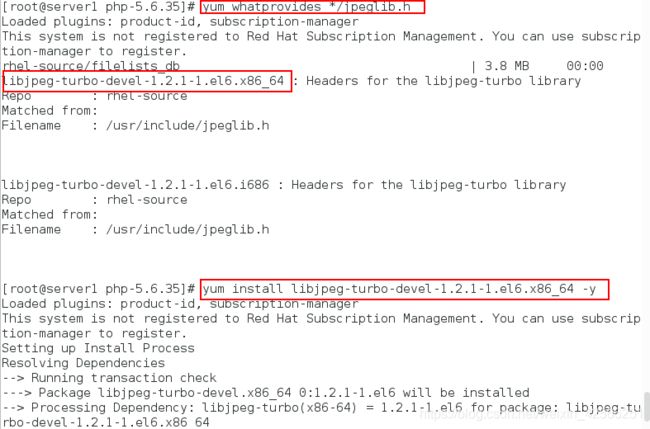


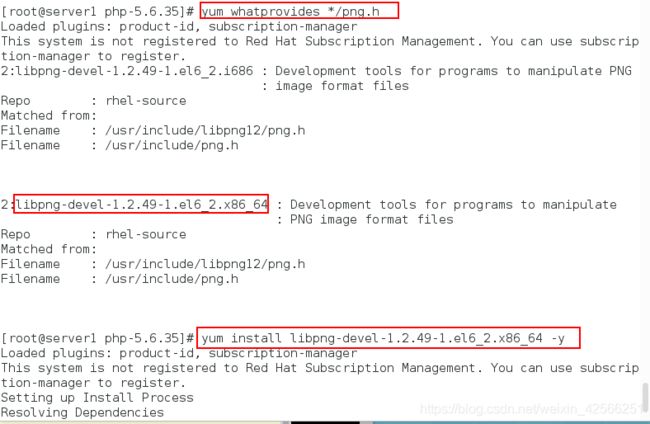
第八次编译(安装2:libpng-devel-1.2.49-1.el6_2.x86_64):
[root@server1 php-5.6.35]# yum whatprovides */png.h
[root@server1 php-5.6.35]# yum install 2:libpng-devel-1.2.49-1.el6_2.x86_64 -y
[root@server1 php-5.6.35]# ./configure --prefix=/usr/local/lnmp/php --with-config-file-path=/usr/local/lnmp/php/etc --with-openssl --with-snmp --with-gd --with-zlib --with-curl --with-libxml-dir --with-png-dir --with-jpeg-dir --with-freetype-dir --with-gmp --with-gettext --with-pear --enable-mysqlnd --enable-inline-optimization --enable-soap --enable-ftp --enable-sockets --enable-mbstring --enable-fpm --with-fpm-user=nginx --with-fpm-group=nginx --with-mcrypt --with-mhash
[root@server1 php-5.6.35]# yum install freetype-devel -y
[root@server1 php-5.6.35]# ./configure --prefix=/usr/local/lnmp/php --with-config-file-path=/usr/local/lnmp/php/etc --with-openssl --with-snmp --with-gd --with-zlib --with-curl --with-libxml-dir --with-png-dir --with-jpeg-dir --with-freetype-dir --with-gmp --with-gettext --with-pear --enable-mysqlnd --enable-inline-optimization --enable-soap --enable-ftp --enable-sockets --enable-mbstring --enable-fpm --with-fpm-user=nginx --with-fpm-group=nginx --with-mcrypt --with-mhash


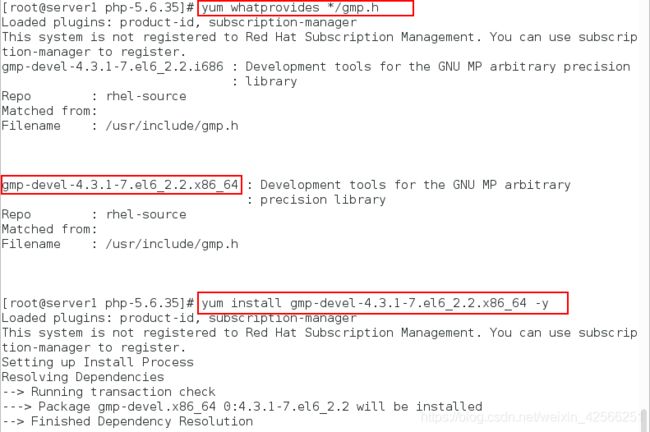
第十次编译(安装gmp-devel-4.3.1-7.el6_2.2.x86_64):
[root@server1 php-5.6.35]# yum whatprovides */gmp.h
[root@server1 php-5.6.35]# yum install gmp-devel-4.3.1-7.el6_2.2.x86_64 -y
[root@server1 php-5.6.35]# ./configure --prefix=/usr/local/lnmp/php --with-config-file-path=/usr/local/lnmp/php/etc --with-openssl --with-snmp --with-gd --with-zlib --with-curl --with-libxml-dir --with-png-dir --with-jpeg-dir --with-freetype-dir --with-gmp --with-gettext --with-pear --enable-mysqlnd --enable-inline-optimization --enable-soap --enable-ftp --enable-sockets --enable-mbstring --enable-fpm --with-fpm-user=nginx --with-fpm-group=nginx --with-mcrypt --with-mhash

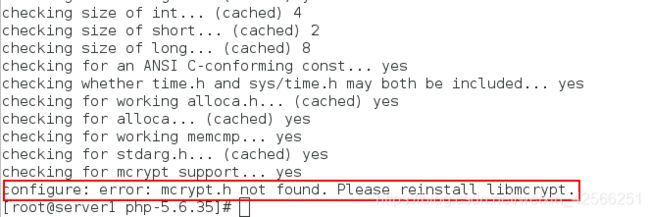
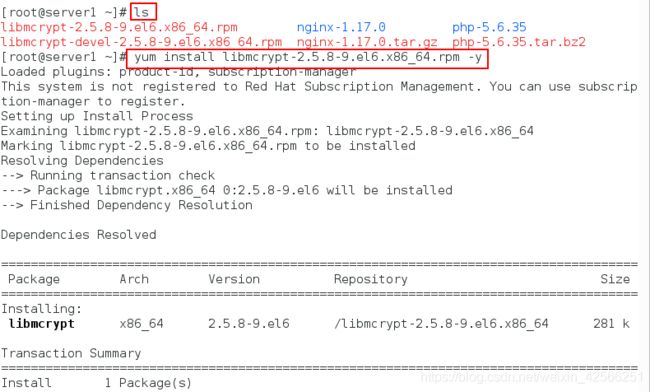
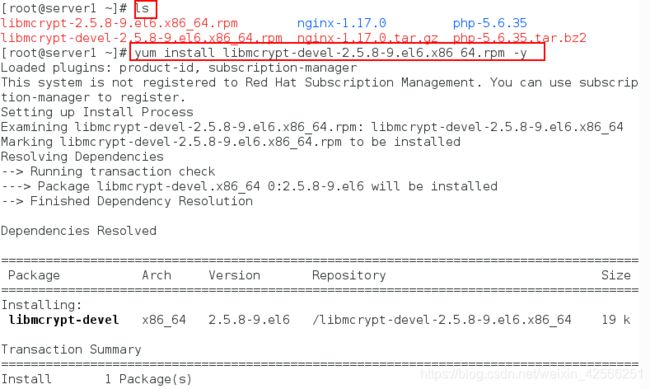
第十一次编译(安装libmcrypt,注意,此包需要到官网上去下载,这里已经下载):
[root@server1 php-5.6.35]# cd
[root@server1 ~]# ls
[root@server1 ~]# yum install libmcrypt-* -y
[root@server1 mysql-5.7.17]# cd
[root@server1 ~]# cd php-5.6.35
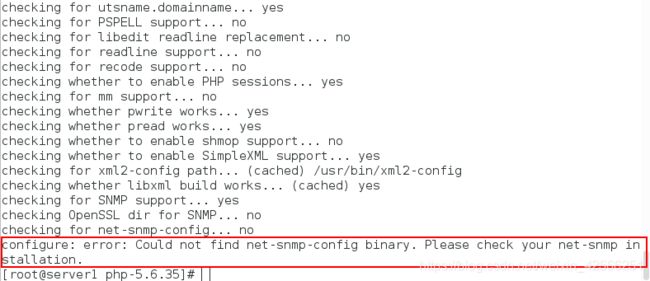
[root@server1 php-5.6.35]# ./configure --prefix=/usr/local/lnmp/php --with-config-file-path=/usr/local/lnmp/php/etc --with-openssl --with-snmp --with-gd --with-zlib --with-curl --with-libxml-dir --with-png-dir --with-jpeg-dir --with-freetype-dir --with-gmp --with-gettext --with-pear --enable-mysqlnd --enable-inline-optimization --enable-soap --enable-ftp --enable-sockets --enable-mbstring --enable-fpm --with-fpm-user=nginx --with-fpm-group=nginx --with-mcrypt --with-mhash
[root@server1 php-5.6.35]# yum install net-snmp-devel -y
[root@server1 php-5.6.35]# ./configure --prefix=/usr/local/lnmp/php --with-config-file-path=/usr/local/lnmp/php/etc --with-openssl --with-snmp --with-gd --with-zlib --with-curl --with-libxml-dir --with-png-dir --with-jpeg-dir --with-freetype-dir --with-gmp --with-gettext --with-pear --enable-mysqlnd --enable-inline-optimization --enable-soap --enable-ftp --enable-sockets --enable-mbstring --enable-fpm --with-fpm-user=nginx --with-fpm-group=nginx --with-mcrypt --with-mhash
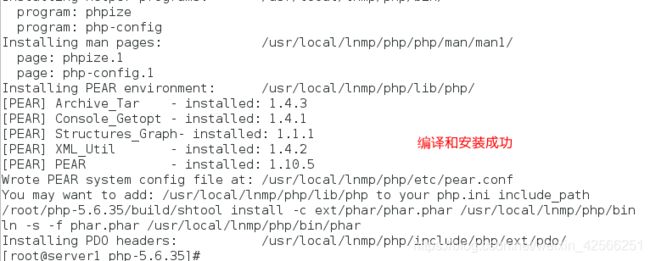
[root@server1 php-5.6.35]# make && make install
![]()
6. 创建nginx用户,并做php服务的简单配置(配置pid和时区)
[root@server1 php-5.6.35]# useradd nginx
[root@server1 php-5.6.35]# cd /usr/local/lnmp/php
[root@server1 php-5.6.35]# cd etc/
[root@server1 etc]# cp php-fpm.conf.default php-fpm.conf
[root@server1 etc]# vim php-fpm.conf
[root@server1 etc]# cd
[root@server1 ~]# cd php-5.6.35
[root@server1 php-5.6.35]# cp php.ini-production /usr/local/lnmp/php/etc/php.ini
[root@server1 php-5.6.35]# cd /usr/local/lnmp/php/etc/
[root@server1 etc]# vim php.ini
25 pid = run/php-fpm.pid	#去掉注释
149 user = nginx	#保证用户和组都是nginx
150 group = nginx
936 date.timezone = Asia/Shanghai

7. 将php启动的脚本复制到系统启动脚本的默认目录下并测试php是否可以成功启动
[root@server1 php-5.6.35]# ls
[root@server1 php-5.6.35]# cd sapi/fpm/
[root@server1 fpm]# cp init.d.php-fpm /etc/init.d/php-fpm #init.d.php-fpm是编译完成的启动脚本
[root@server1 fpm]# chmod +x /etc/init.d/php-fpm
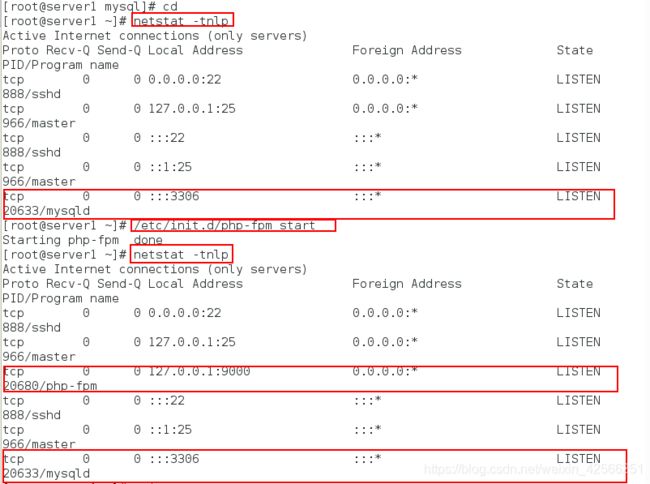
[root@server1 fpm]# /etc/init.d/php-fpm start
[root@server1 fpm]# netstat -tlnp	#查看php服务的舰艇端口(9000)

总结:
php源码编译成功的结果主要看php服务是否可以开启且端口是否是9000
3、nginx源码编译
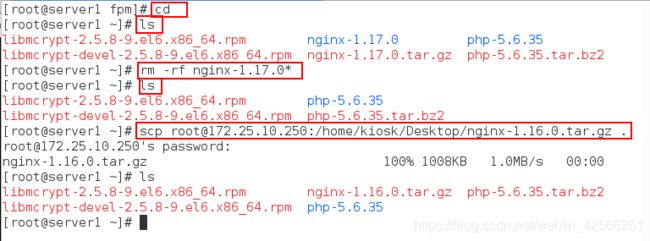
1.上传nginx的安装包并解压(此处删除nginx1.7版本是因为其不稳定,所以用1.6版本)
[root@server1 ~]# ls
[root@server1 ~]# rm -rf nginx-1.17.0*
[root@server1 ~]# ls
[root@server1 ~]# scp [email protected]:/home/kiosk/Desktop/nginx-1.16.0.tar.gz .
[root@server1 ~]# ls
[root@server1 ~]# tar zxf nginx-1.14.0.tar.gz
[root@server1 ~]# ls
./configure --prefix=/usr/local/lnmp/nginx:表示编译的路径
–with-threads:会有线程值
–with-file-aio:文件io
–with-http_ssl_module:ssl模块
–with-http_stub_status_module:状态监控
–user=nginx --group=nginx:用户和组
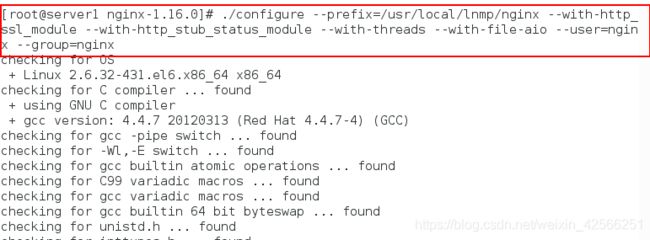
第一次编译:
[root@server1 nginx-1.16.0]# ./configure --prefix=/usr/local/nginx --with-http_ssl_module --with-http_stub_status_module --with-threads --with-file-aio --user=nginx --group=nginx


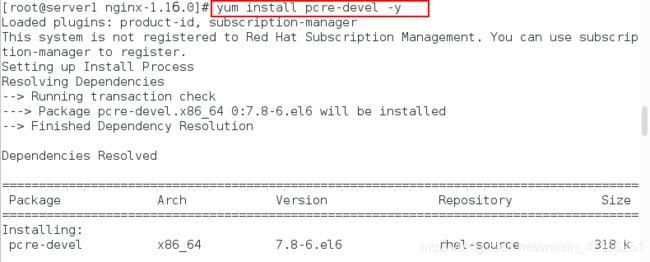
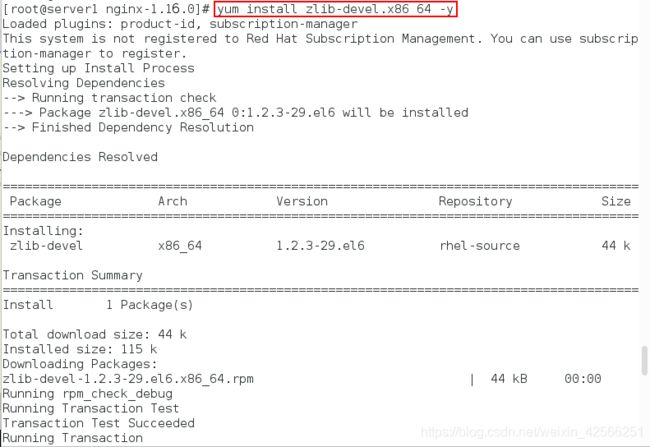
第二次编译(安装pcre-develhe和 zlib-devel.x86_64):
[root@server1 nginx-1.16.0]# yum install pcre-devel -y
[root@server1 nginx-1.16.0]# yum zlib-devel.x86_64 -y
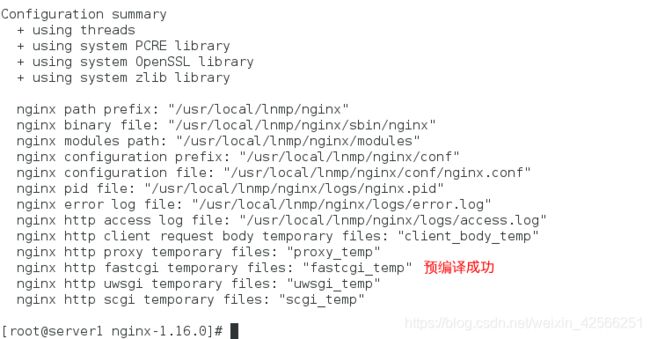
[root@server1 nginx-1.16.0]# ./configure --prefix=/usr/local/nginx --with-http_ssl_module --with-http_stub_status_module --with-threads --with-file-aio --user=nginx --group=nginx
[root@server1 nginx-1.16.0]# make && make install
[root@server1 nginx-1.16.0]# cd /usr/local/lnmp/nginx/
[root@server1 nginx]# ls
[root@server1 nginx]# cd conf/
[root@server1 conf]# ls
[root@server1 conf]# vim nginx.conf
  2 user  nginx nginx;	#组和用户
  3 worker_processes  auto;	#php服务只能由ngnix提供,ngnix的模式是worker_processes(cpu是几核的就写几,可以随便写,只是性能不强劲)
 45             index  index.php index.html index.htm;	#第一个访问的是index.php
#将php的相关设置的注释都取消掉
 65         location ~ \.php$ {
 66             root           html;
 67             fastcgi_pass   127.0.0.1:9000;
 68             fastcgi_index  index.php;
 69         #    fastcgi_param  SCRIPT_FILENAME  /scripts$fastcgi_script_name;
 70             include        fastcgi.conf;	#应该包括的是这个文件
 71         }
[root@server1 conf]# ln -s /usr/local/lnmp/nginx/sbin/nginx /usr/local/sbin
[root@server1 conf]# nginx
#如果可以补齐nginx说明成功配置
[root@server1 conf]# ./nginx -t
[root@server1 conf]# pwd
[root@server1 conf]# cd ../html
[root@server1 conf]# ls

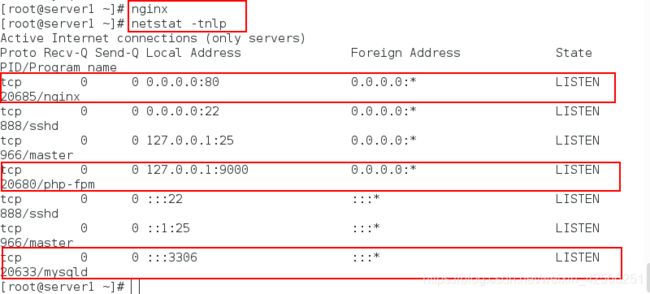
6.开启nginx服务并查看其端口是否成功开启(nginx端口默认是80)
[root@server1 sbin]# nginx
[root@server1 sbin]# netstat -tnlp

7.nginx与php结合
在共享目录下添加index.php下的内容
[root@server1 html]# ls
[root@server1 html]# vim index.php
[root@server1 html]# cat index.php

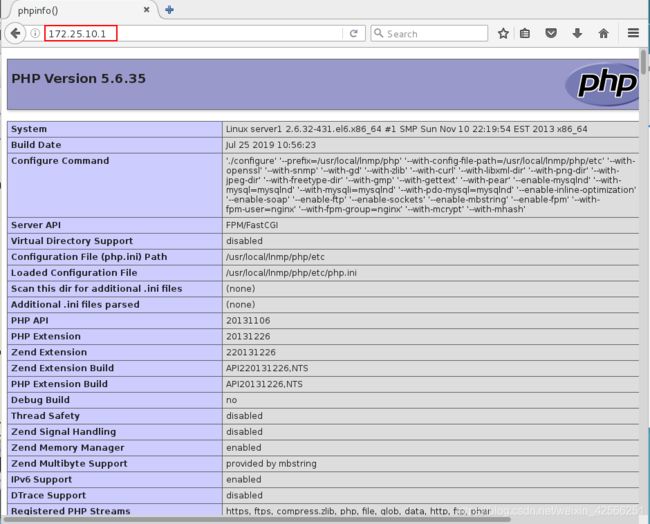
8. 在浏览器中查看,此时出现php与nginx的结合,如下所示:
4、mysql源码编译
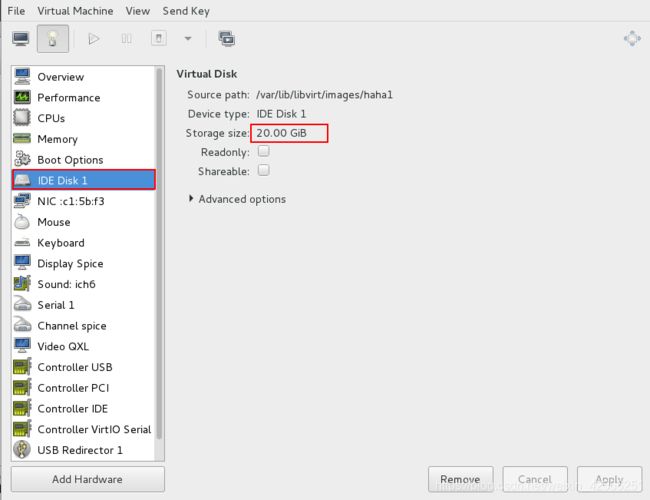
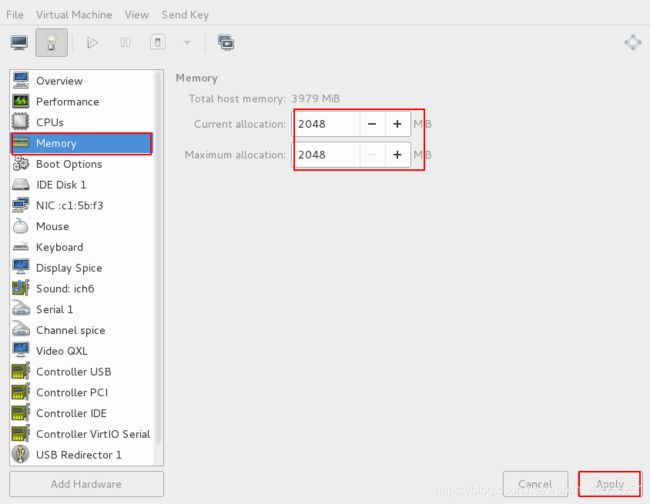
1.首先关机,然后在虚拟机管理器中查看磁盘大小(最小需要20G),将CPU设定为2个,将内存设定为2048MB,具体图如下:


2、再次登陆虚拟机并ssh在真机链接虚拟机server1,如下所示:

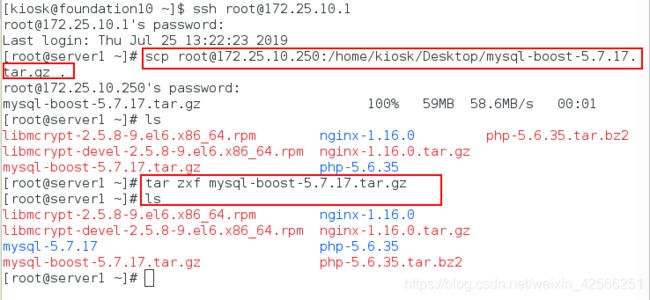
3. 从物理机上传mysql的安装包到server1的主机上,并解压,然后查看目录mysql-5.7.17下的内容
[root@server1 ~]# scp [email protected]:/home/kiosk/Desktop/mysql-boost-5.7.17.tar.gz .
[root@server1 ~]# ls
[root@server1 ~]# tar zxf mysql-boost-5.7.17.tar.gz
[root@server1 ~]# ls
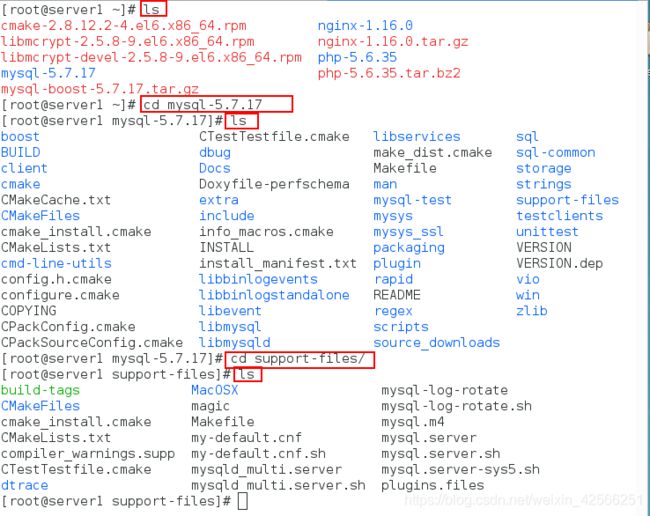
[root@server1 ~]# cd mysql-5.7.17/
[root@server1 mysql-5.7.17]# ls

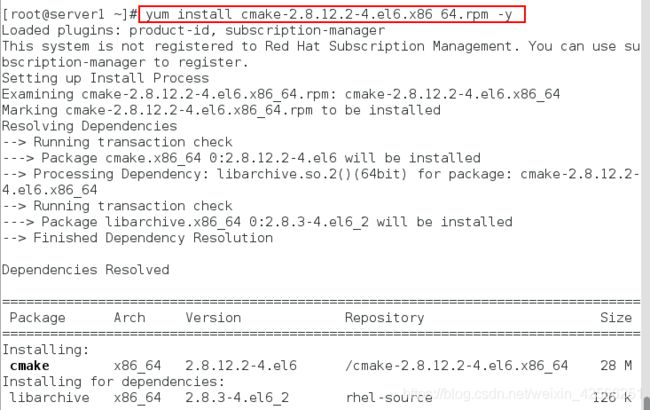
4.上传cmake的包并安装cmake软件(支持c++语言)
[root@server1 ~]# scp [email protected]:/home/kiosk/Desktop/cmake-2.8.12.2-4.el6.x86_64.rpm .
[root@server1 mysql-5.7.17]# yum install cmake-2.8.12.2-4.el6.x86_64.rpm -y

5.编译(编译中会出现许多依赖性未安装,我们需要一个一个解决依赖性,预编译环境配置完成):
(1)简单的编译过程:
解决软件包依赖性:
yum install -y gcc gcc-c++ make ncurses-devel bison openssl-devel zlib-devel cmake
tar zxvf mysql-5.5.12.tar.gz
cd mysql-5.5.12
cmake -DCMAKE_INSTALL_PREFIX=/usr/local/mysql \	#安装目录
-DMYSQL_DATADIR=/usr/local/mysql/data \	#数据库存放目录
-DMYSQL_UNIX_ADDR=/usr/local/mysql/data/mysql.sock \ #Unix socket 文件路径
-DWITH_MYISAM_STORAGE_ENGINE=1 \	#安装 myisam 存储引擎
-DWITH_INNOBASE_STORAGE_ENGINE=1 \	#安装 innodb 存储引擎
-DWITH_ARCHIVE_STORAGE_ENGINE=1 \	#安装 archive 存储引擎
-DWITH_BLACKHOLE_STORAGE_ENGINE=1 \	#安装 blackhole 存储引擎
-DWITH_PARTITION_STORAGE_ENGINE=1 \	#安装数据库分区
-DENABLED_LOCAL_INFILE=1 \	#允许从本地导入数据
-DWITH_READLINE=1 \	#快捷键功能
-DWITH_SSL=yes \	#支持 SSL
-DDEFAULT_CHARSET=utf8 \	#使用 utf8 字符
-DDEFAULT_COLLATION=utf8_general_ci \	#校验字符
-DEXTRA_CHARSETS=all \	#安装所有扩展字符集
-DMYSQL_TCP_PORT=3306 \	#MySQL 监听端口
(2)详细的编译过程:
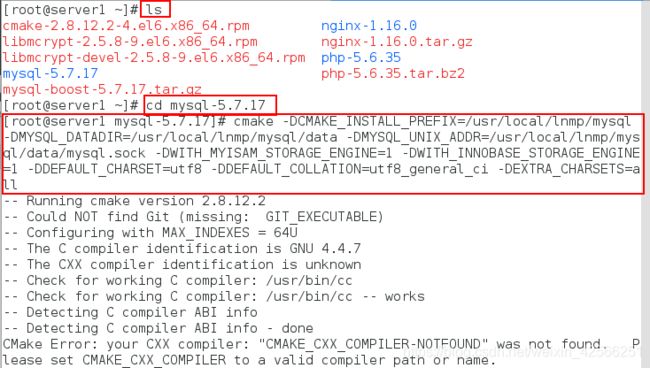
第一次编译:
   [root@server1 mysql-5.7.17]# cmake
         -DCMAKE_INSTALL_PREFIX=/usr/local/lnmp/mysql
         -DMYSQL_DATADIR=/usr/local/lnmp/mysql/data
         -DMYSQL_UNIX_ADDR=/usr/local/lnmp/mysql/data/mysql.sock
         -DWITH_MYISAM_STORAGE_ENGINE=1
         -DWITH_INNOBASE_STORAGE_ENGINE=1
         -DDEFAULT_CHARSET=utf8 -DDEFAULT_COLLATION=utf8_general_ci
         -DEXTRA_CHARSETS=all
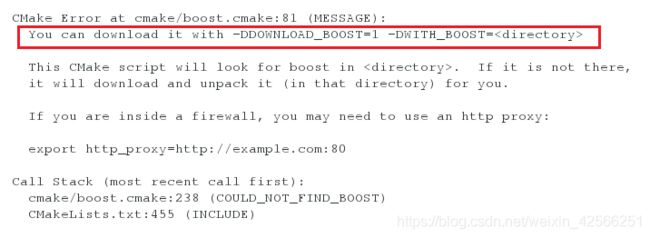
第二次编译(增加-DWITH_BOOST=boost/boost_1_59_0/):
   [root@server1 mysql-5.7.17]# cmake
         -DCMAKE_INSTALL_PREFIX=/usr/local/lnmp/mysql
         -DMYSQL_DATADIR=/usr/local/lnmp/mysql/data
         -DMYSQL_UNIX_ADDR=/usr/local/lnmp/mysql/data/mysql.sock
         -DWITH_MYISAM_STORAGE_ENGINE=1
         -DWITH_INNOBASE_STORAGE_ENGINE=1
         -DDEFAULT_CHARSET=utf8 -DDEFAULT_COLLATION=utf8_general_ci
         -DEXTRA_CHARSETS=all -DWITH_BOOST=boost/boost_1_59_0/
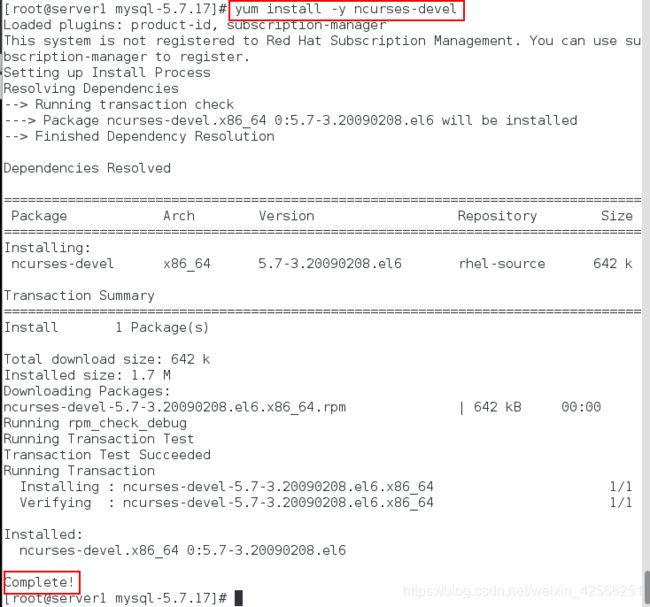
   [root@server1 mysql-5.7.17]# yum install ncurses-devel -y
   [root@server1 mysql-5.7.17]# cmake
         -DCMAKE_INSTALL_PREFIX=/usr/local/lnmp/mysql
         -DMYSQL_DATADIR=/usr/local/lnmp/mysql/data
         -DMYSQL_UNIX_ADDR=/usr/local/lnmp/mysql/data/mysql.sock
         -DWITH_MYISAM_STORAGE_ENGINE=1
         -DWITH_INNOBASE_STORAGE_ENGINE=1
         -DDEFAULT_CHARSET=utf8 -DDEFAULT_COLLATION=utf8_general_ci
         -DEXTRA_CHARSETS=all -DWITH_BOOST=boost/boost_1_59_0/


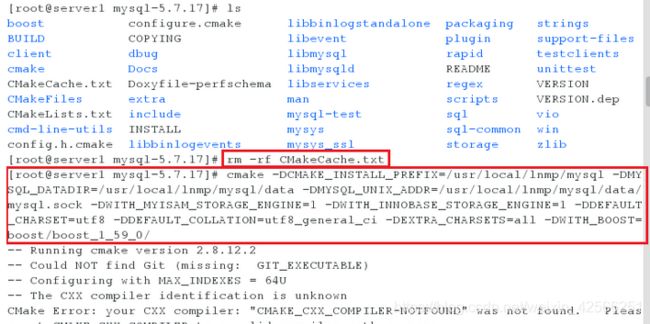
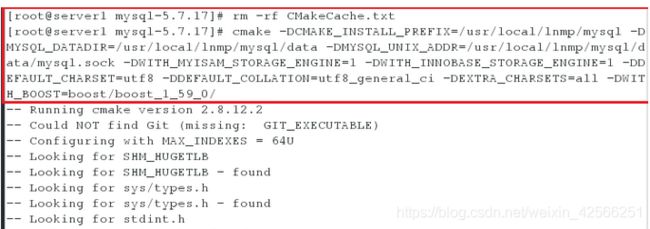
第四次编译(根据报错删除CMakeCache.txt,此文件最好每次都删除,因为会影响编译):
 [root@server1 mysql-5.7.17]# ls
 [root@server1 mysql-5.7.17]# rm -rf CMakeCache.txt
 [root@server1 mysql-5.7.17]# cmake
       -DCMAKE_INSTALL_PREFIX=/usr/local/lnmp/mysql
       -DMYSQL_DATADIR=/usr/local/lnmp/mysql/data
       -DMYSQL_UNIX_ADDR=/usr/local/lnmp/mysql/data/mysql.sock
       -DWITH_MYISAM_STORAGE_ENGINE=1
       -DWITH_INNOBASE_STORAGE_ENGINE=1
       -DDEFAULT_CHARSET=utf8 -DDEFAULT_COLLATION=utf8_general_ci
       -DEXTRA_CHARSETS=all -DWITH_BOOST=boost/boost_1_59_0/
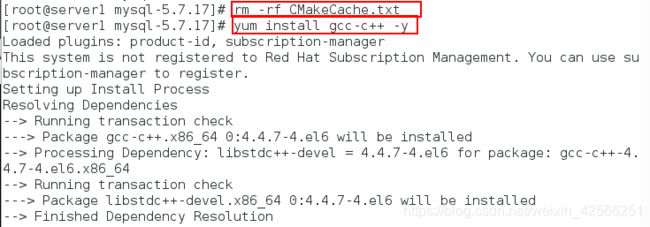
[root@server1 mysql-5.7.17]# yum install gcc gcc-c++ -y
[root@server1 mysql-5.7.17]# rm -rf CMakeCache.txt
[root@server1 mysql-5.7.17]# cmake
           -DCMAKE_INSTALL_PREFIX=/usr/local/lnmp/mysql
           -DMYSQL_DATADIR=/usr/local/lnmp/mysql/data
           -DMYSQL_UNIX_ADDR=/usr/local/lnmp/mysql/data/mysql.sock
           -DWITH_MYISAM_STORAGE_ENGINE=1
           -DWITH_INNOBASE_STORAGE_ENGINE=1
           -DDEFAULT_CHARSET=utf8 -DDEFAULT_COLLATION=utf8_general_ci
           -DEXTRA_CHARSETS=all -DWITH_BOOST=boost/boost_1_59_0/
[root@server1 mysql-5.7.17]# yum install bison -y
[root@server1 mysql-5.7.17]# rm -rf CMakeCache.txt
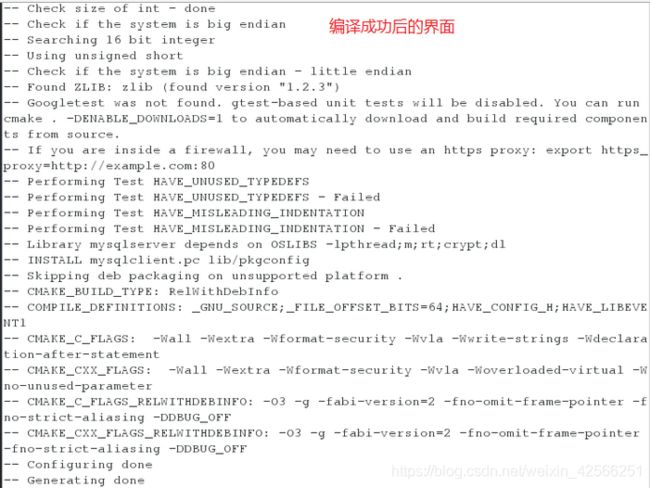
[root@server1 mysql-5.7.17]# cmake
               -DCMAKE_INSTALL_PREFIX=/usr/local/lnmp/mysql
               -DMYSQL_DATADIR=/usr/local/lnmp/mysql/data
               -DMYSQL_UNIX_ADDR=/usr/local/lnmp/mysql/data/mysql.sock
               -DWITH_MYISAM_STORAGE_ENGINE=1
               -DWITH_INNOBASE_STORAGE_ENGINE=1
               -DDEFAULT_CHARSET=utf8 -DDEFAULT_COLLATION=utf8_general_ci
               -DEXTRA_CHARSETS=all -DWITH_BOOST=boost/boost_1_59_0/

6.make && make install安装
![]()
7.进入源码编译目录,再进入mysql安装的位置,将编译完成的默认配置文件放置/etc/my.cnf并编译此文件
[root@server1 ~]# ls
[root@server1 ~]# cd mysql-5.7.17
[root@server1 cd mysql-5.7.17]# ls
[root@server1 mysql-5.7.17]# cd support-files/
[root@server1 support-files]# ls
cp mysql.server /etc/init.d/mysqld
chmod +x /etc/init.d/mysqld
cp /etc/my.cnf /etc/my.cnf.bak
cp my-default.cnf /etc/my.cnf
vim /etc/my.cnf
basedir = /usr/local/lnmp/mysql
datadir = /usr/local/lnmp/mysql/data
socket = /usr/local/lnmp/mysql/data/mysql.sock

8.创建组和用户mysql,并修改mysql目录下的权限(利用mysql用户对mysql服务进行限制,将mysql服务的工作组局限在mysql用户的家目录中,创建mysql组和mysql用户,之所以是27的原因是因为mysql默认配置中对应的就是27,所以这里为了方便也设置为27)
[root@server1 ~]# groupadd -g 27 mysql
[root@server1 ~]# useradd -u 27 -g 27 mysql
[root@server1 ~]# id mysql
[root@server1 mysql]# chown mysql.mysql /usr/local/lnmp/mysql -R
[root@server1 mysql]# cd /usr/loca/lnmp/mysql/
[root@server1 mysql]# ls
[root@server1 mysql]# ll

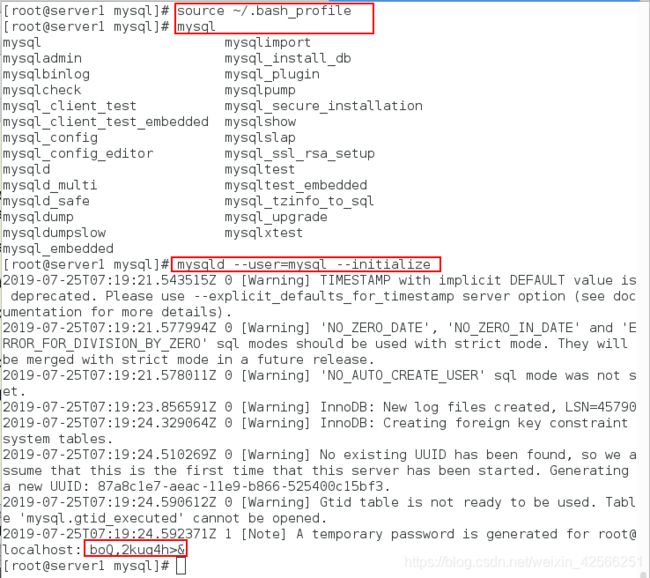
9.将编译生成的mysql二进制命令放进系统的环境变量文件中,保证可以直接调用该二进制命令,生成data目录的同时回给一个数据库的初始密码(完成后mysql命令可以生成)
[root@server1 mysql]# vim ~/.bash_profile
[root@server1 mysql]# source ~/.bash_profile	#使之生效
PATH=$PATH:$HOME/bin:/usr/local/lnmp/mysql/bin

10.生成data目录之后将权限改回来,只把data目录的权限给mysql,开启mysqld
[root@server1 mysql]# chown root /usr/local/lnmp/mysql -R
[root@server1 mysql]# chown mysql /usr/local/lnmp/mysql/data -R
[root@server1 mysql]# /etc/init.d/mysqld start
[root@server1 mysql]# mysql -uroot -p/boQ,2kug4h>&

注意:
如果报错2002,可能是mysql.sock目录位置没有写对,也可能是my.cnf中写错,也有可能是3306端口被占用了(使用以下命令查看:netstat -anp | grep 3306,如果被占用了使用kill -9 占用pid,然后关闭mysql服务,把data下内容全部删除,再重新开启mysql服务,再次执行初始化配置文件,登陆即可)
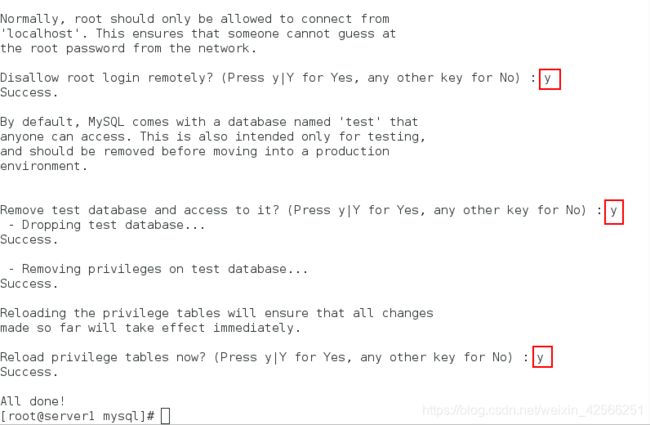
12.无法正常查看的原因是因为没有设置安全初始化,所以下面将设置安全初始化(#按提示完成 mysql 安全设置,生产环境推荐使用)
[root@server1 mysql]# mysql_secure_installatio
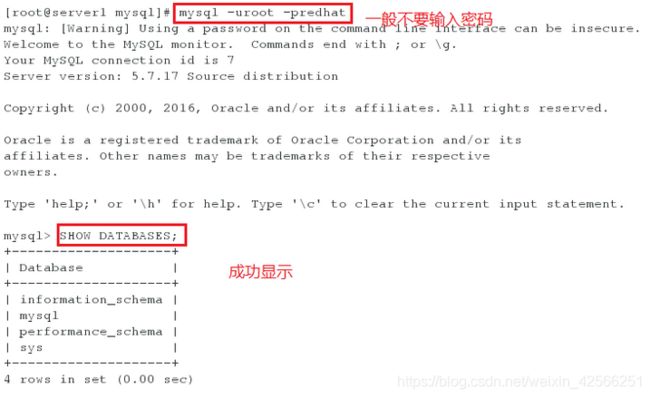
[root@server1 mysql]# mysql -uroot -predhat


