基于linux下的系统存储管理
打开两个终端进行挂载实验:
A:
[root@foundation21 ~]# df       查看系统正在使用的设备
/dev/sdb1       15100688  8722224   6378464  58% /run/media/kiosk/Ѧ     会出来U盘标识
[root@foundation21 ~]# umount /dev/sdb1        卸载
[root@foundation21 ~]# mount /dev/sdb1 /mnt/   挂载到/mnt/下,打开/mnt会看到U盘文件
[root@foundation21 ~]# cd /mnt/       占用后台,然后用另外一个shell来结束进程
[root@foundation21 mnt]# fdisk -l     查看分区信息
   Device Boot      Start         End      Blocks   Id  System
/dev/sdb1   *          63    30217823    15108880+   c  W95 FAT32 (LBA)   U盘

B:
[root@foundation21 ~]# umount /mnt/    在挂载目录中没办法直接卸载
umount: /mnt: target is busy.
        (In some cases useful info about processes that use
         the device is found by lsof(8) or fuser(1))  两种查看方式
[root@foundation21 ~]# fuser -vm /dev/sdb1   查看占用后台的PID
                     USER        PID ACCESS COMMAND
/dev/sdb1:           root     kernel mount /mnt
                     root      14537 ..c.. bash
[root@foundation21 ~]# fuser -kvm /dev/sdb1   杀死后台
                     USER        PID ACCESS COMMAND
/dev/sdb1:           root     kernel mount /mnt
                     root      14537 ..c.. bash
[root@foundation21 ~]# umount /mnt/卸载成功
lsof查看占用后台的PID就可以结合kill -9强制杀死

mount -o添加参数进行挂载
[root@foundation21 ~]# mount -o ro /dev/sdb1 /mnt/    添加参数表示只读挂载
[root@foundation21 ~]# df
Filesystem     1K-blocks     Used Available Use% Mounted on
/dev/sda3      307974224 29625448 278348776  10% /
devtmpfs         1868044        0   1868044   0% /dev
tmpfs            1881152      188   1880964   1% /dev/shm
tmpfs            1881152     9036   1872116   1% /run
tmpfs            1881152        0   1881152   0% /sys/fs/cgroup
/dev/sda1         505580   149472    356108  30% /boot
/dev/loop0       3654720  3654720         0 100% /var/www/html/source7.0
/dev/loop1       3947824  3947824         0 100% /var/www/html/source7.2
tmpfs             376232       36    376196   1% /run/user/1000
tmpfs             376232        0    376232   0% /run/user/0
/dev/sdb1       15100688  8722224   6378464  58% /mnt
[root@foundation21 ~]# touch /mnt/file1
touch: cannot touch ‘/mnt/file1’: Read-only file system
用mount查看为ro不能建立文件只读
[root@foundation21 ~]# umount /dev/sdb1
[root@foundation21 ~]# mount -o rw /dev/sdb1 /mnt/    可写挂载
用mount查看为rw可以建立文件可写
[root@foundation21 ~]# touch /mnt/file1

fdisk命令的使用:
[root@localhost ~]# fdisk /dev/vdb打开分区列表
Command (m for help): n  创建分区
Partition type:          创建分区类型
   p   primary (0 primary, 0 extended, 4 free)
   e   extended
Select (default p): p   主分区
Partition number (1-4, default 1): 1  指定主分区id
First sector (2048-20971519, default 2048):   分区起始块位置,用默认
Using default value 2048
Last sector, +sectors or +size{K,M,G} (2048-20971519, default 20971519): +100M 分配100M内存,分区结束位置,用+大小的方式指定
Partition 1 of type Linux and of size 100 MiB is set

Command (m for help): p    查看分区
   Device Boot      Start         End      Blocks   Id  System
/dev/vdb1            2048      206847      102400   83  Linux
/dev/vdb2          206848      411647      102400   83  Linux
/dev/vdb3          411648      616447      102400   83  Linux
/dev/vdb4          616448    20971519    10177536    5  Extended
/dev/vdb5          618496      823295      102400   83  Linux

Command (m for help): wq  保存分区策略并退出fdisk界面
[root@localhost ~]# partprobe    手动同步分区信息
[root@localhost ~]# cat /proc/partitions  查看设备是否被系统识别
major minor  #blocks  name

 253        0   10485760 vda
 253        1   10484142 vda1
 253       16   10485760 vdb
 253       17     102400 vdb1
 253       18     102400 vdb2
 253       19     102400 vdb3
 253       20          1 vdb4
 253       21     102400 vdb5
fdisk的帮助命令:
[root@localhost ~]# fdisk /dev/vdb
Command (m for help): m 获得帮助
Command action
   a   toggle a bootable flag
   b   edit bsd disklabel
   c   toggle the dos compatibility flag
   d   delete a partition 删除分区
   g   create a new empty GPT partition table
   G   create an IRIX (SGI) partition table
   l   list known partition types
   m   print this menu
   n   add a new partition 新建分区
   o   create a new empty DOS partition table
   p   print the partition table 显示分区信息
   q   quit without saving changes退出
   s   create a new empty Sun disklabel
   t   change a partition's system id 修改分区id
   u   change display/entry units
   v   verify the partition table
   w   write table to disk and exit将当前操作写入硬盘分区表
   x   extra functionality (experts only)
演示创建拓展分区:

同步查看分区列表:

文件系统:
mkfs.xfs /dev/vdb1  格式化设备,在设备上安装文件系统xfs
blkid                查看可用设备,可以看到被格式化好的 /dev/vdb1
[root@localhost ~]# mount /dev/vdb5 /mnt/  无法挂载
mount: /dev/vdb5 is write-protected, mounting read-only
mount: unknown filesystem type '(null)'
[root@localhost ~]# mkfs.xfs /dev/vdb5  格式化设备
meta-data=/dev/vdb5              isize=256    agcount=4, agsize=6400 blks
         =                       sectsz=512   attr=2, projid32bit=1
         =                       crc=0
data     =                       bsize=4096   blocks=25600, imaxpct=25
         =                       sunit=0      swidth=0 blks
naming   =version 2              bsize=4096   ascii-ci=0 ftype=0
log      =internal log           bsize=4096   blocks=853, version=2
         =                       sectsz=512   sunit=0 blks, lazy-count=1
realtime =none                   extsz=4096   blocks=0, rtextents=0
[root@localhost ~]# blkid   查看可用设备
/dev/vda1: UUID="9bf6b9f7-92ad-441b-848e-0257cbb883d1" TYPE="xfs"
/dev/vdb5: UUID="c26f6c71-59b7-42e3-aab9-295d369ceb30" TYPE="xfs"
[root@localhost ~]# mkfs.xfs /dev/vdb1  格式化vdb1
meta-data=/dev/vdb1              isize=256    agcount=4, agsize=6400 blks
         =                       sectsz=512   attr=2, projid32bit=1
         =                       crc=0
data     =                       bsize=4096   blocks=25600, imaxpct=25
         =                       sunit=0      swidth=0 blks
naming   =version 2              bsize=4096   ascii-ci=0 ftype=0
log      =internal log           bsize=4096   blocks=853, version=2
         =                       sectsz=512   sunit=0 blks, lazy-count=1
realtime =none                   extsz=4096   blocks=0, rtextents=0
[root@localhost ~]# blkid  查看可用设备
/dev/vda1: UUID="9bf6b9f7-92ad-441b-848e-0257cbb883d1" TYPE="xfs"
/dev/vdb5: UUID="c26f6c71-59b7-42e3-aab9-295d369ceb30" TYPE="xfs"
/dev/vdb1: UUID="b6e4f9cf-1e3e-437f-ae4e-fefb9fad45a5" TYPE="xfs"
[root@localhost ~]# mount /dev/vdb5 /mnt/  挂载成功
[root@localhost ~]# df     查看时挂载成功
Filesystem     1K-blocks    Used Available Use% Mounted on
/dev/vda1       10473900 3764108   6709792  36% /
devtmpfs          469344       0    469344   0% /dev
tmpfs             484932      84    484848   1% /dev/shm
tmpfs             484932   12820    472112   3% /run
tmpfs             484932       0    484932   0% /sys/fs/cgroup
/dev/vdb5          98988    5280     93708   6% /mnt
格式化vdb1:

解决挂载问题,格式化之后可以挂载。

MBR分区和GPT分区:
MBR分区的意思是“主引导记录”,它有自己的启动器,也就是启动代码,一旦启动代码被破坏,系统就没法启动,只有通过
修复才能启动系统。最大支持2TB容量,在容量方面存在着极大的瓶颈,那么GPT在今后的发展就会越来越占优势。
GPT意为GUID分区表,这个标准没有MBR的那些限制。磁盘驱动器容量可以大得多,大到操作系统和文件系统都没法支持。
它同时还支持几乎无限个分区数量,限制只在于操作系统,Windows支持最多128个GPT分区。
GPT分区方式:解决一个分区不能超过2tb。
[root@localhost ~]# fdisk /dev/vdb    删除分区

Command (m for help): d
Partition number (1-5, default 5): 1
Partition 1 is deleted
不挨个演示删除分区,命令格式都是相同的。
[root@localhost ~]# umount /mnt/  解除挂载,不然会有报错
[root@localhost ~]# parted /dev/vdb   设置分区方式
New disk label type? gpt
[root@localhost ~]# fdisk -l  出来gpt说明更改分区方式成功
Disk label type: gpt
#         Start          End    Size  Type            Name
[root@localhost ~]# fdisk /dev/vdb  创建两个分区
Command (m for help): p
Disk label type: gpt  已经变为gpt分区


#         Start          End    Size  Type            Name
 1         2048       206847    100M  Linux filesyste
 2       206848       411647    100M  Linux filesyste

Command (m for help): wq
[root@localhost ~]# partprobe
[root@localhost ~]# cat /proc/partitions
major minor  #blocks  name

 253        0   10485760 vda
 253        1   10484142 vda1
 253       16   10485760 vdb
 253       17     102400 vdb1
 253       18     102400 vdb2
更改分区类型为gpt类型。

同步查看:

gpt分区中可以建立1-128个分区。

变更分区:将gpt分区变更为mbr分区:
[root@localhost ~]# parted /dev/vdb
New disk label type? msdos
[root@localhost ~]# fdisk -l
Disk label type: dos   变成dos表示变更成功
Disk identifier: 0x000ee51e
   Device Boot      Start         End      Blocks   Id  System
变更分区:

永久挂载:
[root@localhost ~]# df    查看挂载
Filesystem     1K-blocks    Used Available Use% Mounted on
/dev/vda1       10473900 3764228   6709672  36% /
devtmpfs          469344       0    469344   0% /dev
tmpfs             484932      84    484848   1% /dev/shm
tmpfs             484932   12772    472160   3% /run
tmpfs             484932       0    484932   0% /sys/fs/cgroup
[root@localhost ~]# vim /etc/fstab   编辑文件
/dev/vdb1   /mnt   xfs文件类型  defaults(挂载参数)     0(是否备份) 0(是否检测)
[root@localhost ~]# mount -a         重新读入
[root@localhost ~]# fdisk /dev/vdb     分区必须存在

   Device Boot      Start         End      Blocks   Id  System
/dev/vdb1            2048      206847      102400   83  Linux
/dev/vdb2          206848      411647      102400   83  Linux
[root@localhost ~]# df
Filesystem     1K-blocks    Used Available Use% Mounted on
/dev/vda1       10473900 3764256   6709644  36% /
devtmpfs          469344       0    469344   0% /dev
tmpfs             484932      84    484848   1% /dev/shm
tmpfs             484932   12788    472144   3% /run
tmpfs             484932       0    484932   0% /sys/fs/cgroup
/dev/vdb1          98988    5280     93708   6% /mnt
写入文件内容:首先需要注意的是文件里面的/dev/vdb1分区需要我们一开始划分好。
 分区存在的情况可以永久挂载

swap分区的设置
Swap分区在系统的物理内存不够用的时候,把物理内存中的一部分空间释放出来,以供当前运行的程序使用。那些被释放
的空间可能来自一些很长时间没有什么操作的程序,这些被释放的空间被临时保存到Swap分区中,等到那些程序要运行时,
再从Swap分区中恢复保存的数据到内存中。
[root@localhost ~]# swapon -s 重新读入
[root@localhost ~]# fdisk /dev/vdb 划分分区
Command (m for help): t 修改为swap分区
Partition number (1-5, default 5): 2
Hex code (type L to list all codes): 82 这里的82就是类型,不知道的可以按两下Tab键会出来所有类型,在其中找到swap对应的分区即可。
Command (m for help): wq
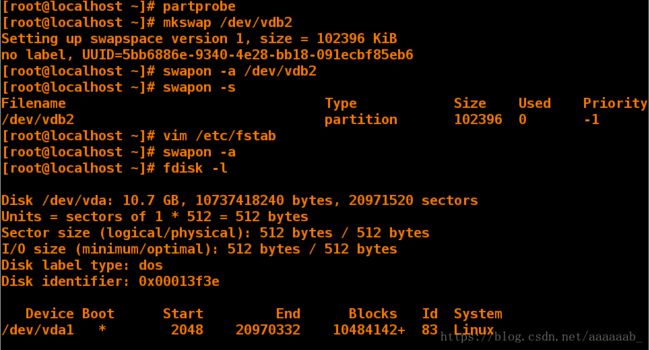
[root@localhost ~]# partprobe 同步
[root@localhost ~]# mkswap /dev/vdb2 格式化
[root@localhost ~]# swapon -a /dev/vdb2 重新读入
[root@localhost ~]# swapon -s 查看
Filename Type Size Used Priority
/dev/vdb2 partition 102396 0 -1
[root@localhost ~]# vim /etc/fstab 永久更改swap
[root@localhost ~]# swapon -a
[root@localhost ~]# fdisk -l
Device Boot Start End Blocks Id System
/dev/vdb1 2048 206847 102400 83 Linux
/dev/vdb2 206848 411647 102400 82 Linux swap / Solaris 已经修改好
/dev/vdb3 411648 616447 102400 83 Linux
/dev/vdb4 616448 20971519 10177536 5 Extended
/dev/vdb5 618496 823295 102400 83 Linux
/dev/vdb2 swap swap defaults 0 0
[root@localhost ~]# vim /etc/fstab 删除永久挂载,恢复环境
[root@localhost ~]# swapoff /dev/vdb2
[root@localhost ~]# fdisk /dev/vdb
Command (m for help): d 删除swap分区
Partition number (1-5, default 5): 2
Command (m for help): wq
[root@localhost ~]# partprobe 同步
[root@localhost ~]# cat /proc/partitions
major minor #blocks name
253 0 10485760 vda
253 1 10484142 vda1
253 16 10485760 vdb
253 17 102400 vdb1
253 19 102400 vdb3
253 20 1 vdb4
253 21 102400 vdb5
vim /etc/fstab永久挂载的文件内容:第一个swap表示系统不需要挂载。第二个swap表示系统配置类型。

同步格式化查看是否更改成功。
删除swap分区同步进行查看。

磁盘的加密保护:
首先用fdisk /dev/vdb命令划分一个1000M的vdb1分区进行实验操作。
[root@localhost ~]# partprobe    同步
[root@localhost ~]# cryptsetup luksFormat /dev/vdb1    设置加密
Are you sure? (Type uppercase yes): YES    必须输入大写,
Enter passphrase: 密码为2018westos
[root@localhost ~]# mount /dev/vdb1 /mnt/  挂载
mount: unknown filesystem type 'crypto_LUKS' LUKS被加密
[root@localhost ~]# ls /dev/mapper/
control
[root@localhost ~]# cryptsetup open /dev/vdb1 westos  生成解密形态
Enter passphrase for /dev/vdb1: 要求输入密码。
[root@localhost ~]# ls /dev/mapper/  解密形态保存到westos
control  westos
[root@localhost ~]# mkfs.xfs /dev/mapper/westos  格式化
[root@localhost ~]# mount /dev/mapper/westos /mnt/  用解密形态挂载成功
[root@localhost ~]# touch /mnt/file{1..10}     建立文件成功
[root@localhost ~]# ls /mnt/
file1  file10  file2  file3  file4  file5  file6  file7  file8  file9
[root@localhost ~]# umount /mnt/       解除挂载
[root@localhost ~]# df
Filesystem     1K-blocks    Used Available Use% Mounted on
/dev/vda1       10473900 3764284   6709616  36% /
devtmpfs          469344       0    469344   0% /dev
tmpfs             484932      84    484848   1% /dev/shm
tmpfs             484932   12808    472124   3% /run
tmpfs             484932       0    484932   0% /sys/fs/cgroup
[root@localhost ~]# ls /mnt/
[root@localhost ~]# cryptsetup close westos   关闭解密形态
[root@localhost ~]# ls /dev/mapper/
control
[root@localhost ~]# mount /dev/mapper/westos /mnt/  挂载不上
mount: special device /dev/mapper/westos does not exist
[root@localhost ~]# mount /dev/vdb1 /mnt/   挂载不成功
mount: unknown filesystem type 'crypto_LUKS'
[root@localhost ~]# cryptsetup open /dev/vdb1 westos  打开保存解密到
westos
Enter passphrase for /dev/vdb1:
[root@localhost ~]# mount /dev/vdb1 /mnt/    用原来文件无法挂载
mount: unknown filesystem type 'crypto_LUKS'
[root@localhost ~]# mount /dev/mapper/westos /mnt/  用形态挂载成功
[root@localhost ~]# df
Filesystem         1K-blocks    Used Available Use% Mounted on
/dev/vda1           10473900 3764284   6709616  36% /
devtmpfs              469344       0    469344   0% /dev
tmpfs                 484932      84    484848   1% /dev/shm
tmpfs                 484932   12808    472124   3% /run
tmpfs                 484932       0    484932   0% /sys/fs/cgroup
/dev/mapper/westos   1018540   32928    985612   4% /mnt   挂载成功
[root@localhost ~]# ls /mnt/   文件可以查看
file1  file10  file2  file3  file4  file5  file6  file7  file8  file9
生成加密,直接挂载不上,所以我们需要解密到一个文件,名字自取。

格式化之后就可以正常挂载,还可以建立文件。

重复操作,不进行打开加密是无法挂载的

开机自动挂载
[root@localhost ~]# vim /root/diskpass 随便建立一个密码文件放入你自己的密码
[root@localhost ~]# cat /root/diskpass
2018westos
[root@localhost ~]# chmod 600 /root/diskpass 赋予权限
[root@localhost ~]# cryptsetup luksAddKey /dev/vdb1 /root/diskpass A,K大写,添加加密
Enter any passphrase: 2018westos
[root@localhost ~]# vim /etc/crypttab 编辑文件使其自动读入密码
[root@localhost ~]# cat /etc/crypttab
westos /dev/vdb1 /root/diskpass
[root@localhost ~]# vim /etc/fstab 将解密形态挂载
[root@localhost ~]# cat /etc/fstab
只演示添加行。
/dev/mapper/westos /mnt xfs defaults 0 0
[root@localhost ~]# reboot 重启生效
[root@localhost ~]# df 开机自动挂载
Filesystem 1K-blocks Used Available Use% Mounted on
/dev/vda1 10473900 3763632 6710268 36% /
devtmpfs 469344 0 469344 0% /dev
tmpfs 484932 80 484852 1% /dev/shm
tmpfs 484932 12760 472172 3% /run
tmpfs 484932 0 484932 0% /sys/fs/cgroup
/dev/mapper/westos 1018540 32928 985612 4% /mnt
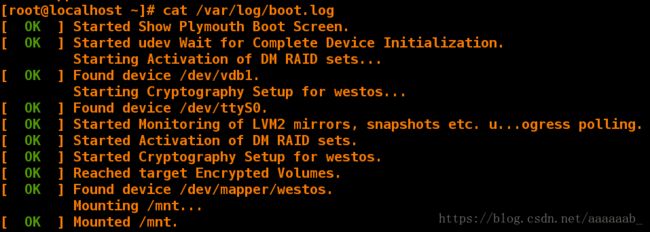
[root@localhost ~]# cat /var/log/boot.log 查看开机启动日志
[ OK ] Found device /dev/mapper/westos. 自动读取密码的日志
Mounting /mnt...
[ OK ] Mounted /mnt.
编辑加密文件使得开机自动挂载:

重启用df查看挂载显示已经挂载成功。

查找登陆日志挂载成功:
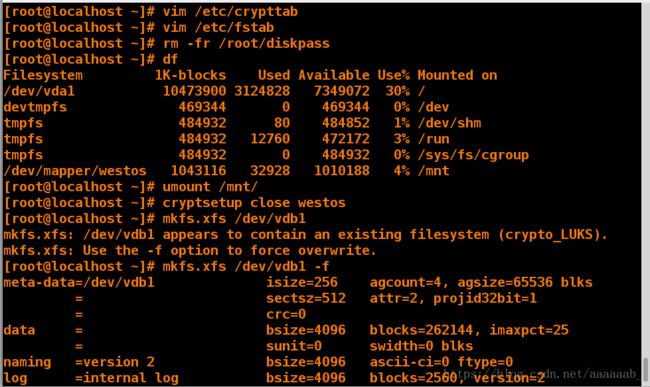
将开机自动挂载解除,还有关闭luks加密
[root@localhost ~]# vim /etc/fstab  删除编辑内容
[root@localhost ~]# vim /etc/crypttab  删除编辑内容
[root@localhost ~]# rm -fr /root/diskpass  删除密码文件
[root@localhost ~]# df
Filesystem         1K-blocks    Used Available Use% Mounted on
/dev/vda1           10473900 3763764   6710136  36% /
devtmpfs              469344       0    469344   0% /dev
tmpfs                 484932      80    484852   1% /dev/shm
tmpfs                 484932   12760    472172   3% /run
tmpfs                 484932       0    484932   0% /sys/fs/cgroup
/dev/mapper/westos   1018540   32928    985612   4% /mnt
[root@localhost ~]# umount /mnt/  解除挂载
[root@localhost ~]# cryptsetup close westos  关闭luks加密
[root@localhost ~]# mkfs.xfs /dev/vdb1       格式化
mkfs.xfs: /dev/vdb1 appears to contain an existing filesystem (crypto_LUKS).
mkfs.xfs: Use the -f option to force overwrite.
[root@localhost ~]# mkfs.xfs /dev/vdb1 -f    根据提示强制格式化