Unity Tutorial - Adventure Game
Unity Tutorial - Adventure Game
标签(空格分隔): unity unity_tutorial
- 写在前面:个人觉得,这个教程是官方教程里面的一个分水岭,教程中涉及了实际 unity 项目开发中几个特别重要的方面:Animation 、 ScriptableObject 、 Editor Scripting ,以及 C# 中的委托、事件、多态、 Lambda 表达式都会涉及到,所以难度和之前几个会有比较大的一个跨度,不过这是好事,如果教程都是差不多难度的,那也没意思。这篇总结会比较长,同时也尽可能多地深入一下各个概念,尝试用自己的话说出来,那才是自己的知识。
01 - Player Control
和往常一样,万丈高楼从地起,我们从 player 的移动构建起,这个游戏和以往的游戏风格不一样,不需要打怪,是一个自己在 scene 中寻找线索,找 NPC 提供信息道具,达成一定条件即可过关的游戏。总结一下我们需要在 player 移动的时候做到以及兼顾到什么
1.通过点击 scene 中的位置,使 player 向该点移动
2.如果点击的是可交互的 NPC 或者物件,需要 player 走到
interactionLocation,同时交互的时候 player 不可接受输入3.player 移动的过程中,animation 要求平滑过渡
要做到上面的事情,我们需要用到下面的方法途径
Build a click to move animated character using:
•EventSystem
•NavMesh
•Animator
•prefabs
这里主要讲 EventSystem 和 Animator 。
EventSystem
想要和整个场景交互,我们需要使用 EventSystem 。使用他有三个要素:- send events
- receive events
- Manage events
首先我们使用 Physics Raycaster component 作为一个光线投射器,将它附着在 camera 中,每当有事件触发激活它的时候,它会从 cramer 发射出一条射线,来击中沿途的第一个属于指定图层的 3D Object ,如果该物体实现了事件接口,那么还可以向该物体传递信息。为此,我们需要为整个 SecurityRoom 添加一个事件触发器(Event Trigger)并指定事件类型为 Pointer Click 。这时将目光放到事件触发时该做什么,当鼠标点击屏幕时,Pointer Click 事件被触发,同时传入 BaseEventData 到回调方法中,通过将 BaseEventData 转型为 PointerEventData 可以访问由刚刚设置好的全局里面唯一一个 Raycaster 投射出的射线击中的目标信息 PointerEventData.pointerCurrentRaycast 。此时,再通过 NavMesh.SamplePosition 采样 NavMesh 中一定范围内最近的点来作为 AI 的目的点,让 NavMeshAgent 自动寻路。详情参考脚本。
Animator
再次提到 Animator 状态机,这次比 Surival Shooter 中的要复杂一些,这里主要有三类状态: Idle, Walking, xTake ,xTake 是指各种高度尝试捡东西的状态。在三种类型之间的状态切换并不复杂,复杂在于 Walking 状态中的 WalkingBlendTree 。BlendTree 这里我们第一次遇到,和一个状态与另一个完全不同状态之间的 Transition 不同,BlendTree 要求需要混合的几种状态之间必须在某些性质和运动时机上相似,比如本例中的,停顿、行走和奔跑就是可以对齐的,因为它们都有一个共性就是脚会着地。按照教程把三个动画添加到 BlendTree 之后,取消Automate Thresholds,并点击Compute Thresholds选择speed,这意味着,unity 会根据你所选择的动画片段的 root motions 来计算各个动画的speed进而决定在混合树中的阈值。值得注意的是,这里还需要把 Idle 和 Walking 两个状态 Tag 为 Locomotion 用作后面判断交互是否完成。
EventSystem 和 Animator 先说到这里,更多深入的东西我们留到日后专题研究,下面来分析 player 移动的脚本。关于整个 PlayerMovement.cs 脚本逻辑,首先需要明确几件事:
NavMeshAgent 的速度是由 Animator 动画人物的速度来决定,这个动画任务的速度是由 Animator.deltaPosition 计算出来的,它的意思是 获取上一帧根骨骼动画的增量位置 ,除上
Time.deltaTime即可得到动画的速度。整个移动过程分为两个部分,一个部分是进入
NavMeshAgent.StoppingDistance之前,该部分直接由 NavMeshAgent 来负责,另一部分是进入NavMeshAgent.StoppingDistance之后,该部分是我们自己来实现,而这部分里面又细分成进入真正停止的的距离之前的 Slowing,以及停止 Stopping 两部分。

为获取目标点 DestinationPosition 的位置信息需要使用 Event Trigger 来触发,为此需要在 Hierarchy 中的 SecurityRoom 中添加事件触发器
Pointer Click,然后再为该事件触发器添加相应的函数。之后的交互事件同样是使用 Event Trigger 实现。在交互事件的触发的过程中,我们不希望接受任何别的输入,于是乎,这里需要用到 Coroutine 来处理
handleInput使得只有当 animator 处于标记为Locomotion的状态(Idle 以及 Walking),才能够接受新的输入。
明确完脚本的基本逻辑之后,来仔细探索脚本中的实现
public class PlayerMovement : MonoBehaviour {

    public Animator animator;
    public NavMeshAgent agent;
    public float inputHoldDelay = 0.5f;
    public float turnSpeedThreshold = 0.5f;
    public float speedDampTime = 0.1f;
    public float slowingSpeed = 0.175f;
    public float turnSmoothing = 15f;

    private Interactable currentInteractable;
    private WaitForSeconds inputHoldWait;
    private Vector3 destinationPosition;                   // 目标点
    private bool handleInput = true;                       // 是否允许输入


    private const float stopDistanceProportion = 0.1f;     // 停止的距离比例
    private const float navMeshSampleDistance = 4f;        // 采样点范围


    private readonly int hashSpeedPara = Animator.StringToHash("Speed");
    private readonly int hashLocomotionTag = Animator.StringToHash("Locomotion");

    private void Start()
    {
        // 我们将使用脚本控制 player 的旋转,所以应该禁止 AI 自动转向
        agent.updateRotation = false;

        inputHoldWait = new WaitForSeconds (inputHoldDelay);

        // 设置开始的终点为当前位置
        destinationPosition = transform.position;
    }


    // 用于修改根运动处理动画移动的回调,该回调将在每帧调用
    private void OnAnimatiorMove()
    {
        // 使用 Animator 里的速度来决定 AI 实际的速度
        agent.velocity = animator.deltaPosition / Time.deltaTime;
    }


    private void Update()
    {
        // 如果路径仍在计算且没有算好,直接跳过该帧
        if (agent.pathPending)
        {
            return;
        }

        // 储存起 player 想要到达的速度
        float speed = agent.desiredVelocity.magnitude;

        // 当 AI 离目标处小于需要停止的距离的十分之一时,停止
        if (agent.remainingDistance <= agent.stoppingDistance * stopDistanceProportion)
        {
            Stopping (out speed);
        }

        // 当 AI 走进应该需要停下来的范围时,减速
        else if (agent.remainingDistance <= agent.stoppingDistance)
        {
            Slowing (out speed, agent.remainingDistance);
        }

        // 当 AI 的速度大于起始速度的阈值时,行动
        else if (speed > turnSpeedThreshold)
        {
            Moving ();
        }

        // 以 speedDampTime 的速率来更新 animator 的速度
        animator.SetFloat (hashSpeedPara, speed, speedDampTime, Time.deltaTime);

//      if (transform.position == destinationPosition)
//          agent.Stop();
//      else {
//          Moving ();
//          animator.SetFloat (hashSpeedPara, agent.desiredVelocity.magnitude, speedDampTime, Time.deltaTime);
//      }
    }


    // 仅当 player 走进确切需要停下来的范围调用
    private void Stopping(out float speed)
    {
        agent.Stop ();
        transform.position = destinationPosition;
        speed = 0f;

        if (currentInteractable)
        {
            // 让 player 正对着交互画面
            transform.rotation = currentInteractable.interactionLocation.rotation;

            // 执行交互并保证交互内容只执行一次
            currentInteractable.Interact ();
            currentInteractable = null;

            // 等待交互完成,防止交互时,player 进行移动
            StartCoroutine (WaitForInteraction ());
        }
    }


    // 当 player 走进 AI 中定义需要停下来的范围时调用
    private void Slowing(out float speed, float distanceToDestination)
    {
        // 这里不需要劳烦 AI 帮我们走到最终的位置,我们自己来
        agent.Stop ();

        // 计算目前位置到终点的距离与应该停止的距离之间的比值
        float proportionalDistance = 1f - distanceToDestination / agent.stoppingDistance;

        // 按照上面计算出的比值进行插值减速
        speed = Mathf.Lerp (slowingSpeed, 0f, proportionalDistance);

        // 如果存在可交互的人或物,则面向他
        Quaternion targetRotation = currentInteractable ? currentInteractable.interactionLocation.rotation : transform.rotation;

         // Interpolate the player's rotation between itself and the target rotation based on how close to the destination the player is.
        transform.rotation = Quaternion.Lerp (transform.rotation, targetRotation, proportionalDistance);

        // Move the player towards the destination by an amount based on the slowing speed.
        transform.position = Vector3.MoveTowards (transform.position, destinationPosition, slowingSpeed * Time.deltaTime);
    }


    // 位移实际上是 NavMeshAgent 帮我们完成,这里只是更新 Player 的 roatation
    private void Moving()
    {
        Quaternion targetRotation = Quaternion.LookRotation (agent.desiredVelocity);

        // Interpolate the player's rotation towards the target rotation.
        transform.rotation = Quaternion.Lerp (transform.rotation, targetRotation, turnSmoothing * Time.deltaTime);
    }


    // 登记了点击 SecurityRoom 的方法
    public void OnGroundClick(BaseEventData data)
    {
        // 如果当前正在交互,则直接返回
        if (!handleInput)
        {
            return;
        }

        currentInteractable = null;

        // 强制转型为我们需要的指针事件数据类型
        PointerEventData pData = (PointerEventData)data;

        // 在 NavMesh 中采样在 NavMesh 所有区域中是否存在点在 navMeshSmpleDistance 的范围内,是返回 true ,反之返回 false
        NavMeshHit hit;
        if (NavMesh.SamplePosition (pData.pointerCurrentRaycast.worldPosition, out hit, navMeshSampleDistance, NavMesh.AllAreas))
            destinationPosition = hit.position;
        else
            destinationPosition = pData.pointerCurrentRaycast.worldPosition;
        agent.SetDestination (destinationPosition);
        agent.Resume ();
    }


    // 登记了点击可交互事件的方法
    public void OnInteractableClick(Interactable interactable)
    {
        // 如果当前正在交互,则直接返回
        if(!handleInput)
        {
            return;
        }

        // 储存可交互事件的 Interactable 变量
        currentInteractable = interactable;
        destinationPosition = currentInteractable.interactionLocation.position;

        agent.SetDestination (destinationPosition);
        agent.Resume ();
    }


    // 控制 handleInput 变量,保证交互时不受其他输入影响
    private IEnumerator WaitForInteraction()
    {
        // 进入交互的时候,在交互完成之前不接受任何输入
        handleInput = false;

        // 延迟一小会
        yield return inputHoldWait;

        // 仅当 animator 恢复到 Locomotion 标记的状态中(Idle 以及 Walking),才重新接受输入
        while (animator.GetCurrentAnimatorStateInfo (0).tagHash != hashLocomotionTag)
        {
            yield return null;
        }

        // Now input can be accepted again.
        handleInput = true;
    }
}
脚本中注释比较详细,下面对几个点再总结一下:
注意到在
Update()方法中,使用了三个函数Stopping()、Slowing()、Moving(),我在学习这里的时候一度觉得疑惑,为什么要弄这么复杂,直接像 Survival Shooter 一样调用 NavMeshAgent 的setDestination()方法,让 AI 全权负责不就好了吗,然而实践是检验真理的唯一标准,在update()方法中底部注释的代码解除注释,上面的代码全注释掉,会发现 AI 的确可以带着我们到达想要的位置,然而在到达那个位置之后,player 却会在诡异地旋转。那么原因到底是什么呢,不得而知,猜想是当 agent 到达目标点之后计算 rotation 的问题。既然知道这三个函数不是吹毛求疵,那么来认真看一下里面到底干了什么Stopping(): 置speed = 0让 player 彻底停下来并且直接暴力地使用transform.position = destinationPosition将 player 移到最终位置,检查当前位置是否存在交互信息,相应进行处理Slowing(): 禁用 NavMeshAgent ,简单的使用Vector3.MoveTowards()进行移动,根据距离终点的距离与开始减速的距离之间的比例更新speed,存在可交互人或物则一并向其旋转Moving(): 让 player 的正面始终朝着 player 前进的方向- 小结:注意到上面用了三次
Lerp()函数,它的是在现有值到目标值之间进行插值。之所以要使用它是因为函数是在Update()里面调用的,我们不希望在一帧里面就到那个目标值,所以要每一帧都进行插值达到缓缓移动或者旋转的效果。
Update()里面还有一个speed变量,我们正是使用它来更新 animator 中的 Speed 参数,进而改变 Walking 中的 BlendTree 的动画效果。注意这里的animator.SetFloat()用到的一个参数是hashSpeedPara,而它其实就是 animator 中 Speed 的一个 ID ,通过Animator.StringToHash()方法实现转换,至于为什么要使用 ID 而不是本身的字符串是因为 ID 可以优化参数的存取器。StartCoroutine(WaitForInteraction())方法使我再一次加深了对 Coroutine 的理解,它最大的作用其实是让一个方法,不必急着在一帧里面执行完,使用yield return可以非常方便的跳转到 return 的代码继续执行,然后下一帧回来再继续执行刚刚yield return下面的代码。同时不必担心,上一帧中方法里所有的信息都会保存起来,在这一帧继续执行。
02 - Inventory
Build a UI and Item Management System for Player Inventory
•UI System
•Editor Scripting
本节构造的物品清单 UI 是 Persistent Scene 中的,因为我们不希望从 SecurityRoom 切换到 Market 场景中这个清单就没了,或者又得在 Market 场景中重新做一个清单,这里的方法是创造一个始终存在的 Persistent Scene 它由始至终都是在渲染的。所有像物品清单这样的 UI 都可以储存在这个 scene 中,这样就可以可将一些 UI 独立到一个 scene 了。同时,这个单独存在的 scene 还可以帮助我们将一些场景的数据状态保存下来,比如说从 Market 中捡了一个硬币,然后走到 SecurityRoom 中,接着又走回 Market ,此时重新加载的 Market 场景理论上会重置,再次刷新出一个硬币,这个时候就可以利用到始终在加载的 Persistent Scene 来保存一些字段的数据,使硬币不再刷新,这个在后面还会讲到。


本节说是构造这个游戏场景里的道具清单,实际上,大部分的力气是花在教我们如何定制属于自己的 Inspector ,来简化我们的工作环境。
UI System
做 Inventory 的 UI 不难,首先为 PersistentCanvas 添加一个子 GameObject 命名为 Inventory ,需要注意的是,Inventory 必须在 FadeImage 的上面,之前也提到过,UI 在 Hierarchy 中的顺序将决定 UI 在场景中的渲染顺序,Hierarchy 中排在越后的,就越在后面渲染,也就是在我们看到的场景最前面,而 FadeImage 将要用来覆盖整个 scene 来作为后面 scene 和 scene 之间的过渡,因此它必须在 Inventory 后面。随后为 Inventory 添加四个 GameObject 名为 ItemSlot ,每一个 ItemSlot 里面有一个 BackgroundImage 和 ItemImage 分别代表物品槽框和物品图片。这时,只需在 Inventor 中添加一个 VerticalLayoutGroup ,再调节一个各个组件的 Rect Transform ,Inventory 的样子就出来了。

饺子皮做好了,来做饺子馅。首先得使用一个贴图类来显示在清单上的物件,这个其实可以直接使用 Sprite 来表示,但是为了使 Item 类不失拓展性,这里使用 Item 类将他进行封装
// This simple script represents Items that can be picked
// up in the game.  The inventory system is done using
// this script instead of just sprites to ensure that items
// are extensible.
[CreateAssetMenu]
public class Item : ScriptableObject
{
public Sprite sprite;
}
这里涉及到重要概念 ScriptableObject ,简单的说,ScriptableObject 可以将一些不需要依附 GameObject 的数据抽象成 asset,这意味着,它可以像纹理,贴图,模型等 asset 一样,只有一份实例,一旦改变它,所有它的实例都会改变(可参考乐乐姐博文)。而物品清单正正就是想要这样的效果,想象我们有一个物品清单,里面存放着各种物品以及它们的状态,现在我们有两个商店从清单中调货出去卖,如果每一商店都拥有一份清单实例,那么它们各自修改清单的时候,彼此的数据是不同步的,有可能在一个店里面已经调货卖光了,而在另一个店的清单实例中仍有该货品,造成清单上有货,但是却调不出的现象。解决它的方法就是将清单作为一个 ScriptableObject 来储存,全局只有一个物品清单,各个商店都只能访问修改同一份清单,这也是设计模式中常见的 单例模式 。
- 值得注意的是:在 Item 类的上面有一个 CreateAssetMenu 的特性,该特性的作用是使 Item 可以自动地罗列在子菜单下。
理解了为什么要 Item 继承 ScriptableObject 之后,来构建 Inventory 类。Inventory 应该暴露两个方法供外界调用,一个负责捡,一个负责使用,那么直接来看脚本实现
public class Inventory : MonoBehaviour
{
public Image[] itemImages = new Image[numItemSlots];    // The Image components that display the Items.
public Item[] items = new Item[numItemSlots];           // The Items that are carried by the player.


public const int numItemSlots = 4;                      // The number of items that can be carried.  This is a constant so that the number of Images and Items are always the same.


// This function is called by the PickedUpItemReaction in order to add an item to the inventory.
public void AddItem(Item itemToAdd)
{
    // Go through all the item slots...
    for (int i = 0; i < items.Length; i++)
    {
        // ... if the item slot is empty...
        if (items[i] == null)
        {
            // ... set it to the picked up item and set the image component to display the item's sprite.
            items[i] = itemToAdd;
            itemImages[i].sprite = itemToAdd.sprite;
            itemImages[i].enabled = true;
            return;
        }
    }
}


// This function is called by the LostItemReaction in order to remove an item from the inventory.
public void RemoveItem (Item itemToRemove)
{
    // Go through all the item slots...
    for (int i = 0; i < items.Length; i++)
    {
        // ... if the item slot has the item to be removed...
        if (items[i] == itemToRemove)
        {
            // ... set the item slot to null and set the image component to display nothing.
            items[i] = null;
            itemImages[i].sprite = null;
            itemImages[i].enabled = false;
            return;
        }
    }
}
}
有暴露出去的方法,对应的就会有调用它的对象,这里需要调用它的是两个 Reaction ,分别是
PickUpItemReaction和LostItemReaction,其他的类型的 Reaction 在后面章节会提到,这两个脚本很简单,就是遍历 Inventory 然后调用它的AddItem,RemoveItem方法public class PickedUpItemReaction : DelayedReaction { public Item item; // The item asset to be added to the Inventory. private Inventory inventory; // Reference to the Inventory component. protected override void SpecificInit() { inventory = FindObjectOfType(); } protected override void ImmediateReaction() { inventory.AddItem(item); } } Editor Scripting
接下来是本节的重头戏定制高效率的 Editor ,将 Inventory 作为组件附着在 PersistentCanvas 上的查看 Inspector 可以看到 Inventory 组件是左边这样的,明明是属于一个槽的 Item 和 ItemImage 确实分开的,这样既不直观又容易出错,所以我们打算将它整合定制成右边这样

我们通过
InventoryEditor.cs来定制想要的 Inspector 效果,首先得给类型前加上 CustomEditor 特性,该特性用来确定哪种类型的对象可以在该自定义编辑类中定制。同时使用 serializedObject 来代表当前编辑器类检查的对象,SerializedProperty 来代表被检查的对象的字段。于是乎,可以通过脚本中非常典型的方法来简单地定制出想要的效果[CustomEditor(typeof(Inventory))] public class InventoryEditor : Editor { private bool[] showItemSlots = new bool[Inventory.numItemSlots]; // Whether the GUI for each Item slot is expanded. private SerializedProperty itemImagesProperty; // Represents the array of Image components to display the Items. private SerializedProperty itemsProperty; // Represents the array of Items. private const string inventoryPropItemImagesName = "itemImages"; // The name of the field that is an array of Image components. private const string inventoryPropItemsName = "items"; // The name of the field that is an array of Items. private void OnEnable () { // Cache the SerializedProperties. itemImagesProperty = serializedObject.FindProperty (inventoryPropItemImagesName); itemsProperty = serializedObject.FindProperty (inventoryPropItemsName); } public override void OnInspectorGUI () { // Pull all the information from the target into the serializedObject. serializedObject.Update (); // Display GUI for each Item slot. for (int i = 0; i < Inventory.numItemSlots; i++) { ItemSlotGUI (i); } // Push all the information from the serializedObject back into the target. serializedObject.ApplyModifiedProperties (); } private void ItemSlotGUI (int index) { EditorGUILayout.BeginVertical (GUI.skin.box); // 缩进一层 EditorGUI.indentLevel++; // Display a foldout to determine whether the GUI should be shown or not. showItemSlots[index] = EditorGUILayout.Foldout (showItemSlots[index], "Item slot " + index); // If the foldout is open then display default GUI for the specific elements in each array. if (showItemSlots[index]) { EditorGUILayout.PropertyField (itemImagesProperty.GetArrayElementAtIndex (index)); EditorGUILayout.PropertyField (itemsProperty.GetArrayElementAtIndex (index)); } // 停止缩进 EditorGUI.indentLevel--; EditorGUILayout.EndVertical (); } }总结这种最经典简单的定制方法就是:在
OnEnable()函数中使用方法 SerializedObject.FindProperty 获取需要在 Inspector 中展示的字段,在OnInspectorGUI()中使用 EditorGUILayout 的各种方法布局、显示,需要特别注意 在回调方法OnInspectorGUI()中最好以 SerializedObject.Update() 方法开始,以 SerializedObject.ApplyModifiedProperties() 方法结束,这样才可以保证 Inspector 中的 Inventory 和实际上的 Inventory 始终是一致的
03 - Interaction System
Build a system allowing the Player to interact with the game
首先来了解 Interactable GameObject 的设计:
The Interactable GameObject will be:
•stand-alone and hold all logic & events
•decoupled from the actual props in the scene
先理清一下交互是怎样发生的。每当点击到一个可交互的对象,首先 player 会走过去一个提前设定好的交互位置,并面朝它的交互对象。此时,交互对象会检查 player 满足那些 Conditions 根据不同的 Conditons 进行 Reaction。为此,我们给所有可交互的对象在 Hierarchy 中创建一个空的 GameObject 将其命名为 xxxInteractable,继而为它添加 Collider 调整大小使之与图形大概吻合来检测点击事件,添加 eventTrigger 来触发点击事件,最后再添加 Interactable 脚本来控制整个交互的逻辑。
- 总结上面,我们通过创建一个新的 Interactable 对象来将交互和实际场景的模型解耦,通过添加 collider 和 eventTrigger 将事件和控制逻辑的 Interactable 脚本独立出来,使交互系统更加模块化。

接着就来深入各个模块一探究竟
Conditions
Conditions are:
•Data objects that contain only an identifier and a boolean
•Saved as ScriptableObject assets that can be used to compare the state of a Condition
Conditions 是用来储存 player 当前满足的条件状态,它会以 ScriptableObject 的形式作为资产储存起来,它要存储的数据很简单,就 3 个字段,分表代表条件,条件状态,条件ID
// This class is used to determine whether or not Reactions
// should happen.  Instances of Condition exist in two places:
// as assets which are part of the AllConditions asset and as
// part of ConditionCollections.  The Conditions that are part
// of the AllConditions asset are those that are set by
// Reactions and reflect the state of the game.  Those that
// are on ConditionCollections are compared to the
// AllConditions asset to determine whether other Reactions
// should happen.
public class Condition : ScriptableObject
{
    public string description;      // A description of the Condition, for example 'BeamsOff'.
    public bool satisfied;          // Whether or not the Condition has been satisfied, for example are the beams off?
    public int hash;                // A number which represents the description.  This is used to compare ConditionCollection Conditions to AllConditions Conditions.
}
随后我们使用 AllConditions.cs 来作为一个全局变量,保存所有的 Condition ,用来和后面 Interactable 中的 Condition 字段进行比较

// This script works as a singleton asset.  That means that
// it is globally accessible through a static instance
// reference.
public class AllConditions : ResettableScriptableObject
{
    public Condition[] conditions;                      // All the Conditions that exist in the game.


    private static AllConditions instance;              // The singleton instance.


    private const string loadPath = "AllConditions";    // The path within the Resources folder that


    public static AllConditions Instance                // The public accessor for the singleton instance.
    {
        get
        {
            // If the instance is currently null, try to find an AllConditions instance already in memory.
            if (!instance)
                instance = FindObjectOfType ();
            // If the instance is still null, try to load it from the Resources folder.
            if (!instance)
                instance = Resources.Load (loadPath);
            // If the instance is still null, report that it has not been created yet.
            if (!instance)
                Debug.LogError ("AllConditions has not been created yet.  Go to Assets > Create > AllConditions.");
            return instance;
        }
        set { instance = value; }
    }


    // This function will be called at Start once per run of the game.
    public override void Reset ()
    {
        // If there are no conditions, do nothing.
        if (conditions == null)
            return;

        // Set all of the conditions to not satisfied.
        for (int i = 0; i < conditions.Length; i++)
        {
            conditions[i].satisfied = false;
        }
    }


    // This is called from ConditionCollections when they are being checked by an Interactable that has been clicked on.
    public static bool CheckCondition (Condition requiredCondition)
    {
        // Cache the condition array.
        Condition[] allConditions = Instance.conditions;
        Condition globalCondition = null;

        // If there is at least one condition...
        if (allConditions != null && allConditions[0] != null)
        {
            // ... go through all the conditions...
            for (int i = 0; i < allConditions.Length; i++)
            {
                // ... and if they match the given condition then this is the global version of the requiredConditiond.
                if (allConditions[i].hash == requiredCondition.hash)
                    globalCondition = allConditions[i];
            }
        }

        // If by this point a globalCondition hasn't been found then return false.
        if (!globalCondition)
            return false;

        // Return true if the satisfied states match, false otherwise.
        return globalCondition.satisfied == requiredCondition.satisfied;
    }
} - 值得注意的是在 AllConditions 中实现了单例模式,方法是声明一个静态的私有变量 instance 再通过静态属性 Instance 返回唯一的 instance,在 get 访问器中首先尝试在内存中寻找 AllConditions 类型的实例,没有则载入 Resource 中存好的 AllConditions 来实现
比较完了 Conditions 就可以确定要播放的 Reaction ,同时我们也希望在 Reaction 播放完之后对 Condition 的状态进行适当的修改
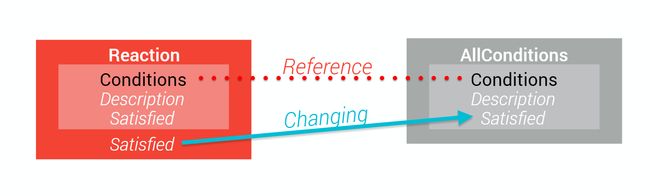
现在我们需要将 Condition 和 Reaction 统一起来,因为一个 Reaction 对应的可能是一组条件而不是单个条件,所以合适的统一方法是,一个 ConditionCollection 中有一组 Conditions 对应着一个特定的 ReactionCollection(因为可能同时需要多个 Reaction ,比如声音、字幕)
// This class represents a single outcome from clicking
// on an interactable.  It has an array of Conditions
// and if they are all met an ReactionCollection that
// will happen.
public class ConditionCollection : ScriptableObject
{
    public string description;                                  // Description of the ConditionCollection.  This is used purely for identification in the inspector.
    public Condition[] requiredConditions = new Condition[0];   // The Conditions that need to be met in order for the ReactionCollection to React.
    public ReactionCollection reactionCollection;               // Reference to the ReactionCollection that will React should all the Conditions be met.


    // This is called by the Interactable one at a time for each of its ConditionCollections until one returns true.
    public bool CheckAndReact()
    {
        // Go through all Conditions...
        for (int i = 0; i < requiredConditions.Length; i++)
        {
            // ... and check them against the AllConditions version of the Condition.  If they don't have the same satisfied flag, return false.
            if (!AllConditions.CheckCondition (requiredConditions[i]))
                return false;
        }

        // If there is an ReactionCollection assigned, call its React function.
        if(reactionCollection)
            reactionCollection.React();

        // A Reaction happened so return true.
        return true;
    }
}
下面思考工作界面如何优化,假设在定制 Editor 上什么都不做,Interactable 中会有一个 ConditionCollection 的数组,还有一个 ReactionCollection 的数组,我们只能集成好一个 ConditionCollection 再将它拖入 Interactable 组件中,然而我们并不希望这样,我们希望通过定制 Editor 来用更加直观容易理解的方式来完成 Condition 和 Reaction 之间的对应。
所以,我们希望的 Editor 应该是这样的,Interactable 里面有 ConditionCollection 的编辑器,ConditionCollection 里面又有 Condition 的编辑器,应该是这样的。

那么如何做到这样呢,由于 Interactable 和 Condition Collection 两个里面都有嵌套的 Editor,为了方便拓展和代码复用,这里编写一个专门带子 Editor 的泛型基类 EditorWithSubEditors
// This class acts as a base class for Editors that have Editors
// nested within them.  For example, the InteractableEditor has
// an array of ConditionCollectionEditors.
// It's generic types represent the type of Editor array that are
// nested within this Editor and the target type of those Editors.
public abstract class EditorWithSubEditors : Editor
    where TEditor : Editor
    where TTarget : Object
{
    protected TEditor[] subEditors;         // Array of Editors nested within this Editor.


    // This should be called in OnEnable and at the start of OnInspectorGUI.
    protected void CheckAndCreateSubEditors (TTarget[] subEditorTargets)
    {
        // If there are the correct number of subEditors then do nothing.
        if (subEditors != null && subEditors.Length == subEditorTargets.Length)
            return;

        // Otherwise get rid of the editors.
        CleanupEditors ();

        // Create an array of the subEditor type that is the right length for the targets.
        subEditors = new TEditor[subEditorTargets.Length];

        // Populate the array and setup each Editor.
        for (int i = 0; i < subEditors.Length; i++)
        {
            subEditors[i] = CreateEditor (subEditorTargets[i]) as TEditor;
            SubEditorSetup (subEditors[i]);
        }
    }


    // This should be called in OnDisable.
    protected void CleanupEditors ()
    {
        // If there are no subEditors do nothing.
        if (subEditors == null)
            return;

        // Otherwise destroy all the subEditors.
        for (int i = 0; i < subEditors.Length; i++)
        {
            DestroyImmediate (subEditors[i]);
        }

        // Null the array so it's GCed.
        subEditors = null;
    }


    // This must be overridden to provide any setup the subEditor needs when it is first created.
    protected abstract void SubEditorSetup (TEditor editor);
}
EditorWithSubEditor 主要做了两件事,创建子 Editor 和 清空子 Editor,我们可以具体结合 ConditionCollectionEditor 来感受一下
[CustomEditor(typeof(ConditionCollection))]
public class ConditionCollectionEditor : EditorWithSubEditors
{
    public SerializedProperty collectionsProperty;              // Represents the array of ConditionCollections that the target belongs to.


    private ConditionCollection conditionCollection;            // Reference to the target.
    private SerializedProperty descriptionProperty;             // Represents a string description for the target.
    private SerializedProperty conditionsProperty;              // Represents an array of Conditions for the target.
    private SerializedProperty reactionCollectionProperty;      // Represents the ReactionCollection that is referenced by the target.


    private const float conditionButtonWidth = 30f;             // Width of the button for adding a new Condition.
    private const float collectionButtonWidth = 125f;           // Width of the button for removing the target from it's Interactable.
    private const string conditionCollectionPropDescriptionName = "description";
    // Name of the field that represents a string description for the target.
    private const string conditionCollectionPropRequiredConditionsName = "requiredConditions";
    // Name of the field that represents an array of Conditions for the target.
    private const string conditionCollectionPropReactionCollectionName = "reactionCollection";
    // Name of the field that represents the ReactionCollection that is referenced by the target.


    private void OnEnable()
    {
        // Cache a reference to the target.
        conditionCollection = (ConditionCollection)target;

        // If this Editor exists but isn't targeting anything destroy it.
        if (target == null)
        {
            DestroyImmediate(this);
            return;
        }

        // Cache the SerializedProperties.
        descriptionProperty = serializedObject.FindProperty(conditionCollectionPropDescriptionName);
        conditionsProperty = serializedObject.FindProperty(conditionCollectionPropRequiredConditionsName);
        reactionCollectionProperty = serializedObject.FindProperty(conditionCollectionPropReactionCollectionName);

        // Check if the Editors for the Conditions need creating and optionally create them.
        CheckAndCreateSubEditors(conditionCollection.requiredConditions);
    }


    private void OnDisable()
    {
        // When this Editor ends, destroy all it's subEditors.
        CleanupEditors();
    }


    // This is called immediately when a subEditor is created.
    protected override void SubEditorSetup(ConditionEditor editor)
    {
        // Set the editor type so that the correct GUI for Condition is shown.
        editor.editorType = ConditionEditor.EditorType.ConditionCollection;

        // Assign the conditions property so that the ConditionEditor can remove its target if necessary.
        editor.conditionsProperty = conditionsProperty;
    }


    public override void OnInspectorGUI()
    {
        // Pull the information from the target into the serializedObject.
        serializedObject.Update();

        // Check if the Editors for the Conditions need creating and optionally create them.
        CheckAndCreateSubEditors(conditionCollection.requiredConditions);

        EditorGUILayout.BeginVertical(GUI.skin.box);
        EditorGUI.indentLevel++;

        EditorGUILayout.BeginHorizontal();

        // Use the isExpanded bool for the descriptionProperty to store whether the foldout is open or closed.
        descriptionProperty.isExpanded = EditorGUILayout.Foldout(descriptionProperty.isExpanded, descriptionProperty.stringValue);

        // Display a button showing 'Remove Collection' which removes the target from the Interactable when clicked.
        if (GUILayout.Button("Remove Collection", GUILayout.Width(collectionButtonWidth)))
        {
            collectionsProperty.RemoveFromObjectArray(conditionCollection);
        }

        EditorGUILayout.EndHorizontal();

        // If the foldout is open show the expanded GUI.
        if (descriptionProperty.isExpanded)
        {
            ExpandedGUI();
        }

        EditorGUI.indentLevel--;
        EditorGUILayout.EndVertical();

        // Push all changes made on the serializedObject back to the target.
        serializedObject.ApplyModifiedProperties();
    }


    private void ExpandedGUI()
    {
        EditorGUILayout.Space();

        // Display the description for editing.
        EditorGUILayout.PropertyField(descriptionProperty);

        EditorGUILayout.Space();

        // Display the Labels for the Conditions evenly split over the width of the inspector.
        float space = EditorGUIUtility.currentViewWidth / 3f;

        EditorGUILayout.BeginHorizontal();
        EditorGUILayout.LabelField("Condition", GUILayout.Width(space));
        EditorGUILayout.LabelField("Satisfied?", GUILayout.Width(space));
        EditorGUILayout.LabelField("Add/Remove", GUILayout.Width(space));
        EditorGUILayout.EndHorizontal();

        // Display each of the Conditions.
        EditorGUILayout.BeginVertical(GUI.skin.box);
        for (int i = 0; i < subEditors.Length; i++)
        {
            subEditors[i].OnInspectorGUI();
        }
        EditorGUILayout.EndHorizontal();

        // Display a right aligned button which when clicked adds a Condition to the array.
        EditorGUILayout.BeginHorizontal();
        GUILayout.FlexibleSpace();
        if (GUILayout.Button("+", GUILayout.Width(conditionButtonWidth)))
        {
            Condition newCondition = ConditionEditor.CreateCondition();
            conditionsProperty.AddToObjectArray(newCondition);
        }
        EditorGUILayout.EndHorizontal();

        EditorGUILayout.Space();

        // Display the reference to the ReactionCollection for editing.
        EditorGUILayout.PropertyField(reactionCollectionProperty);
    }


    // This function is static such that it can be called without an editor being instanced.
    public static ConditionCollection CreateConditionCollection()
    {
        // Create a new instance of ConditionCollection.
        ConditionCollection newConditionCollection = CreateInstance();

        // Give it a default description.
        newConditionCollection.description = "New condition collection";

        // Give it a single default Condition.
        newConditionCollection.requiredConditions = new Condition[1];
        newConditionCollection.requiredConditions[0] = ConditionEditor.CreateCondition();
        return newConditionCollection;
    }
} - ConditionCollectionEditor 的
SerializedProperty.AddToObjectArray以及SerializedProperty.RemoveFromObjectArray方法值得我们注意,它们是 扩展方法 ,扩展方法能够向现有类型添加方法而无需修改原始类型。扩展方法是一种静态方法但又可以通过实例进行调用。通过上面两个方法,可以直接通过 SerializedProperty 的实例来向里面增加和删除数组内的元素
在定制 Editor 这个方面,感觉很难抓到重点来阐述,改日得专门总结一下这个方面
Create a system to check the current game state
•Scripting Patterns
•Scriptable Objects
•Generic Classes
•Inheritance
•Extension Methods
Reactions
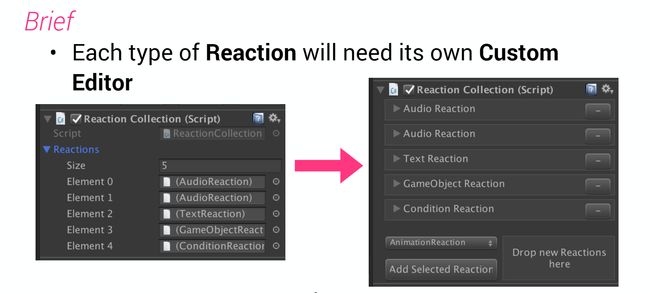
上面有提到过,交互的时候往往是播放一组 Reactions 而不是单个Reaction ,因为需要一个 ReactionCollection 来封装好满足一定条件时,播放的是哪一组 Reactions 。而一个 Reaction 里面,应该有这个 Reaction 特有的、需要用到的 public 变量供我们在 Editor 中拖拽来完成。和上面 ConditionCollection 一样,想要通过这种简单直观的方式来完成工作,我们需要将工作流进行定制,如下图
为了后面使用 ReactionCollection 中使用 Reaction 数组,先将各种 Reaction 抽象出基类的 Reaction
using UnityEngine;

// This is the base class for all Reactions.
// There are arrays of inheriting Reactions on ReactionCollections.
public abstract class Reaction : ScriptableObject
{
    // This is called from ReactionCollection.
    // This function contains everything that is required to be done for all
    // Reactions as well as call the SpecificInit of the inheriting Reaction.
    public void Init ()
    {
        SpecificInit ();
    }


    // This function is virtual so that it can be overridden and used purely
    // for the needs of the inheriting class.
    protected virtual void SpecificInit()
    {}


    // This function is called from ReactionCollection.
    // It contains everything that is required for all for all Reactions as
    // well as the part of the Reaction which needs to happen immediately.
    public void React (MonoBehaviour monoBehaviour)
    {
        ImmediateReaction ();
    }


    // This is the core of the Reaction and must be overridden to make things happpen.
    protected abstract void ImmediateReaction ();
}
可以看到,Reaction 里面大致又分两类,一种是立即交互的,一种是有延迟交互的,具体的 Reaction 在这里不再深入,自行查看代码即可。集中精力来定制 Reaction Collection 的 Inspector 来简化我们的工作。注意,这其实是一种思想,因为把 Reaction,Reaction Collection 都设计的足够简单直观,所以在背后需要多花一点力气来,补全简单直观逻辑之间的复杂关系,这可能在日后的 Unity 编程中经常地用到。Reaction Collection Editor 的篇幅很长,但是有必要好好读懂它
using System;
using UnityEngine;
using System.Collections.Generic;
using UnityEditor;

// This is the Editor for the ReactionCollection MonoBehaviour.
// However, since the ReactionCollection contains many Reactions,
// it requires many sub-editors to display them.
// For more details see the EditorWithSubEditors class.
// There are two ways of adding Reactions to the ReactionCollection:
// a type selection popup with confirmation button and a drag and drop
// area.  Details on these are found below.
[CustomEditor(typeof(ReactionCollection))]
public class ReactionCollectionEditor : EditorWithSubEditors
{
    private ReactionCollection reactionCollection;          // Reference to the target.
    private SerializedProperty reactionsProperty;           // Represents the array of Reactions.

    private Type[] reactionTypes;                           // All the non-abstract types which inherit from Reaction.  This is used for adding new Reactions.
    private string[] reactionTypeNames;                     // The names of all appropriate Reaction types.
    private int selectedIndex;                              // The index of the currently selected Reaction type.


    private const float dropAreaHeight = 50f;               // Height in pixels of the area for dropping scripts.
    private const float controlSpacing = 5f;                // Width in pixels between the popup type selection and drop area.
    private const string reactionsPropName = "reactions";   // Name of the field for the array of Reactions.


    private readonly float verticalSpacing = EditorGUIUtility.standardVerticalSpacing;
                                                            // Caching the vertical spacing between GUI elements.


    private void OnEnable ()
    {
        // Cache the target.
        reactionCollection = (ReactionCollection)target;

        // Cache the SerializedProperty
        reactionsProperty = serializedObject.FindProperty(reactionsPropName);

        // If new editors are required for Reactions, create them.
        CheckAndCreateSubEditors (reactionCollection.reactions);

        // Set the array of types and type names of subtypes of Reaction.
        SetReactionNamesArray ();
    }


    private void OnDisable ()
    {
        // Destroy all the subeditors.
        CleanupEditors ();
    }


    // This is called immediately after each ReactionEditor is created.
    protected override void SubEditorSetup (ReactionEditor editor)
    {
        // Make sure the ReactionEditors have a reference to the array that contains their targets.
        editor.reactionsProperty = reactionsProperty;
    }


    public override void OnInspectorGUI ()
    {
        // Pull all the information from the target into the serializedObject.
        serializedObject.Update ();

        // If new editors for Reactions are required, create them.
        CheckAndCreateSubEditors(reactionCollection.reactions);

        // Display all the Reactions.
        for (int i = 0; i < subEditors.Length; i++)
        {
            subEditors[i].OnInspectorGUI ();
        }

        // If there are Reactions, add a space.
        if (reactionCollection.reactions.Length > 0)
        {
            EditorGUILayout.Space();
            EditorGUILayout.Space ();
        }

        // Create a Rect for the full width of the inspector with enough height for the drop area.
        Rect fullWidthRect = GUILayoutUtility.GetRect(GUIContent.none, GUIStyle.none, GUILayout.Height(dropAreaHeight + verticalSpacing));

        // Create a Rect for the left GUI controls.
        Rect leftAreaRect = fullWidthRect;

        // It should be in half a space from the top.
        leftAreaRect.y += verticalSpacing * 0.5f;

        // The width should be slightly less than half the width of the inspector.
        leftAreaRect.width *= 0.5f;
        leftAreaRect.width -= controlSpacing * 0.5f;

        // The height should be the same as the drop area.
        leftAreaRect.height = dropAreaHeight;

        // Create a Rect for the right GUI controls that is the same as the left Rect except...
        Rect rightAreaRect = leftAreaRect;

        // ... it should be on the right.
        rightAreaRect.x += rightAreaRect.width + controlSpacing;

        // Display the GUI for the type popup and button on the left.
        TypeSelectionGUI (leftAreaRect);

        // Display the GUI for the drag and drop area on the right.
        DragAndDropAreaGUI (rightAreaRect);

        // Manage the events for dropping on the right area.
        DraggingAndDropping(rightAreaRect, this);

        // Push the information back from the serializedObject to the target.
        serializedObject.ApplyModifiedProperties ();
    }


    private void TypeSelectionGUI (Rect containingRect)
    {
        // Create Rects for the top and bottom half.
        Rect topHalf = containingRect;
        topHalf.height *= 0.5f;
        Rect bottomHalf = topHalf;
        bottomHalf.y += bottomHalf.height;

        // Display a popup in the top half showing all the reaction types.
        selectedIndex = EditorGUI.Popup(topHalf, selectedIndex, reactionTypeNames);

        // Display a button in the bottom half that if clicked...
        if (GUI.Button (bottomHalf, "Add Selected Reaction"))
        {
            // ... finds the type selected by the popup, creates an appropriate reaction and adds it to the array.
            Type reactionType = reactionTypes[selectedIndex];
            Reaction newReaction = ReactionEditor.CreateReaction (reactionType);
            reactionsProperty.AddToObjectArray (newReaction);
        }
    }


    private static void DragAndDropAreaGUI (Rect containingRect)
    {
        // Create a GUI style of a box but with middle aligned text and button text color.
        GUIStyle centredStyle = GUI.skin.box;
        centredStyle.alignment = TextAnchor.MiddleCenter;
        centredStyle.normal.textColor = GUI.skin.button.normal.textColor;

        // Draw a box over the area with the created style.
        GUI.Box (containingRect, "Drop new Reactions here", centredStyle);
    }


    private static void DraggingAndDropping (Rect dropArea, ReactionCollectionEditor editor)
    {
        // Cache the current event.
        Event currentEvent = Event.current;

        // If the drop area doesn't contain the mouse then return.
        if (!dropArea.Contains (currentEvent.mousePosition))
            return;

        switch (currentEvent.type)
        {
            // If the mouse is dragging something...
            case EventType.DragUpdated:

                // ... change whether or not the drag *can* be performed by changing the visual mode of the cursor based on the IsDragValid function.
                DragAndDrop.visualMode = IsDragValid () ? DragAndDropVisualMode.Link : DragAndDropVisualMode.Rejected;

                // Make sure the event isn't used by anything else.
                currentEvent.Use ();

                break;

            // If the mouse was dragging something and has released...
            case EventType.DragPerform:

                // ... accept the drag event.
                DragAndDrop.AcceptDrag();

                // Go through all the objects that were being dragged...
                for (int i = 0; i < DragAndDrop.objectReferences.Length; i++)
                {
                    // ... and find the script asset that was being dragged...
                    MonoScript script = DragAndDrop.objectReferences[i] as MonoScript;

                    // ... then find the type of that Reaction...
                    Type reactionType = script.GetClass();

                    // ... and create a Reaction of that type and add it to the array.
                    Reaction newReaction = ReactionEditor.CreateReaction (reactionType);
                    editor.reactionsProperty.AddToObjectArray (newReaction);
                }

                // Make sure the event isn't used by anything else.
                currentEvent.Use();

                break;
        }
    }


    private static bool IsDragValid ()
    {
        // Go through all the objects being dragged...
        for (int i = 0; i < DragAndDrop.objectReferences.Length; i++)
        {
            // ... and if any of them are not script assets, return that the drag is invalid.
            if (DragAndDrop.objectReferences[i].GetType () != typeof (MonoScript))
                return false;

            // Otherwise find the class contained in the script asset.
            MonoScript script = DragAndDrop.objectReferences[i] as MonoScript;
            Type scriptType = script.GetClass ();

            // If the script does not inherit from Reaction, return that the drag is invalid.
            if (!scriptType.IsSubclassOf (typeof(Reaction)))
                return false;

            // If the script is an abstract, return that the drag is invalid.
            if (scriptType.IsAbstract)
                return false;
        }

        // If none of the dragging objects returned that the drag was invalid, return that it is valid.
        return true;
    }


    private void SetReactionNamesArray ()
    {
        // Store the Reaction type.
        Type reactionType = typeof(Reaction);

        // Get all the types that are in the same Assembly (all the runtime scripts) as the Reaction type.
        Type[] allTypes = reactionType.Assembly.GetTypes();

        // Create an empty list to store all the types that are subtypes of Reaction.
        List reactionSubTypeList = new List();

        // Go through all the types in the Assembly...
        for (int i = 0; i < allTypes.Length; i++)
        {
            // ... and if they are a non-abstract subclass of Reaction then add them to the list.
            if (allTypes[i].IsSubclassOf(reactionType) && !allTypes[i].IsAbstract)
            {
                reactionSubTypeList.Add(allTypes[i]);
            }
        }

        // Convert the list to an array and store it.
        reactionTypes = reactionSubTypeList.ToArray();

        // Create an empty list of strings to store the names of the Reaction types.
        List<string> reactionTypeNameList = new List<string>();

        // Go through all the Reaction types and add their names to the list.
        for (int i = 0; i < reactionTypes.Length; i++)
        {
            reactionTypeNameList.Add(reactionTypes[i].Name);
        }

        // Convert the list to an array and store it.
        reactionTypeNames = reactionTypeNameList.ToArray();
    }
}
这里想讲的是 多态 的概念,方法 SetReactionNamesArray() 将 Reaction 的所有非抽象子类以及它们的名字提取到 reactionType 和 reactionTypeNames 数组中,然后再 TypeSelectionGUI() 方法中根据 EditorGUI.Popup(topHalf, selectedIndex, reactionTypeNames) 所返回的 selectedIndex 对应的创建该类型的 Reaction 加入到 ReactionCollection 的数组中。
- 注意:上面的实现多态的前提是,Reaction 必须继承 ScriptableObject ,否则 ReactionCollection 的 Reaction 数组中的 Reaction 只能表现为 Reaction 一种形态。

不仅于此,上面还实现了一个拖拽的功能,可以将各种 Reaction 直接拖拽进 ReactionCollection 的 Reaction 数组。要实现该功能,首先得获取当前的事件,随即判断当前事件的鼠标位置是否在允许拖拽的区域内;如果在,则进一步检查当前事件类型是否为 EventType.DragUpdated 或者 EventType.DragPerform;如果是 EventType.DragUpdated,则检查所拖拽的文件类型是否为 Reaction 的非抽象子类来显示链接或者拒接,同时只有当 DragAndDrop.visualMode 被置为 DragAndDropVisualMode.Link 时,才会触发 EventType.DragPerform ,与此同时才会对拖拽文件从 DragAndDrop.objectReferences 转型问特定的 Reaction ,继而加入 Reaction Collection 数组
本节最后还介绍了一个具体的 Reaction ,在这里不展开描述,但是非常建议自己去阅读各个 Reaction 的具体实现
Create a system to perform actions based on condition state
•Polymorphism
•Further editor scripting
•Serialization
Interactables
交互系统的最后一步,像之前说的一样,Interactable 需要一个 BoxCollider,一个 EventTrigger,还有一个 Interactable Script 来控制交互,这个 Interactable Script 中包含了我们的 ConditionCollection,而 ConditionCollection 里面又包含了 Condition。所以它里面其实嵌套了两层的内容,这个时候相信你肯定回想起来又要上面各种的 Custom Editor,没错,这里将要再次定制我们的编辑器了,在此之前,我们不妨先看一下这个简单的 Interactable Script
// This is one of the core features of the game.
// Each one acts like a hub for all things that transpire
// over the course of the game.
// The script must be on a gameobject with a collider and
// an event trigger.  The event trigger should tell the
// player to approach the interactionLocation and the
// player should call the Interact function when they arrive.
public class Interactable : MonoBehaviour
{
    public Transform interactionLocation;                   // The position and rotation the player should go to in order to interact with this Interactable.
    public ConditionCollection[] conditionCollections = new ConditionCollection[0];
                                                            // All the different Conditions and relevant Reactions that can happen based on them.
    public ReactionCollection defaultReactionCollection;    // If none of the ConditionCollections are reacted to, this one is used.


    // This is called when the player arrives at the interactionLocation.
    public void Interact ()
    {
        // Go through all the ConditionCollections...
        for (int i = 0; i < conditionCollections.Length; i++)
        {
            // ... then check and potentially react to each.  If the reaction happens, exit the function.
            if (conditionCollections[i].CheckAndReact ())
                return;
        }

        // If none of the reactions happened, use the default ReactionCollection.
        defaultReactionCollection.React ();
    }
}
这个脚本很简单,只有一个方法 Interact() 该方法会用各个 ConditionCollection 中所有的 Condition 和 All Condition 中的状态进行比较,全部满足则播放该组 ConditionCollection 所对应的 Reaction
接着又是来到了定制编辑器的时候了,所以说凡是都是有代价的,为了使运行时的脚本足够简单,就要适当地付出一些代价来修改编辑器,然而这个编辑器的定制也可以说是最简单的一个了,因为子编辑器的东西我们之前都已经做好了,这里只需要调用它以及增加自己本身的一些字段
using UnityEngine;
using UnityEditor;

// This is the Editor for the Interactable MonoBehaviour.
// However, since the Interactable contains many sub-objects,
// it requires many sub-editors to display them.
// For more details see the EditorWithSubEditors class.
[CustomEditor(typeof(Interactable))]
public class InteractableEditor : EditorWithSubEditors
{
    private Interactable interactable;                              // Reference to the target.
    private SerializedProperty interactionLocationProperty;         // Represents the Transform which is where the player walks to in order to Interact with the Interactable.
    private SerializedProperty collectionsProperty;                 // Represents the ConditionCollection array on the Interactable.
    private SerializedProperty defaultReactionCollectionProperty;   // Represents the ReactionCollection which is used if none of the ConditionCollections are.


    private const float collectionButtonWidth = 125f;               // Width in pixels of the button for adding to the ConditionCollection array.
    private const string interactablePropInteractionLocationName = "interactionLocation";
    // Name of the Transform field for where the player walks to in order to Interact with the Interactable.
    private const string interactablePropConditionCollectionsName = "conditionCollections";
    // Name of the ConditionCollection array.
    private const string interactablePropDefaultReactionCollectionName = "defaultReactionCollection";
    // Name of the ReactionCollection field which is used if none of the ConditionCollections are.


    private void OnEnable()
    {
        // Cache the target reference.
        interactable = (Interactable)target;

        // Cache the SerializedProperties.
        collectionsProperty = serializedObject.FindProperty(interactablePropConditionCollectionsName);
        interactionLocationProperty = serializedObject.FindProperty(interactablePropInteractionLocationName);
        defaultReactionCollectionProperty = serializedObject.FindProperty(interactablePropDefaultReactionCollectionName);

        // Create the necessary Editors for the ConditionCollections.
        CheckAndCreateSubEditors(interactable.conditionCollections);
    }


    private void OnDisable()
    {
        // When the InteractableEditor is disabled, destroy all the ConditionCollection editors.
        CleanupEditors();
    }


    // This is called when the ConditionCollection editors are created.
    protected override void SubEditorSetup(ConditionCollectionEditor editor)
    {
        // Give the ConditionCollection editor a reference to the array to which it belongs.
        editor.collectionsProperty = collectionsProperty;
    }


    public override void OnInspectorGUI()
    {
        // Pull information from the target into the serializedObject.
        serializedObject.Update();

        // If necessary, create editors for the ConditionCollections.
        CheckAndCreateSubEditors(interactable.conditionCollections);

        // Use the default object field GUI for the interactionLocation.
        EditorGUILayout.PropertyField(interactionLocationProperty);

        // Display all of the ConditionCollections.
        for (int i = 0; i < subEditors.Length; i++)
        {
            subEditors[i].OnInspectorGUI();
            EditorGUILayout.Space();
        }

        // Create a right-aligned button which when clicked, creates a new ConditionCollection in the ConditionCollections array.
        EditorGUILayout.BeginHorizontal();
        GUILayout.FlexibleSpace();
        if (GUILayout.Button("Add Collection", GUILayout.Width(collectionButtonWidth)))
        {
            ConditionCollection newCollection = ConditionCollectionEditor.CreateConditionCollection();
            collectionsProperty.AddToObjectArray(newCollection);
        }
        EditorGUILayout.EndHorizontal();

        EditorGUILayout.Space();

        // Use the default object field GUI for the defaultReaction.
        EditorGUILayout.PropertyField(defaultReactionCollectionProperty);

        // Push information back to the target from the serializedObject.
        serializedObject.ApplyModifiedProperties();
    }
}
万事俱备,现在可以正式地来创建 Interactable GameObject 并把它做成一个 prefab 了。为此,我们需要为 Interactable 增加上两个子 GameObject 分别是 InteractableLocation 和 DefaultReaction,随即将这两个拖拽到 Interactable GameObject 的 Interactable Script 的引用中,保存到 prefab 中,交互系统终于大功告成
Create a system to define what the player can interact with
•Interactable Geometry
•EventSystem
•Interaction System Summary
04 - Game State
Game State 本节要处理的主要问题是:如何实现在场景之间的切换。
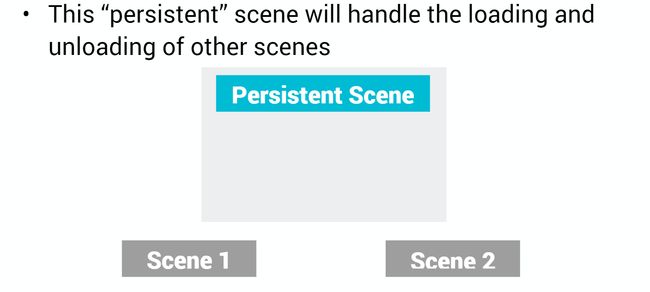
回答这个问题之前,首先来看一下我们游戏里有几个场景,三个,Market,SecurityRoom,Persistent。前两个都是对应着很多的对象实际道具,而 Persistent 却是只有一个 Inventory 的 Canvas,自然想到的就是 Persistent 场景是一直加载在内存中的,变得只是 Market 和 SecurityRoom 的交替加载。
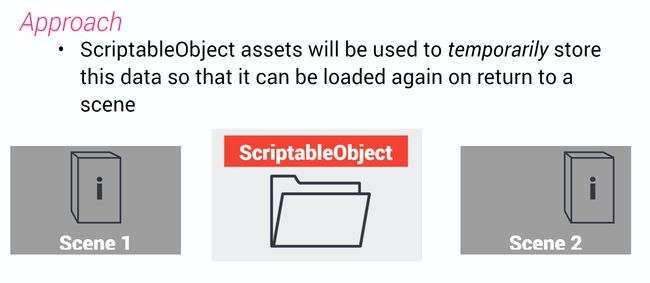
往深一点想,为了两个场景之间切换的时候不会丢失或重置数据,我们需要将这些数据暂时保存起来,保存在哪里最好呢,自然就是一直加载在内存中的 Persistent Scene 了,我们不会把全部的数据都保存在 Persistent 场景中,只需要保存那些特定可能改变的数据,这里使用 ScriptableObject asset 的形式来储存数据
具体的使用 SceneController.cs 来完成场景切换,在具体进入脚本的讲解之前,官方简略地讨论了 Delegates, Event, Lambda Expression,这里推荐阅读 张子阳-C#中委托和事件。好,那么来研究脚本。
using System;
using UnityEngine;
using System.Collections;
using UnityEngine.SceneManagement;

// This script exists in the Persistent scene and manages the content
// based scene's loading.  It works on a principle that the
// Persistent scene will be loaded first, then it loads the scenes that
// contain the player and other visual elements when they are needed.
// At the same time it will unload the scenes that are not needed when
// the player leaves them.
public class SceneController : MonoBehaviour
{
    public event Action BeforeSceneUnload;          // Event delegate that is called just before a scene is unloaded.
    public event Action AfterSceneLoad;             // Event delegate that is called just after a scene is loaded.


    public CanvasGroup faderCanvasGroup;            // The CanvasGroup that controls the Image used for fading to black.
    public float fadeDuration = 1f;                 // How long it should take to fade to and from black.
    public string startingSceneName = "SecurityRoom";
                                                    // The name of the scene that should be loaded first.
    public string initialStartingPositionName = "DoorToMarket";
                                                    // The name of the StartingPosition in the first scene to be loaded.
    public SaveData playerSaveData;                 // Reference to the ScriptableObject which stores the name of the StartingPosition in the next scene.


    private bool isFading;                          // Flag used to determine if the Image is currently fading to or from black.


    private IEnumerator Start ()
    {
        // Set the initial alpha to start off with a black screen.
        faderCanvasGroup.alpha = 1f;

        // Write the initial starting position to the playerSaveData so it can be loaded by the player when the first scene is loaded.
        playerSaveData.Save (PlayerMovement.startingPositionKey, initialStartingPositionName);

        // Start the first scene loading and wait for it to finish.
        yield return StartCoroutine (LoadSceneAndSetActive (startingSceneName));

        // Once the scene is finished loading, start fading in.
        StartCoroutine (Fade (0f));
    }


    // This is the main external point of contact and influence from the rest of the project.
    // This will be called by a SceneReaction when the player wants to switch scenes.
    public void FadeAndLoadScene (SceneReaction sceneReaction)
    {
        // If a fade isn't happening then start fading and switching scenes.
        if (!isFading)
        {
            StartCoroutine (FadeAndSwitchScenes (sceneReaction.sceneName));
        }
    }


    // This is the coroutine where the 'building blocks' of the script are put together.
    private IEnumerator FadeAndSwitchScenes (string sceneName)
    {
        // Start fading to black and wait for it to finish before continuing.
        yield return StartCoroutine (Fade (1f));

        // If this event has any subscribers, call it.
        if (BeforeSceneUnload != null)
            BeforeSceneUnload ();

        // Unload the current active scene.
        yield return SceneManager.UnloadSceneAsync (SceneManager.GetActiveScene ().buildIndex);

        // Start loading the given scene and wait for it to finish.
        yield return StartCoroutine (LoadSceneAndSetActive (sceneName));

        // If this event has any subscribers, call it.
        if (AfterSceneLoad != null)
            AfterSceneLoad ();

        // Start fading back in and wait for it to finish before exiting the function.
        yield return StartCoroutine (Fade (0f));
    }


    private IEnumerator LoadSceneAndSetActive (string sceneName)
    {
        // Allow the given scene to load over several frames and add it to the already loaded scenes (just the Persistent scene at this point).
        yield return SceneManager.LoadSceneAsync (sceneName, LoadSceneMode.Additive);

        // Find the scene that was most recently loaded (the one at the last index of the loaded scenes).
        Scene newlyLoadedScene = SceneManager.GetSceneAt (SceneManager.sceneCount - 1);

        // Set the newly loaded scene as the active scene (this marks it as the one to be unloaded next).
        SceneManager.SetActiveScene (newlyLoadedScene);
    }


    private IEnumerator Fade (float finalAlpha)
    {
        // Set the fading flag to true so the FadeAndSwitchScenes coroutine won't be called again.
        isFading = true;

        // Make sure the CanvasGroup blocks raycasts into the scene so no more input can be accepted.
        faderCanvasGroup.blocksRaycasts = true;

        // Calculate how fast the CanvasGroup should fade based on it's current alpha, it's final alpha and how long it has to change between the two.
        float fadeSpeed = Mathf.Abs (faderCanvasGroup.alpha - finalAlpha) / fadeDuration;

        // While the CanvasGroup hasn't reached the final alpha yet...
        while (!Mathf.Approximately (faderCanvasGroup.alpha, finalAlpha))
        {
            // ... move the alpha towards it's target alpha.
            faderCanvasGroup.alpha = Mathf.MoveTowards (faderCanvasGroup.alpha, finalAlpha,
                fadeSpeed * Time.deltaTime);

            // Wait for a frame then continue.
            yield return null;
        }

        // Set the flag to false since the fade has finished.
        isFading = false;

        // Stop the CanvasGroup from blocking raycasts so input is no longer ignored.
        faderCanvasGroup.blocksRaycasts = false;
    }
}
脚本的基本逻辑是向外部暴露一个 FadeAndLoadScene() 方法,这个方法负责,切换场景和触发切换场景这个事件。内部需要注意的是,当场景 Fading 的时候通过 faderCanvasGroup.blocksRaycasts = true; 可以不接受鼠标的输入,且在内部加载场景的时候,是异步在后台加载,加载完了再 SetActive 。
另外,注意到在协程 Start 中使用了 SaveData 的实例,在这里是使用它导入这个初始数据,在游戏运行的时候也会由它储存起数据的变化,来看它是如何组成的
using System;
using UnityEngine;
using System.Collections.Generic;

// Instance of this class can be created as assets.
// Each instance contains collections of data from
// the Saver monobehaviours they have been referenced
// by.  Since assets exist outside of the scene, the
// data will persist ready to be reloaded next time
// the scene is loaded.  Note that these assets
// DO NOT persist between loads of a build and can
// therefore NOT be used for saving the gamestate to
// disk.
[CreateAssetMenu]
public class SaveData : ResettableScriptableObject
{
    // This nested class is a lighter replacement for
    // Dictionaries.  This is required because Dictionaries
    // are not serializable.  It has a single generic type
    // that represents the type of data to be stored in it.
    [Serializable]
    public class KeyValuePairLists
    {
        public List<string> keys = new List<string>();      // The keys are unique identifiers for each element of data.
        public List values = new List();              // The values are the elements of data.


        public void Clear ()
        {
            keys.Clear ();
            values.Clear ();
        }


        public void TrySetValue (string key, T value)
        {
            // Find the index of the keys and values based on the given key.
            int index = keys.FindIndex(x => x == key);

            // If the index is positive...
            if (index > -1)
            {
                // ... set the value at that index to the given value.
                values[index] = value;
            }
            else
            {
                // Otherwise add a new key and a new value to the collection.
                keys.Add (key);
                values.Add (value);
            }
        }


        public bool TryGetValue (string key, ref T value)
        {
            // Find the index of the keys and values based on the given key.
            int index = keys.FindIndex(x => x == key);

            // If the index is positive...
            if (index > -1)
            {
                // ... set the reference value to the value at that index and return that the value was found.
                value = values[index];
                return true;
            }

            // Otherwise, return that the value was not found.
            return false;
        }
    }


    // These are collections for various different data types.
    public KeyValuePairLists<bool> boolKeyValuePairLists = new KeyValuePairLists<bool> ();
    public KeyValuePairLists<int> intKeyValuePairLists = new KeyValuePairLists<int>();
    public KeyValuePairLists<string> stringKeyValuePairLists = new KeyValuePairLists<string>();
    public KeyValuePairLists vector3KeyValuePairLists = new KeyValuePairLists();
    public KeyValuePairLists quaternionKeyValuePairLists = new KeyValuePairLists();


    public override void Reset ()
    {
        boolKeyValuePairLists.Clear ();
        intKeyValuePairLists.Clear ();
        stringKeyValuePairLists.Clear ();
        vector3KeyValuePairLists.Clear ();
        quaternionKeyValuePairLists.Clear ();
    }


    // This is the generic version of the Save function which takes a
    // collection and value of the same type and then tries to set a value.
    private void Save(KeyValuePairLists lists, string key, T value)
    {
        lists.TrySetValue(key, value);
    }


    // This is similar to the generic Save function, it tries to get a value.
    private bool Load(KeyValuePairLists lists, string key, ref T value)
    {
        return lists.TryGetValue(key, ref value);
    }


    // This is a public overload for the Save function that specifically
    // chooses the generic type and calls the generic version.
    public void Save (string key, bool value)
    {
        Save(boolKeyValuePairLists, key, value);
    }
    // other version

    // This works the same as the public Save overloads except
    // it calls the generic Load function.
    public bool Load (string key, ref bool value)
    {
        return Load(boolKeyValuePairLists, key, ref value);
    }
    // other version
}
学计算机最重要的一个概念就是抽象,抽象可以帮助将复杂的实现给简化掉,从而形成一个简单直观的模型。 这里我们可以首先将 SaveData 抽象成一组存放对应类型的字典,同时作为 ScriptableObject 它可以直接在 Project 中像其他 asset 一样创建。字典中的 key 为 string 是每个数据的标识符,value 是该数据的对应类型的值。接着对 Saver 进行抽象,Saver 就像一个 SaveData 的保管者,它本身是一个抽象类,它只负责做一些每种数据保管都需要做的事,比如说在
Awake()回调方法里在内存中找到 SceneController 的引用,在OnEnable(),OnDisable()回调方法中对 SceneController 中的BeforeSceneUnload,AfterSceneLoad事件进行监听与注销。Saver 只是数据保管者的一道门槛或者说必备技能,要当一个专业的保管者还需要在这基础上派生出更加专业的技能,比如角度,位置,硬币等道具的保管。所以,点开 Market 场景你可以看到一个名为 Saver 的 GameObject,里面就是所有具体的 Saver ,他们都监听了场景转换的事件,并且引用了各自特定的 SaveData 。注意,所有的交互对象的状态变化都是由对应 Reaction 来触发的,Saver 只负责在场景转换的时候,把该场景变化储存到 SaveData 中,并且从下一个场景的 SaveData 加载到下一个场景小结:
- SaveData :需要记录的信息的载体(ScriptableObject 形式)
- Saver : 负责场景间切换时,保存当前场景的 SaveData,加载下一场景的 SaveData
- SceneController : 控制场景切换

Creating a system to load scenes while preserving game state
•Scene Manager
•ScriptableObjects as temporary runtime data storage
•Delegates
•Lambda Expressions