命令模式-headfirst例子改进
分析命令模式
引入情景分析
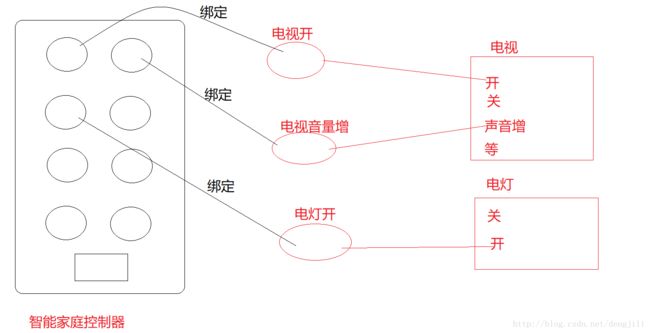
现在我们有很多智能家居,他们都由同一个控制器控制,比如,能控制点灯,窗帘,电视等

每一个按钮(相当于命令)都对应一个电器的功能,列如点灯的开,电视的关等,如下

但是控制器1按钮,对应功能不一定是电视开功能,也可能是电灯开功能,或者其他,也就是说,我们的控制器按钮,可以绑定任意的具体电器功能,(这也是我们在设计模式中所追求的),所有我们修改一下设计,定义统一接口,以便控制器能够自由更换绑定功能

开启第一个例子
我们为智能家庭控制器的第一个控制,给电视的开功能
原始电视功能
package headfirst.hd.command;

//原始电视类
public class TV {

    public void open() {
        System.out.println("打开电视");
    }

    public void off() {
        System.out.println("关闭电视");
    }

    public void increaseVolume() {
        System.out.println("减小音量");
    }

    public void reduceVolume() {
        System.out.println("增大音量");
    }

}
定义统一接口
package headfirst.hd.command;

public interface Command {
    void execute();
}
封装电视开功能
package headfirst.hd.command;
//通过适配器方式,适配出一个开功能
public class TvOpen implements Command {

    TV tv;

    public TvOpen(TV tv) {
        this.tv = tv;
    }

    @Override
    public void execute() {
        tv.open();
    }

}
适配模式参考:http://blog.csdn.net/dengjili/article/details/79485034
智能家庭控制器,这里简单化,只实现一个按钮的功能
package headfirst.hd.command;

//智能家庭控制器
public class HomeRemoteControl {
    //一个按钮,多个按钮可定义为数组
    Command command;

    // 将按钮与功能绑定
    public void setCommand(Command command) {
        this.command = command;
    }

    // 按功能键
    public void pressButton() {
        command.execute();
    }
}
测试类
package headfirst.hd.command;

public class DriveTest {

    public static void main(String[] args) {
        //智能家庭控制器
        HomeRemoteControl control = new HomeRemoteControl();
        TV tv = new TV();
        //通过适配器方式,适配出一个电视开功能
        TvOpen tvOpen = new TvOpen(tv);
        //绑定电视开功能
        control.setCommand(tvOpen);
        //按键
        control.pressButton();
    }

}
开启第二个例子
将第一个功能更换为电视关功能
适配电视关功能
package headfirst.hd.command;

//通过适配器方式,适配出一个开功能
public class TvOff implements Command {

    TV tv;

    public TvOff(TV tv) {
        this.tv = tv;
    }

    @Override
    public void execute() {
        tv.off();
    }

}
重写绑定新功能
package headfirst.hd.command;

public class DriveTest {

    public static void main(String[] args) {
        //智能家庭控制器
        HomeRemoteControl control = new HomeRemoteControl();
        TV tv = new TV();
        //通过适配器方式,适配出一个电视开功能
        TvOpen tvOpen = new TvOpen(tv);
        //绑定电视开功能
        control.setCommand(tvOpen);
        //按键
        control.pressButton();
        //通过适配器方式,适配出一个电视开功能
        TvOff tvOff = new TvOff(tv);
        //绑定电视开功能
        control.setCommand(tvOff);
        //按键
        control.pressButton();
    }
}
对应的设计图
上述代码的改进
当没有绑定具体的功能时候,调用代码,报空指针异常
package headfirst.hd.command;

public class DriveTest {

    public static void main(String[] args) {
        //智能家庭控制器
        HomeRemoteControl control = new HomeRemoteControl();
        //按键
        control.pressButton();
    }
}
通常逻辑,判空。但不是最好的方式
package headfirst.hd.command;

//智能家庭控制器
public class HomeRemoteControl {
    //一个按钮,多个按钮可定义为数组
    Command command;

    // 将按钮与功能绑定
    public void setCommand(Command command) {
        this.command = command;
    }

    // 按功能键
    public void pressButton() {
        if (command != null) {
            command.execute();
        }
    }
}
更优秀的方式,NoCommand对象
NoCommand
package headfirst.hd.command;

//NoCommand对象,什么都不做,通常用于初始化
public class NoCommand implements Command {

    @Override
    public void execute() {
    }

}
package headfirst.hd.command;

//智能家庭控制器
public class HomeRemoteControl {
    //一个按钮,多个按钮可定义为数组
    Command command = new NoCommand();

    // 将按钮与功能绑定
    public void setCommand(Command command) {
        this.command = command;
    }

    // 按功能键
    public void pressButton() {
        //不用判空
        command.execute();
    }
}
NoCommand对象是一个空对象(null object)的例子。当你不想返回一个有意义的对象时,空对象就很有用。客户也可以将处理null的责任转移给空对象。举例来说,遥控器不可能出厂就设计了有意义的命令对象,所以提高了NoCommand对象作为代替品,当调用它的execute()方法时,这种对象什么事情都不做。
定义命令模式
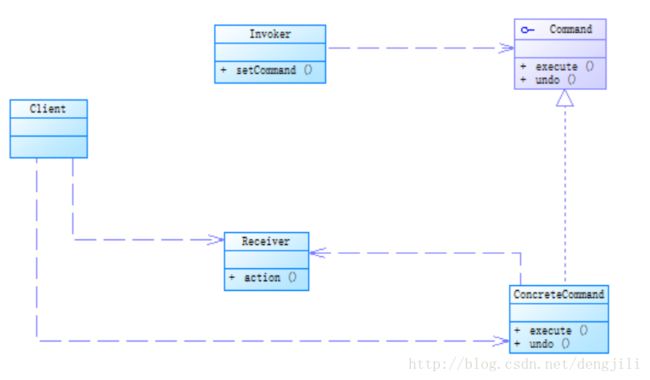
对应的设计图
1) 命令角色(Command):声明执行操作的接口。有java接口或者抽象类来实现。
2) 具体命令角色(Concrete Command):将一个接收者对象绑定于一个动作;调用接收者相应的操作,以实现命令角色声明的执行操作的接口。
3) 客户角色(Client):创建一个具体命令对象(并可以设定它的接收者)。
4) 请求者角色(Invoker):调用命令对象执行这个请求。
5) 接收者角色(Receiver):知道如何实施与执行一个请求相关的操作。任何类都可能作为一个接收者。
继续完成上面的例子,加上命令模式思想
重要代码
洗衣机
package headfirst.hd.command;

public class Washing {

    public void putWater() {
        System.out.println("洗衣机加水");
    }

    public void turn() {
        System.out.println("洗衣机转动,开始洗衣服");
    }

    public void dry() {
        System.out.println("洗衣机甩干");
    }

    public void stop() {
        System.out.println("停止");
    }

}
洗衣机开功能
package headfirst.hd.command;

//通过适配器方式,适配出一个开功能
public class WashingOn implements Command {

    Washing washing;

    public WashingOn(Washing washing) {
        this.washing = washing;
    }

    @Override //智能洗衣机
    public void execute() {
        washing.putWater();
        washing.turn();
        washing.dry();
        washing.stop();
    }

}
洗衣机关功能
package headfirst.hd.command;

//通过适配器方式,适配出一个关功能
public class WashingOff implements Command {

    Washing washing;

    public WashingOff(Washing washing) {
        this.washing = washing;
    }

    @Override
    public void execute() {
        washing.stop();
    }

}
智能家庭控制器,这里实现八个按钮的功能
package headfirst.hd.command;

//智能家庭控制器
public class HomeRemoteControl {
    //8个按钮
    Command[] commands;

    public HomeRemoteControl() {
        commands = new Command[8];

        Command noCommand = new NoCommand();
        for (int i = 0; i < commands.length; i++) {
            commands[i] = noCommand;
        }
    }

    // 将按钮与功能绑定
    public void setCommand(int index, Command command) {
        this.commands[index] = command;
    }

    // 按功能键
    public void pressButton(int index) {
        this.commands[index].execute();
    }

    @Override
    public String toString() {
        StringBuffer sb = new StringBuffer();
        sb.append("\n-------------远程控制-----------\n");
        for (int i = 0; i < commands.length; i++) {
            Command command = commands[i];
            sb.append("命令["+i+"],").append(command.getClass().getName()).append("\n");
        }

        return sb.toString();
    }
}
测试类
package headfirst.hd.command;

public class DriveTest {

    public static void main(String[] args) {
        //智能家庭控制器
        HomeRemoteControl control = new HomeRemoteControl();
        System.out.println(control);

        //电器
        Light light = new Light();
        TV tv = new TV();
        Washing washing = new Washing();

        //功能适配
        LightOn lightOn = new LightOn(light);
        LightOff lightOff = new LightOff(light);
        TvOpen tvOpen = new TvOpen(tv);
        TvOff tvOff = new TvOff(tv);
        TvIncrease tvIncrease = new TvIncrease(tv);
        TvReduce tvReduce = new TvReduce(tv);
        WashingOn washingOn = new WashingOn(washing);
        WashingOff washingOff = new WashingOff(washing);

        //绑定
        control.setCommand(0, lightOn);
        control.setCommand(1, lightOff);
        control.setCommand(2, tvOpen);
        control.setCommand(3, tvOff);
        control.setCommand(4, tvIncrease);
        control.setCommand(5, tvReduce);
        control.setCommand(6, washingOn);
        control.setCommand(7, washingOff);
        System.out.println(control);

        //开个电视
        control.pressButton(2);
        //洗个衣服
        control.pressButton(6);
    }
}
测试结果
-------------远程控制-----------
命令[0],headfirst.hd.command.NoCommand
命令[1],headfirst.hd.command.NoCommand
命令[2],headfirst.hd.command.NoCommand
命令[3],headfirst.hd.command.NoCommand
命令[4],headfirst.hd.command.NoCommand
命令[5],headfirst.hd.command.NoCommand
命令[6],headfirst.hd.command.NoCommand
命令[7],headfirst.hd.command.NoCommand


-------------远程控制-----------
命令[0],headfirst.hd.command.LightOn
命令[1],headfirst.hd.command.LightOff
命令[2],headfirst.hd.command.TvOpen
命令[3],headfirst.hd.command.TvOff
命令[4],headfirst.hd.command.TvIncrease
命令[5],headfirst.hd.command.TvReduce
命令[6],headfirst.hd.command.WashingOn
命令[7],headfirst.hd.command.WashingOff

打开电视
洗衣机加水
洗衣机转动,开始洗衣服
洗衣机甩干
停止
组合命令使用
将多个功能绑定在一个按钮上,比如当我们按下一个按钮时候,我们需要将电视打开,增加音量,然后将点灯关闭
组合命令CompositeComand
package headfirst.hd.command;

//组合命令
public class CompositeComand implements Command {

    Command[] commands;

    public CompositeComand(Command[] commands) {
        this.commands = commands;
    }

    @Override
    public void execute() {
        for (Command command : commands) {
            command.execute();
        }
    }


}
测试类
package headfirst.hd.command;

public class DriveTest {

    public static void main(String[] args) {
        //智能家庭控制器
        HomeRemoteControl control = new HomeRemoteControl();

        //电器
        Light light = new Light();
        TV tv = new TV();

        //功能适配
        TvOpen tvOpen = new TvOpen(tv);
        TvIncrease tvIncrease = new TvIncrease(tv);
        LightOff lightOff = new LightOff(light);

        //多功能绑定
        Command[] commands = new Command[]{tvOpen, tvIncrease, lightOff};
        CompositeComand compositeComand = new CompositeComand(commands);

        //绑定
        control.setCommand(0, compositeComand);
        System.out.println(control);

        //一键将电视打开,增加音量,然后将点灯关闭
        control.pressButton(0);
    }
}
测试结果
-------------远程控制-----------
命令[0],headfirst.hd.command.CompositeComand
命令[1],headfirst.hd.command.NoCommand
命令[2],headfirst.hd.command.NoCommand
命令[3],headfirst.hd.command.NoCommand
命令[4],headfirst.hd.command.NoCommand
命令[5],headfirst.hd.command.NoCommand
命令[6],headfirst.hd.command.NoCommand
命令[7],headfirst.hd.command.NoCommand

打开电视
减小音量
关闭点灯
命令模式undo,redo讲解:http://blog.csdn.net/dengjili/article/details/79533521
应用,队列请求列子:
http://blog.csdn.net/dengjili/article/details/79546480


