来自一个编程都不懂的小白深度学习逆袭之路,关于Keras图像分类,轻量级MobileNetv1网络结构,训练预测和测试
来自一个编程都不懂的小白深度学习逆袭之路,关于Keras图像分类,轻量级MobileNetv1网络结构,训练预测和测试
当自己的电脑配置不这么好时,想快速实现代码,想试试调每个超参对网络带来怎么样的loss,acc改变可以采用MobileNet网络。优势在于快,轻便。同样的数据集训练,Mobilenet比VGG16快4倍左右!精度只比VGG差了0.2%(本人的测试,论文中比VGG16差了1%)
对于MobileNetv1的理解:
该网络最具代表性的就是深度可分离卷积模块(depthwise separable convolutions)
先来讲讲深度可分离卷积和普通卷积的计算
普通的卷积
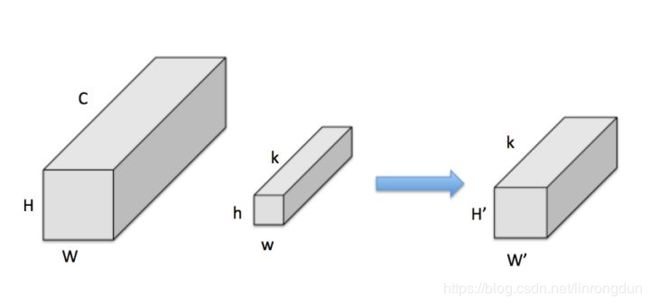
输入特征图尺寸为H * W * C,被尺寸为h * w * k卷积,得到输出特征图为尺寸H’ * H’ * k’。(这里就不解释拉,自觉baidu卷积哈)
普通卷积的计算量为:H * W * C * K 3 3(这里拿33卷积)
深度卷积(depthwise):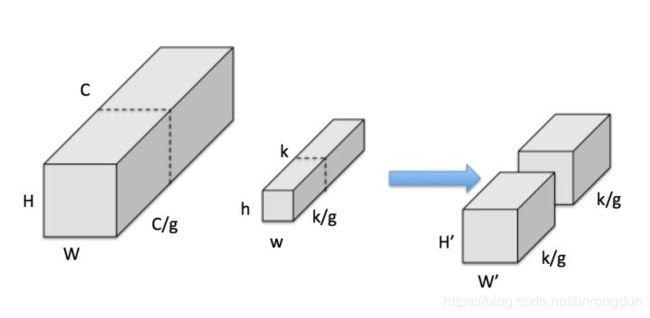
把input feature分为 g组,每组尺寸为H * W (C/g),假设可整除,下同
把kernel也分为g组,每组尺寸为h * w * (k/g)
按顺序,每组input feature和kernel分别做普通卷积,输出 g组H’ * W’ * (k/g)特征,
即一共H’ * W’ * k
Depthwise的计算量为H * W * C 3 * 3
(个人的看图见解)
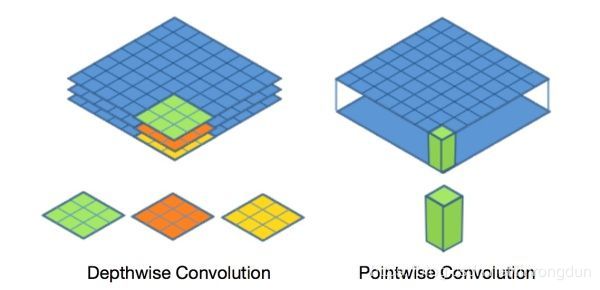
可以想象成输入为66 * 3的RGB图像,我此时需要拿一个同样是RGB的卷积核对他进行卷积,
这里我用4 * 4 * 3(RGB)卷积核对他进行卷积。然后将输入的图像和卷积核的RGB3层图像分离(看下左图)
然后一个对应着一个(RR)(BB)(GG)卷积。
卷积后你会发现你卷积核的通道数(可以理解成上面的RGB的3)取决于你输入图像的通道数,
当你输入进来的图像是灰度图(只有一个通道)那我的卷积核也只能是一个通道数,
这样就不能对图像进行一个比较好的特征提取。
伟大的发明家就想到可以采用一个1 * 1的卷积核对图像进行一个通道数的调整,增加目标的特征(下右图)
在MobileNet中这个11卷积操作名字叫做(Pointwise)命个名可能更加高大上把!
Pointwise计算量为:H * W * C *k
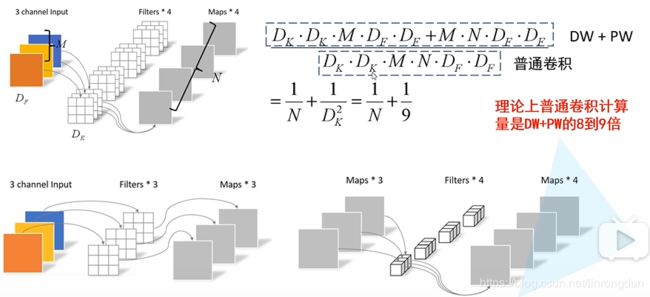
通过Depthwise+Pointwise的拆分,相当于将普通卷积的计算量压缩为:

可以看出,深度可分离卷积比普通卷积的参数量减少了9倍多
举个例子,大家会好理解一点!
当输入为6 X 6 X 3,要求输出为4 X 4 X 256,有两种方法:
第一:直接拿一个33256的卷积核,参数量为6 X 6 X 3 X 3 X 3 X 256=248832(6 X 6 X 3为图像大小,3 X 3 X 256为卷积核大小)
第二:使用深度可分离卷积,为为两步,先用3 * 3卷积然后1 * 1卷积
参数量为6 X 6 X 3 X 3 X 3 + 6 X 6 X 3 X 1 X 1 X 256 = 972+28620=29592
深度可分离卷积结构
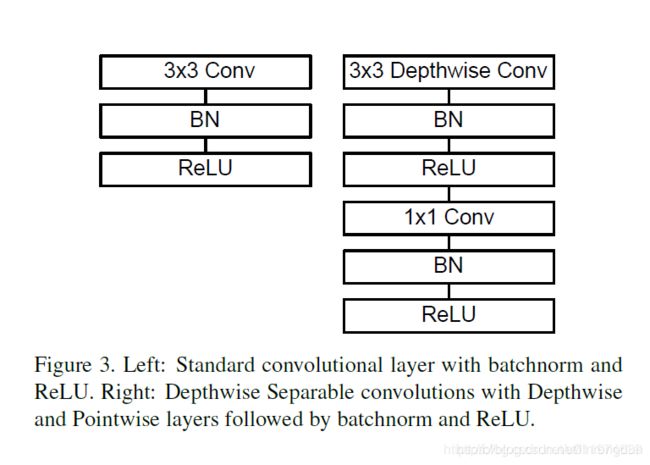
左边是普通的卷积结果,一层3*3的卷积然后跟着Batch Normalization(归一化的作用:防止过拟合)和激活函数(Relu)
右边是深度可分离卷积结构:先是深度卷积对图像进行目标的提取,这里的目标提取不能改变通道数!(输入和输出的通道数一样)后面一样跟着Batch Normalization(归一化的作用:防止过拟合)和激活函数(Relu),拿1*1的卷积核对图像调整通道数!后来还是BN和激活
(这里不明白没用关系,看代码就好了)
注意:如果是需要下采样,则在第一个深度卷积上取步长为2.
MobileNet网络结构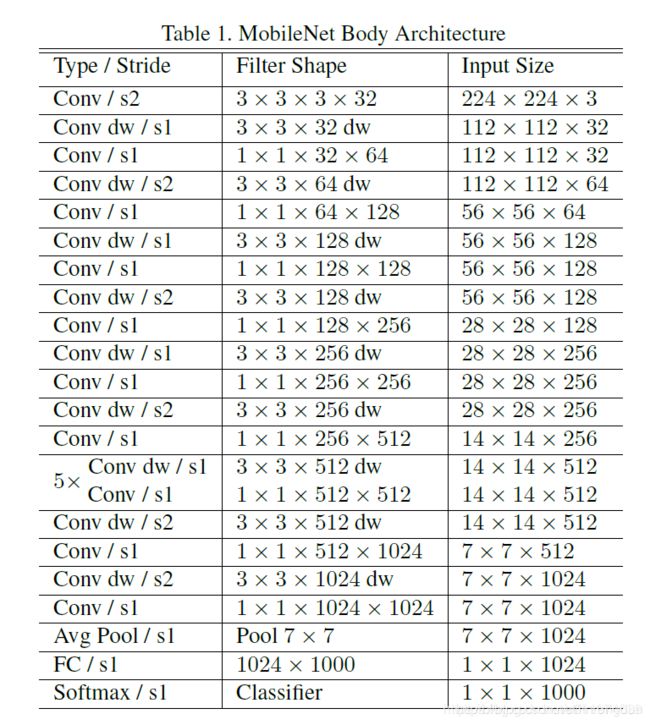
超参数one:Mobilenet v1已经非常小了,但是还可以对所有卷积层统一乘以缩小因子 (其中 )以压缩网络。这样Depthwise+Pointwise总计算量可以进一降低(个人认为作用不太,代码depth_multiplier取值为1就好)
超参数tow:分辨率因子ρρ \rhoρ(resolution multiplier ).用于控制输入和内部层表示。即用分辨率因子控制输入的分辨率。(不太理解,希望大神评论区讲解。)
代码部分
'''
利于了深度可分离卷积,
  正常的卷积核:输入的通道数是16 输出图像需要32,卷积核大小3*3*32  3*3*16*32=4608
  深度可分离卷积核:输入的通道数是16 输出图像需要32,卷积核大小3*3*16和1*1*32
先用3*3*16对输入卷积,由于卷积后的通道数不足,在加上一个1*1*32的卷积增加通道数,3*3*16+16*32*1*1=656
depthwise conv最大的优势!
'''

import warnings
import numpy as np
import os
# os.environ['TF_CPP_MIN_LOG_LEVEL'] = '1'
from keras.preprocessing import image  #数据增强
from keras.models import Model
from keras.layers import DepthwiseConv2D, Input, Activation, Dropout, Reshape, BatchNormalization, \
     GlobalAveragePooling2D, GlobalMaxPooling2D, Conv2D,Dense,Flatten
from keras.applications.imagenet_utils import decode_predictions
from keras import backend as K


# _depthwise_conv_block   深度可分离卷积块

def MobileNet(input_shape=[224, 224, 3],  # 导入图片的大小
              depth_multiplier=1, #有时你需要更小的模型时就需要将输入和输出的计算量都减少,一般会取值1,0.75,0.5,0.25。缩小你的卷积大小和通道
              dropout=1e-3,     #dropout 带多少神经元进行训练
              classes=1000): #分类1000,这个后面可以改的
    img_input = Input(shape=input_shape)  #转换为张量的形式,在tf和keras输入的值都是应该张量的形式
# 一阶的张量[1,2,3]的shape是(3,);一个二阶的张量[[1,2,3],[4,5,6]]的shape是(2,3);一个三阶的张量[[[1],[2],[3]],[[4],[5],[6]]]的shape是(2,3,1)。

    # 224,224,3 -> 112,112,32
    x = _conv_block(img_input, 32, strides=(2, 2))  # 输入 通道数  步数
    # 112,112,32 -> 112,112,64
    x = _depthwise_conv_block(x, 64, depth_multiplier, block_id=1)  # 输入 通道数 depth_multiplier不进行缩小卷积核(计算量), block_id=1

    # 112,112,64 -> 56,56,128
    x = _depthwise_conv_block(x, 128, depth_multiplier,
                              strides=(2, 2), block_id=2)
    # 56,56,128 -> 56,56,128
    x = _depthwise_conv_block(x, 128, depth_multiplier, block_id=3)

    # 56,56,128 -> 28,28,256
    x = _depthwise_conv_block(x, 256, depth_multiplier,
                              strides=(2, 2), block_id=4)
    # 28,28,256 -> 28,28,256
    x = _depthwise_conv_block(x, 256, depth_multiplier, block_id=5)

    # 28,28,256 -> 14,14,512
    x = _depthwise_conv_block(x, 512, depth_multiplier,
                              strides=(2, 2), block_id=6)
    # 14,14,512 -> 14,14,512
    x = _depthwise_conv_block(x, 512, depth_multiplier, block_id=7)
    x = _depthwise_conv_block(x, 512, depth_multiplier, block_id=8)
    x = _depthwise_conv_block(x, 512, depth_multiplier, block_id=9)
    x = _depthwise_conv_block(x, 512, depth_multiplier, block_id=10)
    x = _depthwise_conv_block(x, 512, depth_multiplier, block_id=11)

    # 14,14,512 -> 7,7,1024
    x = _depthwise_conv_block(x, 1024, depth_multiplier,
                              strides=(2, 2), block_id=12)
    x = _depthwise_conv_block(x, 1024, depth_multiplier, block_id=13)

    # 7,7,1024 -> 1,1,1024
    # 7x7x1024
    # 1024
    x = GlobalAveragePooling2D()(x)  # 全局平均池化代替了全连接层,使计算量大大减少了
    x = Reshape((1, 1, 1024), name='reshape_1')(x)#reshape图像变成1*1*1024shape,相当于卷积操作
    x = Dropout(dropout, name='dropout')(x) #防止过拟合
    # 1000
    x = Conv2D(classes, (1, 1), padding='same', name='conv_preds')(x) #用1*1的卷积1000个通道对图像卷积
    x = Activation('softmax', name='act_softmax')(x)#分类,计算每一个的概率
    x = Reshape((classes,), name='reshape_2')(x)#相当于扁平化,输出1000个数值
    inputs = img_input

    model = Model(inputs, x, name='mobilenet_1_0_224_tf') #导出模型,

    return model


def _conv_block(inputs, filters, kernel=(3, 3), strides=(1, 1)):  #输入 通道数 卷积层 步长
    x = Conv2D(filters, kernel,
               padding='same',#假如没有卷积完就对其进行补齐的操作
               use_bias=False, #布尔值,是否使用偏置项
               strides=strides, #步长
               name='conv1')(inputs) #名字和输入
    x = BatchNormalization(name='conv1_bn')(x)  # 标准化
    return Activation(relu6, name='conv1_relu')(x)  # 激活函数


def _depthwise_conv_block(inputs, pointwise_conv_filters,  # 可分离卷积     输入 通道数 缩小卷积的大小 步长
                          depth_multiplier=1, strides=(1, 1), block_id=1):  #block_id层数的意思
    x = DepthwiseConv2D((3, 3),  # 可分离卷积3*3
                        padding='same',
                        depth_multiplier=depth_multiplier,
                        strides=strides,
                        use_bias=False, #布尔值,是否使用偏置项
                        name='conv_dw_%d' % block_id)(inputs)
    x = BatchNormalization(name='conv_dw_%d_bn' % block_id)(x)  # 标准化
    x = Activation(relu6, name='conv_dw_%d_relu' % block_id)(x)  # 激活函数  最大值是6

    x = Conv2D(pointwise_conv_filters, (1, 1),  # 利用1*1的卷积调整通道数
               padding='same',
               use_bias=False,
               strides=(1, 1),
               name='conv_pw_%d' % block_id)(x)
    x = BatchNormalization(name='conv_pw_%d_bn' % block_id)(x)  # 标准化
    return Activation(relu6, name='conv_pw_%d_relu' % block_id)(x)  # 激活函数 最大值是6


def relu6(x):
    return K.relu(x, max_value=6)


def preprocess_input(x):#归一化的操作
    x /= 255.
    x -= 0.5
    x *= 2.
    return x


if __name__ == '__main__':
    model = MobileNet(input_shape=(224, 224, 3))
    # model.summary() #显示网络层数
    img_path = 'E:\pycharm/tensorflow\lianxi\Transfer-Learning-master\MobileNetCatVSdog\data\image/train\hear.5.jpg' #测试图片
    img = image.load_img(img_path, target_size=(224, 224))
    x = image.img_to_array(img)
    x = np.expand_dims(x, axis=0)
    x = preprocess_input(x)
    print('Input image shape:', x.shape)
    preds = model.predict(x)
    print(np.argmax(preds))
    print('Predicted:', decode_predictions(preds, 1))
代码都有非常多的注释,img_path中输入你想测试的照片运行就后就可以得到网络结构和图片的分类了
下面是训练代码
from keras.callbacks import TensorBoard, ModelCheckpoint, ReduceLROnPlateau, EarlyStopping
from keras.utils import np_utils,get_file
from keras.optimizers import Adam
from model.mobileNet import MobileNet
import numpy as np
import utils
import cv2
from keras import backend as K
K.set_image_dim_ordering('tf')
from PIL import Image
BASE_WEIGHT_PATH = ('https://github.com/fchollet/deep-learning-models/'
                    'releases/download/v0.6/')  #导入的mobileNet网址
'''
数据生成器
'''
def generate_arrays_from_file(lines,batch_size):  #lines就是90%用于训练的lines,batch_size就是一次带多少训练的神经元个数
    # 获取总长度
    n = len(lines)  #lines的个数
    i = 0
    while 1:
        X_train = []
        Y_train = []
        # 获取一个batch_size大小的数据
        for b in range(batch_size):
            if i==0:
                np.random.shuffle(lines)  #生成随机列表
            name = lines[i].split(';')[0]  #分号进行分割,前面是他的文件,后面是他的类别
            # 从文件中读取图像
            img = cv2.imread(r"./data/image/train" + '/' + name ) #读取文件
            img = cv2.cvtColor(img,cv2.COLOR_BGR2RGB)#使用函数cv2.cvtColor(input_image ,flag),flag是转换类型
            img = img/255  #归一化
            X_train.append(img)  #加到train的参数里面
            Y_train.append(lines[i].split(';')[1])  #利用分割将标签加入到Y-train里面
            # 读完一个周期后重新开始
            i = (i+1) % n
        # 处理图像
        X_train = utils.resize_image(X_train,(224,224))  #调整图片大小
        X_train = X_train.reshape(-1,224,224,3)  #reshape变成张量的形式,keras和tensorflow都需要将数据变成张量的形式
        Y_train = np_utils.to_categorical(np.array(Y_train),num_classes= 2) #np.array将数字类型转换成什么样的格式,classes分类
        #np_utils.to_categorical是把类别标签转换为onehot编码(categorical就是类别标签的意思,表示现实世界中你分类的各类别), 而onehot编码是一种方便计算机处理的二元编码。
        yield (X_train, Y_train) #输出训练的数据和标签


if __name__ == "__main__":#当.py文件被直接运行时,if __name__ == '__main__'之下的代码块将被运行;
# 当.py文件以模块形式被导入时,if __name__ == '__main__'之下的代码块不被运行。
    # 模型保存的位置
    log_dir = "./logs/"  #保存模型

    # 打开数据集的txt
    with open(r".\data\train.txt","r") as f: #打开数据集txt 读取每一行
        lines = f.readlines() #readlines() 方法用于读取所有行(直到结束符 EOF)并返回列表,该列表可以由 Python 的 for... in ... 结构进行处理。

    # 打乱行,这个txt主要用于帮助读取数据来训练
    # 打乱的数据更有利于训练
    np.random.seed(10101)  #原来每次运行代码时设置相同的seed,则每次生成的随机数也相同,如果不设置seed,则每次生成的随机数都会不一样。
    np.random.shuffle(lines)    #生成随机列表(打乱所有的)
    np.random.seed(None)        #结束

    # 90%用于训练,10%用于估计。
    num_val = int(len(lines)*0.1)  #10%用于预测  int() 函数用于将一个字符串或数字转换为整型。len计算数量和长度
    num_train = len(lines) - num_val  #90%用于训练

    # 建立MobileNet模型
    model = MobileNet(classes=2)   #导入函数MobileNet  并改变分类的个数
    model_name = 'logs/mobilenet_1_0_224_tf_no_top.h5'  #载入权重
    model.load_weights(model_name,by_name=True)  #导入mobilenet81层的权重,by_name=True代表运行,F停止
        #1、keras.models.load_model() 读取网络、权重
        #2、keras.models.load_weights() 仅读取权重

    # 保存的方式,3世代保存一次
    checkpoint_period1 = ModelCheckpoint(   #ModelCheckpoint此函数的作用是将每一轮训练后的模型保存下来。
                                    log_dir + 'ep{epoch:03d}-loss{loss:.3f}-val_loss{val_loss:.3f}.h5', #保存文件路径和文件名
                                    monitor='acc',  #需要监视的值
                                    save_weights_only=False,  #当设置为True时,只保留性能最好的模型
                                    save_best_only=True,  #若设置为True,则只保存模型权重,否则将保存整个模型(包括模型结构,配置信息等)
                                    period=3 #每3个世代就保存一个loss值
                                )
    # 学习率下降的方式,acc三次不下降就下降学习率继续训练
    reduce_lr = ReduceLROnPlateau( #ReduceLROnPlateau:训练过程中的某些测量值对学习率进行动态的下降.
                            monitor='acc', #需要监视的值
                            factor=0.5, #每次学习率下降的大小
                            patience=3,  #每3世代acc值不下降,那就下降学习率
                            verbose=1 #学习率最多下降1
                        )
    # 是否需要早停,当val_loss一直不下降的时候意味着模型基本训练完毕,可以停止
    early_stopping = EarlyStopping(  #EarlyStopping  当被监测的数量不再提升,则停止训练。
                            monitor='val_loss', #需要监视的值
                            min_delta=0, #在被监测的数据中被认为是提升的最小变化, 例如,小于 min_delta 的绝对变化会被认为没有提升。
                            patience=10, #没有进步的训练轮数,在这之后训练就会被停止。
                            verbose=1 # 详细信息模式。
                        )
    trainable_layer = 81
    for i in range(trainable_layer):
        model.layers[i].trainable = False   #trainable(可训练的81)都冻结

    # 交叉熵
    model.compile(loss = 'categorical_crossentropy', #定义交叉熵方式训练model
            optimizer = Adam(lr=1e-3), #定义利用Adam优化器 学习率为1e-3
            metrics = ['accuracy'])#在训练和测试期间的模型评估标准。

    # 一次的训练集大小
    batch_size = 10   #全部层解冻后一次带16张神经元训练
    batch = 200  #后面几层训练时一次性带200神经元训练(当你的数据集小时,能全部带上一起训练效果较好)
    print('Train on {} samples, val on {} samples, with batch size {}.'.format(num_train, num_val, batch))#format基本语法是通过 {} 和 : 来代替以前的 % 。
    print('freeze the first {} layers of total {} layers.'.format(trainable_layer, len(model.layers))) #冷冻前81层共88层。

    # 开始训练
    model.fit_generator(generate_arrays_from_file(lines[:num_train], batch),#generate_arrays_from_file改变图片的shape,将90%的照片按batch数量一次一次排队开始训练!
            steps_per_epoch=max(1, num_train//batch), #数据集的总数/batch数量=样本批次总数
            validation_data=generate_arrays_from_file(lines[num_train:], batch), #结束训练
            validation_steps=max(1, num_val//batch),#数据集的总数/batch数量=样本批次总数
            epochs=5, #训练多少世代
            initial_epoch=0,#从第几世代开始训练
            callbacks=[checkpoint_period1, reduce_lr]) #checkpoint_period1(多少世代保存一次),reduce_lr(学习率的下降)

    model.save_weights(log_dir+'middle_one.h5')  #训练81层后的层数,保存权值
    for i in range(len(model.layers)):
        model.layers[i].trainable = True   #所有层一起训练
    # 交叉熵
    model.compile(loss = 'categorical_crossentropy',#定义交叉熵方式训练model
            optimizer = Adam(lr=1e-4),#定义利用Adam优化器 学习率为1e-4
            metrics = ['accuracy'])#在训练和测试期间的模型评估标准。

    model.fit_generator(generate_arrays_from_file(lines[:num_train], batch_size), #generate_arrays_from_file改变图片的shape
            steps_per_epoch=max(1, num_train//batch_size),
            validation_data=generate_arrays_from_file(lines[num_train:], batch_size),
            validation_steps=max(1, num_val//batch_size),
            epochs=7,   #第几世代停止训练
            initial_epoch=5,  #从第几世代开始训练
            callbacks=[checkpoint_period1, reduce_lr])#checkpoint_period1(多少世代保存一次),reduce_lr(学习率的下降)

    model.save_weights(log_dir+'last_one.h5')   #保存所以层解冻后的权值


#loss 代表准确率  acc代表准确率

'''
fit()函数时,意味着如下两个假设:
全部训练数据可以 完整地 放入到内存(RAM)里
数据已经不需要再进行任何处理了
fit_generator()逐批生成的数据,按批次训练模型。
生成器与模型并行运行,以提高效率。 例如,这可以让你在 CPU 上对图像进行实时数据增强,以在 GPU 上训练模型。
'''
图片处理
import matplotlib.image as mpimg
import numpy as np
import cv2
import tensorflow as tf
from tensorflow.python.ops import array_ops

def load_image(path):
    # 读取图片,rgb
    img = mpimg.imread(path)
    # 将图片修剪成中心的正方形
    short_edge = min(img.shape[:2])
    yy = int((img.shape[0] - short_edge) / 2)
    xx = int((img.shape[1] - short_edge) / 2)
    crop_img = img[yy: yy + short_edge, xx: xx + short_edge]
    return crop_img

def resize_image(image, size):
    with tf.name_scope('resize_image'):  #tf.name_scope 为了解决命名冲突问题,他们的“name”属性上会增加该命名区的区域名,用以区别对象属于哪个区域;)
        images = []
        for i in image:
            i = cv2.resize(i, size) #原始图像大小,转换后的图像大小
            images.append(i)#下一张图像
        images = np.array(images) #转换类型为整数类型
        return images

def print_answer(argmax):
    with open("./data/model/index_word.txt","r",encoding='utf-8') as f: #poen打开文件夹,r只读模式, encoding是编码的意思,在python中,Unicode类型是作为编码的基础类型。
        synset = [l.split(";")[1][:-1] for l in f.readlines()] #readlines()方法读取整个文件所有行,保存在一个列表(list)变量中,每行作为一个元素,但读取大文件会比较占内存。

    print(synset[argmax])
    return synset[argmax]
测试
import numpy as np
import utils
import cv2
from keras import backend as K
from model.mobileNet import MobileNet
import os
K.set_image_dim_ordering('tf')
# img = Image.open(img)
# if __name__ == "__main__":


model = MobileNet(classes = 2)
model.load_weights("logs/last_one.h5")
while True:
    img = input('Input image filename:')
    img = cv2.imread(img) #读取文件
    img = cv2.cvtColor(img,cv2.COLOR_BGR2RGB) #改变文件的类型RGB值
    img = img/255 #归一化
    img = np.expand_dims(img,axis = 0)
    img = utils.resize_image(img,(224,224))
    utils.print_answer(np.argmax(model.predict(img)))    #utils.print_answer读取文件的标签(np.argmax返回最大概率的索引(model.predict为输入样本生成输出预测))
    # try:
    #     image = Image.open(img)
    # except:
    #     print('Open Error! Try again!')
待续哈!
参考了这位优秀的博主
https://blog.csdn.net/u011974639/article/details/79199306