nRF52832 secure DFU移植详细步骤
nRF52832 secure DFU移植详细步骤
一. 测试的平台
参考博文:
https://blog.csdn.net/mygod2008ok/article/details/89715626
https://www.cnblogs.com/iini/p/9314246.html
http://www.sunyouqun.com/2017/05/nordic-dfu-study/?tdsourcetag=s_pcqq_aiomsg
本篇文章主要介绍将DFU功能移植到ble_app_hrs_pca10040_s132工程上。
整个测试平台如下:
环境:win10,64位,MDK集成开发环境.
SDK:nRF5_SDK_15.2
协议栈:s132_nrf52_6.1_softdevice.hex.
Bootloader工程:secure_dfu_ble_s132_pca10040.
DFU参考工程:ble_app_buttonless_dfu_pca10040_s132.
硬件平台:pca10040开发板.
二. Application移植
- 添加相关C文件
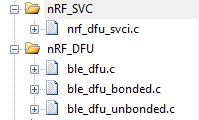
在工程中添加ble_dfu.c、ble_dfu_bonded.c、ble_dfu_unbonded.c、nrf_dfu_svci.c这四个文件
2. 添加头文件
![]()
3. 添加全局变量
在C/C++选项中添加2个NRF_DFU_TRANSPORT_BLE=1和BL_SETTINGS_ACCESS_ONLY宏定义
![]()
4. 加入DFU相关代码(可参考ble_app_buttonless_dfu_pca10040_s132)
(1)在main.c中的services_init函数中添加DFU服务初时化代码
ble_dfu_buttonless_init_t dfus_init = {0};

dfus_init.evt_handler = ble_dfu_evt_handler;

err_code = ble_dfu_buttonless_init(&dfus_init);

APP_ERROR_CHECK(err_code);
(2)在main.c中添加DFU事件处理函数
#include "ble_dfu.h"
#ifdef DFU_SUPPORT
static void advertising_config_get(ble_adv_modes_config_t * p_config)
{
    memset(p_config, 0, sizeof(ble_adv_modes_config_t));

    p_config->ble_adv_fast_enabled  = true;
    p_config->ble_adv_fast_interval = APP_ADV_INTERVAL;
    p_config->ble_adv_fast_timeout  = APP_ADV_DURATION;
}
static void disconnect(uint16_t conn_handle, void * p_context)
{
    UNUSED_PARAMETER(p_context);

    ret_code_t err_code = sd_ble_gap_disconnect(conn_handle, BLE_HCI_REMOTE_USER_TERMINATED_CONNECTION);
    if (err_code != NRF_SUCCESS)
    {
        NRF_LOG_WARNING("Failed to disconnect connection. Connection handle: %d Error: %d", conn_handle, err_code);
    }
    else
    {
        NRF_LOG_DEBUG("Disconnected connection handle %d", conn_handle);
    }
}
// YOUR_JOB: Update this code if you want to do anything given a DFU event (optional).
/**@brief Function for handling dfu events from the Buttonless Secure DFU service
 *
 * @param[in]   event   Event from the Buttonless Secure DFU service.
 */
static void ble_dfu_evt_handler(ble_dfu_buttonless_evt_type_t event)
{
    switch (event)
    {
        case BLE_DFU_EVT_BOOTLOADER_ENTER_PREPARE:
        {
            NRF_LOG_INFO("Device is preparing to enter bootloader mode.");

            // Prevent device from advertising on disconnect.
            ble_adv_modes_config_t config;
            advertising_config_get(&config);
            config.ble_adv_on_disconnect_disabled = true;
            ble_advertising_modes_config_set(&m_advertising, &config);

            // Disconnect all other bonded devices that currently are connected.
            // This is required to receive a service changed indication
            // on bootup after a successful (or aborted) Device Firmware Update.
            uint32_t conn_count = ble_conn_state_for_each_connected(disconnect, NULL);
            NRF_LOG_INFO("Disconnected %d links.", conn_count);
            break;
        }

        case BLE_DFU_EVT_BOOTLOADER_ENTER:
            // YOUR_JOB: Write app-specific unwritten data to FLASH, control finalization of this
            //           by delaying reset by reporting false in app_shutdown_handler
            NRF_LOG_INFO("Device will enter bootloader mode.");
            break;

        case BLE_DFU_EVT_BOOTLOADER_ENTER_FAILED:
            NRF_LOG_ERROR("Request to enter bootloader mode failed asynchroneously.");
            // YOUR_JOB: Take corrective measures to resolve the issue
            //           like calling APP_ERROR_CHECK to reset the device.
            break;

        case BLE_DFU_EVT_RESPONSE_SEND_ERROR:
            NRF_LOG_ERROR("Request to send a response to client failed.");
            // YOUR_JOB: Take corrective measures to resolve the issue
            //           like calling APP_ERROR_CHECK to reset the device.
            APP_ERROR_CHECK(false);
            break;

        default:
            NRF_LOG_ERROR("Unknown event from ble_dfu_buttonless.");
            break;
    }
}
#endif
5. 修改sdk_config.h
使能DFU
#ifndef BLE_DFU_ENABLED
#define BLE_DFU_ENABLED 1
#endif
UUID_COUNT这里添加了一个DFU服务,所以加1;TAB_SIZE添加了200
//  NRF_SDH_BLE_GATTS_ATTR_TAB_SIZE - Attribute Table size in bytes. The size must be a multiple of 4.
#ifndef NRF_SDH_BLE_GATTS_ATTR_TAB_SIZE
#define NRF_SDH_BLE_GATTS_ATTR_TAB_SIZE 1608
#endif

//  NRF_SDH_BLE_VS_UUID_COUNT - The number of vendor-specific UUIDs.
#ifndef NRF_SDH_BLE_VS_UUID_COUNT
#define NRF_SDH_BLE_VS_UUID_COUNT 1
#endif
6. 修改RAM和ROM的设置
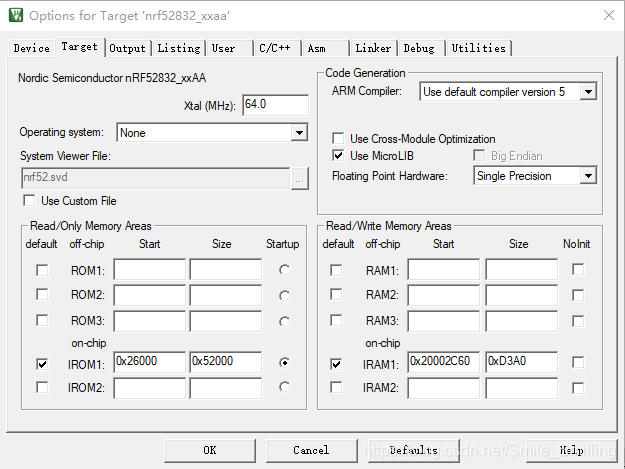
0x26000是协议栈s132_nrf52_6.1.0_softdevice.hex所占的ROM空间大小,即协议栈地址范围是0~0x26000
0x52000是用户程序可用ROM空间的大小
0x20002C60是协议栈s132_nrf52_6.1.0_softdevice.hex所占的RAM空间大小,范围是0x20000000~0x20002C60
0Xd3A0是用户程序可能RAM空间的大小
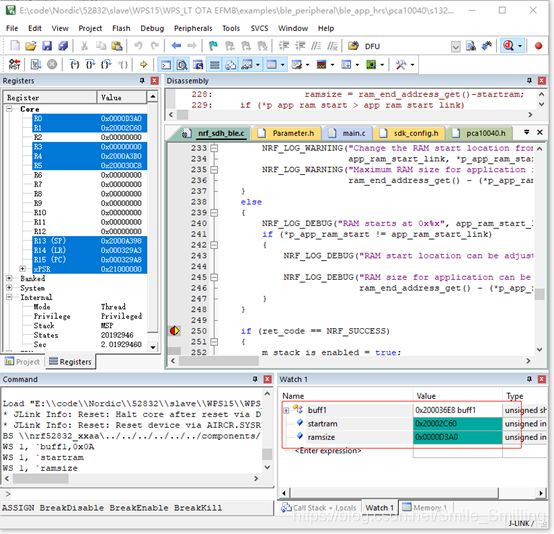
如果不确定协议栈所占RAM的空间大小,可以使用以下方法来确定
7. 在nrf_sdh_ble.c中定义变量startRam,ramSize;然后在nrf_sdh_ble_enable函数中添加2行代码后编译一下
8. 设置断点,仿真运行就能得到startRam,ramSize这两个参数的值了
三. Bootloarder修改
BootLoader工程路径“nRF5_SDK_15.2.0_9412b96\examples\dfu\secure_bootloader\pca10040_ble”
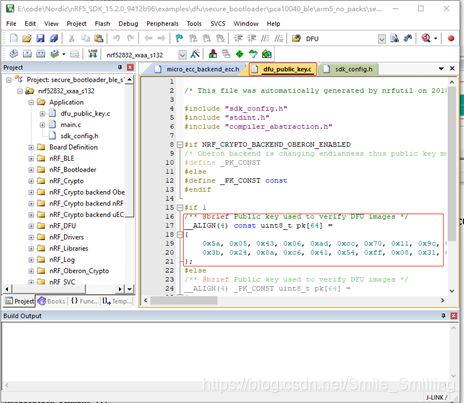
- 添加秘钥
将生成的秘钥添加到dfu_public_key.c文件中
2. 修改sdk_config.h
修改进入DFU的模式, NRF_BL_DFU_ENTER_METHOD_BUTTONLESS 决定是否通过按键进入DFU模式。
四. 在做空中升级过程中可能遇到的问题
BootLoader错误:
- 缺少uECC.h文件.
- 缺少micro_ecc_lib_nrf52.lib文件.
- 出现报错:#error "Debug public key not valid for production. Please see https://github.com/NordicSemiconductor/pc-nrfutil/blob/master/README.md to generate it" .
五. 安装软件工具
安装编译micro-ecc所需的工具,micro-ecc文件路径“nRF5_SDK_15.2.0_9412b96\external\micro-ecc”
(1)gcc-arm-none-eabi-6-2017-q2-update-win32:(keil官方下载,编译工具)
https://developer.arm.com/open-source/gnu-toolchain/gnu-rm/downloads
根据提示安装 6-2017-q2-update版本的 GCC compiler toolchain for ARM
双击安装把路径,安装结束勾选添加到环境变量,如果没有就手动添加。
也可以安装更高级的编译工具链,安装完之后需要修改配置文件“nRF5_SDK_15.2.0_9412b96\components\toolchain\gcc\makefiles.windows”将红色框框修改成自己的路径就可以了 
(2)make工具:(MinGW、GNU Make、Xcode 三选一)build库工具
http://www.mingw.org/download/installer (我选的这个)
选中Basic Setup中的 mingw32-base,和minggw32-gcc-g+
然后点菜单 installation -> Apply Changes
等待安装完成后,如下图:

打开 MinGW 的安装目录,打开 bin 文件夹,将 mingw32-make.exe 复制一个当前目录下,然后重命名为 make.exe
(3)python-2.7.12.amd64.msi(用来安装nrfutil的)
https://www.python.org/downloads/
双击python-2.7.12.amd64.msi安装 ,安装完毕后,把python的路径加入到环境变量中C:\Python27;C:\Python27\Scripts
进入命令行窗口,并到Python路径,输入python -m pip install nrfutil等待安装完成
nrfutil会被安装到C:\Python27\Scripts目录下,可以通过pip install nrfutil==3.5.0去安装指定版本的nrfutil,切记不能用低级的版本,不然在生成秘钥的过程会遇到以下错误“Got unexpected extra argument (private.pem)”
(4)nRFgo Studio
主要提供nrfjprog.exe和mergehex.exe
这两个软件在nRFgo Studio的安装目录下找到
C:\Program Files (x86)\Nordic Semiconductor\nrf5x\bin
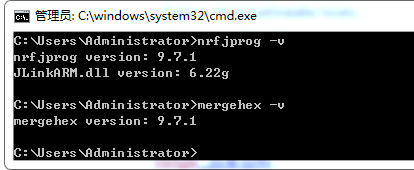
安装之后用cmd输入nrfjprog和mergehex,查看是否安装可用
(5)下载git
因为SDK15的mircro-ecc(椭圆加密算法,安全升级的加密签名算法) 需要的文件通过执行git自动下载的 https://www.git-scm.com/download/
六. 解决问题步骤
1.解决缺少uECC.h文件问题(SDK15比之前版本下载更方便)操作如下:
(1)在..\ nRF5_SDK_15.2.0_9412b96\external\micro-ecc文件夹中双击build_all.bat
就会通过git自动下载mircro-ecc相关的文件。
(2)打开micro-ecc目录可以看见uECC.h
2.解决缺少micro_ecc_lib_nrf52.lib的问题
(1)方法1:双击批处理文件nRF5_SDK_15.2.0_9412b96\external\micro-ecc\build_all.bat即可生成lib文件;
可以修改build_all.bat 最后增加pause指令,方便查看是否build成功,也可以删除不需要的条目。
(2)方法2:打开cmd,进入下面的到路径,nRF5_SDK_15.2.0_9412b96\external\micro-ecc\nrf52_keil\armgcc路径,输入make 生成lib文件。
nrf52hf_keil和nrf52nf_keil区别nrf52hf_keil是硬件浮点数运算,如果编译不行就用 nrf52nf_keil 替换nrf52hf_keil,实际编译设置环境有关。
以上两种方法都是用到了micro-ecc\nrf52_keil\armgcc\makefile
......\dfu\secure_bootloader\pca10040_ble编译过程中会出现报错:
#error "Debug public key not valid for production. Please see https://github.com/NordicSemiconductor/pc-nrfutil/blob/master/README.md to generate it",看报错就知道这是缺少秘钥造成的,这个报错,需要大家添加一个秘钥上去。
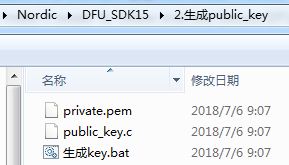
在windows任意目录下,做个BAT文件,输入下面两行命令,双击bat,在当前目录就会生成两个文件,或者按照下面操作步骤:
打开cmd命令行,键入以下指令
nrfutil.exe keys generate private.pem
nrfutil.exe keys display --key pk --format code private.pem --out_file public_key.c
这样生成的秘钥就保存在 public_key.c中,打开public_key.c。把数组pk复制到报错的位置。
以上工作全部做完就可以编译 bootloarder了,输出hex
七. 烧录协议栈、应用层、bootloader(全部写成bat文件了)
(1)先要生成bootloader setting, 这个文件包含了app version ,bootloader version , hw version, 等信息。
nrfutil.exe settings generate --family NRF52 --application nrf52832_xxaa.hex --application-version 3 --bootloader-version 2 --bl-settings-version 1 bootloader_settings.hex(2)合并所有文件,注意自己的hex文件名。
合并BootLoader文件和softdevice文件:
mergehex.exe --merge nrf52832_xxaa_s132.hex 132_nrf52_6.1.0_softdevice.hex --output production_final1.hex合并临时文件和用户程序:
mergehex.exe --merge production_final1.hex nrf52832_xxaa.hex --output production_final2.hex合并临时文件和配置settings 文件:
mergehex.exe --merge production_final2.hex bootloader_settings.hex --output nrf52832_final.hex(3)固件烧录
方法1:
将烧录器和板子还有电脑连接,在命令窗口中输入以下指令
nrfjprog -f NRF52 --eraseall
nrfjprog -f NRF52 --program " nrf52832_final.hex " --verify
nrfjprog -f NRF52 –reset
方法2:
将烧录器和板子还有电脑连接,打开nRFgo Studio
先选择“Erase all”擦除程序,然后选择nrf52832_final.hex直接烧录即可。
这时打开手机app nRF Connect即可看到程序中设置的蓝牙名称的设备了。
(4)生成DFU升级文件。
将nrf52832_xxaa.hex和private.pem复制到同一个目录下
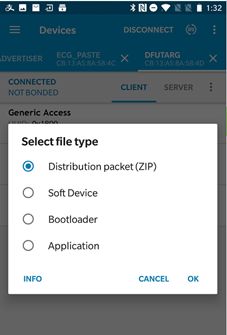
s132_nrf52_6.0.0_softdevice.hex --application SDK15DFUtest.hex --application-version 0xFF --hw-version 52 --sd-req 0xa8 --key-file priv.pem sd132_v3_bl.zip--sd-req 0xaf 协议栈版本,可通过以下指令查询“nrfutil pkg generate --help”
--key-file private.pem “解决编译报错问题 "中生成的秘钥文件 ,给压缩包数字签名用的
(5)制作 bootloader 和 协议栈及应用 升级包(全部升级,一般不用)
命令:
nrfutil pkg generate --bootloader nrf52832_s132_boot.hex --bootloader-version 0xFF --softdevice s132_nrf52_6.0.0_softdevice.hex --application SDK15DFUtest.hex --application-version 0xFF --hw-version 52 --sd-req 0xa8 --key-file priv.pem sd132_v3_bl.zip六. 手机空中升级的实现(nRF Connect工具操作升级)
(1)打开nRF Connect扫描设备
![]()
(2)连接设备
(3)打开DFU服务notify开关。
![]()
![]()
(4)点击notify左边的按钮打开写数据界面,打send发送使设备进入bootloader 模式
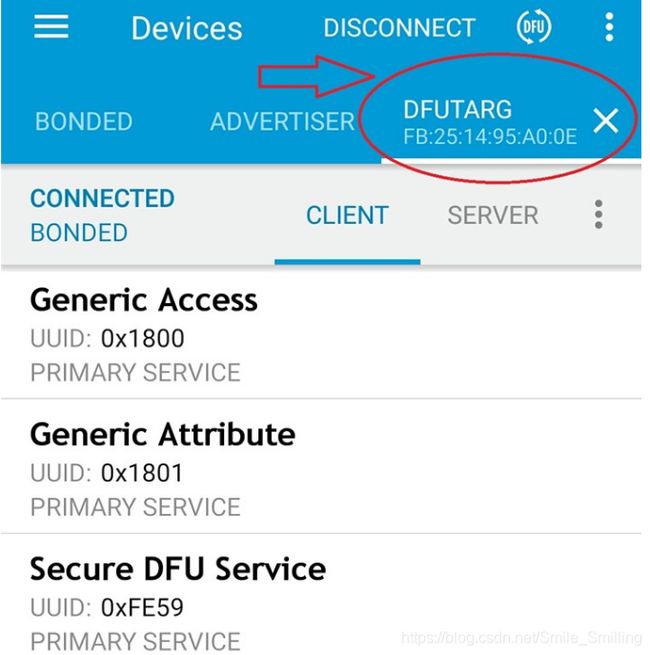
(5)重新扫描
![]()
![]()
(6)连接DfuTarg后打开notify开关
这个名字要改的话,请在bootload中修改
sdk_config文件中 #define NRF_DFU_BLE_ADV_NAME "DfuTarg"
