SpringBoot
文章目录
- 1.了解 SpringBoot
- 1.1.SpringBoot的起步依赖
- 1.2.SpringBoot工程热部署
- 2.SpringBoot原理分析
- 2.1.分析 spring-boot-starter-parent
- 2.2 .分析spring-boot-starter-web
- 2.3.自动配置原理解析
- 小结
- 2.4.SpringBoot配置文件
- 2.5.配置文件与配置类的属性映射方式
- 使用注解@ConfigurationProperties
- 使用注解@Value映射
- 3.一些注解
- @EnableAutoConfiguration
- @SpringBootApplication
- @ConfigurationProperties
- @EnableConfigurationProperties
- 4.整合SpringMVC
- 4.1.添加拦截器
- 4.2.静态资源访问问题
- 4.3.配置 Servlet
- 4.4.整合Filter、Listener
- 5.整合Mybatis
- 5.1.通用mapper
- 5.2.整合事务
- 5.3.整合Spring Data JPA
- 6.整合 Junit 等工具
- 整合 Swagger
- 7.整合 Thymeleaf
- 8.整合Redis
- 9.SpringBoot异步任务
- 9.1.定时任务
- 9.2.发邮件
- 10.安全框架
1.了解 SpringBoot
人们把 Spring Boot称为搭建程序的脚手架。其最主要作用就是帮我们快速的构建庞大的spring项目,并且尽可能的减少一切xml配置,做到开箱即用,迅速上手,让我们关注于业务而非配置。
java一直被人诟病的一点就是臃肿、麻烦。当我们还在辛苦的搭建项目时,可能 Python程序员已经把功能写好了,究其原因主要是两点:
-
复杂的配置
项目各种配置其实是开发时的损耗, 因为在思考 Spring 特性配置和解决业务问题之间需要进行思维切换,所以写配置挤占了写应用程序逻辑的时间。
-
混乱的依赖管理
项目的依赖管理也是件吃力不讨好的事情。决定项目里要用哪些库就已经够让人头痛的了,你还要知道这些库的哪个版本和其他库不会有冲突,这也是件棘手的问题。并且,依赖管理也是一种损耗,添加依赖不是写应用程序代码。一旦选错了依赖的版本,随之而来的不兼容问题毫无疑问会是生产力杀手。
而 SpringBoot 让这一切成为过去!
Spring Boot 主要特征是:
- 创建独立的 spring 应用程序
- 直接内嵌 tomcat、jetty和 undertow(不需要打包成war包部署)
- 提供了固定化的“starter”配置,以简化构建配置
- 尽可能的自动配置spring和第三方库
- 提供产品级的功能,如:安全指标、运行状况监测和外部化配置等
- 绝对不会生成代码,并且不需要XML配置
总之,Spring Boot为所有 Spring 的开发者提供一个开箱即用的、非常快速的、广泛接受的入门体验
更多细节,大家可以到官网查看。
- 起步依赖
起步依赖本质上是一个Maven项目对象模型(Project Object Model,POM),定义了对其他库的传递依赖,这些东西加在一起即支持某项功能。
简单的说,起步依赖就是将具备某种功能的坐标打包到一起,并提供一些默认的功能。
- 自动配置
Spring Boot的自动配置是一个运行时(更准确地说,是应用程序启动时)的过程,考虑了众多因素,才决定Spring配置应该用哪个,不该用哪个。该过程是Spring自动完成的。
1.1.SpringBoot的起步依赖
SpringBoot要求,项目要继承SpringBoot的起步依赖 spring-boot-starter-parent
<parent>
    <groupId>org.springframework.bootgroupId>
    <artifactId>spring-boot-starter-parentartifactId>
    <version>2.0.1.RELEASEversion>
parent>
SpringBoot要集成SpringMVC进行Controller的开发,所以项目要导入web的启动依赖
<dependencies>
    <dependency>
        <groupId>org.springframework.bootgroupId>
        <artifactId>spring-boot-starter-webartifactId>
    dependency>
dependencies>
1.2.SpringBoot工程热部署
我们在开发中反复修改类、页面等资源,每次修改后都是需要重新启动才生效,这样每次启动都很麻烦,浪费了大量的时间,我们可以在修改代码后不重启就能生效,在 pom.xml 中添加如下配置就可以实现这样的功能,我们称之为热部署。
使用 spring 提供的 devtools
<dependency>
    <groupId>org.springframework.bootgroupId>
    <artifactId>spring-boot-devtoolsartifactId>
dependency>
使用 idea 中 JRebel 插件:
打开 idea 设置,在 pllugins 中搜索,会显示两个JRebel 的插件。我们安装 JRebel for Intellij,选中此插件,对话框右边有个绿色的 install plugin 按钮。点击安装即可。 安装完成之后,需要重启 intellij idea。
2.SpringBoot原理分析
2.1.分析 spring-boot-starter-parent
按住Ctrl点击 pom.xml 中的spring-boot-starter-parent,跳转到了它的pom.xml,配置如下(只摘抄了部分重点配置):
<parent>
  <groupId>org.springframework.bootgroupId>
  <artifactId>spring-boot-dependenciesartifactId>
  <version>2.0.1.RELEASEversion>
  <relativePath>../../spring-boot-dependenciesrelativePath>
parent>
按住Ctrl点击pom.xml中的spring-boot-dependencies,跳转到了它的pom.xml,配置如下(只摘抄了部分重点配置):
<properties>
  	<activemq.version>5.15.3activemq.version>
  	<antlr2.version>2.7.7antlr2.version>
  	<appengine-sdk.version>1.9.63appengine-sdk.version>
  	<artemis.version>2.4.0artemis.version>
  	<aspectj.version>1.8.13aspectj.version>
  	<assertj.version>3.9.1assertj.version>
  	<atomikos.version>4.0.6atomikos.version>
  	<bitronix.version>2.1.4bitronix.version>
  	<build-helper-maven-plugin.version>3.0.0build-helper-maven-plugin.version>
  	<byte-buddy.version>1.7.11byte-buddy.version>
  	... ... ...
properties>
<dependencyManagement>
  	<dependencies>
      	<dependency>
        	<groupId>org.springframework.bootgroupId>
        	<artifactId>spring-bootartifactId>
        	<version>2.0.1.RELEASEversion>
      	dependency>
      	<dependency>
        	<groupId>org.springframework.bootgroupId>
        	<artifactId>spring-boot-testartifactId>
        	<version>2.0.1.RELEASEversion>
      	dependency>
      	... ... ...
	dependencies>
dependencyManagement>
<build>
  	<pluginManagement>
    	<plugins>
      		<plugin>
        		<groupId>org.jetbrains.kotlingroupId>
        		<artifactId>kotlin-maven-pluginartifactId>
        		<version>${kotlin.version}version>
      		plugin>
      		<plugin>
        		<groupId>org.jooqgroupId>
        		<artifactId>jooq-codegen-mavenartifactId>
        		<version>${jooq.version}version>
      		plugin>
      		<plugin>
        		<groupId>org.springframework.bootgroupId>
        		<artifactId>spring-boot-maven-pluginartifactId>
        		<version>2.0.1.RELEASEversion>
      		plugin>
          	... ... ...
    	plugins>
  	pluginManagement>
build>
从上面的spring-boot-starter-dependencies的pom.xml中我们可以发现,一部分坐标的版本、依赖管理、插件管理已经定义好,所以我们的SpringBoot工程继承spring-boot-starter-parent后已经具备版本锁定等配置了。所以起步依赖的作用就是进行依赖的传递。
2.2 .分析spring-boot-starter-web
按住Ctrl点击 pom.xml 中的spring-boot-starter-web,跳转到了它的pom.xml,配置如下(只摘抄了部分重点配置):
<project xsi:schemaLocation="http://maven.apache.org/POM/4.0.0 http://maven.apache.org/xsd/maven-4.0.0.xsd" xmlns="http://maven.apache.org/POM/4.0.0"
    xmlns:xsi="http://www.w3.org/2001/XMLSchema-instance">
  	<modelVersion>4.0.0modelVersion>
  	<parent>
    	<groupId>org.springframework.bootgroupId>
    	<artifactId>spring-boot-startersartifactId>
    	<version>2.0.1.RELEASEversion>
  	parent>
  	<groupId>org.springframework.bootgroupId>
  	<artifactId>spring-boot-starter-webartifactId>
  	<version>2.0.1.RELEASEversion>
  	<name>Spring Boot Web Startername>

  	<dependencies>
    	<dependency>
      		<groupId>org.springframework.bootgroupId>
      		<artifactId>spring-boot-starterartifactId>
      		<version>2.0.1.RELEASEversion>
      		<scope>compilescope>
    	dependency>
    	<dependency>
      		<groupId>org.springframework.bootgroupId>
      		<artifactId>spring-boot-starter-jsonartifactId>
      		<version>2.0.1.RELEASEversion>
      		<scope>compilescope>
    	dependency>
    	<dependency>
      		<groupId>org.springframework.bootgroupId>
      		<artifactId>spring-boot-starter-tomcatartifactId>
      		<version>2.0.1.RELEASEversion>
      		<scope>compilescope>
    	dependency>
    	<dependency>
      		<groupId>org.hibernate.validatorgroupId>
      		<artifactId>hibernate-validatorartifactId>
      		<version>6.0.9.Finalversion>
      		<scope>compilescope>
    	dependency>
    	<dependency>
      		<groupId>org.springframeworkgroupId>
      		<artifactId>spring-webartifactId>
      		<version>5.0.5.RELEASEversion>
      		<scope>compilescope>
    	dependency>
    	<dependency>
      		<groupId>org.springframeworkgroupId>
      		<artifactId>spring-webmvcartifactId>
      		<version>5.0.5.RELEASEversion>
      		<scope>compilescope>
    	dependency>
  	dependencies>
project>
从上面的spring-boot-starter-web的 pom.xml 中我们可以发现,spring-boot-starter-web 就是将 web 开发要使用的 spring-web、spring-webmvc 等坐标进行了“打包”,这样我们的工程只要引入 spring-boot-starter-web 起步依赖的坐标就可以进行 web 开发了,同样体现了依赖传递的作用。
2.3.自动配置原理解析
我们知道 @EnableAutoConfiguration会开启 SpringBoot 的自动配置,并且根据你引入的依赖来生效对应的默认配置。
- 这些默认配置是怎么配置的,在哪里配置的呢?
- 为何依赖引入就会触发配置呢?
- 这些默认配置的属性来自哪里呢?
按住 Ctrl 点击查看注解 @EnableAutoConfiguration
@Target(ElementType.TYPE)
@Retention(RetentionPolicy.RUNTIME)
@Documented
@Inherited
@AutoConfigurationPackage
@Import(AutoConfigurationImportSelector.class)
public @interface EnableAutoConfiguration {
	... ... ...
}
其中,@Import(AutoConfigurationImportSelector.class) 导入了AutoConfigurationImportSelector类
按住Ctrl点击查看AutoConfigurationImportSelector源码
public String[] selectImports(AnnotationMetadata annotationMetadata) {
        ... ... ...
        List<String> configurations = getCandidateConfigurations(annotationMetadata,
                                                                   attributes);
        configurations = removeDuplicates(configurations);
        Set<String> exclusions = getExclusions(annotationMetadata, attributes);
        checkExcludedClasses(configurations, exclusions);
        configurations.removeAll(exclusions);
        configurations = filter(configurations, autoConfigurationMetadata);
        fireAutoConfigurationImportEvents(configurations, exclusions);
        return StringUtils.toStringArray(configurations);
}


protected List<String> getCandidateConfigurations(AnnotationMetadata metadata,
			AnnotationAttributes attributes) {
		List<String> configurations = SpringFactoriesLoader.loadFactoryNames(
				getSpringFactoriesLoaderFactoryClass(), getBeanClassLoader());

		return configurations;
}
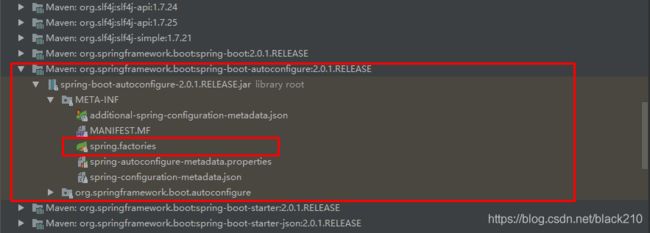
其中,SpringFactoriesLoader.loadFactoryNames 方法的作用就是从META-INF/spring.factories文件中读取指定类对应的类名称列表
spring.factories 文件中有关自动配置的配置信息如下:
... ... ...

org.springframework.boot.autoconfigure.web.reactive.function.client.WebClientAutoConfiguration,\
org.springframework.boot.autoconfigure.web.servlet.DispatcherServletAutoConfiguration,\
org.springframework.boot.autoconfigure.web.servlet.ServletWebServerFactoryAutoConfiguration,\
org.springframework.boot.autoconfigure.web.servlet.error.ErrorMvcAutoConfiguration,\
org.springframework.boot.autoconfigure.web.servlet.HttpEncodingAutoConfiguration,\
org.springframework.boot.autoconfigure.web.servlet.MultipartAutoConfiguration,\

... ... ...
上面配置文件存在大量的以Configuration为结尾的类名称,这些类就是存有自动配置信息的类,而SpringApplication 在获取这些类名后再加载
我们以ServletWebServerFactoryAutoConfiguration为例来分析源码:
@Configuration
@AutoConfigureOrder(Ordered.HIGHEST_PRECEDENCE)
@ConditionalOnClass(ServletRequest.class)
@ConditionalOnWebApplication(type = Type.SERVLET)
@EnableConfigurationProperties(ServerProperties.class)
@Import({ ServletWebServerFactoryAutoConfiguration.BeanPostProcessorsRegistrar.class,
		ServletWebServerFactoryConfiguration.EmbeddedTomcat.class,
		ServletWebServerFactoryConfiguration.EmbeddedJetty.class,
		ServletWebServerFactoryConfiguration.EmbeddedUndertow.class })
public class ServletWebServerFactoryAutoConfiguration {
	... ... ...
}
其中,@EnableConfigurationProperties(ServerProperties.class) 代表加载ServerProperties服务器配置属性类
进入ServerProperties.class源码如下:
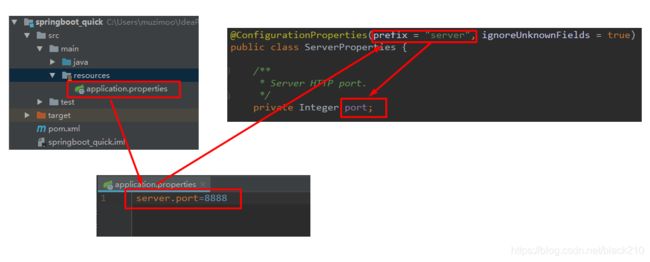
@ConfigurationProperties(prefix = "server", ignoreUnknownFields = true)
public class ServerProperties {

	/**
	 * Server HTTP port.
	 */
	private Integer port;

	/**
	 * Network address to which the server should bind.
	 */
	private InetAddress address;

  	... ... ...

}
其中,prefix = "server"表示SpringBoot配置文件中的前缀,SpringBoot会将配置文件中以server开始的属性映射到该类的字段中。映射关系如下:
小结
简述一下整个流程:
- 最主要的注解就是
@EnableAutoConfiguration,而这个注解会导入一个EnableAutoConfigurationImportSelector的类 - 它会利用
AutoConfigurationImportSelector给容器中导入一些组件。 - 扫描所有 jar 包类路径下
META-INF/spring.factories, - 然后把扫描到的这些文件包装成 Properties 对象。
- 从 properties 中获取到
EnableAutoConfiguration.class类名对应的值,然后把他们添加在容器中。
再简单一点:
- 整个过程就是将类路径下
META-INF/spring.factories里面配置的所有EnableAutoConfiguration的值加入到容器中。 - 每一个这样
XXAutoConfiguration类都是容器中的一个组件都加入到容器中,用他们来做自动配置。 - 如果我们要覆盖这些默认属性,只需要在
application.properties中定义与其前缀 prefix 和字段名一致的属性即可。
拓展类
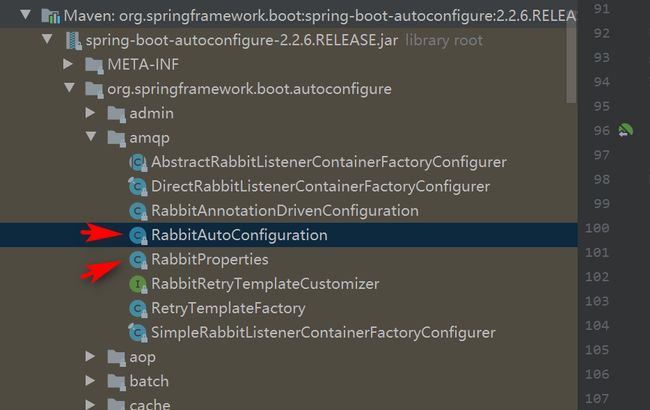
在 Spring 中,有非常多的 xxx Configuration 帮助我们进行拓展配置。
自制 start :
- 编写一个 xxxProperties,自动配置类,封装配置文件的内容
- 定义一个 xxxAutoConfiguration,向容器中自动配置组件
- 在 resources 编写一个自己的 META-INF\spring.factories
- 放入 jar 包中(安装到maven仓库)
2.4.SpringBoot配置文件
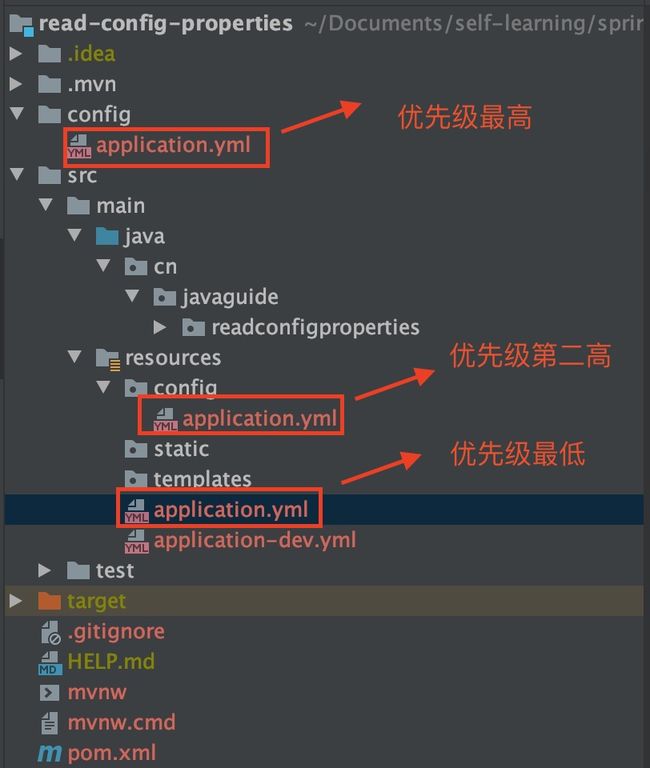
SpringBoot默认会从Resources目录下加载application.properties或application.yml文件
  <resources>
            <resource>
                <filtering>truefiltering>
                <directory>${basedir}/src/main/resourcesdirectory>
                <includes>
                    <include>**/application*.ymlinclude>
                    <include>**/application*.yamlinclude>
                    <include>**/application*.propertiesinclude>
                includes>
            resource>
            <resource>
                <directory>${basedir}/src/main/resourcesdirectory>
                <excludes>
                    <exclude>**/application*.ymlexclude>
                    <exclude>**/application*.yamlexclude>
                    <exclude>**/application*.propertiesexclude>
                excludes>
            resource>
        resources>
其中,application.properties文件是键值对类型的文件。除了properties文件外,SpringBoot还可以使用yml文件进行配置,下面对yml文件进行讲解。
server:
  port: 8087
spring:
  application:
    name: auth-service
eureka:
  client:
    service-url:
      defaultZone: http://127.0.0.1:10086/eureka
    registry-fetch-interval-seconds: 10
  instance:
    lease-renewal-interval-in-seconds: 5 # 每隔5秒发送一次心跳
    lease-expiration-duration-in-seconds: 10 # 10秒不发送就过期
leyou:
  jwt:
    secret: leyou@Login(Auth}*^31)&heiMa% # 登录校验的密钥
    pubKeyPath: C:\\tmp\\rsa\\rsa.pub # 公钥地址
    priKeyPath: C:\\tmp\\rsa\\rsa.pri # 私钥地址
    expire: 30 # 过期时间,单位分钟
    cookieName: LY_TOKEN # token
- 注意:value之前有一个空格
- 在 yml 语法中,相同缩进代表同一个级别
拓展
2.5.配置文件与配置类的属性映射方式
使用注解@ConfigurationProperties
通过注解@ConfigurationProperties(prefix="配置文件中的key的前缀")可以将配置文件中的配置自动与实体进行映射
person:
  name: zhangsan
  age: 18
@Controller
@ConfigurationProperties(prefix = "person")
public class QuickStartController {

    private String name;
    private Integer age;

    @RequestMapping("/quick")
    @ResponseBody
    public String quick(){
        return "springboot 访问成功! name="+name+",age="+age;
    }

    public void setName(String name) {
        this.name = name;
    }

    public void setAge(Integer age) {
        this.age = age;
    }
}
使用注解@Value映射
我们可以通过 @Value 注解将配置文件中的值映射到一个 Spring 管理的Bean的字段上
3.一些注解
@EnableAutoConfiguration
开启自动配置。SpringBoot基于你所添加的依赖和你自己定义的bean,试图去猜测并配置你想要的配置。比如我们引入了spring-boot-starter-web,而这个启动器中帮我们添加了tomcat、SpringMVC的依赖。此时自动配置就知道你是要开发一个web应用,所以就帮你完成了web及SpringMVC的默认配置了!
@SpringBootApplication
我们常使用一个启动类:
@SpringBootApplication
public class LeyouItemServiceApplication {
    public static void main(String[] args) {
        SpringApplication.run(LeyouItemServiceApplication.class);
    }
}
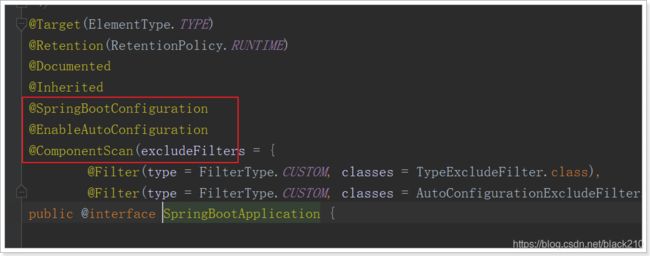
发现 @SpringBootApplication其实是一个组合注解,这里重点的注解有3个:
- @SpringBootConfiguration:在这个注解上面,又有一个
@Configuration注解,作用就是声明当前类是一个配置类 - @EnableAutoConfiguration:开启自动配置
- @ComponentScan:开启注解扫描
@ConfigurationProperties
@ConfigurationProperties(prefix = "jdbc")
public class JdbcProperties {
    private String url;
    private String driverClassName;
    private String username;
    private String password;
    // ... 略
    // getters 和 setters
}
- 在类上通过@ConfigurationProperties 注解声明当前类为属性读取类
prefix="jdbc"读取属性文件中,前缀为 jdbc 的值。
如果一段属性只有一个Bean需要使用,我们无需将其注入到一个类(JdbcProperties)中。而是直接在需要的地方声明即可:
@Configuration
public class JdbcConfiguration {

    @Bean
    // 声明要注入的属性前缀,SpringBoot会自动把相关属性通过set方法注入到DataSource中
    @ConfigurationProperties(prefix = "jdbc")
    public DataSource dataSource() {
        DruidDataSource dataSource = new DruidDataSource();
        return dataSource;
    }
}
- 使用的前提是:该类(DataSource)必须有对应属性的set方法!
我们可以通过
@ConfigurationProperties读取并校验
可以参考
格式不正确,所以程序运行的时候就报错,根本运行不起来,保证了数据类型的安全性。
@EnableConfigurationProperties
@EnableConfigurationProperties注解的作用是:使用 @ConfigurationProperties 注解的类生效。
如果一个配置类只配置@ConfigurationProperties注解,而没有使用@Component,那么在IOC容器中是获取不到properties 配置文件转化的bean。说白了 @EnableConfigurationProperties 相当于把使用 @ConfigurationProperties 的类进行了一次注入。
@Configuration
@EnableConfigurationProperties(JwtProperties.class)
public class LeyouWebMvcConfiguration implements WebMvcConfigurer {
    @Autowired
    private LoginInterceptor loginInterceptor;
    @Autowired
    private JwtProperties jwtProperties;

    @Bean
    public LoginInterceptor loginInterceptor() {
        return new LoginInterceptor(jwtProperties);
    }

    @Override
    public void addInterceptors(InterceptorRegistry registry) {
        registry.addInterceptor(loginInterceptor).addPathPatterns("/**");
    }
}
@Component
@ConfigurationProperties(prefix = "leyou.jwt")
public class JwtProperties {

    private String pubKeyPath;// 公钥

    private PublicKey publicKey; // 公钥

    private String cookieName; //cookie

    private static final Logger logger = LoggerFactory.getLogger(JwtProperties.class);

    /**
     * @PostContruct:在构造方法执行之后执行该方法
     */
    @PostConstruct
    public void init(){
        try {
            // 获取公钥和私钥
            this.publicKey = RsaUtils.getPublicKey(pubKeyPath);

        } catch (Exception e) {
            logger.error("初始化公钥和私钥失败!", e);
            throw new RuntimeException();
        }
    }

}
4.整合SpringMVC
虽然默认配置已经可以使用 SpringMVC 了,不过我们有时候需要进行自定义配置。
设置 yml 文件
# 映射端口
server:
  port: 80
4.1.添加拦截器
通过实现WebMvcConfigurer并添加@Configuration注解来实现自定义部分SpringMvc配置。
首先我们定义一个拦截器:
@Component
public class MyInterceptor implements HandlerInterceptor {
    @Override
    public boolean preHandle(HttpServletRequest request, HttpServletResponse response, Object handler) throws Exception {
        System.out.println("preHandle method is running!");
        return true;
    }

    @Override
    public void postHandle(HttpServletRequest request, HttpServletResponse response, Object handler, ModelAndView modelAndView) throws Exception {
        System.out.println("postHandle method is running!");
    }

    @Override
    public void afterCompletion(HttpServletRequest request, HttpServletResponse response, Object handler, Exception ex) throws Exception {
        System.out.println("afterCompletion method is running!");
    }
}
然后定义配置类,注册拦截器:
@Configuration
public class MvcConfiguration implements WebMvcConfigurer {

    @Autowired
    private HandlerInterceptor myInterceptor;

    /**
     * 重写接口中的addInterceptors方法,添加自定义拦截器
     * @param registry
     */
    @Override
    public void addInterceptors(InterceptorRegistry registry) {
        registry.addInterceptor(myInterceptor)
            					.addPathPatterns("/**")
            					.excludePathPatterns("/css/**","/js/**");
    }
}
使用 excludePathPatterns 设置白名单,允许放行的路径
4.2.静态资源访问问题
- 查看 WebMvcAutoConfiguration 的源码,有一个方法:addResourceHandlers 添加资源处理
@Override
public void addResourceHandlers(ResourceHandlerRegistry registry) {
    if (!this.resourceProperties.isAddMappings()) {
        // 已禁用默认资源处理
        logger.debug("Default resource handling disabled");
        return;
    }
    // 缓存控制
    Duration cachePeriod = this.resourceProperties.getCache().getPeriod();
    CacheControl cacheControl = this.resourceProperties.getCache().getCachecontrol().toHttpCacheControl();
    // webjars 配置
    if (!registry.hasMappingForPattern("/webjars/**")) {
        customizeResourceHandlerRegistration(registry.addResourceHandler("/webjars/**")
                                             .addResourceLocations("classpath:/META-INF/resources/webjars/")
                                             .setCachePeriod(getSeconds(cachePeriod)).setCacheControl(cacheControl));
    }
    // 静态资源配置
    String staticPathPattern = this.mvcProperties.getStaticPathPattern();
    if (!registry.hasMappingForPattern(staticPathPattern)) {
        customizeResourceHandlerRegistration(registry.addResourceHandler(staticPathPattern)
                                             .addResourceLocations(getResourceLocations(this.resourceProperties.getStaticLocations()))
                                             .setCachePeriod(getSeconds(cachePeriod)).setCacheControl(cacheControl));
    }
}
读一下源代码:比如所有的 /webjars/** , 都需要去 classpath:/META-INF/resources/webjars/ 找对应的资源;官网
Webjars 本质就是以 jar 包的方式引入我们的静态资源 , 我们以前要导入一个静态资源文件,直接导入即可。
要使用 jQuery,我们只要要引入jQuery对应版本的pom依赖即可!
<dependency>
    <groupId>org.webjarsgroupId>
    <artifactId>jqueryartifactId>
    <version>3.4.1version>
dependency>
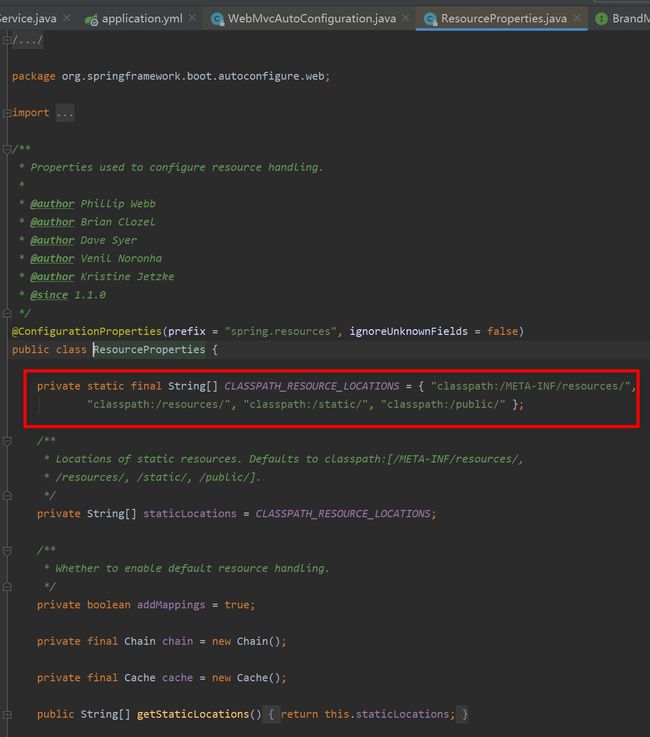
- 再进入 ResourceProperties,发现如下配置:
总结
-
jar 包的 webjars 目录。
localhost:8080/wbjars/ -
resource、 static 、 public 目录。
localhost:8080/优先级:resource > static > public
-
自定义静态资源路径:一旦自己定义了静态文件夹的路径,原来的自动配置就都会失效了!
spring.resources.static-locations=classpath:/coding/,classpath:/kuang/
注意,在 templates 目录下的 html 需要模板导入模板引擎使用;比如往后讲到的 Thymeleaf ,这里先提一下。
4.3.配置 Servlet
虽然现在几乎用不到servlet了,但是学习SpringBoot整合servlet有助于学习的深入了解,更好的理解框架。参考
第一种:推荐
- 写一个类MyFirstServlet继承HttpServlet,并重写doGet方法。
- 在类的上面用 @WebServlet 标识Servlet并指明 name 和 urlPatterns 。
- 在标识有 @SpringBootApplication 的启动类上加上
@ServletComponentScan。
@WebServlet(name="MyFirstServlet",urlPatterns="/myFirst")
public class FirstServlet extends HttpServlet {
    @Override
    protected void doGet(HttpServletRequest req, HttpServletResponse resp) throws ServletException, IOException {
        System.out.println("MyFirstServlet init............");
    }

     @Override
    protected void doPost(HttpServletRequest req, HttpServletResponse resp)
            throws ServletException, IOException {
    this.doGet(req,resp);
}
第二种:
- 创建一个类SecondServlet继承 HttpServlet,并重写 doGet方法。这里就不需要@WebServlet 注解了
- 在 @SpringBootApplication 标识的主类中加 @Bean 的一个方法。
@SpringBootApplication
//@ServletComponentScan //在springBoot启动时会扫描@WebServlet,并将该类实例化
public class ServletApplication {

   public static void main(String[] args) {
      SpringApplication.run(ServletApplication.class, args);
   }

  /**
 * 整合Servlet的第二种方式,创建ServletRegistrationBean并添加路径
 * @return
 */
@Bean
public ServletRegistrationBean getServletRegistrationBean(){
   ServletRegistrationBean bean = new ServletRegistrationBean(new SecondServlet());
   bean.addUrlMappings("/mySecond");
   return bean;
}
4.4.整合Filter、Listener
大致方式相同,讲一下思路吧:
第一种:
- 创建一个MyFirstFilter类实现
Filter接口,并在类上面标注 @WebFilter。 - 在注解中 可以配置要拦截的路径
- 在@SpringBootApplication的主类上加上@ServletComponentScan注解。
第二种:
- 创建一个类MySecondFilter实现Filter接口,重写方法。
- 在@SpringBootApplication标识的主类中加@Bean的一个方法,将MySecondFilter对象注入容器中。
整合Listener
第一种:
- 创建一个类MyFirstListener实现
ServletContextListener接口,重写方法 - 在该类上加上@WebListener注解,
- 在@SpringBootApplication的主类上加上@ServletComponentScan注解。在项目启动的时候,就会执行初始化 servlet,被Listener监听到
第二种:
- 创建一个类MySecondListener实现
ServletContextListener接口,重写方法。 - 在@SpringBootApplication标识的主类中加@Bean的一个方法,将MySecondListener对象注入容器中。
5.整合Mybatis
导入起步依赖
        <dependency>
            <groupId>org.mybatis.spring.bootgroupId>
            <artifactId>mybatis-spring-boot-starterartifactId>
            <version>2.1.2version>
        dependency>

        <dependency>
            <groupId>org.springframework.bootgroupId>
            <artifactId>spring-boot-starter-jdbcartifactId>
        dependency>

        <dependency>
            <groupId>mysqlgroupId>
            <artifactId>mysql-connector-javaartifactId>
        dependency>
设置 yml
server:
  port: 8081
spring:
  application:
    name: item-service
  datasource:
    url: jdbc:mysql://localhost:3306/leyou
    username: root
    password: root
    hikari:
      max-lifetime: 28830000 # 一个连接的生命时长(毫秒),超时而且没被使用则被释放(retired),缺省:30分钟,建议设置比数据库超时时长少30秒,参考MySQL wait_timeout参数(show variables like '%timeout%';)
      maximum-pool-size: 9 # 连接池中允许的最大连接数。缺省值:10;推荐的公式:((core_count * 2) + effective_spindle_count)

mybatis:
  type-aliases-package: com.leyou.item.pojo
  mapper-locations: classpath:mapper/*.xml   # 想用xml写sql,需配置映射路径
xml 方式查表数据时,一般在 resources 目录下 建个目录,放入映射文件,与mapper名字对应。

需要注意,这里没有配置 mapper 接口扫描包,因此我们需要给每一个Mapper接口添加@Mapper注解,才能被识别。
我们选择更简单的方式:使用 @MapperScan,在启动类上配置
@SpringBootApplication
@MapperScan("com.leyou.item.mapper")
public class LeyouItemServiceApplication {
    public static void main(String[] args) {
        SpringApplication.run(LeyouItemServiceApplication.class);
    }
}
创建实体Bean
public class User {
    // 主键
    private Long id;
    // 用户名
    private String username;
    // 密码
    private String password;
    // 姓名
    private String name;

    //此处省略getter和setter方法 .. ..

}
这里提一下,有时候报错:No beans of ‘BrandMapper’ type found;这是因为没有在mapper 上使用 Repository 注解,和在业务层加 servie 差不多意思。
5.1.通用mapper
通用Mapper的作者也为自己的插件编写了启动器,我们直接引入即可:
<dependency>
    <groupId>tk.mybatisgroupId>
    <artifactId>mapper-spring-boot-starterartifactId>
    <version>2.0.2version>
dependency>
定义一个接口,继承 Mapper接口即可使用,举个例子:
public interface BrandMapper extends Mapper<Brand> {//尽量使用#代替$,效率更高

    /**
     * 新增商品分类和品牌中间表数据
     * @param cid
     * @param id
     */
    @Insert("INSERT INTO tb_category_brand(category_id, brand_id) VALUES (#{cid}, #{bid})")
    void insertCategoryAndBrand(@Param("cid") Long cid,@Param("bid") Long id);


    @Select("SELECT * from tb_brand b INNER JOIN tb_category_brand cb on b.id=cb.brand_id where cb.category_id=#{cid}")
    List<Brand> selectBrandsByCid(Long cid);
}
5.2.整合事务
其实,我们引入 jdbc 或者 web 的启动器,就已经引入事务相关的依赖及默认配置了
        <dependency>
            <groupId>org.mybatis.spring.bootgroupId>
            <artifactId>mybatis-spring-boot-starterartifactId>
        dependency>

        <dependency>
            <groupId>tk.mybatisgroupId>
            <artifactId>mapper-spring-boot-starterartifactId>
        dependency>

        <dependency>
            <groupId>com.github.pagehelpergroupId>
            <artifactId>pagehelper-spring-boot-starterartifactId>
        dependency>

        <dependency>
            <groupId>org.springframework.bootgroupId>
            <artifactId>spring-boot-starter-jdbcartifactId>
        dependency>

        <dependency>
            <groupId>mysqlgroupId>
            <artifactId>mysql-connector-javaartifactId>
        dependency>
至于事务,SpringBoot中通过注解来控制。就是我们熟知的@Transactional
    @Transactional  //勿忘添加事务注解
    public void saveBrand(Brand brand, List<Long> cids) {
        //先新增brand
        this.brandMapper.insertSelective(brand);//若未传参,不会像insert方法那样传null,只拼接传递参数,效率更高
        //在新增中间表
        cids.forEach(cid -> {
            this.brandMapper.insertCategoryAndBrand(cid, brand.getId());
        });
- @Transactional 注解可以被应用于接口定义和接口方法、类定义和类的
public方法上。 - 同样的,你也可以在括号内指定相应的属性:如(propagation、readOnly…)
- 失效:当配置在非
public方法上、配置属性错误、数据库引擎不支持事务等情况便会失效
5.3.整合Spring Data JPA
不想使用 Mybatis ,我们也可以选择 整合Spring Data JPA
添加 Spring Data JPA 的起步依赖
<dependency>
    <groupId>org.springframework.bootgroupId>
    <artifactId>spring-boot-starter-data-jpaartifactId>
dependency>

<dependency>
    <groupId>mysqlgroupId>
    <artifactId>mysql-connector-javaartifactId>
dependency>

<dependency>
    <groupId>javax.xml.bindgroupId>
    <artifactId>jaxb-apiartifactId>
    <version>2.3.0version>
dependency>
配置 yml 关于命名策略
spring:
  application:
    name: item-service
  datasource:
    url: jdbc:mysql://localhost:3306/leyou
    username: root
    password: root
  jpa:
    database: MySQL
    show-sql: true
    generate-ddl: true
    hibernate:
      ddl-auto: update  # 第一次建表用create,后面使用update
创建实体配置实体
@Entity
public class User {
    // 主键
    @Id
    @GeneratedValue(strategy = GenerationType.IDENTITY)
    private Long id;
    // 用户名
    private String username;
    // 密码
    private String password;
    // 姓名
    private String name;

    //此处省略setter和getter方法... ...
}
编写 UserRepository
public interface UserRepository extends JpaRepository<User,Long>{
    public List<User> findAll();
}
编写测试类
@RunWith(SpringRunner.class)
@SpringBootTest(classes=MySpringBootApplication.class)
public class JpaTest {

    @Autowired
    private UserRepository userRepository;

    @Test
    public void test(){
        List<User> users = userRepository.findAll();
        System.out.println(users);
    }

}
6.整合 Junit 等工具
添加 Junit 的起步依赖
        <dependency>
            <groupId>org.springframework.bootgroupId>
            <artifactId>spring-boot-starter-testartifactId>
            <scope>testscope>
        dependency>

		<dependency>
            <groupId>org.slf4jgroupId>
            <artifactId>jcl-over-slf4jartifactId>
            <version>1.7.21version>
        dependency>
        <dependency>
            <groupId>org.slf4jgroupId>
            <artifactId>slf4j-log4j12artifactId>
            <version>1.7.21version>
        dependency>
        <dependency>
            <groupId>log4jgroupId>
            <artifactId>log4jartifactId>
            <version>1.2.17version>
        dependency>
    dependencies>
编写测试类
@SpringBootTest
@RunWith(SpringRunner.class)
public class FastDFSTest {

    @Autowired
    private FastFileStorageClient storageClient;

    @Autowired
    private ThumbImageConfig thumbImageConfig;

    @Test
    public void testUploadAndCreateThumb() throws FileNotFoundException {
//        File file = new File("C:\\Users\\joedy\\Pictures\\xbx1.jpg");
        File file = new File("C:\\Users\\ccw\\Desktop\\1524297512647.jpg");
        // 上传并且生成缩略图
        StorePath storePath = this.storageClient.uploadImageAndCrtThumbImage(
                new FileInputStream(file), file.length(), "png", null);
        // 带分组的路径
        System.out.println(storePath.getFullPath());
        // 不带分组的路径
        System.out.println(storePath.getPath());
        // 获取缩略图路径
        String path = thumbImageConfig.getThumbImagePath(storePath.getPath());
        System.out.println(path);
    }
}
其中,
SpringRunner继承自SpringJUnit4ClassRunner,使用哪一个Spring提供的测试测试引擎都可以@SpringBootTest的属性指定的是引导类的字节码对象
@SpringBootTest 说明
- 之前我们使用@ContextConfiguration注解指定
locations属性(配置文件用),或者指定classes属性(注解的类)。如:@ContextConfiguration(locations= {"classpath:bean.xml"}) - 同样的该注解也可以这么使用
@SpringBootTest(classes = MySpringBootApplication.class) - 当没有指定,那么就是
SpringBootContextLoader作为默认的ContextLoader。即引导类
整合 Swagger
官网:https://github.com/OAI/OpenAPI-Specification
- 导入依赖
<dependency>
    <groupId>io.springfoxgroupId>
    <artifactId>springfox-swagger2artifactId>
    <version>2.9.2version>
dependency>


<dependency>
    <groupId>io.springfoxgroupId>
    <artifactId>springfox-swagger-uiartifactId>
    <version>2.9.2version>
dependency>
- 配置 Swagger
@Configuration
@EnableSwagger2
public class SwaggerConfig {
    @Bean
    public Docket api() {
        return new Docket(DocumentationType.SWAGGER_2)
                .host("http://order.leyou.com")
                .apiInfo(apiInfo())
                .select()
                .apis(RequestHandlerSelectors.basePackage("com.black.demo.controller"))
                .paths(PathSelectors.any())
                .build();
    }

    private ApiInfo apiInfo() {
        return new ApiInfoBuilder()
                .title("My Swagger Document")
                .description("测试 ZTree 系统接口文档")
                .version("1.0")
                .build();
    }
}
配置多个分组
编写多个 Docket 实例,每个写上如下组名,注入容器即可
.groupName("GroupOne")
开发、发布环境切换
.enable(false)会使 swagger 失效,达到效果- 在类上使用 @Profile(“dev”) 注解
spring boot允许你通过命名约定按照一定的格式(application-{profile}.properties)来定义多个配置文件,然后通过在application.properyies通过spring.profiles.active来具体激活一个或者多个配置文件,如果没有没有指定任何profile的配置文件的话,spring boot默认会启动application-default.properties。
- 定义文件 application-dev.properties 和 application-prod.properties,
- 在主配置文件 application.properties 中 选择激活哪个,如下
spring.profiles.active=dev
- 接口声明
常用注解说明:
/**
 @Api:修饰整个类,描述Controller的作用
 @ApiOperation:描述一个类的一个方法,或者说一个接口
 @ApiParam:单个参数描述
 @ApiModel:用对象来接收参数
 @ApiProperty:用对象接收参数时,描述对象的一个字段
 @ApiResponse:HTTP响应其中1个描述
 @ApiResponses:HTTP响应整体描述
 @ApiIgnore:使用该注解忽略这个API
 @ApiError :发生错误返回的信息
 @ApiImplicitParam:一个请求参数
 @ApiImplicitParams:多个请求参数
 */
示例:
@RestController
@RequestMapping("order")
@Api("订单服务接口")
public class OrderController {

    @Autowired
    private OrderService orderService;

    @Autowired
    private PayHelper payHelper;

    /**
     * 创建订单
     *
     * @param order 订单对象
     * @return 订单编号
     */
    @PostMapping
    @ApiOperation(value = "创建订单接口,返回订单编号", notes = "创建订单")
    @ApiImplicitParam(name = "order", required = true, value = "订单的json对象,包含订单条目和物流信息")
    public ResponseEntity<Long> createOrder(@RequestBody @Valid Order order) {
        Long id = this.orderService.createOrder(order);
        return new ResponseEntity<>(id, HttpStatus.CREATED);
    }

    /**
     * 根据订单编号查询订单
     *
     * @param id
     * @return
     */
    @GetMapping("{id}")
    @ApiOperation(value = "根据订单编号查询订单,返回订单对象", notes = "查询订单")
    @ApiImplicitParam(name = "id", required = true, value = "订单的编号")
    public ResponseEntity<Order> queryOrderById(@PathVariable("id") Long id) {
        Order order = this.orderService.queryById(id);
        if (order == null) {
            return new ResponseEntity<>(HttpStatus.NOT_FOUND);
        }
        return ResponseEntity.ok(order);
    }

    /**
     * 分页查询当前用户订单
     *
     * @param status 订单状态
     * @return 分页订单数据
     */
    @GetMapping("list")
    @ApiOperation(value = "分页查询当前用户订单,并且可以根据订单状态过滤", notes = "分页查询当前用户订单")
    @ApiImplicitParams({
            @ApiImplicitParam(name = "page", value = "当前页", defaultValue = "1", type = "Integer"),
            @ApiImplicitParam(name = "rows", value = "每页大小", defaultValue = "5", type = "Integer"),
            @ApiImplicitParam(name = "status", value = "订单状态:1未付款,2已付款未发货,3已发货未确认,4已确认未评价,5交易关闭,6交易成功,已评价", type = "Integer"),
    })
    @ApiResponses({
            @ApiResponse(code = 200, message = "订单的分页结果"),
            @ApiResponse(code = 404, message = "没有查询到结果"),
            @ApiResponse(code = 500, message = "查询失败"),
    })
    public ResponseEntity<PageResult<Order>> queryUserOrderList(
            @RequestParam(value = "page", defaultValue = "1") Integer page,
            @RequestParam(value = "rows", defaultValue = "5") Integer rows,
            @RequestParam(value = "status", required = false) Integer status) {
        PageResult<Order> result = this.orderService.queryUserOrderList(page, rows, status);
        if (result == null) {
            return new ResponseEntity<>(HttpStatus.NOT_FOUND);
        }
        return ResponseEntity.ok(result);
    }
}
-
访问测试
启动服务,然后访问:http://localhost:8089/swagger-ui.html
7.整合 Thymeleaf
SpringBoot 并不推荐使用 jsp ,但是支持一些模板引擎技术:
- Freemarker
- Thymeleaf
- Mustache
开始使用
直接引入启动器:
<dependency>
    <groupId>org.springframework.bootgroupId>
    <artifactId>spring-boot-starter-thymeleafartifactId>
dependency>
yml
server:
  port: 8084
spring:
  application:
    name: goods-web
  thymeleaf:
    cache: false
    mode: HTML
Thymelea f会在第一次对模板解析之后进行缓存,极大的提高了并发处理能力。但是这给我们开发带来了不便,修改页面后并不会立刻看到效果,我们开发阶段可以关掉缓存使用。
注意:
在Idea中,我们需要在修改页面后按快捷键:Ctrl + Shift + F9 对项目进行 rebuild 才可以。
编写html模板,渲染模型中的数据:
注意,把html 的名称空间,改成:xmlns:th="http://www.thymeleaf.org" 会有语法提示
<html xmlns:th="http://www.thymeleaf.org">
<head>
    <meta charset="UTF-8">
    <title>首页title>
    <style type="text/css">
        table {border-collapse: collapse; font-size: 14px; width: 80%; margin: auto}
        table, th, td {border: 1px solid darkslategray;padding: 10px}
    style>
head>
<body>
<div style="text-align: center">
    <span style="color: darkslategray; font-size: 30px">欢迎光临!span>
    <hr/>
    <table class="list">
        <tr>
            <th>idth>
            <th>姓名th>
            <th>用户名th>
            <th>年龄th>
            <th>性别th>
            <th>生日th>
        tr>
        <tr th:each="user : ${users}">
            <td th:text="${user.id}">1td>
            <td th:text="${user.name}">张三td>
            <td th:text="${user.userName}">zhangsantd>
            <td th:text="${user.age}">20td>
            <td th:text="${user.sex}">男td>
            <td th:text="${user.birthday}">1980-02-30td>
        tr>
    table>
div>
body>
html>
SpringBoot会自动为 Thymeleaf 注册一个视图解析器:ThymeleafViewResolver
与解析 JSP 的InternalViewResolver类似,Thymeleaf也会根据前缀和后缀来确定模板文件的位置:
- 默认前缀:
classpath:/templates/ - 默认后缀:
.html
所以如果我们返回视图:item,会指向到 classpath:/templates/item.html
一般我们无需进行修改,默认即可。所以我们这样放置静态页面:
@Controller
@RequestMapping("item")
public class GoodsController {
    @Autowired
    private GoodsService goodsService;
    @Autowired
    private GoodsHtmlService goodsHtmlService;
    /**
     * 跳转到商品详情页
     * @param id
     * @param model
     * @return
     */
    @GetMapping("{id}.html")
    public String toItemPage(@PathVariable("id")Long id, Model model){
        Map<String, Object> map = this.goodsService.loadData(id);
        model.addAllAttributes(map);
        this.goodsHtmlService.createHtml(id);
        return "item";
    }
}
8.整合Redis
在程序中可以使用缓存的技术来节省对数据库的开销。Spring Boot对缓存提供了很好的支持,我们几乎不用做过多的配置即可使用各种缓存实现。这里主要介绍平日里个人接触较多的 Redis 缓存实现。
添加redis的起步依赖:
<dependency>
    <groupId>org.springframework.bootgroupId>
    <artifactId>spring-boot-starter-data-redisartifactId>
dependency>
配置 redis 的连接信息,默认端口为 6379:
spring:
  application:
    name: cart-service
  redis:
    host: 192.168.229.130
使用:
RedisTemplate 基本操作
Spring Data Redis 提供了一个工具类:RedisTemplate。里面封装了对于Redis的五种数据结构的各种操作,包括:
redisTemplate.opsForValue():操作字符串redisTemplate.opsForHash():操作hashredisTemplate.opsForList():操作 listredisTemplate.opsForSet():操作 setredisTemplate.opsForZSet():操作 zset
其它一些通用命令,如 expire,可以通过 redisTemplate.xx() 来直接调用
不过 RedisTemplate 默认会采用 JDK 自带的序列化(Serialize)来对对象进行转换。生成的数据十分庞大,因此一般我们都会指定 key 和 value 为 String 类型,这样就由我们自己把对象序列化为 json 字符串来存储即可。
Spring就默认提供了这样一个实现: StringRedisTemplate
StringRedisTemplate
使用了 key 和 value 都为 String 的 RedisTemplate ,便于我们阅读开发
public class StringRedisTemplate extends RedisTemplate<String, String> {

	/**
	 * Constructs a new StringRedisTemplate instance. {@link #setConnectionFactory(RedisConnectionFactory)}
	 * and {@link #afterPropertiesSet()} still need to be called.
	 */
	public StringRedisTemplate() {
		RedisSerializer<String> stringSerializer = new StringRedisSerializer();
		setKeySerializer(stringSerializer);
		setValueSerializer(stringSerializer);
		setHashKeySerializer(stringSerializer);
		setHashValueSerializer(stringSerializer);
	}
}
举例使用:
@Service
public class CartService {
@Autowired
private StringRedisTemplate redisTemplate;
/**
* 查询购物车
* @return
*/
public List<Cart> queryCarts() {
UserInfo userInfo = LoginInterceptor.getUserInfo();
// 判断是否存在购物车
String key = KEY_PREFIX + userInfo.getId();
if(!this.redisTemplate.hasKey(key)){
// 不存在,直接返回
return null;
}
//获取用户的购物车记录
BoundHashOperations<String, Object, Object> hashOperations = this.redisTemplate.boundHashOps(key);
//获取购物车Map中的Cart值
List<Object> cartsJson =hashOperations.values();
// 判断是否有数据
if(CollectionUtils.isEmpty(cartsJson)){
return null;
}
//遍历序列化, 把List
return cartsJson.stream().map(cartJson-> JsonUtils.parse(cartJson.toString(),Cart.class)).collect(Collectors.toList());
}
9.SpringBoot异步任务
什么叫做任务呢?其实就是类中实现了一个什么功能的方法。常见的任务就是异步任务,定时任务,发邮件。
异步任务:其实就是一个很特别的方法,这个方法没有返回值(也可以有返回值,后面会说的),但是方法内部的逻辑会耗费很多时间!例如,用户请求每次到controller,要执行到这个异步方法的时候,我们只需要命令一个空闲状态的线程去执行它即可,由于没有返回值不影响后续代码的运行,controller直接去执行后续的代码。这样可以极为迅速的响应用户,用户体验非常好。
定时任务:这个其实看名字就知道了,你可以选定一个月的哪一天哪个小时的具体时分秒,去执行一个方法。这个方法是自动执行的,极大的减轻了我们的工作量。
发邮件:这个还是比较常见的吧!注册什么的大多都要邮件激活,我们也可以用java程序的方式,来给你邮箱发邮件。
简单说说异步任务和 RabbitMQ
异步任务和 RabbitMQ 最大的区别应该是访问量的差异;可以将异步任务看作是简化版RabbitMQ 。
那假如是异步任务:还是用订单/库存系统举例,几千人都在买买买,一时间几千个订单请求到controller,然后调用service(注:service还是跟上面一样要几十秒),一到service,判断是个异步方法,于是赶紧让处理异步任务的线程过来慢慢处理就好,controller可以直接响应用户“订单成功”。用户极短时间就收到响应,于是可以继续买买买。
这里就要说个东西,那个处理异步方法的线程哪里来的啊?其实是从异步方法线程池里拿的。大家应该知道连接池啊,是处理与数据库连接问题的,还能设置个数,最大超时时间等等,还能防止频繁的销毁创建线程的资源消耗。这里的线程池也差不多,可以设置个数啊什么的。。。。后面我们就会试试简单的配置一个连接池专门处理异步任务。
自定义异步任务的线程池
以下内容参考自
其实也是可以用多线程来做的,只是每次都用多线程比较麻烦,不过小伙伴们可以试试。线程池就相当于包装了一下多线程的操作,做了很多配置!就类似 ArrayList 和 Object 数组的关系。
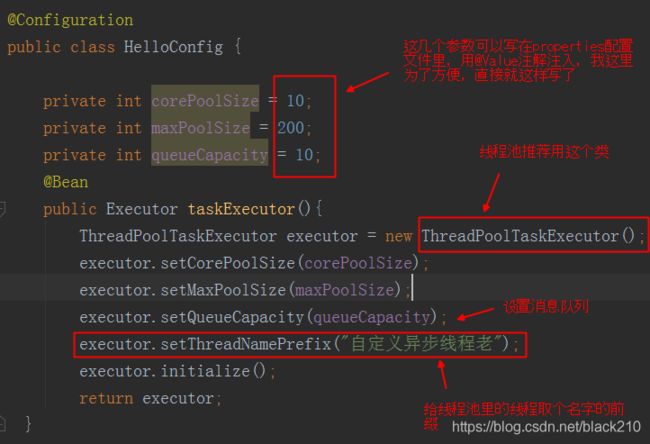
使用注解 @Async(“自己配置的线程池的名字”),这里可以指定配置的哪个线程池,可以自己试试,我们这里要写应该是 taskExecutor)
给异步方法设置返回值
前面说的都是异步方法返回值为 void 的情况,但是有的时候我们要拿到异步方法的返回值。
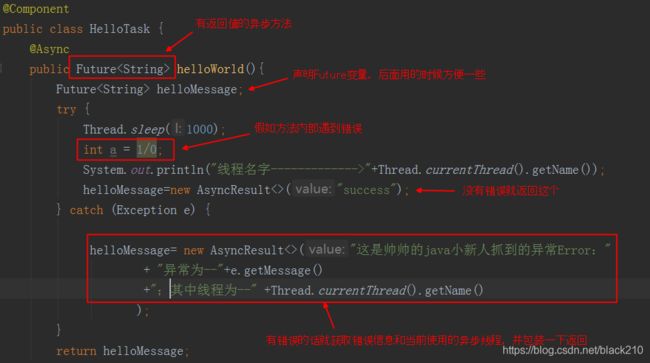
举个例子,当请求到controller,线程就会去执行controller方法,碰到了要执行一个异步方法,于是异步方法立马返回一个 Future 对象敷衍 controller 一下(假如子线程还没处理完,那此时的Future里面是空的,主线程自然会阻塞,先立马给你返回空的Future对象,此时主线程一边继续往下执行,一边等子线程传数据过来;如果子线程执行完成了,会立马返回值),然后继续执行controller后面的方法
这个Future就是异步方法的返回值,只是刚开始还没有数据,等异步方法执行完毕,自动的就会将数据放入Future,比较常见的是利用Future来捕获异常。
其中,Future是个接口,实现类是AsyncResult,下面就看看修改后的 controller:
再看看异步方法内部代码:
9.1.定时任务
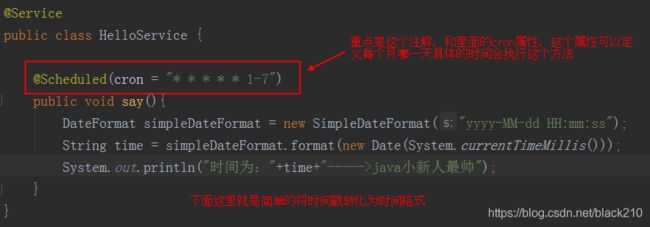
定时任务可以设置精确到秒的准确时间去自动执行方法。
使用 @Scheduled 注解
然后,在主配置类上开启如下注解:
@SpringBootApplication
@EnableAsync
@EnableScheduling
public class AsyncAplication{
}
9.2.发邮件
引入依赖 参考博客
<dependency>
   <groupId>org.springframework.bootgroupId>
   <artifactId>spring-boot-starter-mailartifactId>
dependency>

<dependency>
   <groupId>org.springframework.bootgroupId>
   <artifactId>spring-boot-starter-thymeleafartifactId>
dependency>

<dependency>
   <groupId>org.springframework.bootgroupId>
   <artifactId>spring-boot-starter-webartifactId>
dependency>

<dependency>
   <groupId>org.projectlombokgroupId>
   <artifactId>lombokartifactId>
dependency>
配置文件
spring:
  mail:
    host: stmp.qq.com
    username: [email protected]
    password: xxx # 注意这里不是邮箱密码,而是SMTP授权密码
    protocol: smtp
    default-encoding: utf-8
MailService.java
@Service
public class MailService {

    private final Logger logger = LoggerFactory.getLogger(this.getClass());

    @Value("${spring.mail.username}")
    private String from;

    @Autowired
    private JavaMailSender mailSender;

    /**
     * 简单文本邮件
     * @param to 接收者邮件
     * @param subject 邮件主题
     * @param contnet 邮件内容
     */
    public void sendSimpleMail(String to, String subject, String contnet){

        SimpleMailMessage message = new SimpleMailMessage();
        message.setTo(to);
        message.setSubject(subject);
        message.setText(contnet);
        message.setFrom(from);

        mailSender.send(message);
    }

    /**
     * HTML 文本邮件
     * @param to 接收者邮件
     * @param subject 邮件主题
     * @param contnet HTML内容
     * @throws MessagingException
     */
    public void sendHtmlMail(String to, String subject, String contnet) throws MessagingException {
        MimeMessage message = mailSender.createMimeMessage();

        MimeMessageHelper helper = new MimeMessageHelper(message, true);
        helper.setTo(to);
        helper.setSubject(subject);
        helper.setText(contnet, true);
        helper.setFrom(from);

        mailSender.send(message);
    }

    /**
     * 附件邮件
     * @param to 接收者邮件
     * @param subject 邮件主题
     * @param contnet HTML内容
     * @param filePath 附件路径
     * @throws MessagingException
     */
    public void sendAttachmentsMail(String to, String subject, String contnet,
                                    String filePath) throws MessagingException {
        MimeMessage message = mailSender.createMimeMessage();

        MimeMessageHelper helper = new MimeMessageHelper(message, true);
        helper.setTo(to);
        helper.setSubject(subject);
        helper.setText(contnet, true);
        helper.setFrom(from);

        FileSystemResource file = new FileSystemResource(new File(filePath));
        String fileName = file.getFilename();
        helper.addAttachment(fileName, file);

        mailSender.send(message);
    }

    /**
     * 图片邮件
     * @param to 接收者邮件
     * @param subject 邮件主题
     * @param contnet HTML内容
     * @param rscPath 图片路径
     * @param rscId 图片ID
     * @throws MessagingException
     */
    public void sendInlinkResourceMail(String to, String subject, String contnet,
                                       String rscPath, String rscId) {
        logger.info("发送静态邮件开始: {},{},{},{},{}", to, subject, contnet, rscPath, rscId);

        MimeMessage message = mailSender.createMimeMessage();
        MimeMessageHelper helper = null;

        try {

            helper = new MimeMessageHelper(message, true);
            helper.setTo(to);
            helper.setSubject(subject);
            helper.setText(contnet, true);
            helper.setFrom(from);

            FileSystemResource res = new FileSystemResource(new File(rscPath));
            helper.addInline(rscId, res);
            mailSender.send(message);
            logger.info("发送静态邮件成功!");

        } catch (MessagingException e) {
            logger.info("发送静态邮件失败: ", e);
        }

    }

}
我们使用 thymeleaf 作为模板引擎。
<html lang="en" xmlns:th="http://www.thymeleaf.org">
<head>
    <meta charset="UTF-8"/>
    <meta name="viewport"
          content="width=device-width, user-scalable=no, initial-scale=1.0, maximum-scale=1.0, minimum-scale=1.0"/>
    <meta http-equiv="X-UA-Compatible" content="ie=edge"/>
    <title>注册-测试邮件模板title>
head>
<body>
    你好,感谢你的注册,这是一封验证邮件,请点击下面的连接完成注册,感谢您的支持。
    <a href="#" th:href="@{https://github.com/{id}(id=${id})}">激活账户a>
body>
html>
测试代码
@RunWith(SpringRunner.class)
@SpringBootTest
public class MailServiceTest {
@Autowired
private MailService mailService;
@Resource
private TemplateEngine templateEngine;
@Test
public void sendSimpleMail() {
mailService.sendSimpleMail("[email protected]","测试spring boot imail-主题","测试spring boot imail - 内容");
}
@Test
public void sendHtmlMail() throws MessagingException {
String content = "\n" +
"\n" +
"hello world
\n" +
"html
\n" +
"\n" +
"\n";
mailService.sendHtmlMail("[email protected]","这是一封HTML邮件",content);
}
@Test
public void sendAttachmentsMail() throws MessagingException {
String filePath = "/ijiangtao/软件开发前景.docx";
String content = "\n" +
"\n" +
"hello world
\n" +
"html
\n" +
"附件传输
\n" +
"\n" +
"\n";
mailService.sendAttachmentsMail("[email protected]","这是一封HTML邮件",content, filePath);
}
@Test
public void sendInlinkResourceMail() throws MessagingException {
//TODO 改为本地图片目录
String imgPath = "/ijiangtao/img/blob/dd9899b4cf95cbf074ddc4607007046c022564cb/blog/animal/dog/dog-at-work-with-computer-2.jpg?raw=true";
String rscId = "admxj001";
String content = "" +
"" +
"hello world
" +
"html
" +
"图片邮件
" +
" " +
"" +
"";
mailService.sendInlinkResourceMail("[email protected]","这是一封图片邮件",content, imgPath, rscId);
}
@Test
public void testTemplateMailTest() throws MessagingException {
Context context = new Context();
context.setVariable("id","ispringboot");
String emailContent = templateEngine.process("emailTeplate", context);
mailService.sendHtmlMail("[email protected]","这是一封HTML模板邮件",emailContent);
}
}
10.安全框架
目前用的最多的是权限框架有两个:Shiro 和 Spring Security,Shiro 底层也是用 Spring Security, Spring Security 更复杂但是更强大。
- Spring Security:待学习
- 参考博客
- 参考w3c
- Shiro:待学习
- 参考链接
