opencv-python:19_图像轮廓【一】(概念、特征、性质 、面积、周长、边界矩形、方向、极点、cv2.findContours(),cv2.drawContours())
OpenCV 中的轮廓
- 理解什么是轮廓
- 学习找轮廓,绘制轮廓等
- 函数:cv2.findContours(),cv2.drawContours()
一、查找轮廓
-
轮廓可以简单认为成将连续的点(连着边界)连在一起的曲线,具有相同的颜色或者灰度。轮廓在形状分析和物体的检测和识别中很有用
- 为了更加准确,要使用二值化图像。在寻找轮廓之前,要进行阈值化处理或者 Canny 边界检测。
- 查找轮廓的函数会修改原始图像。如果你在找到轮廓之后还想使用原始图像的话,你应该将原始图像存储到其他变量中。
- 在 OpenCV 中,查找轮廓就像在黑色背景中超白色物体。你应该记住,要找的物体应该是白色而背景应该是黑色。
-
使用cv2.findContours()在二值图像中查找轮廓:
- 函数 cv2.findContours() 有三个参数,第一个是输入图像,第二个是轮廓检索模式,第三个是轮廓近似方法。返回值有三个,第一个是图像,第二个是轮廓,第三个是(轮廓的)层析结构。轮廓(第二个返回值)是一个 Python列表,其中存储这图像中的所有轮廓。每一个轮廓都是一个 Numpy 数组,包含对象边界点(x,y)的坐标。
二、绘制轮廓
函数 cv2.drawContours() 可以被用来绘制轮廓。它可以根据你提供的边界点绘制任何形状。它的第一个参数是原始图像,第二个参数是轮廓,一个 Python 列表。第三个参数是轮廓的索引(在绘制独立轮廓是很有用,当设置为 -1 时绘制所有轮廓)。接下来的参数是轮廓的颜色和厚度等。
在一幅图像上绘制所有的轮廓:
import numpy as np
import cv2
def cv_show(img,name):
    cv2.imshow(name,img)
    cv2.waitKey()
    cv2.destroyAllWindows()
img = cv2.imread('opencv.jpg')
imgray = cv2.cvtColor(img,cv2.COLOR_BGR2GRAY)

ret,thresh = cv2.threshold(imgray,127,255,0)
image, contours, hierarchy = cv2.findContours(thresh,cv2.RETR_TREE,cv2.CHAIN_APPROX_SIMPLE)
#绘制独立轮廓,如第四个轮廓:
img = cv2.drawContours(img, contours, -1, (0,255,0), 3)
cv_show(img,'img')
#但是大多数时候,下面的方法更有用:
img = cv2.drawContours(img, contours, 3, (0,255,0), 3)
cv_show(img,'img')
轮廓的近似方法
这是函数 cv2.findCountours() 的第三个参数。它到底代表什么意思呢?
上边我们已经提到轮廓是一个形状具有相同灰度值的边界。它会存贮形状边界上所有的 (x,y) 坐标。但是需要将所有的这些边界点都存储吗?这就是这个参数要告诉函数 cv2.findContours 的。
这个参数如果被设置为 cv2.CHAIN_APPROX_NONE,所有的边界点都会被存储。但是我们真的需要这么多点吗?例如,当我们找的边界是一条直线时。你用需要直线上所有的点来表示直线吗?不是的,我们只需要这条直线的两个端点而已。这就是 cv2.CHAIN_APPROX_SIMPLE 要做的。它会将轮廓上的冗余点都去掉,压缩轮廓,从而节省内存开支。
我们用下图中的矩形来演示这个技术。在轮廓列表中的每一个坐标上画一个蓝色圆圈。第一个图显示使用cv2.CHAIN_APPROX_NONE 的效果,一共 734 个点。第二个图是使用 cv2.CHAIN_APPROX_SIMPLE 的结果,只有 4 个点。看到他的威力了吧!
三、轮廓特征
- 查找轮廓的不同特征,例如面积,周长,重心,边界框等。
- 轮廓相关函数
(1)图像矩
图像的矩可以帮助我们计算图像的质心,面积等。函数 cv2.moments() 会将计算得到的矩以一个字典的形式返回。
import cv2
import numpy as np

img = cv2.imread('tower.jpg',0)
ret,thresh = cv2.threshold(img,127,255,0)
image, contours,hierarchy = cv2.findContours(thresh, 1, 2)

cnt = contours[0]

M = cv2.moments(cnt)
print(M)
{'m00': 2.0, 'm10': 742.0, 'm01': 1502.0, 'm20': 275282.3333333333, 'm11': 557242.0, 'm02': 1128002.3333333333, 'm30': 102129993.0, 'm21': 206737032.33333334, 'm12': 418488865.6666667, 'm03': 847130253.0, 'mu20': 0.3333333333139308, 'mu11': 0.0, 'mu02': 0.3333333332557231, 'mu30': 1.4901161193847656e-08, 'mu21': 2.450542524456978e-08, 'mu12': 4.866160452365875e-08, 'mu03': 1.1920928955078125e-07, 'nu20': 0.0833333333284827, 'nu11': 0.0, 'nu02': 0.08333333331393078, 'nu30': 2.634178031930877e-09, 'nu21': 4.331988091573825e-09, 'nu12': 8.60223763552427e-09, 'nu03': 2.1073424255447017e-08}
cx = int(M['m10']/M['m00'])
cy = int(M['m01']/M['m00'])

print(cx,cy)
371 751
(2)轮廓面积
- 使用函数 cv2.contourArea() 计算
- 使用(0 阶矩),M[‘m00’]。
(3) 轮廓周长
也被称为弧长。可以使用函数 cv2.arcLength() 计算得到。这个函数的第二参数可以用来指定对象的形状是闭合的(True),还是打开的(一条曲线)。
import cv2
import numpy as np

img = cv2.imread('opencv.jpg')
imgray = cv2.cvtColor(img,cv2.COLOR_BGR2GRAY)
ret,thresh = cv2.threshold(imgray,127,255,0)
image, contours,hierarchy = cv2.findContours(thresh, 1, 2)

cnt = contours[0]

# 计算面积
Area = cv2.contourArea(cnt)

# 计算周长
perimeter = cv2.arcLength(cnt,True)

print(Area)

img = cv2.drawContours(img, contours, -1, (0,255,0), 3)
cv_show(img,'img')
41.0
(4)轮廓近似
将轮廓形状近似到另外一种由更少点组成的轮廓形状,新轮廓的点的数目由我们设定的准确度来决定。使用的Douglas-Peucker算法,你可以到维基百科获得更多此算法的细节。
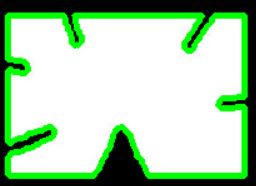
为了帮助理解,假设我们要在一幅图像中查找一个矩形,但是由于图像的种种原因,我们不能得到一个完美的矩形,而是一个“坏形状”(如下图所示)。现在你就可以使用这个函数来近似这个形状()了。这个函数的第二个参数叫epsilon,它是从原始轮廓到近似轮廓的最大距离。它是一个准确度参数。选择一个好的 epsilon 对于得到满意结果非常重要。
下边,第二幅图中的绿线是当 epsilon = 10% 时得到的近似轮廓,第三幅图是当 epsilon = 1% 时得到的近似轮廓。第三个参数设定弧线是否闭合。

import cv2
import numpy as np

img = cv2.imread('contours.jpg')
imgray = cv2.cvtColor(img,cv2.COLOR_BGR2GRAY)
ret,thresh = cv2.threshold(imgray,127,255,0)
image, contours,hierarchy = cv2.findContours(thresh, 1, 2)

cnt = contours[0]

epsilon = 0.1*cv2.arcLength(cnt,True)
approx = cv2.approxPolyDP(cnt,epsilon,True)
contours[0] = cnt

img = cv2.drawContours(img, contours, -1, (0,255,0), 3)
cv_show(img,'img')
(5)凸包
凸包与轮廓近似相似,但不同,虽然有些情况下它们给出的结果是一样的。
函数 cv2.convexHull() 可以用来检测一个曲线是否具有凸性缺陷,并能纠正缺陷。一般来说,凸性曲线总是凸出来的,至少是平的。如果有地方凹进去了就被叫做凸性缺陷。例如下图中的手。红色曲线显示了手的凸包,凸性缺陷被双箭头标出来了。
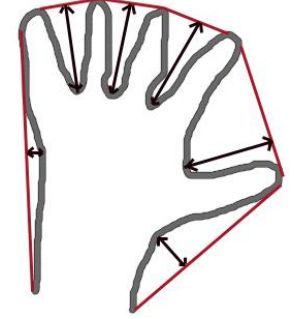
hull = cv2.convexHull(points[, hull[, clockwise[, returnPoints]]
- points 我们要传入的轮廓
- hull 输出,通常不需要
- clockwise 方向标志。如果设置为 True,输出的凸包是顺时针方向的。否则为逆时针方向。
- returnPoints 默认值为 True。它会返回凸包上点的坐标。如果设置为 False,就会返回与凸包点对应的轮廓上的点。
import cv2
import numpy as np

img = cv2.imread('contours.jpg')
imgray = cv2.cvtColor(img,cv2.COLOR_BGR2GRAY)
ret,thresh = cv2.threshold(imgray,127,255,0)
image, contours,hierarchy = cv2.findContours(thresh, 1, 2)

cnt = contours[0]

# 要获得上图的凸包,下面的命令就够了
hull = cv2.convexHull(cnt)

img = cv2.drawContours(img, contours, -1, (0,255,0), 3)
cv_show(img,'img')
但是如果你想获得凸性缺陷,需要把 returnPoints 设置为 False。上面的矩形为例,首先我们找到他的轮廓 cnt。现在我把 returnPoints 设置为 True 查找凸包,我得到下列值:
[[[234 202]], [[ 51 202]], [[ 51 79]], [[234 79]]],其实就是矩形的个角点。
现在把 returnPoints 设置为 False,我得到的结果是[[129],[ 67],[ 0],[142]]
他们是轮廓点的索引。例如:cnt[129] = [[234, 202]],这与前面我们得到结果的第一个值是一样的。在凸检验中你我们还会遇到这些。
(6)凸性检测
函数 cv2.isContourConvex() 可以可以用来检测一个曲线是不是凸的。它只能返回 True 或 False。没什么大不了的。
k = cv2.isContourConvex(cnt)
(7)边界矩形
当得到对象轮廓后,可用boundingRect()得到包覆此轮廓的最小正矩形,minAreaRect()得到包覆轮廓的最小斜矩形。
有两类边界矩形。
- 直边界矩形 一个直矩形(就是没有旋转的矩形)。它不会考虑对象是否旋转。所以边界矩形的面积不是最小的。可以使用函数 cv2.boundingRect() 查找得到。
(x,y)为矩形左上角的坐标,(w,h)是矩形的宽和高。
x,y,w,h = cv2.boundingRect(cnt)
img = cv2.rectangle(img,(x,y),(x+w,y+h),(0,255,0),2)
- 旋转的边界矩形 这个边界矩形是面积最小的,因为它考虑了对象的旋转。用到的函数为 cv2.minAreaRect()。返回的是一个 Box2D 结构,其中包含矩形左上角角点的坐标(x,y),矩形的宽和高(w,h),以及旋转角度。但是要绘制这个矩形需要矩形的 4 个角点,可以通过函数 cv2.boxPoints() 获得。
rect = cv2.minAreaRect(cnt)

# cv2.boxPoints(rect) for OpenCV 3.x
box = cv2.boxPoints(rect)
box = np.int0(box)
img = cv2.drawContours(img,[box],0,(0,0,255),2)
把这两中边界矩形显示在下图中,其中绿色的为直矩形,红的为旋转矩形。

(1)OpenCV中minAreaRect()最小外接矩形详解
该函数计算并返回指定点集的最小区域边界斜矩形。
points:输入信息,可以为包含点的容器(vector)或是Mat。 返回包覆输入信息的最小斜矩形,是一个Box2D结构rect:(最小外接矩形的中心(x,y),(宽度,高度),旋转角度),但是要绘制这个矩形,我们需要矩形的4个顶点坐标box, 通过函数 cv2.cv.BoxPoints() 获得,返回形式[ [x0,y0], [x1,y1], [x2,y2], [x3,y3] ]。得到的最小外接矩形的4个顶点顺序、中心坐标、宽度、高度、旋转角度(是度数形式,不是弧度数)的对应关系如下:
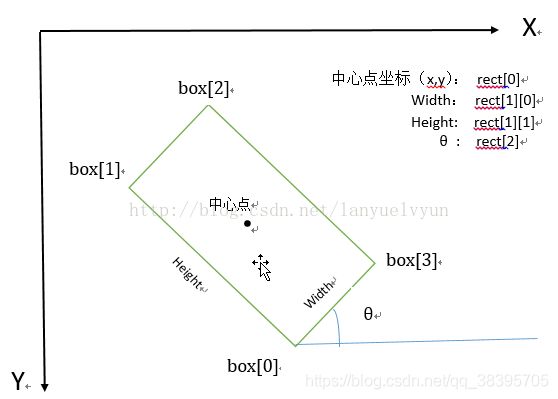
图片来自博客:https://blog.csdn.net/duiwangxiaomi/article/details/92565308
-
旋转角度θ是水平轴(x轴)逆时针旋转,与碰到的矩形的第一条边的夹角。并且这个边的边长是width,另一条边边长是height。也就是说,在这里,width与height不是按照长短来定义的。
-
在opencv中,坐标系原点在左上角,相对于x轴,逆时针旋转角度为负,顺时针旋转角度为正。所以,θ∈(-90度,0]。
(2)cv2.minAreaRect()内部实现算法分析
-
opencv里求最小外接矩形的函数是cv2.minAreaRect()
-
minAreaRect()内部实现思路:
-
先求轮廓点集的凸包convex hull
- 关于凸包convex hull:opencv里求凸包的函数是convexHull(),其用的算法是Sklansky算法
- 其他的凸包算法:Learn OpenCV之Convex Hull,凸包问题的五种解法,数学:凸包算法详解
-
再求凸包的最小外接矩形
-
几何定理:多边形的最小外接矩形的一条边必然与多边形的其中一条边共线
-
旋转卡尺算法Rotating calipers
-
根据上面的定理,只需要枚举多边形的边,做外接矩形,比较外接矩的面积,选最小的那个。(因为是矩形,所以枚举旋转超过90度结束,之后的枚举都是重复的外接矩形)
-
-
(3)最小外接矩形的另一种实现思路
虽然最小外接矩形minAreaRect在很大的程度上可以代表物体的方向性,即,oriented bounding box。
但是,还有一种OBB的实现思路,来源https://www.cnblogs.com/jsxyhelu/p/9345590.html
- PCA主成分分析得到物体的主方向
- 旋转物体的主方向,使其正交与坐标系,此时再求旋转后的up-right bounding box
- 求得bbox后,再旋转回去,此时的bbox变为了obb
(8)最小外接圆
函数 cv2.minEnclosingCircle() 可以帮我们找到一个对象的外切圆。它是所有能够包括对象的圆中面积最小的一个。
(x,y),radius = cv2.minEnclosingCircle(cnt)
center = (int(x),int(y))
radius = int(radius)
img = cv2.circle(img,center,radius,(0,255,0),2)
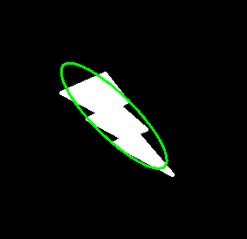
(9)椭圆拟合
使用的函数为 cv2.ellipse(),返回值其实就是旋转边界矩形的内切圆。
ellipse = cv2.fitEllipse(cnt)
im = cv2.ellipse(im,ellipse,(0,255,0),2)
(10)直线拟合
我们可以根据一组点拟合出一条直线,同样我们也可以为图像中的白色点拟合出一条直线。
rows,cols = img.shape[:2]

[vx,vy,x,y] = cv2.fitLine(cnt, cv2.DIST_L2,0,0.01,0.01)
lefty = int((-x*vy/vx) + y)
righty = int(((cols-x)*vy/vx)+y)
img = cv2.line(img,(cols-1,righty),(0,lefty),(0,255,0),2)
[外链图片转存失败,源站可能有防盗链机制,建议将图片保存下来直接上传(img-NXhzl8Ra-1591843847991)(attachment:image.png)]
四、轮廓性质
(1)长宽比
x,y,w,h = cv2.boundingRect(cnt)
aspect_ratio = float(w)/h
(2)轮廓面积与边界矩形面积的比。
area = cv2.contourArea(cnt)
x,y,w,h = cv2.boundingRect(cnt)
rect_area = w*h
extent = float(area)/rect_area
(3)Solidity
area = cv2.contourArea(cnt)
hull = cv2.convexHull(cnt)
hull_area = cv2.contourArea(hull)
solidity = float(area)/hull_area
(4)Equivalent Diameter
area = cv2.contourArea(cnt)
equi_diameter = np.sqrt(4*area/np.pi)
(5)方向
对象的方向,下面的方法还会返回长轴和短轴的长度
(x,y),(MA,ma),angle = cv2.fitEllipse(cnt)
(6)掩模和像素点
-
有时我们需要构成对象的所有像素点,我们可以这样做:
-
第一种方法使用了 Numpy 函数,第二种使用了 OpenCV 函数。结果相同,但还是有点不同。Numpy 给出的坐标是(row,colum)形式的。
-
而 OpenCV 给出的格式是(x,y)形式的。所以这两个结果基本是可以互换的。row=x,colunm=y。
mask = np.zeros(imgray.shape,np.uint8)

# 这里一定要使用参数-1, 绘制填充的的轮廓
cv2.drawContours(mask,[cnt],0,255,-1)

#Returns a tuple of arrays, one for each dimension of a,
#containing the indices of the non-zero elements in that dimension.
#The result of this is always a 2-D array, with a row for
#each non-zero element.
#To group the indices by element, rather than dimension, use:
#transpose(nonzero(a))
#>>> x = np.eye(3)
#>>> x
#array([[ 1., 0., 0.],
# [ 0., 1., 0.],
# [ 0., 0., 1.]])
#>>> np.nonzero(x)
#(array([0, 1, 2]), array([0, 1, 2]))
#>>> x[np.nonzero(x)]
#array([ 1., 1., 1.])
#>>> np.transpose(np.nonzero(x))
#array([[0, 0],
# [1, 1],
# [2, 2]])

pixelpoints = np.transpose(np.nonzero(mask))
#pixelpoints = cv2.findNonZero(mask)
(7)最大值和最小值及它们的位置
我们可以使用掩模图像得到这些参数。
min_val, max_val, min_loc, max_loc = cv2.minMaxLoc(imgray,mask = mask)
(8)平均颜色及平均灰度
我们也可以使用相同的掩模求一个对象的平均颜色或平均灰度
mean_val = cv2.mean(im,mask = mask)
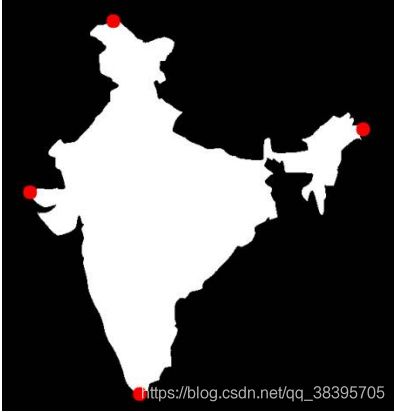
(8)极点
一个对象最上面,最下面,最左边,最右边的点。
leftmost = tuple(cnt[cnt[:,:,0].argmin()][0])
rightmost = tuple(cnt[cnt[:,:,0].argmax()][0])
topmost = tuple(cnt[cnt[:,:,1].argmin()][0])
bottommost = tuple(cnt[cnt[:,:,1].argmax()][0])
import cv2
import numpy as np

img = cv2.imread('contours.jpg')
imgray = cv2.cvtColor(img,cv2.COLOR_BGR2GRAY)
ret,thresh = cv2.threshold(imgray,127,255,0)
image, contours,hierarchy = cv2.findContours(thresh, 1, 2)

cnt = contours[0]

# 计算面积
area = cv2.contourArea(cnt)

# 计算周长
perimeter = cv2.arcLength(cnt,True)

# 计算长宽比
x,y,w,h = cv2.boundingRect(cnt)
aspect_ratio = float(w)/h


# 轮廓面积与边界矩形面积的比。
rect_area = w*h
extent = float(area)/rect_area


# 轮廓面积与凸包面积的比。
hull = cv2.convexHull(cnt)
hull_area = cv2.contourArea(hull)
solidity = float(area)/hull_area

# 与轮廓面积相等的圆形的直径
equi_diameter = np.sqrt(4*area/np.pi)

# 对象的方向,下面的方法还会返回长轴和短轴的长度
(x,y),(MA,ma),angle = cv2.fitEllipse(cnt)


print(area)
print(perimeter)
print(aspect_ratio)
print(extent)
print(solidity)
print(equi_diameter)
print(angle)

img = cv2.drawContours(img, contours, -1, (0,255,0), 3)
cv_show(img,'img')
22158.0
972.048770070076
1.4728682170542635
0.9040391676866585
0.9159415497178761
167.96559716871113
84.16471099853516
参考
https://blog.csdn.net/duiwangxiaomi/article/details/92565308
https://blog.csdn.net/weixin_39916966/article/details/104731800

