19. springBoot高级篇——缓存技术(SpringDataRedis)
1. 整合步骤
1.1 SpringDataRedis启动器引入
    org.springframework.boot
    spring-boot-starter-data-redis
1.2 编写 Spring Data Redis 的配置类
步骤:
1)创建 JedisPoolConfig 对象。 在该对象中完成一些链接池配置
2)创建 JedisConnectionFactory: 配置 redis 链接信息
3)创建 RedisTemplate:用于执行 Redis 操作的方法
配置类如下:
package com.bjc.conf;

import org.springframework.context.annotation.Bean;
import org.springframework.context.annotation.Configuration;
import org.springframework.data.redis.connection.jedis.JedisConnectionFactory;
import org.springframework.data.redis.core.RedisTemplate;
import org.springframework.data.redis.serializer.StringRedisSerializer;

import redis.clients.jedis.JedisPoolConfig;

/**redis配置类
 * @Configuration 用于标识该类为一个配置类
 *
 */
@Configuration
public class Redisconfg {

	/**
	* 1.创建 JedisPoolConfig 对象。 在该对象中完成一些链接池配置
	* @Bean 注解用于在boot启动的时候加载@Configuration的时候初始化加载@Bean标注的代码
	*/
	@Bean
	public JedisPoolConfig JedisPoolConfig() {
		// 1. 创建连接池对象
		JedisPoolConfig pool = new JedisPoolConfig();
		// 2. 可选配置
		pool.setMaxIdle(10);	//最大空闲数
		pool.setMinIdle(5);		//最小空闲数
		pool.setMaxTotal(20);	//最大链接数
		return pool;
	}

	/**
	* 2.创建 JedisConnectionFactory: 配置 redis 链接信息
	*/
	@Bean
	public JedisConnectionFactory jedisConnectionFactory(JedisPoolConfig config) {
		// 2.1 创建JedisConnectionFactory工厂对象
		JedisConnectionFactory factory = new JedisConnectionFactory();

		// 2.2 设置RedisPool连接池
		factory.setPoolConfig(config);

		// 2.3 设置连接信息
		factory.setHostName("localhost");
		factory.setPort(6379);
		// 指定redis数据库,redis默认有16个库,默认指向0号索引库
		// factory.setDatabase(1);

		return factory;
	}

	/**
	* 3.创建 RedisTemplate:用于执行 Redis 操作的方法
	*/
	public RedisTemplate redisTemplate(JedisConnectionFactory factory) {
		// 3.1 创建模板对象并设置连接工厂
		RedisTemplate template = new RedisTemplate();
		template.setConnectionFactory(factory);

		// 3.2 设置序列化器
		//为 key 设置序列化器
		template.setKeySerializer(new StringRedisSerializer());
		//为 value 设置序列化器
		template.setValueSerializer(new StringRedisSerializer());

		return template;
	}
}
1.3 简单的测试
package com.bjc.test;

import javax.annotation.Resource;

import org.junit.Test;
import org.junit.runner.RunWith;
import org.springframework.boot.test.context.SpringBootTest;
import org.springframework.data.redis.core.RedisTemplate;
import org.springframework.test.context.junit4.SpringJUnit4ClassRunner;

@RunWith(SpringJUnit4ClassRunner.class)
@SpringBootTest
public class RedisTest {

	@Resource
	private RedisTemplate templete;

	@Test
	public void test01() {
		templete.boundValueOps("name").set("张三");
	}

	@Test
	public void test02() {
		String value = (String) templete.boundValueOps("name").get();
		System.out.println(value);
	}

}
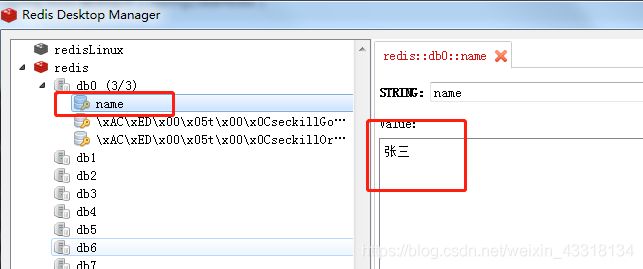
查看redis工具,可以看到存储的key为name,值为张三
程序运行的结果也是输出了张三
注意:操作redis的api除了有boundValueOps外还有一个opsForValue,例如:
@Test
public void test03() {
	templete.opsForValue().set("age", "21");
}

@Test
public void test04() {
	String age = (String) templete.opsForValue().get("age");
	System.out.println(age);
}
2. 提取Redis的链接参数
2.1 提取配置信息
我们将redis的一些链接信息放在配置类中,一旦环境发生变化,需要改变代码,显得不那么方便,所以,我们可以将这些配置信息放在配置文件中,在application.properties文件中添加如下链接信息:
spring.redis.pool.max-idle=10
spring.redis.pool.min-idle=5
spring.redis.pool.max-total=20
spring.redis.hostName=localhost
spring.redis.port=6379
注意:前缀自定义,但是后缀是固定的,例如:spring.redis.pool.max-idle=10 可以写成aaa.bbb.ccc.max-idle=10,其中max-idle是固定的。
2.2 读取配置信息——@ConfigurationProperties
我们在配置文件中配置了链接信息,那么我们怎么在我们的配置类中引入这些信息,spring提供了一个注解@ConfigurationProperties,该注解可以将配置文件中前缀相同的部分抽取出来,并且创建一个实体,然后,将后缀作为一个实体的属性出现。前缀内容通过属性prefix来指定。这样,我们在配置类中就不需要在指定参数信息了,只需要创建并返回,boot就会自动给我们将参数注入到对象之中了。
例如:将连接池配置信息从配置文件读取的改造
/**
* 1.创建 JedisPoolConfig 对象。 在该对象中完成一些链接池配置
* @Bean 注解用于在boot启动的时候加载@Configuration的时候初始化加载@Bean标注的代码
*/
@Bean
@ConfigurationProperties(prefix = "spring.redis.pool")
public JedisPoolConfig JedisPoolConfig() {
	// 1. 创建连接池对象
	JedisPoolConfig pool = new JedisPoolConfig();
	/** 改成了从配置文件中提取参数,这里不需要指定
	// 2. 可选配置
	pool.setMaxIdle(10);	//最大空闲数
	pool.setMinIdle(5);		//最小空闲数
	pool.setMaxTotal(20);	//最大链接数
	*/
	return pool;
}
将Jedis连接工厂配置信息改成从配置文件读取
/**
* 2.创建 JedisConnectionFactory: 配置 redis 链接信息
*/
@Bean
@ConfigurationProperties(prefix = "spring.redis")
public JedisConnectionFactory jedisConnectionFactory(JedisPoolConfig config) {
	// 2.1 创建JedisConnectionFactory工厂对象
	JedisConnectionFactory factory = new JedisConnectionFactory();

	// 2.2 设置RedisPool连接池
	factory.setPoolConfig(config);

	// 2.3 设置连接信息
	// factory.setHostName("localhost");
	// factory.setPort(6379);
	// 指定redis数据库,redis默认有16个库,默认指向0号索引库
	// factory.setDatabase(1);

	return factory;
}
再次测试,发现程序可以正常运行,说明配置生效了!
3. 存取Java对象
前面的例子都是操作字符串的,我们现在来看看如何使用SpringDataRedis操作java对象。
3.1 存对象
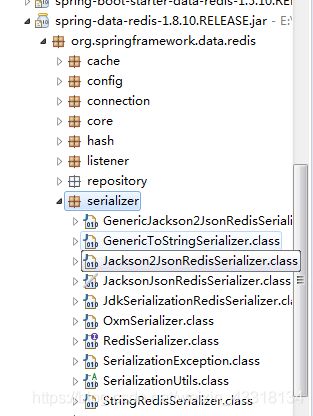
新建一个实体类user,直接设置user对象到redis,发现程序报错了,这是因为我们在配置对象中设置了value的序列化器是string序列化器,springdateRedis无法将对象转成string类型,所以报了类型转换异常,同时,我们知道,在SpringDataRedis核心包中提供了一个可序列化的jar,其中有很多序列化器,如图:
可以看到第五个序列化器JdkSerializationRedisSerializer.class,我们可以将当前序列化器指定为JdkSerializationRedisSerializer即可。例如:
@Test
public void test05() {
	// 重设序列化器
	templete.setValueSerializer(new JdkSerializationRedisSerializer());
	templete.opsForValue().set("user", new User("张三",23,new Date()));
}
查看redis,可以看到存储的信息,如图:
注意:实体类需要实现序列化接口
3.2 取对象
我们不能直接调用get方法来取对象信息,我们在取之前也需要重新指定可序列化器
例如:
@Test
public void test06() {
	// 重设序列化器
	templete.setValueSerializer(new JdkSerializationRedisSerializer());
	User user = (User) templete.opsForValue().get("user");
	System.out.println(user);
}
输出结果:
注意:通过boundValueOps也可以实现相同的效果,同样需要指定可序列化器,例如;
@Test
public void test05() {
	// 重设序列化器
	templete.setValueSerializer(new JdkSerializationRedisSerializer());
	templete.boundValueOps("users").set(new User("张三",23,new Date()));
}
@Test
public void test06() {
	// 重设序列化器
	templete.setValueSerializer(new JdkSerializationRedisSerializer());
	User user = (User) templete.boundValueOps("users").get();
	System.out.println(user);
}
4. 存取JSON格式的实体对象
前面我们通过jdk的序列化器实现了对对象的存取,但是,这种方式有一种很明显的缺陷,就是存储所占用的空间比较大,相对于Json格式来说,以序列化字节码的方式存储方式是很重的,所以,接下来,我们介绍一下如何使用json格式来存储对象。
4.1 存
我们看一下SpringDataRedis的核心jar的序列化jar,发现可以操作json的序列化器有三个,GenericJackson2JsonRedisSerializer、Jackson2JsonRedisSerializer、JacksonJsonRedisSerializer,如图:
我们发现JacksonJsonRedisSerializer是过时的class,所以,我们可以使用另外的两个可序列化器
例如:
@Test
public void test07() {
	// 重设序列化器
	templete.setValueSerializer(new Jackson2JsonRedisSerializer(User.class));
	templete.boundValueOps("jsonUser").set(new User("张三",23,new Date()));
}
执行程序,查看redis管理客户端,如图,发现存储的对象是以json格式存储的
4.2 取
取的方法也很简单了,也是需要指定对应的可序列化器即可,例如;
@Test
public void test08() {
	// 重设序列化器
	templete.setValueSerializer(new Jackson2JsonRedisSerializer(User.class));
	User user = (User) templete.boundValueOps("jsonUser").get();
	System.out.println(user);
} 


