纹理
1.纹理坐标
纹理坐标在x和y轴上,范围为0到1之间(注意我们使用的是2D纹理图像)。使用纹理坐标获取纹理颜色叫做采样(Sampling)。纹理坐标起始于(0, 0),也就是纹理图片的左下角,终始于(1, 1),即纹理图片的右上角。
2.纹理环绕方式
| GL_REPEAT | 对纹理的默认行为。重复纹理图像。 |
| GL_MIRRORED_REPEAT | 和GL_REPEAT一样,但每次重复图片是镜像放置的。 |
| GL_CLAMP_TO_EDGE | 纹理坐标会被约束在0到1之间,超出的部分会重复纹理坐标的边缘,产生一种边缘被拉伸的效果。 |
| GL_CLAMP_TO_BORDER | 超出的坐标为用户指定的边缘颜色。 |
3.纹理过滤
GL_NEAREST(也叫邻近过滤,Nearest Neighbor Filtering)是OpenGL默认的纹理过滤方式。当设置为GL_NEAREST的时候,OpenGL会选择中心点最接近纹理坐标的那个像素。下图中你可以看到四个像素,加号代表纹理坐标。左上角那个纹理像素的中心距离纹理坐标最近,所以它会被选择为样本颜色:
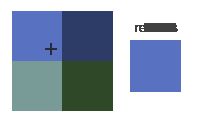
GL_LINEAR(也叫线性过滤,(Bi)linear Filtering)它会基于纹理坐标附近的纹理像素,计算出一个插值,近似出这些纹理像素之间的颜色。一个纹理像素的中心距离纹理坐标越近,那么这个纹理像素的颜色对最终的样本颜色的贡献越大。下图中你可以看到返回的颜色是邻近像素的混合色:
4.多级纹理
假设我们有一个包含着上千物体的大房间,每个物体上都有纹理。有些物体会很远,但其纹理会拥有与近处物体同样高的分辨率。由于远处的物体可能只产生很少的片段,OpenGL从高分辨率纹理中为这些片段获取正确的颜色值就很困难,因为它需要对一个跨过纹理很大部分的片段只拾取一个纹理颜色。在小物体上这会产生不真实的感觉,更不用说对它们使用高分辨率纹理浪费内存的问题了。
OpenGL使用一种叫做多级渐远纹理(Mipmap)的概念来解决这个问题,它简单来说就是一系列的纹理图像,后一个纹理图像是前一个的二分之一。多级渐远纹理背后的理念很简单:距观察者的距离超过一定的阈值,OpenGL会使用不同的多级渐远纹理,即最适合物体的距离的那个。由于距离远,解析度不高也不会被用户注意到。同时,多级渐远纹理另一加分之处是它的性能非常好。
| 过滤方式 | 描述 |
|---|---|
| GL_NEAREST_MIPMAP_NEAREST | 使用最邻近的多级渐远纹理来匹配像素大小,并使用邻近插值进行纹理采样 |
| GL_LINEAR_MIPMAP_NEAREST | 使用最邻近的多级渐远纹理级别,并使用线性插值进行采样 |
| GL_NEAREST_MIPMAP_LINEAR | 在两个最匹配像素大小的多级渐远纹理之间进行线性插值,使用邻近插值进行采样 |
| GL_LINEAR_MIPMAP_LINEAR | 在两个邻近的多级渐远纹理之间使用线性插值,并使用线性插值进行采样 |
5.加载创建纹理 使用相关库
int width, height, nrChannel;
	unsigned char *data = stbi_load("container.jpg", &width, &height, &nrChannel, 0);
	if (data)
	{
		glTexImage2D(GL_TEXTURE_2D, 0, GL_RGB, width, height, 0, GL_RGB, GL_UNSIGNED_BYTE, data);
		glGenerateMipmap(GL_TEXTURE_2D);
	}
	else
	{
		cout << "load image error" << endl;
	}
	stbi_image_free(data);
6.生成纹理
unsigned int TexBufferA;
	glGenTextures(1, &TexBufferA);
	glBindTexture(GL_TEXTURE_2D, TexBufferA);

	// set the texture wrapping parameters
	glTexParameteri(GL_TEXTURE_2D, GL_TEXTURE_WRAP_S, GL_REPEAT);	// set texture wrapping to GL_REPEAT (default wrapping method)
	glTexParameteri(GL_TEXTURE_2D, GL_TEXTURE_WRAP_T, GL_REPEAT);
	// set texture filtering parameters
	glTexParameteri(GL_TEXTURE_2D, GL_TEXTURE_MIN_FILTER, GL_LINEAR);
	glTexParameteri(GL_TEXTURE_2D, GL_TEXTURE_MAG_FILTER, GL_LINEAR);
7.应用纹理
根据顶点信息获取使用纹理的uv坐标
float vertices[] = {
	// positions          // colors           // texture coords
	 0.5f,  0.5f, 0.0f,   1.0f, 0.0f, 0.0f,   1.0f, 1.0f,   // top right
	 0.5f, -0.5f, 0.0f,   0.0f, 1.0f, 0.0f,   1.0f, 0.0f,   // bottom right
	-0.5f, -0.5f, 0.0f,   0.0f, 0.0f, 1.0f,   0.0f, 0.0f,   // bottom left
	-0.5f,  0.5f, 0.0f,   1.0f, 1.0f, 0.0f,   0.0f, 1.0f    // top left
};
unsigned int indices[] = {  // note that we start from 0!
	0, 1, 3,  // first Triangle
	1, 2, 3   // second Triangle
};
	//顶点位置属性
	glVertexAttribPointer(0, 3, GL_FLOAT, GL_FALSE, 8 * sizeof(float), (void*)0);
	glEnableVertexAttribArray(0);

	//顶点颜色属性
	glVertexAttribPointer(1, 3, GL_FLOAT, GL_FALSE, 8 * sizeof(float), (void*) (3 * sizeof(float)));
	glEnableVertexAttribArray(1);

	//纹理颜色属性
	glVertexAttribPointer(2, 2, GL_FLOAT, GL_FALSE, 8 * sizeof(float), (void*)(6 * sizeof(float)));
	glEnableVertexAttribArray(2);
着色器纹理采样
顶点着色器通过cpu传入纹理UV坐标 输出给片段着色器用 片段着色器进行纹理采样
#version 330 core
layout (location = 0) in vec3 aPos;
layout (location = 1) in vec3 aColor;
layout (location = 2) in vec2 aTexcoord;

out vec4 vertexColor;
out vec2 texcoord;
void main()
{
	gl_Position = vec4(aPos.x, aPos.y, aPos.z, 1.0);
    vertexColor = vec4(aColor.x,aColor.y,aColor.z,1.0);
	texcoord = aTexcoord;
}

#version 330 core
in vec4 vertexColor;
in vec2 texcoord;
out vec4 FragColor;

uniform sampler2D ourTexture;
//uniform vec4 ourColor;

uniform sampler2D ourFace;
void main()
{
   FragColor = texture(ourTexture,texcoord)+texture(ourFace,texcoord);
}
8.纹理单元
你可能会奇怪为什么sampler2D变量是个uniform,我们却不用glUniform给它赋值。使用glUniform1i,我们可以给纹理采样器分配一个位置值,这样的话我们能够在一个片段着色器中设置多个纹理。一个纹理的位置值通常称为一个纹理单元(Texture Unit)。一个纹理的默认纹理单元是0,它是默认的激活纹理单元,所以教程前面部分我们没有分配一个位置值。
纹理单元的主要目的是让我们在着色器中可以使用多于一个的纹理。通过把纹理单元赋值给采样器,我们可以一次绑定多个纹理,只要我们首先激活对应的纹理单元。就像glBindTexture一样,我们可以使用glActiveTexture激活纹理单元,传入我们需要使用的纹理单元:
glActiveTexture(GL_TEXTURE0); //在绑定纹理之前先激活纹理单元
glBindTexture(GL_TEXTURE_2D, texture);
激活纹理单元之后,接下来的glBindTexture函数调用会绑定这个纹理到当前激活的纹理单元,纹理单元GL_TEXTURE0默认总是被激活,所以我们在前面的例子里当我们使用glBindTexture的时候,无需激活任何纹理单元。
Important
OpenGL至少保证有16个纹理单元供你使用,也就是说你可以激活从GL_TEXTURE0到GL_TEXTRUE15。它们都是按顺序定义的,所以我们也可以通过GL_TEXTURE0 + 8的方式获得GL_TEXTURE8,这在当我们需要循环一些纹理单元的时候会很有用。
9.多张纹理使用
unsigned int TexBufferA;
	glGenTextures(1, &TexBufferA);
	glBindTexture(GL_TEXTURE_2D, TexBufferA);

	// set the texture wrapping parameters
	glTexParameteri(GL_TEXTURE_2D, GL_TEXTURE_WRAP_S, GL_REPEAT);	// set texture wrapping to GL_REPEAT (default wrapping method)
	glTexParameteri(GL_TEXTURE_2D, GL_TEXTURE_WRAP_T, GL_REPEAT);
	// set texture filtering parameters
	glTexParameteri(GL_TEXTURE_2D, GL_TEXTURE_MIN_FILTER, GL_LINEAR);
	glTexParameteri(GL_TEXTURE_2D, GL_TEXTURE_MAG_FILTER, GL_LINEAR);
	// load image, create texture and generate mipmaps

	int width, height, nrChannel;
	unsigned char *data = stbi_load("container.jpg", &width, &height, &nrChannel, 0);
	if (data)
	{
		glTexImage2D(GL_TEXTURE_2D, 0, GL_RGB, width, height, 0, GL_RGB, GL_UNSIGNED_BYTE, data);
		glGenerateMipmap(GL_TEXTURE_2D);
	}
	else
	{
		cout << "load image error" << endl;
	}
	stbi_image_free(data);

	unsigned int TexBufferB;
	glGenTextures(1, &TexBufferB);
	glBindTexture(GL_TEXTURE_2D, TexBufferB);

	// set the texture wrapping parameters
	glTexParameteri(GL_TEXTURE_2D, GL_TEXTURE_WRAP_S, GL_REPEAT);	// set texture wrapping to GL_REPEAT (default wrapping method)
	glTexParameteri(GL_TEXTURE_2D, GL_TEXTURE_WRAP_T, GL_REPEAT);
	// set texture filtering parameters
	glTexParameteri(GL_TEXTURE_2D, GL_TEXTURE_MIN_FILTER, GL_LINEAR);
	glTexParameteri(GL_TEXTURE_2D, GL_TEXTURE_MAG_FILTER, GL_LINEAR);
	// load image, create texture and generate mipmaps
	stbi_set_flip_vertically_on_load(true);
	unsigned char *data2 = stbi_load("awesomeface.png", &width, &height, &nrChannel, 0);
	if (data2)
	{
		glTexImage2D(GL_TEXTURE_2D, 0, GL_RGBA, width, height, 0, GL_RGBA, GL_UNSIGNED_BYTE, data2);
		glGenerateMipmap(GL_TEXTURE_2D);
	}
	else
	{
		cout << "load awesomeface image error" << endl;
	}
	stbi_image_free(data2);
	Shader shader = Shader("vertexSource.txt", "fragSource.txt");
	shader.Use();
	glUniform1i(glGetUniformLocation(shader.ID, "ourTexture"), 0);
	glUniform1i(glGetUniformLocation(shader.ID, "ourFace"), 1);
#include
using namespace std;
#include
#include
#include "Shader.h"
#define STB_IMAGE_IMPLEMENTATION
#include "stb_image.h"

void processInput(GLFWwindow *window);

float vertices[] = {
	// positions          // colors           // texture coords
	 0.5f,  0.5f, 0.0f,   1.0f, 0.0f, 0.0f,   1.0f, 1.0f,   // top right
	 0.5f, -0.5f, 0.0f,   0.0f, 1.0f, 0.0f,   1.0f, 0.0f,   // bottom right
	-0.5f, -0.5f, 0.0f,   0.0f, 0.0f, 1.0f,   0.0f, 0.0f,   // bottom left
	-0.5f,  0.5f, 0.0f,   1.0f, 1.0f, 0.0f,   0.0f, 1.0f    // top left
};
unsigned int indices[] = {  // note that we start from 0!
	0, 1, 3,  // first Triangle
	1, 2, 3   // second Triangle
};

int main()
{
	glfwInit();  //初始化glfw库
	glfwWindowHint(GLFW_CONTEXT_VERSION_MAJOR, 3);
	glfwWindowHint(GLFW_CONTEXT_VERSION_MINOR, 3);
	glfwWindowHint(GLFW_OPENGL_PROFILE, GLFW_OPENGL_CORE_PROFILE);

	GLFWwindow* window = glfwCreateWindow(800, 600, "OpenGL Window", NULL, NULL);

	if (window == NULL)
	{
		cout << "init window error" << endl;
		glfwTerminate();
		return -1;
	}
	glfwMakeContextCurrent(window);


	//init glew
	//glewExperimental = GL_TRUE; //使用有问题 注释掉
	if (glewInit() != GLEW_OK)
	{
		cout << "glewInit error" << endl;
		glfwTerminate();
		return -1;
	}

	glViewport(0, 0, 800, 600);
	//glPolygonMode(GL_FRONT_AND_BACK, GL_LINE);
	//创建VAO并且绑定
	unsigned int VAO;
	glGenVertexArrays(1, &VAO);
	glBindVertexArray(VAO);

	//创建VBO
	unsigned int VBO;
	glGenBuffers(1, &VBO);
	glBindBuffer(GL_ARRAY_BUFFER, VBO);

	//数据写入内存
	glBufferData(GL_ARRAY_BUFFER, sizeof(vertices), vertices, GL_STATIC_DRAW);

	//创建EBO
	unsigned int EBO;
	glGenBuffers(1, &EBO);
	glBindBuffer(GL_ELEMENT_ARRAY_BUFFER, EBO);

	//数据写入内存
	glBufferData(GL_ELEMENT_ARRAY_BUFFER, sizeof(indices), indices, GL_STATIC_DRAW);

	//顶点位置属性
	glVertexAttribPointer(0, 3, GL_FLOAT, GL_FALSE, 8 * sizeof(float), (void*)0);
	glEnableVertexAttribArray(0);

	//顶点颜色属性
	glVertexAttribPointer(1, 3, GL_FLOAT, GL_FALSE, 8 * sizeof(float), (void*) (3 * sizeof(float)));
	glEnableVertexAttribArray(1);

	//纹理颜色属性
	glVertexAttribPointer(2, 2, GL_FLOAT, GL_FALSE, 8 * sizeof(float), (void*)(6 * sizeof(float)));
	glEnableVertexAttribArray(2);

	unsigned int TexBufferA;
	glGenTextures(1, &TexBufferA);
	glBindTexture(GL_TEXTURE_2D, TexBufferA);

	// set the texture wrapping parameters
	glTexParameteri(GL_TEXTURE_2D, GL_TEXTURE_WRAP_S, GL_REPEAT);	// set texture wrapping to GL_REPEAT (default wrapping method)
	glTexParameteri(GL_TEXTURE_2D, GL_TEXTURE_WRAP_T, GL_REPEAT);
	// set texture filtering parameters
	glTexParameteri(GL_TEXTURE_2D, GL_TEXTURE_MIN_FILTER, GL_LINEAR);
	glTexParameteri(GL_TEXTURE_2D, GL_TEXTURE_MAG_FILTER, GL_LINEAR);
	// load image, create texture and generate mipmaps

	int width, height, nrChannel;
	unsigned char *data = stbi_load("container.jpg", &width, &height, &nrChannel, 0);
	if (data)
	{
		glTexImage2D(GL_TEXTURE_2D, 0, GL_RGB, width, height, 0, GL_RGB, GL_UNSIGNED_BYTE, data);
		glGenerateMipmap(GL_TEXTURE_2D);
	}
	else
	{
		cout << "load image error" << endl;
	}
	stbi_image_free(data);

	unsigned int TexBufferB;
	glGenTextures(1, &TexBufferB);
	glBindTexture(GL_TEXTURE_2D, TexBufferB);

	// set the texture wrapping parameters
	glTexParameteri(GL_TEXTURE_2D, GL_TEXTURE_WRAP_S, GL_REPEAT);	// set texture wrapping to GL_REPEAT (default wrapping method)
	glTexParameteri(GL_TEXTURE_2D, GL_TEXTURE_WRAP_T, GL_REPEAT);
	// set texture filtering parameters
	glTexParameteri(GL_TEXTURE_2D, GL_TEXTURE_MIN_FILTER, GL_LINEAR);
	glTexParameteri(GL_TEXTURE_2D, GL_TEXTURE_MAG_FILTER, GL_LINEAR);
	// load image, create texture and generate mipmaps
	stbi_set_flip_vertically_on_load(true);
	unsigned char *data2 = stbi_load("awesomeface.png", &width, &height, &nrChannel, 0);
	if (data2)
	{
		glTexImage2D(GL_TEXTURE_2D, 0, GL_RGBA, width, height, 0, GL_RGBA, GL_UNSIGNED_BYTE, data2);
		glGenerateMipmap(GL_TEXTURE_2D);
	}
	else
	{
		cout << "load awesomeface image error" << endl;
	}
	stbi_image_free(data2);
	Shader shader = Shader("vertexSource.txt", "fragSource.txt");
	shader.Use();
	glUniform1i(glGetUniformLocation(shader.ID, "ourTexture"), 0);
	glUniform1i(glGetUniformLocation(shader.ID, "ourFace"), 1);

	while (!glfwWindowShouldClose(window))
	{
		glfwPollEvents();

		glClearColor(0.2f, 0.3f, 0.3f, 1.0f);
		glClear(GL_COLOR_BUFFER_BIT);
		glActiveTexture(GL_TEXTURE0);
		glBindTexture(GL_TEXTURE_2D, TexBufferA);
		glActiveTexture(GL_TEXTURE1);
		glBindTexture(GL_TEXTURE_2D, TexBufferB);
		glBindVertexArray(VAO);
		glBindBuffer(GL_ELEMENT_ARRAY_BUFFER, EBO);

		//float timeValue = glfwGetTime();
		//float greenValue = (sin(timeValue) / 2.0f) + 0.5f;
		//glDrawArrays(GL_TRIANGLES, 0, 3);
		glDrawElements(GL_TRIANGLES, 6, GL_UNSIGNED_INT, 0);
		glfwSwapBuffers(window); //双缓存防止闪烁

		processInput(window);
	}
	return 0;
}

void processInput(GLFWwindow *window)
{
	if (glfwGetKey(window, GLFW_KEY_ESCAPE) == GLFW_PRESS)
	{
		glfwSetWindowShouldClose(window, true);
	}
}

