『目标检测』Yolo_v3之Pytorch版本项目详细分析
一.前言
最近在学习yolo_v3项目,该项目是深度学习发展到现阶段最受欢迎的大项目之一,是多目标识别跟踪框架集大成者。
yolo_v3是yolo系列之一神经网络,同时也是发展到的最优美的网络。当然,随着系列发展,yolo_v3也保留和yolo_v1和yolo_v2神经网络的部分优点,同时,也抛弃了yolo_v1和yolo_v2中大多数缺点。下面就yolo_v3进行理论和代码信息分析。同学完全可以通过这篇文章,完全学会使用yolo_v3,并结合做出自己好玩的东西。话不过说,开始你的路程吧。
先写上yolo_v3设计上的一些思想,先不必看懂:
- “分而治之”:yolo系列算法是通过对原始输入图片通过划分单元格来做检测。不同之处在于划分的格子数量不同而已。
- 激活函数:yolo_v3采用Leaky ReLU函数作为激活函数。
- 普通卷积层:yolo_v2和yolo_v3使用 Batch Normalization 作为正则化、加速收敛、避免过拟合的方法。在每一层卷积层后接上 BN层和Leaky Relu层 。
class ConvolutionalLayer(torch.nn.Module):

    def __init__(self, in_channels, out_channels, kernel_size, stride, padding, bias=False):
        super(ConvolutionalLayer, self).__init__()

        self.sub_module = torch.nn.Sequential(
            torch.nn.Conv2d(in_channels, out_channels, kernel_size, stride, padding, bias=bias),
            torch.nn.BatchNorm2d(out_channels),#BN
            torch.nn.LeakyReLU(0.1)#leaky relu
        )
- 度尺度训练: 在速度和准确率之间tradeoff。想速度快点,可以牺牲准确率;想准确率高点儿,可以牺牲一点速度 。
- 分类函数: 对象分类用Logistic取代了softmax。
二.yolo系列简要分析
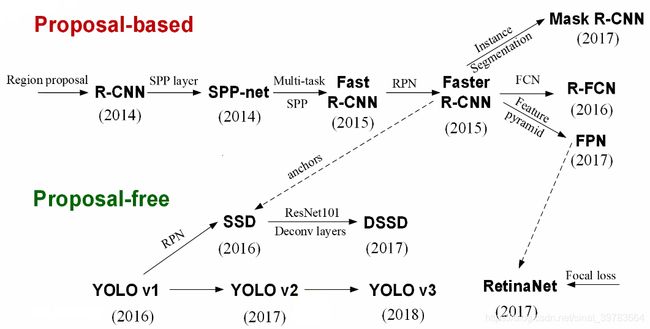
yolo适合作为工程算法。从yolo_v1到yolo_v3,不难发现yolo每一代神经网络性能达大幅提升很大一部分功劳在于基础网络的提升。yolo_v2使用Darkent-19基础网络,yolo_v3使用 darknet-53 基础网络(网络性能高)。yolo_v3还可以使用 tiny-darknet (轻量加速)替换darknet-53。( 在官方代码里用一行代码就可以实现切换 )
1.yolo_v1
- 输入图像大小224x224,分7x7个格子,每个格子代表原来的32x32大小。
- 5个下采样。(2的5次方)
- 缺点:输入图片较小。
- 输出层用全连接层。
- 只有2种建议框:横向长方形,竖向长方形。
2.yolo_v2
- 输出层用全卷积结构。从原理上,输入可以任意大小。
- 两种尺寸:448和224。
- 448:每个格子64x64大小。组合卷积的步长也为64。
- 224:每个格子代表原来的32x32大小。
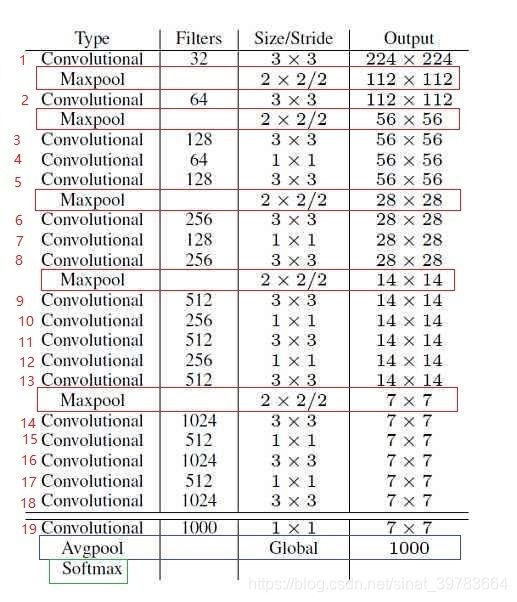
- Darkent-19:19个带权重的层。
- 对于前向过程中张量尺寸变换,是通过最大池化来进行,一共有5次下采样。
- 设计技巧:3x3–>1x1–>3x3。尺寸大小不变,固可进行更改:1)可使用残差层替换;2)可更改为:1x1–>3x3–>1x1(计算量小) 。
- darknet-19最后面没有全局平均池化。
- darknet-19是不存在残差结构的,和VGG是同类型的backbone(属于上一代CNN结构) 。
3.yolo_v3
- 上采样:过程使用特征金字塔。(尺寸受到限制,限制不严重)
- 3种尺寸:608、416、320。(实际中反推合理数据都可以。是32的倍数)
- 9种建议框。并使用K-mean做聚类。
- Darkent-53:53个带权重的层(基础网络)。
- 首先,使用基础网络在其他数据集上进行分类(最后一层使用softmax做分类),然后将权重保存;最后再用于Yolov3上。【迁移学习:训练速度调小。尽量使用SGD等反应比较温和的训练器。因为,训练速度调大,会破坏掉原来的知识体系。训练技巧:先冻结前边的知识体系,等后边的知识体系学好了,再将前边的放开,一起去学习。】
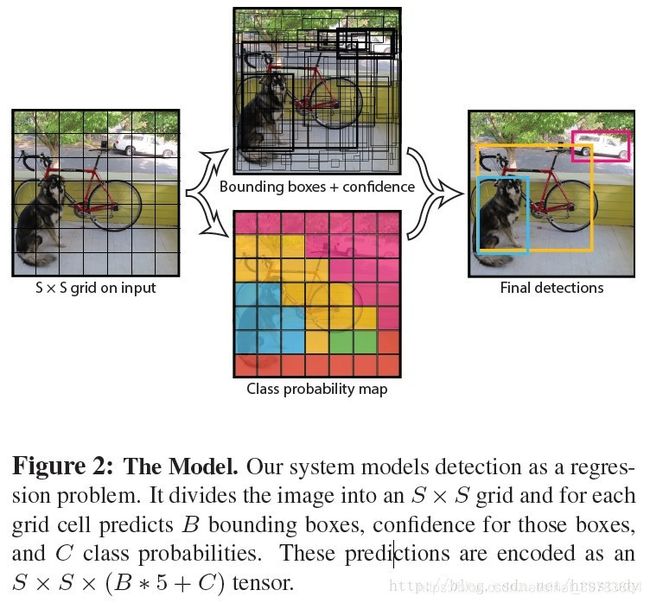
- 将输入图像分化为SxS的 网格,一个格子是一个向量,每个向量代表原来的一块。
- 步长=核尺寸。使用组合卷积。
- 对于前向过程中张量尺寸变换,是通过卷积核增大步长来进行,一共有5次 。
- darknet-53最后面有一个全局平均池化 。因为最后的特征信息都是有用的。如果使用最大池化会将部分有用信息过滤掉。 在一些层之间设置了快捷链路(shortcut connections)。
- 使用卷积进行下采样,增加网络容量。因为卷积层带有参数,最大池化不带参数。
- 跳跃连接。
三.yolo_v3理论分析
1.几个关键结构
(1)DBL
全称: Darknetconv2d_BN_Leaky ( 卷积+BN+Leaky relu ),是 yolo_v3的基本组件 。如图yolo_v3网络结构(1)中绿色框中的内容。代码处使用面向对象思想单独写出来。代码如下:
"""普通卷积层(DBL)"""
class ConvolutionalLayer(torch.nn.Module):

    def __init__(self, in_channels, out_channels, kernel_size, stride, padding, bias=False):
        super(ConvolutionalLayer, self).__init__()

        self.sub_module = torch.nn.Sequential(
            torch.nn.Conv2d(in_channels, out_channels, kernel_size, stride, padding, bias=bias),#Darknetconv2d
            torch.nn.BatchNorm2d(out_channels),#BN
            torch.nn.LeakyReLU(0.1)#Leaky
        )

    def forward(self, x):
        return self.sub_module(x)
(2)resn
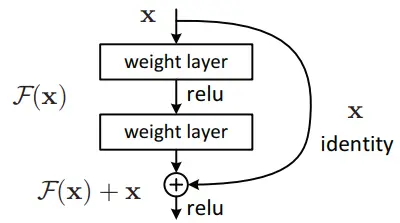
res代表残差结构,n代表数字。res1,res2, … ,res8等, 表示多少个重复的残差组件。(可以此更改网络结构。相关论文: 基于改进损失函数的YOLOv3网络 ),是 yolo_v3的大组件 。借鉴了ResNet的残差结构 。这样做的好处是:使用残差网络结构,让网络结构更深,这也就是从yolo_v2中的 darknet-19提升到yolo_v3的darknet-53的原理。结构:DBL降低通道+DBL还原通道。 每个残差组件有两个卷积层和一个快捷链路,示意图如下:
代码如下:
"""普通卷积层(DBL)"""
class ConvolutionalLayer(torch.nn.Module):

    def __init__(self, in_channels, out_channels, kernel_size, stride, padding, bias=False):
        super(ConvolutionalLayer, self).__init__()

        self.sub_module = torch.nn.Sequential(
            torch.nn.Conv2d(in_channels, out_channels, kernel_size, stride, padding, bias=bias),
            torch.nn.BatchNorm2d(out_channels),
            torch.nn.LeakyReLU(0.1)
        )

    def forward(self, x):
        return self.sub_module(x)
"""残差层"""#(输入大小=输入大小)
class ResidualLayer(torch.nn.Module):

    def __init__(self, in_channels):
        super(ResidualLayer, self).__init__()

        self.sub_module = torch.nn.Sequential(
            ConvolutionalLayer(in_channels, in_channels // 2, 1, 1, 0),#DBL降低通道。调用普通卷积层。
            ConvolutionalLayer(in_channels // 2, in_channels, 3, 1, 1),#DBL还原通道。
        )

    def forward(self, x):
        return x + self.sub_module(x)#H(x)=x+F(x)
(3)concat
张量拼接。 将基础网络中间层和后面的某一层的上采样进行拼接。拼接的操作和残差层add的操作是不一样的,拼接会扩充张量的维度,而add只是直接相加不会导致张量维度的改变。
concat和相加的对比分析:
相加可以提高对特征的增强,但分类效果不高。因为人脸识别,最终是人脸人类,最终一层特征至少保存128个维度,当类别少,会分的不清。增加效果的提升是在分类维度上进行增加的。相加时,特征维度不增加;拼接会增加特征维度,增加分类能力。
拼接好的另一个原因:基础网络中注重局部信息(如26x26大小。局部信息好,感受野小。维度大512。);当下采样后再上采样的特征图(如26x26大小。特征融合更好,全局性更好,特征更全面,感受野大。维度小256。26x26预测更小的物体,局部重要,所以,局部数据维度大,全局维度信息少,更加注重基础网络中得到的局部信息)与基础网络中的特征图进行拼接时。52x52道理同上。预测更更小的物体,局部重要,所以,局部数据维度大,全局维度信息少,更加注重基础网络中得到的局部信息。
(4)总结
yolo_v3共包含252层结构。
2.几个关键内容
(1)基础网络
- yolo_v3的改进:在基础网络结构中张良尺寸的变化技巧取消使用池化层和全连接层,取而代之的是卷积层。通过改变卷积核步长实现的,如:s=2时,等于将图像边长缩小为原来的1/2,面积缩小为原来的1/4。
- 神器的数字5:在yolo_v2和yolo_v3的基础网络结构中,原始图片经历5次缩小,最终特征图变为原来的 1 / 2 5 1/2^5 1/25,即1/32。当输入图片大小为416x416时,输出图片大小为13x13。
- 输入图片要求: 通常要求输入图片是32的倍数。
(2)网络的输出
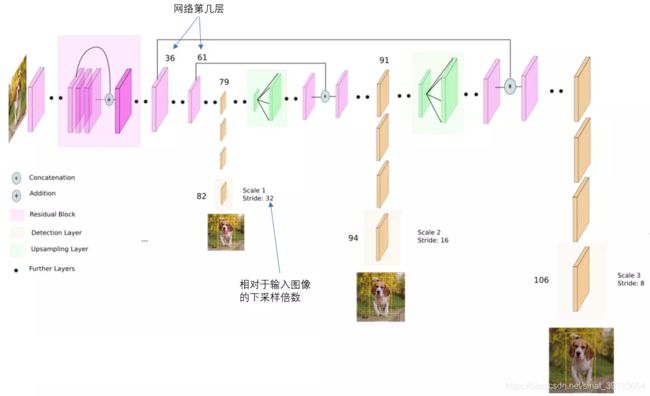
如下图所示,yolo_v3 输出了3个不同尺度的特征图。这是 yolo_v3 的**一大改进。**该思想借鉴与FPM( feature pyramid networks )。是的yolo_v3 可以对多尺度目标进行检测。3种不同尺寸特征图边长规律为13:26:52。
这三种不同尺寸的深度为255。解释如下:
-
论文中,作者使用COCO数据集进行分类,该数据集有80种物体类别。
-
每个网格单元预测3个实际框,每个实际框需要五个参数和80个类别概率才能作为分类使用:中心点坐标两个值、框的宽和高两个值、置信度一个值(x,y,w,h, confidence )。
-
综上:255=3x(5+80)=255。
-
当然,数据集不同,类别也不用,深度也不同。
-
13x3特征图侦测
如下图中,卷积网络在第79层处,经过向下几次卷积得到一种尺度特征图用于侦测。在yolo_v3 中,输入图片大小416x416,下采样32倍,得到13x13大小的特征图。因为下采样倍数高,得到的特征图感受野较大,适合侦测图片中尺寸较大的物体。
- 26x26特征图侦测
如下图中,卷积网络在第79层处向右开始作上采样,然后与第61层特征图融合(Concatenation),在第91层向下几次卷积得到另一种尺度特征图用于侦测。在yolo_v3 中,输入图片大小416x416,下采样16倍,得到26x26大小的特征图。得到的特征图感受野中等,适合侦测图片中尺寸中等的物体。
- 52x52特征图侦测
在第91层特征图再次上采样,并与第36层特征图融合(Concatenation),最后得到相对输入图像8倍下采样的特征图。得到的特征图感受野中最小,适合侦测图片中尺寸小的物体。
(3)9种尺度建议框
YOLO3 中延续 YOLO2中采用 K-means聚类得到建议框的尺寸 。每种下采样尺度设定3种建议框,3种侦测结果,共聚类出来9种建议框。 在COCO数据集这9个先验框是:
10,13, 16,30, 33,23, 30,61, 62,45, 59,119, 116,90, 156,198, 373,326
分配如下:
- 13x13大小特征图
具有最大的感受视野,使用较大的建议框: (116x90),(156x198),(373x326) 。 适合检测较大的物体 。
- 26x26大小特征图
具有中等的感受视野,使用中等的建议框: (30x61),(62x45),(59x119) 。 适合检测中等大小的物体 。
- 52x52大小特征图
具有最大的感受视野,使用较小的建议框: (10x13),(16x30),(33x23) 。 适合检测较小的物体 。
下面在视觉上感受9种建议框的尺寸:
- 蓝色框为聚类得到的建议框;
- 黄色框为实际框;
- 红色框为对象中心点所在的网格。
(4)网络侦测技术
预测相对位置 。 预测出b-box中心点相对于网格单元左上角的相对坐标。
-
预测五个参数( t x t_x tx, t y t_y ty, t w t_w tw, t h t_h th, t o t_o to)。从上述公式可以看出,b-box的位置大小和置信度可以通过( t x t_x tx, t y t_y ty, t w t_w tw, t h t_h th, t o t_o to)计算得来。其中,b-box的宽和高的预测受到 prior影响(即,建议框框的种类。yolo_v3中有9中建议框) 。
-
对 b-box进行预测时,输出 ( t x t_x tx, t y t_y ty, t w t_w tw, t h t_h th, t o t_o to),然后通过上述公式计算出绝对的 (x, y, w, h, c) 。
-
使用 logistic回归对边界框包围的部分进行目标性评分, 即这块位置是目标的可能性有多大。 这一步是在predict之前进行的,可以去掉不必要anchor,可以减少计算量。
-
对那个最佳预测进行操作。
(5)分类函数
在物体预测时,yolo_v3使用 logistic 代替 softmax 函数。 logistic支持多标签对象,如:男人和人的预测。
(6)损失函数
yolo_v3的重要改进。在目标检测中有几个关键信息需要确定: ( x , y ) , ( w , h ) , c l a s s , c o n f i d e n c e (x,y),(w,h),class,confidence (x,y),(w,h),class,confidence。根据关键信息的特点可以分为四类(中心点坐标、宽和高、分类、置信度),损失函数也用该由各自的特点确定。最后将四类相加得到最终的损失函数。这也就是一个神经网络项目中损失函数最为重要,确定了损失函数,基本整个项目就确定了。
除了(w, h)的损失函数依然采用总方误差之外,其他部分的损失函数用的是二值交叉熵 。
(7)输入->输出
yolo_v3将输入图像映射到3个尺度的输出张量。对于一个416x416的图像,每个尺度的特征图的每个网格设置了3个建议框,总共得到10647的预测=13x13x3+26x26x3+52x52x3。每个预测是一个85维向量=(2+2+1+80)。其中,两个2分别代表中心点坐标值2个和框的置信度1个,物体概率类别概率(COCO数据集80个种类)。
三种尺寸输出特征图结构:NCHW。其中,C=(1+4+S)x3。公式中,1代表一个置信度,4代表中心点坐标两个值,宽和高两个值,S代表分类的类别数量,3代表三种建议框。
(8)总结
-
yolo_v3借鉴了残差网络结构,形成更深的网络层次;
-
使用多尺度检测,提升了mAP及小物体检测效果。
(9)几点建议
在实际项目中,当数据集和Yolov3的数据集不相同时,建议框的选择有两种方法:(1)人为画出建议框(对特定模型很好。但是人为具有局限性,通用性差);(2)通过K-mean聚类算法聚类得到合适建议框(推荐。可能特定目标效果不好,但是整体效果很好)。
四.yolo_v3代码分析
1.网络结构
写网络结构:清晰、便于修改
- 拆分成块;
- 写块代码块;
- 主框架(组装块)。
代码:
import torch

"""上采样层"""
class UpsampleLayer(torch.nn.Module):

    def __init__(self):
        super(UpsampleLayer, self).__init__()

    def forward(self, x):
        return torch.nn.functional.interpolate(x, scale_factor=2, mode='nearest')#临近采样,快一些,插值为原来的2倍。插值方法很多:像素混合,反卷积等

"""普通卷积层"""
class ConvolutionalLayer(torch.nn.Module):

    def __init__(self, in_channels, out_channels, kernel_size, stride, padding, bias=False):
        super(ConvolutionalLayer, self).__init__()

        self.sub_module = torch.nn.Sequential(
            torch.nn.Conv2d(in_channels, out_channels, kernel_size, stride, padding, bias=bias),
            torch.nn.BatchNorm2d(out_channels),
            torch.nn.LeakyReLU(0.1)#Prelu的参数需要学习
        )

    def forward(self, x):
        return self.sub_module(x)

"""残差层"""#(输入大小=输入大小)
class ResidualLayer(torch.nn.Module):

    def __init__(self, in_channels):
        super(ResidualLayer, self).__init__()

        self.sub_module = torch.nn.Sequential(
            ConvolutionalLayer(in_channels, in_channels // 2, 1, 1, 0),#调用普通卷积层。
            ConvolutionalLayer(in_channels // 2, in_channels, 3, 1, 1),#输出通道大小=输出通道大小
        )

    def forward(self, x):
        return x + self.sub_module(x)#H(x)=x+F(x)

"""下采样层"""
class DownsamplingLayer(torch.nn.Module):
    def __init__(self, in_channels, out_channels):
        super(DownsamplingLayer, self).__init__()

        self.sub_module = torch.nn.Sequential(
            ConvolutionalLayer(in_channels, out_channels, 3, 2, 1)
        )

    def forward(self, x):
        return self.sub_module(x)

"""专用卷积集"""
class ConvolutionalSet(torch.nn.Module):
    def __init__(self, in_channels, out_channels):#输入和输出单独列出来
        super(ConvolutionalSet, self).__init__()

        self.sub_module = torch.nn.Sequential(
            ConvolutionalLayer(in_channels, out_channels, 1, 1, 0),#1x1的卷积
            ConvolutionalLayer(out_channels, in_channels, 3, 1, 1),#3x3的卷积

            ConvolutionalLayer(in_channels, out_channels, 1, 1, 0),#1x1的卷积
            ConvolutionalLayer(out_channels, in_channels, 3, 1, 1),#3x3的卷积

            ConvolutionalLayer(in_channels, out_channels, 1, 1, 0),#1x1的卷积
        )

    def forward(self, x):
        return self.sub_module(x)

"""Concatenate不需要写出来"""

"""主网络"""
class MainNet(torch.nn.Module):

    def __init__(self):
        super(MainNet, self).__init__()

        """52*52的基础网络"""
        self.trunk_52 = torch.nn.Sequential(
            ConvolutionalLayer(3, 32, 3, 1, 1),
            ConvolutionalLayer(32, 64, 3, 2, 1),#可调用下采样函数替换

            ResidualLayer(64),#一个残差
            DownsamplingLayer(64, 128),#一个下采样

            ResidualLayer(128),#两个残差
            ResidualLayer(128),
            DownsamplingLayer(128, 256),#一个下采样

            ResidualLayer(256),#八个残差
            ResidualLayer(256),
            ResidualLayer(256),
            ResidualLayer(256),
            ResidualLayer(256),
            ResidualLayer(256),
            ResidualLayer(256),
            ResidualLayer(256),
        )
        """26*13的基础网络"""
        self.trunk_26 = torch.nn.Sequential(
            DownsamplingLayer(256, 512),#一个下采样
            ResidualLayer(512),#八个残差
            ResidualLayer(512),
            ResidualLayer(512),
            ResidualLayer(512),
            ResidualLayer(512),
            ResidualLayer(512),
            ResidualLayer(512),
            ResidualLayer(512),
        )
        """13*13的基础网络"""
        self.trunk_13 = torch.nn.Sequential(
            DownsamplingLayer(512, 1024),#一个下采样
            ResidualLayer(1024),#四个残差。这里可更改为16个残差
            ResidualLayer(1024),
            ResidualLayer(1024),
            ResidualLayer(1024)
        )
        """13*13---专用卷积集"""
        self.convset_13 = torch.nn.Sequential(
            ConvolutionalSet(1024, 512)
        )
        """13*13的侦测"""
        self.detetion_13 = torch.nn.Sequential(
            ConvolutionalLayer(512, 1024, 3, 1, 1),#1024可更改
            torch.nn.Conv2d(1024, 45, 1, 1, 0)#10各类。三个建议框。每个建议框包括5个值:一个置信度(置信度用iou)、四个坐标值、分类类型。预测:3*(1+4+10)=45
        )


        """上采样-->26*26"""
        self.up_26 = torch.nn.Sequential(
            ConvolutionalLayer(512, 256, 1, 1, 0),#1x1的卷积,
            UpsampleLayer()#上采样。Concatenate无法体现
        )
        """26*26--专用卷积集"""
        self.convset_26 = torch.nn.Sequential(#专有卷积
            ConvolutionalSet(768, 256)#通道数要计算。512+256=768
        )
        """26*26的侦测"""
        self.detetion_26 = torch.nn.Sequential(#26的侦测部分
            ConvolutionalLayer(256, 512, 3, 1, 1),
            torch.nn.Conv2d(512, 45, 1, 1, 0)
        )


        """上采样-->52*52"""
        self.up_52 = torch.nn.Sequential(
            ConvolutionalLayer(256, 128, 1, 1, 0),#1x1的卷积
            UpsampleLayer()#上采样(#如果使用转置卷积,需要学习)
        )
        """52*52---专用卷积集"""
        self.convset_52 = torch.nn.Sequential(#专有卷积
            ConvolutionalSet(384, 128)#通道数要计算
        )
        """52*52的侦测"""
        self.detetion_52 = torch.nn.Sequential(#52的侦测部分
            ConvolutionalLayer(128, 256, 1, 1, 0),
            torch.nn.Conv2d(256, 45, 1, 1, 0)
        )

    def forward(self, x):

        #基础网络13、16、52的输出
        h_52 = self.trunk_52(x)
        h_26 = self.trunk_26(h_52)
        h_13 = self.trunk_13(h_26)

        # 13的侦测部分
        convset_out_13 = self.convset_13(h_13)
        detetion_out_13 = self.detetion_13(convset_out_13)

        # 26的侦测部分
        up_out_26 = self.up_26(convset_out_13)
        route_out_26 = torch.cat((up_out_26, h_26), dim=1)
        convset_out_26 = self.convset_26(route_out_26)
        detetion_out_26 = self.detetion_26(convset_out_26)

        # 52的侦测部分
        up_out_52 = self.up_52(convset_out_26)
        route_out_52 = torch.cat((up_out_52, h_52), dim=1)
        convset_out_52 = self.convset_52(route_out_52)
        detetion_out_52 = self.detetion_52(convset_out_52)

        return detetion_out_13, detetion_out_26, detetion_out_52


if __name__ == '__main__':
    trunk = MainNet()

    # x = torch.Tensor(2, 3, 416, 416)
    x=torch.randn([2,3,416,416],dtype=torch.float32)

    y_13, y_26, y_52 = trunk(x)
    print(y_13.shape)#两张图、每个格子15个通道(3x5)、高和宽=13
    print(y_26.shape)
    print(y_52.shape)
    print(y_13.view(-1, 3, 5, 13, 13).shape)
2.数据制作
数据格式:
图片  类别1  x1  y1  w1  h1  类别2  x2  y2  w2  h2  ...
images/1.jpg 1 12 13 51 18 2 22 31 55 98 2 44 33 62 62
置信度:IOU值。来自实际框与建议框的比值。
建议框、类别、坐标值。
-
宽和高做处理
-
实际框和建议框的宽和高不能直接拿去神经网络进行训练。可以学习真实框/建议框的比值(真实框的宽/建议框的宽;真实框的高/建议框的高)是整数。要神经网路学习比例(比例>0)。神经网络输出值范围在(-∞,+∞),要变为>0。使用log函数激活。 x = l o g ( w ) x=log(w) x=log(w)–> w = l o g e x w=loge^x w=logex。w变为正数。又因为,log的在(0-1)梯度非常大,因为比值不是很大(学的置信度很高的框,比值在1附近),易于网络收敛。也可以起到数据压缩的作用,易于模型收敛。
-
中心点的处理
-
中心点的坐标也不能直接拿来学习。中心点与当前格子的左上角做一个偏移。当一张图特别大,比值非常小,数值非常小,计算机容易丢失精度,收敛起来也很慢。首先需要知道当前格子的坐标:使用索引。如,中心点坐标x=3x32+比例x32(格子数从o开始数);中心点坐标y=2x32+比例x32。同样,索引通过特征图计算:x(y)/32,整数部分是索引,小数部分是中心点在当前格子的偏移比值。做样本时只需要小数部分(偏移量)。反算:索引x32为当前格子左上角坐标值(记为A);偏移量x32+A为当前格子中心点的坐标值。下图中, p w , p h p_w,p_h pw,ph是真实框的宽和高, b w , b h b_w,b_h bw,bh是建议框的宽和高。计算: t x = l o g ( b w / p w ) t_x=log(b_w/pw) tx=log(bw/pw), t y = l o g ( b h / p h ) t_y=log(b_h/p_h) ty=log(bh/ph);反算:如下图。
-
实际使用中:使用标注精灵时,首先在图片上框出物体对象(实际框,即得到种类),得到物体的中心点坐标,然后除以32,结果中整数部分为索引值,小数为中心点相对当前格子偏移了多少;接着,依据实际框得到三种建议框,建议框以实际框为中心,分别有正方形、竖着的长方形、横着的长方形三种;最后,按比例缩放三种框得到9个建议框(也可聚类得到),并使用9个建议框和实际框做IOU,即置信度。 t x = l o g ( w 真 实 框 / w 建 议 框 ) t_x=log(w_{真实框}/w_{建议框}) tx=log(w真实框/w建议框), t y = l o g ( h 真 实 框 / h 建 议 框 ) t_y=log(h_{真实框}/h_{建议框}) ty=log(h真实框/h建议框),反算得到宽和高。最终得到
- 代码:
import torch
from torch.utils.data import Dataset,DataLoader
import torchvision
import numpy as np
from my_yolov3 import cfg
import os

from PIL import Image
import math


LABEL_FILE_PATH = "data/person_label.txt"#数据集
IMG_BASE_DIR = "data"#图片(416*416)(建议:先将图片处理为416*416大小,再做标签。因为长方形处理为正方形时左上角参考会变化)

transforms = torchvision.transforms.Compose([
    torchvision.transforms.ToTensor()
])


def one_hot(cls_num, i):
    b = np.zeros(cls_num)#一维0数组
    b[i] = 1.#i:当前类别。
    return b

class MyDataset(Dataset):
    def __init__(self):
        with open(LABEL_FILE_PATH) as f:#with:防止资源泄露
            self.dataset = f.readlines()#readlines():读取所有行。

    def __len__(self):
        return len(self.dataset)

    def __getitem__(self, index):
        labels = {}#三个尺寸。存放数据标签
        line = self.dataset[index]#根据索引拿到每一行
        strs = line.split()#切开
        _img_data = Image.open(os.path.join(IMG_BASE_DIR, strs[0]))#第0个为图片名字。图片位置。(原数据格式:images/1.jpg 1 12 13 51 18 2 22 31 55 98 2 44 33 62 62)
        img_data = transforms(_img_data)#to tensor (NCHW) #还可以进行缩放、变换等操作(自行更改)
        # _boxes = np.array(float(x) for x in strs[1:])
        _boxes = np.array(list(map(float, strs[1:])))# 切割出来是列表,需要转成数组格式进行广播。#map:迭代器。 #_boxes = np.array(list(map(float, strs[1:])))
        boxes = np.split(_boxes, len(_boxes) // 5)#除图片,剩下的每5个一组(原数据格式:images/1.jpg 1 12 13 51 18 2 22 31 55 98 2 44 33 62 62)

        #建议框及其尺寸
        for feature_size, anchors in cfg.ANCHORS_GROUP.items():#循环三种尺寸及三种尺寸下的建议框。ANCHORS_GROUP:建议框#得到特征图尺寸、建议框数据(因为是字典形式存放)。
            labels[feature_size] = np.zeros(shape=(feature_size, feature_size, 3, 5 + cfg.CLASS_NUM))#生成一个0数组,形状为13x13/26x26/52x52,3(三种建议框),5+类别数量-->如:(13,13,3,15),最终得到HWC(13,13,45),其中没有批次。通过index添加的是一张图片,没有批次。如果需要添加批次,在训练数据时添加数据时设置批次。
                                                                                                     # 设计0矩阵用于填充特征值
            #建议box计算索引和偏移量
            for box in boxes:#分好的,每5个一组的。格式如:[[1,2,3,4,5],[1,2,3,4,5],...]。循环拿出每个box
                cls, cx, cy, w, h = box#每个box有5个值。
                cx_offset, cx_index = math.modf(cx * feature_size / cfg.IMG_WIDTH)#cx*13/416=cx/32  小数、整数=偏移量和索引。
                cy_offset, cy_index = math.modf(cy * feature_size / cfg.IMG_WIDTH)#cy*13/416=cy/32  小数、整数=偏移量和索引。

                #每个建议框
                for i, anchor in enumerate(anchors):#遍历每一种尺寸的每个建议框
                    anchor_area = cfg.ANCHORS_GROUP_AREA[feature_size][i]#得到三个建议框的面积列表
                    p_w, p_h = w / anchor[0], h / anchor[1]#计算真实框/建议框#anchor[0]:建议框的宽;anchor[1]:建议框的高
                    p_area = w * h#真实框面积
                    iou = min(p_area, anchor_area) / max(p_area, anchor_area)#iou值一定小于1。选择小的面积除以大的面积。
                    #打包。输出每种尺寸下的建议框的标签值
                    labels[feature_size][int(cy_index), int(cx_index), i] = np.array(
                        [iou, cx_offset, cy_offset, np.log(p_w), np.log(p_h), *one_hot(cfg.CLASS_NUM, int(cls))])#10,i#hwc-->y,x,3。cy_index代表H;cx_index代表W;i代表哪一个(3个)。

        return labels[13], labels[26], labels[52], img_data
data = MyDataset()
dataloader = DataLoader(data,2,shuffle=True)#中间数字可更改
for y_13,y_26,y_52,image in dataloader:
    print(y_13.shape)#几种尺寸,特征图大小,每种尺寸下有多少种建议框,15
    print(y_26.shape)
    print(y_52.shape)
    print(image.shape)
3.训练
做置信度比较,保留置信度大的框,做中心点和宽、高的损失,以及分类。
- 代码
from my_yolov3 import dataset
from my_yolov3.model import *
import torch
from torch.utils.data import DataLoader
import os

def loss_fn(output, target, alpha):
    conf_loss_fn = torch.nn.BCEWithLogitsLoss()#计算置信度。也可使用均方差损失计算。#sigmold+BCE,就不使用sigmold激活,比BCEloss稳定。
    # conf_loss_fn=torch.nn.BCELoss()#计算置信度。也可使用均方差损失计算。
    crood_loss_fn = torch.nn.MSELoss()#计算坐标偏移量。
    cls_loss_fn = torch.nn.CrossEntropyLoss()#计算多分类。可区别类与类之间的包含关系的情况。如果标签里包含包含关系,不使用交叉熵损失函数。
    output = output.permute(0, 2, 3, 1)#nchw-->nhwc(如:1,45,13,13-->1,13,13,45)。为了跟标签匹配。先转置,
    output = output.reshape(output.size(0), output.size(1), output.size(2), 3, -1)#如(1,13,13,45)-->(1,13,13,3,15).再变形。

    #先计算置信度的满足情况
    mask_obj = target[..., 0] > 0#掩码。格式为true和fulse。(数值根据需求可更改。)
    output_obj = output[mask_obj]#得到符合条件的正样本输出
    target_obj = target[mask_obj]#得到符合条件的正样本标签
    loss_obj_conf = conf_loss_fn(output_obj[:, 0], target_obj[:, 0])#置信度损失。正确的学正确
    loss_obj_crood = crood_loss_fn(output_obj[:, 1:5], target_obj[:, 1:5])#中心点、宽和高,通过MSEloss计算
    loss_obj_cls = cls_loss_fn(output_obj[:, 5:], target_obj[:, 5:])#类别,通过交叉熵计算
    loss_obj = loss_obj_conf + loss_obj_crood + loss_obj_cls##总体损失计算(正样本损失)

    mask_noobj = target[..., 0] == 0#拿到标签中置信度为0的掩码。(数值根据需求可更改。)
    output_noobj = output[mask_noobj]
    target_noobj = target[mask_noobj]
    loss_noobj = conf_loss_fn(output_noobj[:, 0], target_noobj[:, 0])#负样本不学坐标的回归量等。

    loss = alpha * loss_obj + (1 - alpha) * loss_noobj#(1 - alpha):在yolo中正样本的权重应该给高些,因为不需要学习太多背景信息。(与MTCNN相反)。这种方法称为:样本平衡。
    # loss = loss_obj + loss_noobj
    return loss

if __name__ == '__main__':
    save_path = "models/net_yolo_GM.pth"
    myDataset = dataset.MyDataset()
    train_loader = DataLoader(myDataset, batch_size=2, shuffle=True)

    device = torch.device("cuda" if torch.cuda.is_available() else "cpu")
    net = MainNet().to(device)

    if os.path.exists(save_path):
        net.load_state_dict(torch.load(save_path))
    else:
        print("NO Param")

    net.train()
    opt = torch.optim.Adam(net.parameters())

    epoch = 0
    while True:
        for target_13, target_26, target_52, img_data in train_loader:
            img_data = img_data.to(device)
            output_13, output_26, output_52 = net(img_data)
            loss_13 = loss_fn(output_13, target_13, 0.9)
            loss_26 = loss_fn(output_26, target_26, 0.9)
            loss_52 = loss_fn(output_52, target_52, 0.9)
            loss = loss_13 + loss_26 + loss_52

            opt.zero_grad()
            loss.backward()
            opt.step()
            if epoch % 10 == 0:
                torch.save(net.state_dict(), save_path)
                print('save {}'.format(epoch))
            print(loss.item())
        epoch += 1
4.侦测
from my_yolov3.model import *
from my_yolov3 import cfg
import torch
import numpy as np
import PIL.Image as pimg
import PIL.ImageDraw as draw
from my_yolov3 import tool

class Detector(torch.nn.Module):

    def __init__(self,save_path):
        super(Detector, self).__init__()

        self.net = MainNet()#实例化网络
        self.net.load_state_dict(torch.load(save_path))#加载训练器
        self.net.eval()#

    def forward(self, input, thresh, anchors):
        output_13, output_26, output_52 = self.net(input)#输出三种结果
        idxs_13, vecs_13 = self._filter(output_13, thresh)#过滤器。输出合格的特征点的索引和(15个)值
        boxes_13 = self._parse(idxs_13, vecs_13, 32, anchors[13])#将值传到专网解析网络中得到建议框

        idxs_26, vecs_26 = self._filter(output_26, thresh)#过滤器。
        boxes_26 = self._parse(idxs_26, vecs_26, 16, anchors[26])#将值传到专网解析网络中得到建议框

        idxs_52, vecs_52 = self._filter(output_52, thresh)#过滤器。
        boxes_52 = self._parse(idxs_52, vecs_52, 8, anchors[52])#将值传到专网解析网络中得到建议框
        return torch.cat([boxes_13, boxes_26, boxes_52], dim=0)

    #特征图上的特征点,判断特征点在原图上是否有物体,如果有,输出(15个)值
    def _filter(self, output, thresh):#
        output = output.permute(0, 2, 3, 1)#nchw-->nhwc
        output = output.reshape(output.size(0), output.size(1), output.size(2), 3, -1)#变成3x15
        mask = output[..., 0] > thresh#掩码。将>阈值的掩码
        idxs = mask.nonzero()#特征图大于多少的索引
        vecs = output[mask]#取值
        return idxs, vecs #索引  值


    #解析
    def _parse(self, idxs, vecs, t, anchors):#索引  值  32  建议框
        anchors = torch.Tensor(anchors)#将建议框转为ensor
        a = idxs[:, 3]  # 建议框:3  #每个特征图下有三种建议框,每个建议框下对应15个(置信度、中心点、宽和高  种类)值。nhw 3 15

        confidence = vecs[:, 0]#置信度
        _classify = vecs[:, 5:]#分类
        if len(_classify) == 0:#如果onehot是0,表示没有训练.返回空
            classify = torch.Tensor([])
        else:
            classify = torch.argmax(_classify, dim=1).float()#否则取最大值的索引,即取出类别

        #取坐标(C  XC XY W H)
        cy = (idxs[:, 1].float() + vecs[:, 2]) * t# 原图的中心点y。H计算Y值。H的索引+偏移值(Y的偏移)*32-->回到原图上的坐标值
        cx = (idxs[:, 2].float() + vecs[:, 1]) * t# 原图的中心点x。W计算X值。W的索引+偏移值(X的偏移)*32-->回到原图上的坐标值
        w = anchors[a, 0] * torch.exp(vecs[:, 3])#anchors:获得三组建议框。第一个建议框的第0个,乘以缩放比例-->真实宽度
        h = anchors[a, 1] * torch.exp(vecs[:, 4])
        x1 = cx - w / 2
        y1 = cy - h / 2
        x2 = x1 + w
        y2 = y1 + h

        out = torch.stack([confidence,x1,y1,x2,y2,classify], dim=1)
        return out

if __name__ == '__main__':
    save_path = "models/net_yolo_GM.pth"
    detector = Detector(save_path)
    # y = detector(torch.randn(3, 3, 416, 416), 0.3, cfg.ANCHORS_GROUP)
    # print(y.shape)

    img1 = pimg.open(r'data\images\1.jpg')
    img = img1.convert('RGB')
    img = np.array(img) / 255
    img = torch.Tensor(img)

    img = img.unsqueeze(0)
    img = img.permute(0, 3, 1, 2)#nhwc-->nchw
    img = img.cuda()

    out_value = detector(img, 0.3, cfg.ANCHORS_GROUP)

    boxes = []

    for j in range(10):
        classify_mask = (out_value[..., -1] == j)#类别正确的掩码
        _boxes = out_value[classify_mask]
        boxes.append(tool.nms(_boxes))#拿到某一类最好的框

    for box in boxes:
        try:
            img_draw = draw.ImageDraw(img1)#画出来框
            x1, y1, x2, y2 = box[0, 1:5]
            print(x1, y1, x2, y2)
            img_draw.rectangle((x1, y1, x2, y2))
        except:
            continue
    img1.show()
好文连接:
https://www.jianshu.com/p/d13ae1055302
https://blog.csdn.net/litt1e/article/details/88907542
https://blog.csdn.net/leviopku/article/details/82660381
模型结构可视化工具是:Netron
