Tensorflow教程之语音识别
1、概述
本人从事语音方面的开发工作,通过音频和代码实战tensorflow是最直接有效的学习方式,先从简单的语音识别和tensorflow代码开始来了解这个体系
2、与传统语音识别的对比
传统的语音识别是基于语音学的方法,通常包含拼写、声学和语音模型等单独组件。训练模型的语料除了标注具体的文字外。还要标注按时间对应的音素,这就需要大量的人工成本。(标记因素是个很大的坑)而使用神经网络的语音识别就变得简单多了,通过能进行时序分类的连续时间分类目标函数(CTC),计算多个标签序列的概率,而序列是语音样本中所有可能的对应文字的集合。然后把预测结果跟实际比较,计算误差,不断更新网络权重。这样就丢弃音素的概念,就省了大量人工标注的成本,也不需要语言模型,只要有足够的样本,就可以训练各种语言的语音识别了。
3、下载并分析数据集
数据下载地址
下载并解压数据文件后如图所示:


data_thchs30文件夹包含的是语音数据和其翻译,我们来看看文件夹里的内容:
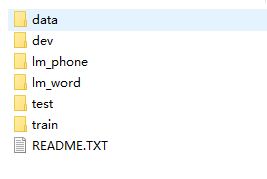
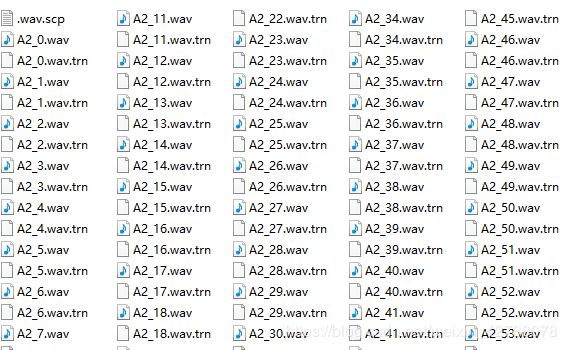
data文件夹下,“.wav”文件保存的是音频文件,”.wav.trn”保存的是翻译文件,然后,train/dev/test文件夹下的文件是将data文件夹下的文件分割过来的,这3个文件夹具体哪个文件夹分了多少文件,下面有个表显示了。这里有个词“symlinks”,链接?难道都是链接文件?不可能吧?去看看再说,打开data文件夹,内容如下图所示,
打开README.TXT

.wav文件是一个音频文件就不做过多描述了,这里我们打开一个.trn文件
![]()
文件的内容一共有三行
- 第一行是音频读取的文字
- 第二行是拼音+音调(中文抑扬顿挫的四个声调,用1234表示)
- 第三行是音素+音调(就是把拼音给分开了)
train文件夹跟data文件夹下的文件名一样,只不过这里总共只有20000个文件,而data文件夹下有26776个文件,可以猜测另外的6776个文件应该是放到dev和test文件夹下了。
4、读取样本
训练的话,我们就用train文件夹下的数据来训练,音频文件可以直接使用train文件夹下的,翻译的话,就得用data文件夹下的了,音频文件是**.wav,对应的翻译文件则是**.wav.trn
所以我们先找出所有的train文件夹下的音频文件,再找data文件夹下音频文件名+”.trn”后缀的文件就是翻译文件,取翻译文件的第一行,就是翻译内容了,将音频文件和翻译的内容一一对应,加载到内存中。
先来实现获取指定文件夹下所有WAV文件的函数
#encoding:utf-8
import os

#获取文件夹下所有的WAV文件
def get_wav_files(wav_path):
    wav_files = []
    for (dirpath, dirnames, filenames) in os.walk(wav_path):
        for filename in filenames:
            if filename.endswith('.wav') or filename.endswith('.WAV'):
                # print(filename)
                filename_path = os.path.join(dirpath, filename)
                # print(filename_path)
                wav_files.append(filename_path)
    return wav_files
根据上面获取的WAV文件,获取其指定文件夹下对应的翻译文件里的第一行,即翻译文字
#获取wav文件对应的翻译文字
def get_tran_texts(wav_files, tran_path):
    tran_texts = []
    for wav_file in wav_files:
        (wav_path, wav_filename) = os.path.split(wav_file)
        tran_file = os.path.join(tran_path, wav_filename + '.trn')
        # print(tran_file)
        if os.path.exists(tran_file) is False:
            return None

        fd = open(tran_file,encoding='gb18030', errors='ignore')
        text = fd.readline()
        tran_texts.append(text.split('\n')[0])
        fd.close()
    return tran_texts
将上面两个函数整合成一个函数
#获取wav和对应的翻译文字
def get_wav_files_and_tran_texts(wav_path, tran_path):
    wav_files = get_wav_files(wav_path)
    tran_texts = get_tran_texts(wav_files, tran_path)
    return wav_files, tran_texts
测试
wav_files, tran_texts = get_wav_files_and_tran_texts('data_thchs30/train', 'data_thchs30/data')
print(wav_files[0], tran_texts[0])
print(len(wav_files), len(tran_texts))
5、梅尔频率倒谱系数(MFCC)
之前写过的MFCC
MFCC
这里重新复习一遍:
声谱图(Spectrogram)

如上图所示,一段语音被分成很多帧,每帧经过一个快速傅里叶变换(FFT)得到一个频谱,频谱反映的是信号频率与能量的关系。在实际应用中,一般有三种频谱图:线性振幅谱、对数振幅谱、自功率谱。对数振幅谱对各谱线的振幅都做了对数计算,其目的是使振幅较低的成份相对振幅较高的成份得以拉高,以便观察掩盖在低振幅噪声中的周期信号,所以其纵坐标的单位是分贝(dB)。
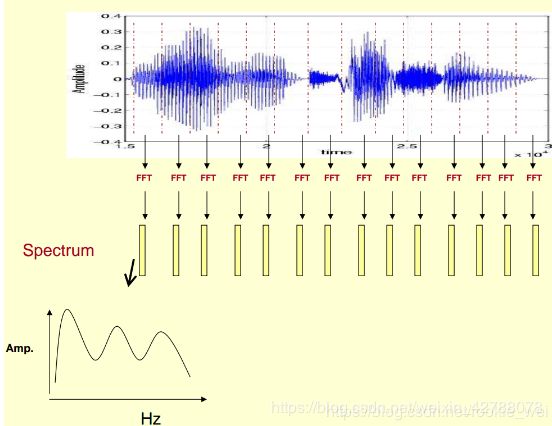
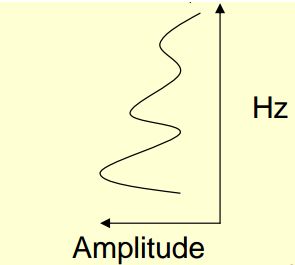
如上图所示,我们先将语音信号的某一帧频谱用坐标表示,注意:此时横轴已经是频率了,纵轴是振幅,然后将坐标旋转90度,得到如下图所示,
接着,将振幅映射到一个灰度水平线,其值为0-255,0表示黑,255表示白,振幅越大,对应的区域越黑,如下图所示,

这样就增加了时间的维度,就可以显示一段语音而不是一帧语音的频谱
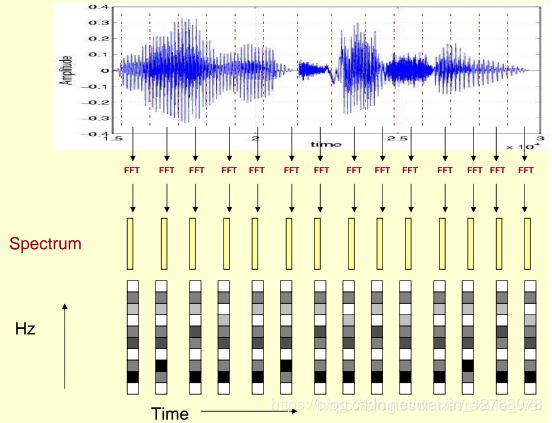
我们就会得到一个随时间变化的频谱图,这个就是描述语音信号的声谱图,如下图所示。

如上图所示,很黑的地方就是频谱图中的峰值(共振峰)。为什么要这样搞呢?因为在声谱图中能更好的观察音素和它的特征。
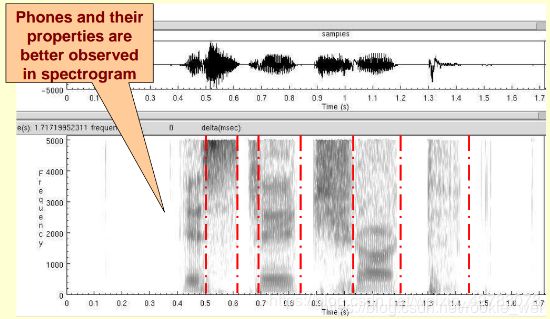
另外,通过观察共振峰和它们的跃迁可以更好地识别声音。

隐马尔科夫模型(Hidden Markov Models)就是隐含地对声谱图进行建模以达到好的识别性能。还有一个作用就是它可以直观的评估TTS系统(text to speech)的好坏,直接对比合成的语音和自然的语音声谱图的匹配度即可。

6、倒谱分析(Cepstrum Analysis)
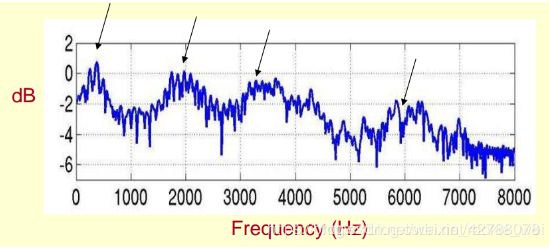
上图是一个语音的频谱图,峰值表示语音的主要频率成分,称为共振峰,共振峰携带了声音的辨识属性(相当于人的身份证),用它就可以识别不同的声音,这个属性特别重要,所以我们要把它提取出来。
我们不仅要提取出共振峰的位置,还得提取它们的转变过程,也就是频谱的包络(Spectral Envelope)。这个包络就是一条连接这些共振峰的平滑曲线,如下图所示

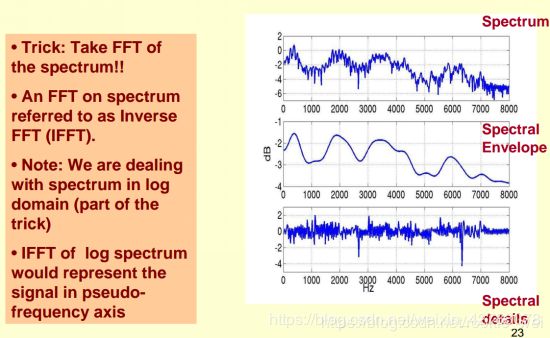
我们可以理解为,原始频谱由包络和频谱的细节组成,如果我们将这两部分分离,就可以得到包络了,如下图所示

因为我们用的是对数频谱,所以都加上了log,单位是dB。如上图所示,我们要在已知的logX[k]的基础上求logH(k)和logE(k),使得logX[k]=logH(k)+logE(k)。
为了将它们分离,我们得使用一个数学技巧,这个技巧就是对频谱做FFT,在频谱上做傅里叶变换,就相当于逆傅里叶变换(IFFT)。因为我们是在频谱的对数上处理的,在对数频谱上做IFFT就相当于在一个伪频率坐标上描述信号。
首先,画出伪频率坐标,如下图所示

伪频率坐标上分为低频率区域和高频率区域,通过IFFT将包络和频谱细节转换到伪频率坐标上

首先,将包络当成是一个每秒4个周期的正弦波,这样在伪频率坐标轴上给出一个4Hz的峰值。

同理,将频谱细节看成一个每秒100个周期的正弦波,这样在伪频率坐标轴上给出一个100Hz的峰值。

把它俩叠加在一起,就是原始频谱信号了

由上述可知,h[k]是x[k]的低频部分,而logX[k]是已知的,所以x[k]也是已知的,所以将x[k]通过一个低通滤波器就可以得到h[k]了,也就是频谱的包络。
x[k]称为倒谱,h[k]就是倒谱的低频部分,h[k]描述了频谱的包络,包络在语音识别中被广泛用于描述特征。
总结一下上述过程就是:
- 先将原始语音信号经过傅里叶变换得到频谱:X[k]=H[k]E[k] 只考虑幅度则是:||X[k]||=||H[k]|| ||E[k]||
- 对上式两边取对数得:log||X[k]||=log||H[k]|| + log||E[k]||
- 再对上式两边取逆傅里叶变换得到倒谱:x[k]=h[k]+e[k]
7、 梅尔频率分析(Mel-Frequency Analysis)
通过上面的步骤,我们可以得到一段语音的频谱包络,但是,对于人类听觉感知的实验表明,人类听觉的感知只聚焦在某些特定的区域,而不是整个频谱包络。
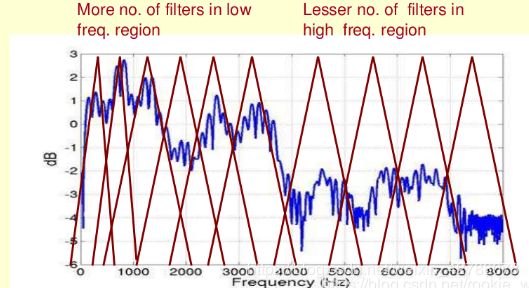
梅尔频率分析就是基于人类听觉感知实验的,实验观测发现人耳就像一个滤波器组,它只关注某些特定的频率分量。但是这些滤波器在频率坐标轴上却不是统一分布的,在低频区域有很多的滤波器,它们分布比较密集,在高频区域,分布的比较稀疏,如下图所示
8、梅尔频率倒谱系数(MFCC)
MFCC考虑了人类听觉特征,先将线性频谱映射到基于听觉感知的梅尔非线性频谱中,然后再转到倒谱上。
将普通频率转换到梅尔频率的公式如下:

在梅尔频域内,人对音调的感知度为线性关系。比如,两端语音信号的梅尔频率相差两倍,人耳听起来两者的音调也是相差两倍。
我们将频谱通过一组梅尔滤波器得到梅尔频谱,公式表达为:logX[k]=log(Mel-Spectrum)。然后,再在logX[k]上进行倒谱分析,
logX[k]=logH[k] + logE[k]
然后,进行IFFT变换,得,
x[k]=h[k]+e[k]
在梅尔频谱上得到的倒谱系数h[k]就是我们要说的梅尔频谱倒谱系数,简称MFCC。

提取MFCC的大致过程如上图所示。
- 先对语音进行预减轻、分帧和加窗;
- 对每个短时分析窗,通过FFT失掉对应的频谱;
- 将上面的频谱通过Mel滤波器组失掉Mel频谱;
- 在Mel频谱上面进行倒谱分析(取对数,做逆变换,现实逆变换一般是通过DCT离散余弦变换来实现,取DCT后的第2个到第13个系数作为MFCC系数),取得Mel频率倒谱系数MFCC,这个MFCC就是这帧语音的特征;

到这里,语音信号就能通过一系列倒谱向量来描述了,每个向量就是每帧的MFCC特征向量。

注:上述MFCC知识点参考自博客:https://blog.csdn.net/zouxy09/article/details/9156785/
文档:http://www.speech.cs.cmu.edu/15-492/slides/03_mfcc.pdf
9、 提取音频数据的MFCC特征
首先来安装python_speech_features工具,执行以下命令行即可
pip install python_speech_features

我们将语音数据转换为需要计算的13位或26位不同的倒谱特征的MFCC,将它作为模型的输入。经过转换,数据将会被存储在一个频率特征系数(行)和时间(列)的矩阵中。
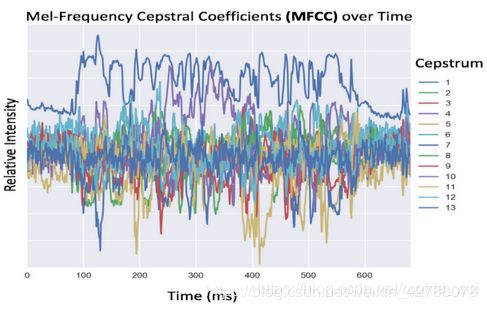
因为声音不会孤立的产生,并且没有一对一映射到字符,所以,我们可以通过在当前时间索引之前和之后捕获声音的重叠窗口上训练网络,从而捕获共同作用的影响(即通过影响一个声音影响另一个发音)。
这里先插讲一下语音中的“分帧”和“加窗”的概念
分帧

如上图所示,傅里叶变换要求输入的信号是平稳的,但是语音信号在宏观上是不平稳的,在微观上却有短时平稳性(10-30ms内可以认为语音信号近似不变)。所以要把语音信号分为一些小段处理,每一个小段称为一帧。
加窗
取出一帧信号以后,在进行傅里叶变换前,还有先进行“加窗”操作,“加窗”其实就是乘以一个“窗函数”,如下图所示

加窗的目的是让一帧信号的幅度在两端渐变到0,这样就可以提供变换结果的分辨率。但是加窗也是有代价的,一帧信号的两端被削弱了,弥补的办法就是,邻近的帧直接要有重叠,而不是直接截取,如下图所示,

如上图所示,两帧之间有重叠部分,帧长为25ms,两帧起点位置的时间差叫帧移,一般取10ms或者帧长的一半
对于RNN,我们使用之前的9个时间片段和后面的9个时间片段,加上当前时间片段,每个加载窗口总共包括19个时间片段。当梅尔倒谱系数为26时,每个时间片段总共就有494个MFCC特征数。下图是以倒谱系数为13为例的加载窗口实例图

而当当前序列前或后不够9个序列时,比如第2个序列,这时就需要进行补0操作,将它凑够9个。最后,再进行标准化处理,减去均值,然后除以方差。
#将音频信息转成MFCC特征
#参数说明---audio_filename:音频文件   numcep:梅尔倒谱系数个数
#       numcontext:对于每个时间段,要包含的上下文样本个数
def audiofile_to_input_vector(audio_filename, numcep, numcontext):
    # 加载音频文件
    fs, audio = wav.read(audio_filename)
    # 获取MFCC系数
    orig_inputs = mfcc(audio, samplerate=fs, numcep=numcep)
    #打印MFCC系数的形状,得到比如(980, 26)的形状
    #955表示时间序列,26表示每个序列的MFCC的特征值为26个
    #这个形状因文件而异,不同文件可能有不同长度的时间序列,但是,每个序列的特征值数量都是一样的
    print(np.shape(orig_inputs))

    # 因为我们使用双向循环神经网络来训练,它的输出包含正、反向的结
    # 果,相当于每一个时间序列都扩大了一倍,所以
    # 为了保证总时序不变,使用orig_inputs =
    # orig_inputs[::2]对orig_inputs每隔一行进行一次
    # 取样。这样被忽略的那个序列可以用后文中反向
    # RNN生成的输出来代替,维持了总的序列长度。
    orig_inputs = orig_inputs[::2]#(490, 26)
    print(np.shape(orig_inputs))
    #因为我们讲解和实际使用的numcontext=9,所以下面的备注我都以numcontext=9来讲解
    #这里装的就是我们要返回的数据,因为同时要考虑前9个和后9个时间序列,
    #所以每个时间序列组合了19*26=494个MFCC特征数
    train_inputs = np.array([], np.float32)
    train_inputs.resize((orig_inputs.shape[0], numcep + 2 * numcep * numcontext))
    print(np.shape(train_inputs))#)(490, 494)

    # Prepare pre-fix post fix context
    empty_mfcc = np.array([])
    empty_mfcc.resize((numcep))

    # Prepare train_inputs with past and future contexts
    #time_slices保存的是时间切片,也就是有多少个时间序列
    time_slices = range(train_inputs.shape[0])

    #context_past_min和context_future_max用来计算哪些序列需要补零
    context_past_min = time_slices[0] + numcontext
    context_future_max = time_slices[-1] - numcontext

    #开始遍历所有序列
    for time_slice in time_slices:
        #对前9个时间序列的MFCC特征补0,不需要补零的,则直接获取前9个时间序列的特征
        need_empty_past = max(0, (context_past_min - time_slice))
        empty_source_past = list(empty_mfcc for empty_slots in range(need_empty_past))
        data_source_past = orig_inputs[max(0, time_slice - numcontext):time_slice]
        assert(len(empty_source_past) + len(data_source_past) == numcontext)

        #对后9个时间序列的MFCC特征补0,不需要补零的,则直接获取后9个时间序列的特征
        need_empty_future = max(0, (time_slice - context_future_max))
        empty_source_future = list(empty_mfcc for empty_slots in range(need_empty_future))
        data_source_future = orig_inputs[time_slice + 1:time_slice + numcontext + 1]
        assert(len(empty_source_future) + len(data_source_future) == numcontext)

        #前9个时间序列的特征
        if need_empty_past:
            past = np.concatenate((empty_source_past, data_source_past))
        else:
            past = data_source_past

        #后9个时间序列的特征
        if need_empty_future:
            future = np.concatenate((data_source_future, empty_source_future))
        else:
            future = data_source_future

        #将前9个时间序列和当前时间序列以及后9个时间序列组合
        past = np.reshape(past, numcontext * numcep)
        now = orig_inputs[time_slice]
        future = np.reshape(future, numcontext * numcep)

        train_inputs[time_slice] = np.concatenate((past, now, future))
        assert(len(train_inputs[time_slice]) == numcep + 2 * numcep * numcontext)

    # 将数据使用正太分布标准化,减去均值然后再除以方差
    train_inputs = (train_inputs - np.mean(train_inputs)) / np.std(train_inputs)

    return train_inputs
10、文字样本转化成向量
对于文字样本,则需要将文字转换成具体的向量,代码如下
#将字符转成向量,其实就是根据字找到字在word_num_map中所应对的下标
def get_ch_lable_v(txt_file,word_num_map,txt_label=None):
    words_size = len(word_num_map)

    to_num = lambda word: word_num_map.get(word, words_size)

    if txt_file!= None:
        txt_label = get_ch_lable(txt_file)

    print(txt_label)
    labels_vector = list(map(to_num, txt_label))
    print(labels_vector)
    return labels_vector
我们调用get_wav_files_and_tran_texts函数获取了所有的WAV文件和其对应的翻译文字。现在,我们先来处理一下翻译的文字,先将所有文字提出来,然后,调用collections和Counter方法,统计一下每个字符出现的次数,然后,把它们放到字典里面去
# 字表
all_words = []
for label in labels:
    #print(label)
    all_words += [word for word in label]

#Counter,返回一个Counter对象集合,以元素为key,元素出现的个数为value
counter = Counter(all_words)
#排序
words = sorted(counter)
words_size= len(words)
word_num_map = dict(zip(words, range(words_size)))

print(word_num_map)
11、将音频数据转为MFCC,将译文转为向量
现在,整合上面两个函数,将音频数据转为时间序列(列)和MFCC(行)的矩阵,将对应的译文转成字向量,代码如下
#将音频数据转为时间序列(列)和MFCC(行)的矩阵,将对应的译文转成字向量
def get_audio_and_transcriptch(txt_files, wav_files, n_input, n_context,word_num_map,txt_labels=None):

    audio = []
    audio_len = []
    transcript = []
    transcript_len = []
    if txt_files!=None:
        txt_labels = txt_files

    for txt_obj, wav_file in zip(txt_labels, wav_files):
        # load audio and convert to features
        audio_data = audiofile_to_input_vector(wav_file, n_input, n_context)
        audio_data = audio_data.astype('float32')
        # print(word_num_map)
        audio.append(audio_data)
        audio_len.append(np.int32(len(audio_data)))

        # load text transcription and convert to numerical array
        target = []
        if txt_files!=None:#txt_obj是文件
            target = get_ch_lable_v(txt_obj,word_num_map)
        else:
            target = get_ch_lable_v(None,word_num_map,txt_obj)#txt_obj是labels
        #target = text_to_char_array(target)
        transcript.append(target)
        transcript_len.append(len(target))

    audio = np.asarray(audio)
    audio_len = np.asarray(audio_len)
    transcript = np.asarray(transcript)
    transcript_len = np.asarray(transcript_len)
    return audio, audio_len, transcript, transcript_len
12、批次音频数据对齐
上面是对单个音频文件的特征补0,在训练中,文件是一批一批的获取并进行训练的,这就要求每一批音频的时序要统一,所以,下面要做对齐处理。
#对齐处理
def pad_sequences(sequences, maxlen=None, dtype=np.float32,
                  padding='post', truncating='post', value=0.):
    #[478 512 503 406 481 509 422 465]
    lengths = np.asarray([len(s) for s in sequences], dtype=np.int64)

    nb_samples = len(sequences)

    #maxlen,该批次中,最长的序列长度
    if maxlen is None:
        maxlen = np.max(lengths)

    # 在下面的主循环中,从第一个非空序列中获取样本形状以检查一致性
    sample_shape = tuple()
    for s in sequences:
        if len(s) > 0:
            sample_shape = np.asarray(s).shape[1:]
            break

    x = (np.ones((nb_samples, maxlen) + sample_shape) * value).astype(dtype)
    for idx, s in enumerate(sequences):
        if len(s) == 0:
            continue  # 序列为空,跳过

        #post表示后补零,pre表示前补零
        if truncating == 'pre':
            trunc = s[-maxlen:]
        elif truncating == 'post':
            trunc = s[:maxlen]
        else:
            raise ValueError('Truncating type "%s" not understood' % truncating)

        # check `trunc` has expected shape
        trunc = np.asarray(trunc, dtype=dtype)
        if trunc.shape[1:] != sample_shape:
            raise ValueError('Shape of sample %s of sequence at position %s is different from expected shape %s' %
                             (trunc.shape[1:], idx, sample_shape))

        if padding == 'post':
            x[idx, :len(trunc)] = trunc
        elif padding == 'pre':
            x[idx, -len(trunc):] = trunc
        else:
            raise ValueError('Padding type "%s" not understood' % padding)

    return x, lengths
13、创建序列的稀疏表示
下面的函数将创建序列的稀疏表示
#创建序列的稀疏表示
def sparse_tuple_from(sequences, dtype=np.int32):
    indices = []
    values = []

    for n, seq in enumerate(sequences):
        indices.extend(zip([n] * len(seq), range(len(seq))))
        values.extend(seq)

    indices = np.asarray(indices, dtype=np.int64)
    values = np.asarray(values, dtype=dtype)
    shape = np.asarray([len(sequences), indices.max(0)[1] + 1], dtype=np.int64)
    # return tf.SparseTensor(indices=indices, values=values, shape=shape)
    return indices, values, shape
上面的函数有什么作用呢?我们写个小demo来测试一下不就知道了吗
sq = [[0,1,2,3,4], [5,6,7,8,]]
indices, values, shape = sparse_tuple_from(sq)
print(indices)
print(values)
print(shape)
14、将字向量转成文字
上面有将文字转成字向量的函数,那么,也应该有将字向量转成文字的函数,代码如下
# Constants
SPACE_TOKEN = ''
SPACE_INDEX = 0
FIRST_INDEX = ord('a') - 1  # 0 is reserved to space

#将稀疏矩阵的字向量转成文字
#tuple是sparse_tuple_from函数的返回值
def sparse_tuple_to_texts_ch(tuple,words):
    indices = tuple[0]
    values = tuple[1]
    results = [''] * tuple[2][0]
    for i in range(len(indices)):
        index = indices[i][0]
        c = values[i]

        c = ' ' if c == SPACE_INDEX else words[c]
        results[index] = results[index] + c
    return results

#将密集矩阵的字向量转成文字
def ndarray_to_text_ch(value,words):
    results = ''
    for i in range(len(value)):
        results += words[value[i]]#chr(value[i] + FIRST_INDEX)
    return results.replace('`', ' ')
15、next_batch函数
接下来,我们来实现next_batch函数,获取下一batch的训练数据
#梅尔倒谱系数的个数
n_input = 26
#对于每个时间序列,要包含上下文样本的个数
n_context = 9
#batch大小
batch_size =8
def next_batch(wav_files, labels, start_idx = 0,batch_size=1):
    filesize = len(labels)
    #计算要获取的序列的开始和结束下标
    end_idx = min(filesize, start_idx + batch_size)
    idx_list = range(start_idx, end_idx)
    #获取要训练的音频文件路径和对于的译文
    txt_labels = [labels[i] for i in idx_list]
    wav_files = [wav_files[i] for i in idx_list]
    #将音频文件转成要训练的数据
    (source, audio_len, target, transcript_len) = get_audio_and_transcriptch(None,
                                                      wav_files,
                                                      n_input,
                                                      n_context,word_num_map,txt_labels)

    start_idx += batch_size
    # Verify that the start_idx is not largVerify that the start_idx is not ler than total available sample size
    if start_idx >= filesize:
        start_idx = -1

    # Pad input to max_time_step of this batch
    # 如果多个文件将长度统一,支持按最大截断或补0
    source, source_lengths = pad_sequences(source)
    #返回序列的稀疏表示
    sparse_labels = sparse_tuple_from(target)

    return start_idx,source, source_lengths, sparse_labels
模块测试
print('音频文件:  ' + wav_files[0])
print('文字内容:  ' + labels[0])
#获取一个batch的数据
next_idx,source,source_len,sparse_lab = next_batch(wav_files,labels,0,batch_size)
print(np.shape(source))
#将字向量转成文字
t = sparse_tuple_to_texts_ch(sparse_lab,words)
print(t[0])
16、Bi-RNN网络
数据准备好了,接着就应该搭建网络了,我们这里使用Bi-RNN网络,现在先来介绍一下这个网络。
Bi-RNN网络,又叫双向RNN网络,它采用了两个方向的RNN网络,如下图所示

RNN网络擅长处理连续的数据,所以将正反两个方向的网络结合,就不仅可以学习它的正向规律,还可以学习它的反向规律,这样就比单个循环网络拥有更高的拟合度。
Bi-RNN跟RNN网络非常类似,只是在正向传播的基础上,再进行一次反向传播,且这两个都连接同一个输出层。
17、CTC网络
还得插讲一下其他内容,直接上代码的话会一脸懵逼。CTC(Connectionist Temporal Classification)是语音识别中的一个关键技术,通过增加一个额外的Symbol代表NULL来解决叠字的问题。
在基于连续的时间序列分类任务中,常用CTC的方法
该方法主要体现在处理loss值上,通过对序列对不上的label添加blank(空)的方式,将预测的输出值与给定的label值在时间序列上对齐,再求出具体损失。
CTC网络的loss在Tensorflow中封装成了ctc_loss函数,该函数的作用就是按照序列来处理输出标签和标注标签之间的损失。函数原型如下,

- labels:是一个int32类型的稀疏矩阵张量(SparseTensor)。什么是稀疏矩阵等下再讲。
- inputs:经过RNN后输出的标签预测值,是三维的浮点型张量,如果time_major=True,则它的形状为[max_time,batch_size,num_classes],否则为[batch_size,max_time,num_classes]。
- sequence_lenght:序列长度
- preprocess_collapse_repeated:是否需要预处理,将重复的label合并成一个label。
- ctc_merge_repeated:在计算时,是否将每个non_blank重复的label当成单独的label来解释。
当取批次样本进行训练时,还需要对ctc_loss的返回值求均值,这个才是最终的loss。
上面参数中,需要注意的是inputs参数中的num_classes,如果样本中有classes个分类,那么,num_classes=classes+1,即num_classes要比classes多出一个分类,用来存放blank类。在后面实现的代码中就知道这点了。
18、稀疏矩阵
稀疏矩阵是相对密集矩阵而言的,密集矩阵就是我们常见的矩阵,如果密集矩阵大部分数都是0,那么就没有必要浪费空间来存这些为0的数据,我们只要将那些不为0的索引、值和形状记录下来,就可以大大节省内存空间,这个就是稀疏矩阵。稀疏矩阵在Tensorflow中的结构如下

- indices:就是密集矩阵中不为0的数的索引
- value:是一个list,存储的是密集矩阵中对应上面indices索引中的值。
- dense_shape:密集矩阵的形状
sparse_tuple_from函数返回的就是上面这三个参数的值
而Tensorflow中,将稀疏矩阵还原成密集矩阵的方法也很简单,使用sparse_tensor_to_dense函数即可。
19、levenshtein距离
Levenshtein距离,也叫编辑距离(Edit Distance),指两个字符串之间,由一个转成另一个所需要的最少的编辑操作次数。编辑操作指的是,将一个字符替换成另一个字符、插入或者删除一个字符。编辑距离越小,说明两个字符串之间的相似度最大。
在Tensorflow中,编辑距离的计算被封装成对两个稀疏矩阵的操作,函数原型如下

- hypothesis:SparseTensor类型,为预测的序列结果
- truth:SparseTensor类型,为真实的序列结果
- normalize:求出来的编辑距离除以真实序列长度
- name:名字
返回值:R-1维的DenseTensor,包含每个序列的编辑距离
20、CTC decoder
虽然输入ctc_loss中的inputs是我们的预测结果,但是这个结果却是带有空标签的(blank),而且是一个与时间序列强对应的输出。实际上我们需要的是一个转化好的,类似原始标注标签一个的输出。这时,我们可以使用CTC decoder,经过它对预测结果加工后,就可以与标准标签进行损失loss的运算了。
Tensorflow中,CTC decoder有两个函数,如下所示

21、定义占位符
现在可以开始搭建网络模型了,首先要定义占位符
# input_tensor为输入音频数据,由前面分析可知,它的结构是[batch_size, amax_stepsize, n_input + (2 * n_input * n_context)]
#其中,batch_size是batch的长度,amax_stepsize是时序长度,n_input + (2 * n_input * n_context)是MFCC特征数,
#batch_size是可变的,所以设为None,由于每一批次的时序长度不固定,所有,amax_stepsize也设为None
input_tensor = tf.placeholder(tf.float32, [None, None, n_input + (2 * n_input * n_context)], name='input')
# Use sparse_placeholder; will generate a SparseTensor, required by ctc_loss op.
#targets保存的是音频数据对应的文本的系数张量,所以用sparse_placeholder创建一个稀疏张量
targets = tf.sparse_placeholder(tf.int32, name='targets')
#seq_length保存的是当前batch数据的时序长度
seq_length = tf.placeholder(tf.int32, [None], name='seq_length')
#keep_dropout则是dropout的参数
keep_dropout= tf.placeholder(tf.float32)
22、构建网络模型
网络模型的话,先使用3个1024节点的全连接层网络,然后经过一个Bi-RNN网络,最后再连接两个全连接层,且都带有dropout层。激活函数的话,使用带截断的Relu,截断值设置为20。
模型的shape变换有点多,我们输入的数据的结构是3维的
[batch_size, amax_stepsize, n_input + (2 * n_input * n_context)]
我们要将它变成2维的,才能传入全连接层
[amax_stepsize * batch_size, n_input + 2 * n_input * n_context]
全连接层到Bi-RNN网络时,又得转成3维的
[amax_stepsize, batch_size, 2*n_cell_dim]
然后又得转成2维的,传入全连接层
[amax_stepsize * batch_size, 2 * n_cell_dim]
最后,又得将2维的转成3维的输出
[amax_stepsize, batch_size, n_character]
代码如下
def BiRNN_model(batch_x, seq_length, n_input, n_context, n_character, keep_dropout):
    # batch_x_shape: [batch_size, amax_stepsize, n_input + 2 * n_input * n_context]
    batch_x_shape = tf.shape(batch_x)

    # 将输入转成时间序列优先
    batch_x = tf.transpose(batch_x, [1, 0, 2])
    # 再转成2维传入第一层
    # [amax_stepsize * batch_size, n_input + 2 * n_input * n_context]
    batch_x = tf.reshape(batch_x, [-1, n_input + 2 * n_input * n_context])

    # 使用clipped RELU activation and dropout.
    # 1st layer
    with tf.name_scope('fc1'):
        b1 = variable_on_cpu('b1', [n_hidden_1], tf.random_normal_initializer(stddev=b_stddev))
        h1 = variable_on_cpu('h1', [n_input + 2 * n_input * n_context, n_hidden_1],
                             tf.random_normal_initializer(stddev=h_stddev))
        layer_1 = tf.minimum(tf.nn.relu(tf.add(tf.matmul(batch_x, h1), b1)), relu_clip)
        layer_1 = tf.nn.dropout(layer_1, keep_dropout)

    # 2nd layer
    with tf.name_scope('fc2'):
        b2 = variable_on_cpu('b2', [n_hidden_2], tf.random_normal_initializer(stddev=b_stddev))
        h2 = variable_on_cpu('h2', [n_hidden_1, n_hidden_2], tf.random_normal_initializer(stddev=h_stddev))
        layer_2 = tf.minimum(tf.nn.relu(tf.add(tf.matmul(layer_1, h2), b2)), relu_clip)
        layer_2 = tf.nn.dropout(layer_2, keep_dropout)

    # 3rd layer
    with tf.name_scope('fc3'):
        b3 = variable_on_cpu('b3', [n_hidden_3], tf.random_normal_initializer(stddev=b_stddev))
        h3 = variable_on_cpu('h3', [n_hidden_2, n_hidden_3], tf.random_normal_initializer(stddev=h_stddev))
        layer_3 = tf.minimum(tf.nn.relu(tf.add(tf.matmul(layer_2, h3), b3)), relu_clip)
        layer_3 = tf.nn.dropout(layer_3, keep_dropout)

    # 双向rnn
    with tf.name_scope('lstm'):
        # Forward direction cell:
        lstm_fw_cell = tf.contrib.rnn.BasicLSTMCell(n_cell_dim, forget_bias=1.0, state_is_tuple=True)
        lstm_fw_cell = tf.contrib.rnn.DropoutWrapper(lstm_fw_cell,
                                                     input_keep_prob=keep_dropout)
        # Backward direction cell:
        lstm_bw_cell = tf.contrib.rnn.BasicLSTMCell(n_cell_dim, forget_bias=1.0, state_is_tuple=True)
        lstm_bw_cell = tf.contrib.rnn.DropoutWrapper(lstm_bw_cell,
                                                     input_keep_prob=keep_dropout)

        # `layer_3`  `[amax_stepsize, batch_size, 2 * n_cell_dim]`
        layer_3 = tf.reshape(layer_3, [-1, batch_x_shape[0], n_hidden_3])

        outputs, output_states = tf.nn.bidirectional_dynamic_rnn(cell_fw=lstm_fw_cell,
                                                                 cell_bw=lstm_bw_cell,
                                                                 inputs=layer_3,
                                                                 dtype=tf.float32,
                                                                 time_major=True,
                                                                 sequence_length=seq_length)

        # 连接正反向结果[amax_stepsize, batch_size, 2 * n_cell_dim]
        outputs = tf.concat(outputs, 2)
        # to a single tensor of shape [amax_stepsize * batch_size, 2 * n_cell_dim]
        outputs = tf.reshape(outputs, [-1, 2 * n_cell_dim])

    with tf.name_scope('fc5'):
        b5 = variable_on_cpu('b5', [n_hidden_5], tf.random_normal_initializer(stddev=b_stddev))
        h5 = variable_on_cpu('h5', [(2 * n_cell_dim), n_hidden_5], tf.random_normal_initializer(stddev=h_stddev))
        layer_5 = tf.minimum(tf.nn.relu(tf.add(tf.matmul(outputs, h5), b5)), relu_clip)
        layer_5 = tf.nn.dropout(layer_5, keep_dropout)

    with tf.name_scope('fc6'):
        # 全连接层用于softmax分类
        b6 = variable_on_cpu('b6', [n_character], tf.random_normal_initializer(stddev=b_stddev))
        h6 = variable_on_cpu('h6', [n_hidden_5, n_character], tf.random_normal_initializer(stddev=h_stddev))
        layer_6 = tf.add(tf.matmul(layer_5, h6), b6)

    # 将2维[amax_stepsize * batch_size, n_character]转成3维 time-major [amax_stepsize, batch_size, n_character].
    layer_6 = tf.reshape(layer_6, [-1, batch_x_shape[0], n_character])
    print('n_character:' + str(n_character))
    # Output shape: [amax_stepsize, batch_size, n_character]
    return layer_6
调用的话就很简单了,使用上面定义的占位符
logits = BiRNN_model( input_tensor, tf.to_int64(seq_length), n_input, n_context,words_size +1,keep_dropout)
注意第5个参数,要加一,多一类来存放blank类
23、定义损失函数和优化器
前面也说了,语音识别属于时序分类任务,要使用ctc_loss来计算损失
#使用ctc loss计算损失
avg_loss = tf.reduce_mean(ctc_ops.ctc_loss(targets, logits, seq_length))
而优化器还是使用梯度下降法AdamOptimizer,设置学习率为0.001
#优化器
learning_rate = 0.001
optimizer = tf.train.AdamOptimizer(learning_rate=learning_rate).minimize(avg_loss)
24、使用CTC decoder和计算编辑距离
这里使用ctc_beam_search_decoder函数对预测结果进行解码,它返回值decoded是一个只有一个元素的数组,所以,使用edit_distance函数计算编辑距离时,我们应该传入的是decoded[0]。最后,对编辑距离取均值,求平均错误率,代码如下
#使用CTC decoder
with tf.name_scope("decode"):
    decoded, log_prob = ctc_ops.ctc_beam_search_decoder( logits, seq_length, merge_repeated=False)

#计算编辑距离
with tf.name_scope("accuracy"):
    distance = tf.edit_distance( tf.cast(decoded[0], tf.int32), targets)
    # 计算label error rate (accuracy)
    ler = tf.reduce_mean(distance, name='label_error_rate')
25、建立session
#迭代次数
epochs = 100
#模型保存地址
savedir = "saver/"
#如果该目录不存在,新建
if os.path.exists(savedir) == False:
    os.mkdir(savedir)

# 生成saver
saver = tf.train.Saver(max_to_keep=1)
# 创建session
with tf.Session() as sess:
    #初始化
    sess.run(tf.global_variables_initializer())
    # 没有模型的话,就重新初始化
    kpt = tf.train.latest_checkpoint(savedir)
    print("kpt:", kpt)
    startepo = 0
    if kpt != None:
        saver.restore(sess, kpt)
        ind = kpt.find("-")
        startepo = int(kpt[ind + 1:])
        print(startepo)

    # 准备运行训练步骤
    section = '\n{0:=^40}\n'
    print(section.format('Run training epoch'))

    train_start = time.time()
    for epoch in range(epochs):  # 样本集迭代次数
        epoch_start = time.time()
        if epoch < startepo:
            continue

        print("epoch start:", epoch, "total epochs= ", epochs)
        #######################run batch####
        n_batches_per_epoch = int(np.ceil(len(labels) / batch_size))
        print("total loop ", n_batches_per_epoch, "in one epoch,", batch_size, "items in one loop")

        train_cost = 0
        train_ler = 0
        next_idx = 0

        for batch in range(n_batches_per_epoch):  # 一次batch_size,取多少次
            # 取数据
            print('开始获取数据咯:' + str(batch))
            next_idx, source, source_lengths, sparse_labels = next_batch(wav_files,labels,next_idx ,batch_size)
            print('结束咯')
            feed = {input_tensor: source, targets: sparse_labels, seq_length: source_lengths,
                    keep_dropout: keep_dropout_rate}

            # 计算 avg_loss optimizer ;
            batch_cost, _ = sess.run([avg_loss, optimizer], feed_dict=feed)
            train_cost += batch_cost
            #验证模型的准确率,比较耗时,我们训练的时候全力以赴,所以这里先不跑
            # if (batch + 1) % 20 == 0:
            #     print('loop:', batch, 'Train cost: ', train_cost / (batch + 1))
            #     feed2 = {input_tensor: source, targets: sparse_labels, seq_length: source_lengths, keep_dropout: 1.0}
            #
            #     d, train_ler = sess.run([decoded[0], ler], feed_dict=feed2)
            #     dense_decoded = tf.sparse_tensor_to_dense(d, default_value=-1).eval(session=sess)
            #     dense_labels = sparse_tuple_to_texts_ch(sparse_labels, words)
            #
            #     counter = 0
            #     print('Label err rate: ', train_ler)
            #     for orig, decoded_arr in zip(dense_labels, dense_decoded):
            #         # convert to strings
            #         decoded_str = ndarray_to_text_ch(decoded_arr, words)
            #         print(' file {}'.format(counter))
            #         print('Original: {}'.format(orig))
            #         print('Decoded:  {}'.format(decoded_str))
            #         counter = counter + 1
            #         break

            #每训练100次保存一下模型
            if (batch + 1) % 100 == 0:
                saver.save(sess, savedir + "saver.cpkt", global_step=epoch)
        epoch_duration = time.time() - epoch_start

        log = 'Epoch {}/{}, train_cost: {:.3f}, train_ler: {:.3f}, time: {:.2f} sec'
        print(log.format(epoch, epochs, train_cost, train_ler, epoch_duration))


    train_duration = time.time() - train_start
    print('Training complete, total duration: {:.2f} min'.format(train_duration / 60))
26、完整代码
# encoding: utf-8
#作者:James_Bobo
import numpy as np
from python_speech_features import mfcc
import scipy.io.wavfile as wav
import os
import time
import tensorflow as tf
from tensorflow.python.ops import ctc_ops
from collections import Counter

# 获取文件夹下所有的WAV文件
def get_wav_files(wav_path):
    wav_files = []
    for (dirpath, dirnames, filenames) in os.walk(wav_path):
        for filename in filenames:
            if filename.endswith('.wav') or filename.endswith('.WAV'):
                # print(filename)
                filename_path = os.path.join(dirpath, filename)
                # print(filename_path)
                wav_files.append(filename_path)
    return wav_files


# 获取wav文件对应的翻译文字
def get_tran_texts(wav_files, tran_path):
    tran_texts = []
    for wav_file in wav_files:
        (wav_path, wav_filename) = os.path.split(wav_file)
        tran_file = os.path.join(tran_path, wav_filename + '.trn')
        # print(tran_file)
        if os.path.exists(tran_file) is False:
            return None

        fd = open(tran_file,encoding='gb18030', errors='ignore')
        text = fd.readline()
        tran_texts.append(text.split('\n')[0])
        fd.close()
    return tran_texts


# 获取wav和对应的翻译文字
def get_wav_files_and_tran_texts(wav_path, tran_path):
    wav_files = get_wav_files(wav_path)
    tran_texts = get_tran_texts(wav_files, tran_path)

    return wav_files, tran_texts


# 旧的训练集使用该方法获取音频文件名和译文
def get_wavs_lables(wav_path, label_file):
    wav_files = []
    for (dirpath, dirnames, filenames) in os.walk(wav_path):
        for filename in filenames:
            if filename.endswith('.wav') or filename.endswith('.WAV'):
                filename_path = os.sep.join([dirpath, filename])
                if os.stat(filename_path).st_size < 240000:  # 剔除掉一些小文件
                    continue
                wav_files.append(filename_path)

    labels_dict = {}
    with open(label_file, 'rb') as f:
        for label in f:
            label = label.strip(b'\n')
            label_id = label.split(b' ', 1)[0]
            label_text = label.split(b' ', 1)[1]
            labels_dict[label_id.decode('ascii')] = label_text.decode('utf-8')

    labels = []
    new_wav_files = []
    for wav_file in wav_files:
        wav_id = os.path.basename(wav_file).split('.')[0]

        if wav_id in labels_dict:
            labels.append(labels_dict[wav_id])
            new_wav_files.append(wav_file)

    return new_wav_files, labels


# Constants
SPACE_TOKEN = ''
SPACE_INDEX = 0
FIRST_INDEX = ord('a') - 1  # 0 is reserved to space


# 将稀疏矩阵的字向量转成文字
# tuple是sparse_tuple_from函数的返回值
def sparse_tuple_to_texts_ch(tuple, words):
    # 索引
    indices = tuple[0]
    # 字向量
    values = tuple[1]
    results = [''] * tuple[2][0]
    for i in range(len(indices)):
        index = indices[i][0]
        c = values[i]
        c = ' ' if c == SPACE_INDEX else words[c]
        results[index] = results[index] + c

    return results


# 将密集矩阵的字向量转成文字
def ndarray_to_text_ch(value, words):
    results = ''
    for i in range(len(value)):
        results += words[value[i]]  # chr(value[i] + FIRST_INDEX)
    return results.replace('`', ' ')


# 创建序列的稀疏表示
def sparse_tuple_from(sequences, dtype=np.int32):
    indices = []
    values = []

    for n, seq in enumerate(sequences):
        indices.extend(zip([n] * len(seq), range(len(seq))))
        values.extend(seq)

    indices = np.asarray(indices, dtype=np.int64)
    values = np.asarray(values, dtype=dtype)
    shape = np.asarray([len(sequences), indices.max(0)[1] + 1], dtype=np.int64)

    # return tf.SparseTensor(indices=indices, values=values, shape=shape)
    return indices, values, shape


# 将音频数据转为时间序列(列)和MFCC(行)的矩阵,将对应的译文转成字向量
def get_audio_and_transcriptch(txt_files, wav_files, n_input, n_context, word_num_map, txt_labels=None):
    audio = []
    audio_len = []
    transcript = []
    transcript_len = []
    if txt_files != None:
        txt_labels = txt_files

    for txt_obj, wav_file in zip(txt_labels, wav_files):
        # load audio and convert to features
        audio_data = audiofile_to_input_vector(wav_file, n_input, n_context)
        audio_data = audio_data.astype('float32')
        # print(word_num_map)
        audio.append(audio_data)
        audio_len.append(np.int32(len(audio_data)))

        # load text transcription and convert to numerical array
        target = []
        if txt_files != None:  # txt_obj是文件
            target = get_ch_lable_v(txt_obj, word_num_map)
        else:
            target = get_ch_lable_v(None, word_num_map, txt_obj)  # txt_obj是labels
        # target = text_to_char_array(target)
        transcript.append(target)
        transcript_len.append(len(target))

    audio = np.asarray(audio)
    audio_len = np.asarray(audio_len)
    transcript = np.asarray(transcript)
    transcript_len = np.asarray(transcript_len)
    return audio, audio_len, transcript, transcript_len


# 将字符转成向量,其实就是根据字找到字在word_num_map中所应对的下标
def get_ch_lable_v(txt_file, word_num_map, txt_label=None):
    words_size = len(word_num_map)

    to_num = lambda word: word_num_map.get(word, words_size)

    if txt_file != None:
        txt_label = get_ch_lable(txt_file)

    # print(txt_label)
    labels_vector = list(map(to_num, txt_label))
    # print(labels_vector)
    return labels_vector


def get_ch_lable(txt_file):
    labels = ""
    with open(txt_file, 'rb') as f:
        for label in f:
            # labels =label.decode('utf-8')
            labels = labels + label.decode('gb2312')
            # labels.append(label.decode('gb2312'))

    return labels


# 将音频信息转成MFCC特征
# 参数说明---audio_filename:音频文件   numcep:梅尔倒谱系数个数
#       numcontext:对于每个时间段,要包含的上下文样本个数
def audiofile_to_input_vector(audio_filename, numcep, numcontext):
    # 加载音频文件
    fs, audio = wav.read(audio_filename)
    # 获取MFCC系数
    orig_inputs = mfcc(audio, samplerate=fs, numcep=numcep)
    # 打印MFCC系数的形状,得到比如(955, 26)的形状
    # 955表示时间序列,26表示每个序列的MFCC的特征值为26个
    # 这个形状因文件而异,不同文件可能有不同长度的时间序列,但是,每个序列的特征值数量都是一样的
    # print(np.shape(orig_inputs))

    # 因为我们使用双向循环神经网络来训练,它的输出包含正、反向的结
    # 果,相当于每一个时间序列都扩大了一倍,所以
    # 为了保证总时序不变,使用orig_inputs =
    # orig_inputs[::2]对orig_inputs每隔一行进行一次
    # 取样。这样被忽略的那个序列可以用后文中反向
    # RNN生成的输出来代替,维持了总的序列长度。
    orig_inputs = orig_inputs[::2]  # (478, 26)
    # print(np.shape(orig_inputs))
    # 因为我们讲解和实际使用的numcontext=9,所以下面的备注我都以numcontext=9来讲解
    # 这里装的就是我们要返回的数据,因为同时要考虑前9个和后9个时间序列,
    # 所以每个时间序列组合了19*26=494个MFCC特征数
    train_inputs = np.array([], np.float32)
    train_inputs.resize((orig_inputs.shape[0], numcep + 2 * numcep * numcontext))
    # print(np.shape(train_inputs))#)(478, 494)

    # Prepare pre-fix post fix context
    empty_mfcc = np.array([])
    empty_mfcc.resize((numcep))

    # Prepare train_inputs with past and future contexts
    # time_slices保存的是时间切片,也就是有多少个时间序列
    time_slices = range(train_inputs.shape[0])

    # context_past_min和context_future_max用来计算哪些序列需要补零
    context_past_min = time_slices[0] + numcontext
    context_future_max = time_slices[-1] - numcontext

    # 开始遍历所有序列
    for time_slice in time_slices:
        # 对前9个时间序列的MFCC特征补0,不需要补零的,则直接获取前9个时间序列的特征
        need_empty_past = max(0, (context_past_min - time_slice))
        empty_source_past = list(empty_mfcc for empty_slots in range(need_empty_past))
        data_source_past = orig_inputs[max(0, time_slice - numcontext):time_slice]
        assert (len(empty_source_past) + len(data_source_past) == numcontext)

        # 对后9个时间序列的MFCC特征补0,不需要补零的,则直接获取后9个时间序列的特征
        need_empty_future = max(0, (time_slice - context_future_max))
        empty_source_future = list(empty_mfcc for empty_slots in range(need_empty_future))
        data_source_future = orig_inputs[time_slice + 1:time_slice + numcontext + 1]
        assert (len(empty_source_future) + len(data_source_future) == numcontext)

        # 前9个时间序列的特征
        if need_empty_past:
            past = np.concatenate((empty_source_past, data_source_past))
        else:
            past = data_source_past

        # 后9个时间序列的特征
        if need_empty_future:
            future = np.concatenate((data_source_future, empty_source_future))
        else:
            future = data_source_future

        # 将前9个时间序列和当前时间序列以及后9个时间序列组合
        past = np.reshape(past, numcontext * numcep)
        now = orig_inputs[time_slice]
        future = np.reshape(future, numcontext * numcep)

        train_inputs[time_slice] = np.concatenate((past, now, future))
        assert (len(train_inputs[time_slice]) == numcep + 2 * numcep * numcontext)

    # 将数据使用正太分布标准化,减去均值然后再除以方差
    train_inputs = (train_inputs - np.mean(train_inputs)) / np.std(train_inputs)

    return train_inputs

#对齐处理
def pad_sequences(sequences, maxlen=None, dtype=np.float32,
                  padding='post', truncating='post', value=0.):
    #[478 512 503 406 481 509 422 465]
    lengths = np.asarray([len(s) for s in sequences], dtype=np.int64)

    nb_samples = len(sequences)

    #maxlen,该批次中,最长的序列长度
    if maxlen is None:
        maxlen = np.max(lengths)

    # 在下面的主循环中,从第一个非空序列中获取样本形状以检查一致性
    sample_shape = tuple()
    for s in sequences:
        if len(s) > 0:
            sample_shape = np.asarray(s).shape[1:]
            break

    x = (np.ones((nb_samples, maxlen) + sample_shape) * value).astype(dtype)
    for idx, s in enumerate(sequences):
        if len(s) == 0:
            continue  # 序列为空,跳过

        #post表示后补零,pre表示前补零
        if truncating == 'pre':
            trunc = s[-maxlen:]
        elif truncating == 'post':
            trunc = s[:maxlen]
        else:
            raise ValueError('Truncating type "%s" not understood' % truncating)

        # check `trunc` has expected shape
        trunc = np.asarray(trunc, dtype=dtype)
        if trunc.shape[1:] != sample_shape:
            raise ValueError('Shape of sample %s of sequence at position %s is different from expected shape %s' %
                             (trunc.shape[1:], idx, sample_shape))

        if padding == 'post':
            x[idx, :len(trunc)] = trunc
        elif padding == 'pre':
            x[idx, -len(trunc):] = trunc
        else:
            raise ValueError('Padding type "%s" not understood' % padding)

    return x, lengths


wav_path='data_thchs30/train'
label_file='data_thchs30/data'
# wav_files, labels = get_wavs_lables(wav_path,label_file)
wav_files, labels = get_wav_files_and_tran_texts(wav_path,label_file)


# 字表
all_words = []
for label in labels:
    #print(label)
    all_words += [word for word in label]
counter = Counter(all_words)
words = sorted(counter)
words_size= len(words)
word_num_map = dict(zip(words, range(words_size)))

print('字表大小:', words_size)

# 梅尔倒谱系数的个数
n_input = 26
# 对于每个时间序列,要包含上下文样本的个数
n_context = 9
# batch大小
batch_size = 8


def next_batch(wav_files, labels, start_idx=0, batch_size=1):
    filesize = len(labels)
    # 计算要获取的序列的开始和结束下标
    end_idx = min(filesize, start_idx + batch_size)
    idx_list = range(start_idx, end_idx)
    # 获取要训练的音频文件路径和对于的译文
    txt_labels = [labels[i] for i in idx_list]
    wav_files = [wav_files[i] for i in idx_list]
    # 将音频文件转成要训练的数据
    (source, audio_len, target, transcript_len) = get_audio_and_transcriptch(None,
                                                                             wav_files,
                                                                             n_input,
                                                                             n_context, word_num_map, txt_labels)

    start_idx += batch_size
    # Verify that the start_idx is not largVerify that the start_idx is not ler than total available sample size
    if start_idx >= filesize:
        start_idx = -1

    # Pad input to max_time_step of this batch
    # 如果多个文件将长度统一,支持按最大截断或补0
    source, source_lengths = pad_sequences(source)
    # 返回序列的稀疏表示
    sparse_labels = sparse_tuple_from(target)

    return start_idx, source, source_lengths, sparse_labels


print('音频文件:  ' + wav_files[0])
print('文字内容:  ' + labels[0])
# 获取一个batch的数据
next_idx, source, source_len, sparse_lab = next_batch(wav_files, labels, 0, batch_size)
print(np.shape(source))
# 将字向量转成文字
t = sparse_tuple_to_texts_ch(sparse_lab, words)
print(t[0])
# source已经将变为前9(不够补空)+本身+后9,每个26,第一个顺序是第10个的数据。


b_stddev = 0.046875
h_stddev = 0.046875

n_hidden = 1024
n_hidden_1 = 1024
n_hidden_2 = 1024
n_hidden_5 = 1024
n_cell_dim = 1024
n_hidden_3 = 2 * 1024

keep_dropout_rate = 0.95
relu_clip = 20

"""
used to create a variable in CPU memory.
"""
def variable_on_cpu(name, shape, initializer):
    # Use the /cpu:0 device for scoped operations
    with tf.device('/cpu:0'):
        # Create or get apropos variable
        var = tf.get_variable(name=name, shape=shape, initializer=initializer)
    return var


def BiRNN_model(batch_x, seq_length, n_input, n_context, n_character, keep_dropout):
    # batch_x_shape: [batch_size, amax_stepsize, n_input + 2 * n_input * n_context]
    batch_x_shape = tf.shape(batch_x)

    # 将输入转成时间序列优先
    batch_x = tf.transpose(batch_x, [1, 0, 2])
    # 再转成2维传入第一层
    # [amax_stepsize * batch_size, n_input + 2 * n_input * n_context]
    batch_x = tf.reshape(batch_x, [-1, n_input + 2 * n_input * n_context])

    # 使用clipped RELU activation and dropout.
    # 1st layer
    with tf.name_scope('fc1'):
        b1 = variable_on_cpu('b1', [n_hidden_1], tf.random_normal_initializer(stddev=b_stddev))
        h1 = variable_on_cpu('h1', [n_input + 2 * n_input * n_context, n_hidden_1],
                             tf.random_normal_initializer(stddev=h_stddev))
        layer_1 = tf.minimum(tf.nn.relu(tf.add(tf.matmul(batch_x, h1), b1)), relu_clip)
        layer_1 = tf.nn.dropout(layer_1, keep_dropout)

    # 2nd layer
    with tf.name_scope('fc2'):
        b2 = variable_on_cpu('b2', [n_hidden_2], tf.random_normal_initializer(stddev=b_stddev))
        h2 = variable_on_cpu('h2', [n_hidden_1, n_hidden_2], tf.random_normal_initializer(stddev=h_stddev))
        layer_2 = tf.minimum(tf.nn.relu(tf.add(tf.matmul(layer_1, h2), b2)), relu_clip)
        layer_2 = tf.nn.dropout(layer_2, keep_dropout)

    # 3rd layer
    with tf.name_scope('fc3'):
        b3 = variable_on_cpu('b3', [n_hidden_3], tf.random_normal_initializer(stddev=b_stddev))
        h3 = variable_on_cpu('h3', [n_hidden_2, n_hidden_3], tf.random_normal_initializer(stddev=h_stddev))
        layer_3 = tf.minimum(tf.nn.relu(tf.add(tf.matmul(layer_2, h3), b3)), relu_clip)
        layer_3 = tf.nn.dropout(layer_3, keep_dropout)

    # 双向rnn
    with tf.name_scope('lstm'):
        # Forward direction cell:
        lstm_fw_cell = tf.contrib.rnn.BasicLSTMCell(n_cell_dim, forget_bias=1.0, state_is_tuple=True)
        lstm_fw_cell = tf.contrib.rnn.DropoutWrapper(lstm_fw_cell,
                                                     input_keep_prob=keep_dropout)
        # Backward direction cell:
        lstm_bw_cell = tf.contrib.rnn.BasicLSTMCell(n_cell_dim, forget_bias=1.0, state_is_tuple=True)
        lstm_bw_cell = tf.contrib.rnn.DropoutWrapper(lstm_bw_cell,
                                                     input_keep_prob=keep_dropout)

        # `layer_3`  `[amax_stepsize, batch_size, 2 * n_cell_dim]`
        layer_3 = tf.reshape(layer_3, [-1, batch_x_shape[0], n_hidden_3])

        outputs, output_states = tf.nn.bidirectional_dynamic_rnn(cell_fw=lstm_fw_cell,
                                                                 cell_bw=lstm_bw_cell,
                                                                 inputs=layer_3,
                                                                 dtype=tf.float32,
                                                                 time_major=True,
                                                                 sequence_length=seq_length)

        # 连接正反向结果[amax_stepsize, batch_size, 2 * n_cell_dim]
        outputs = tf.concat(outputs, 2)
        # to a single tensor of shape [amax_stepsize * batch_size, 2 * n_cell_dim]
        outputs = tf.reshape(outputs, [-1, 2 * n_cell_dim])

    with tf.name_scope('fc5'):
        b5 = variable_on_cpu('b5', [n_hidden_5], tf.random_normal_initializer(stddev=b_stddev))
        h5 = variable_on_cpu('h5', [(2 * n_cell_dim), n_hidden_5], tf.random_normal_initializer(stddev=h_stddev))
        layer_5 = tf.minimum(tf.nn.relu(tf.add(tf.matmul(outputs, h5), b5)), relu_clip)
        layer_5 = tf.nn.dropout(layer_5, keep_dropout)

    with tf.name_scope('fc6'):
        # 全连接层用于softmax分类
        b6 = variable_on_cpu('b6', [n_character], tf.random_normal_initializer(stddev=b_stddev))
        h6 = variable_on_cpu('h6', [n_hidden_5, n_character], tf.random_normal_initializer(stddev=h_stddev))
        layer_6 = tf.add(tf.matmul(layer_5, h6), b6)

    # 将2维[amax_stepsize * batch_size, n_character]转成3维 time-major [amax_stepsize, batch_size, n_character].
    layer_6 = tf.reshape(layer_6, [-1, batch_x_shape[0], n_character])
    print('n_character:' + str(n_character))
    # Output shape: [amax_stepsize, batch_size, n_character]
    return layer_6

# input_tensor为输入音频数据,由前面分析可知,它的结构是[batch_size, amax_stepsize, n_input + (2 * n_input * n_context)]
#其中,batch_size是batch的长度,amax_stepsize是时序长度,n_input + (2 * n_input * n_context)是MFCC特征数,
#batch_size是可变的,所以设为None,由于每一批次的时序长度不固定,所有,amax_stepsize也设为None
input_tensor = tf.placeholder(tf.float32, [None, None, n_input + (2 * n_input * n_context)], name='input')
# Use sparse_placeholder; will generate a SparseTensor, required by ctc_loss op.
#targets保存的是音频数据对应的文本的系数张量,所以用sparse_placeholder创建一个稀疏张量
targets = tf.sparse_placeholder(tf.int32, name='targets')
#seq_length保存的是当前batch数据的时序长度
seq_length = tf.placeholder(tf.int32, [None], name='seq_length')
#keep_dropout则是dropout的参数
keep_dropout= tf.placeholder(tf.float32)

# logits is the non-normalized output/activations from the last layer.
# logits will be input for the loss function.
# nn_model is from the import statement in the load_model function
logits = BiRNN_model(input_tensor, tf.to_int64(seq_length), n_input, n_context, words_size + 1, keep_dropout)

# 使用ctc loss计算损失
avg_loss = tf.reduce_mean(ctc_ops.ctc_loss(targets, logits, seq_length))

# 优化器
learning_rate = 0.001
optimizer = tf.train.AdamOptimizer(learning_rate=learning_rate).minimize(avg_loss)

# 使用CTC decoder
with tf.name_scope("decode"):
    decoded, log_prob = ctc_ops.ctc_beam_search_decoder(logits, seq_length, merge_repeated=False)

# 计算编辑距离
with tf.name_scope("accuracy"):
    distance = tf.edit_distance(tf.cast(decoded[0], tf.int32), targets)
    # 计算label error rate (accuracy)
    ler = tf.reduce_mean(distance, name='label_error_rate')

#迭代次数
epochs = 100
#模型保存地址
savedir = "saver/"
#如果该目录不存在,新建
if os.path.exists(savedir) == False:
    os.mkdir(savedir)

# 生成saver
saver = tf.train.Saver(max_to_keep=1)
# 创建session
with tf.Session() as sess:
    #初始化
    sess.run(tf.global_variables_initializer())
    # 没有模型的话,就重新初始化
    kpt = tf.train.latest_checkpoint(savedir)
    print("kpt:", kpt)
    startepo = 0
    if kpt != None:
        saver.restore(sess, kpt)
        ind = kpt.find("-")
        startepo = int(kpt[ind + 1:])
        print(startepo)

    # 准备运行训练步骤
    section = '\n{0:=^40}\n'
    print(section.format('Run training epoch'))

    train_start = time.time()
    for epoch in range(epochs):  # 样本集迭代次数
        epoch_start = time.time()
        if epoch < startepo:
            continue

        print("epoch start:", epoch, "total epochs= ", epochs)
        #######################run batch####
        n_batches_per_epoch = int(np.ceil(len(labels) / batch_size))
        print("total loop ", n_batches_per_epoch, "in one epoch,", batch_size, "items in one loop")

        train_cost = 0
        train_ler = 0
        next_idx = 0

        for batch in range(n_batches_per_epoch):  # 一次batch_size,取多少次
            # 取数据
            print('开始获取数据咯:' + str(batch))
            next_idx, source, source_lengths, sparse_labels = next_batch(wav_files,labels,next_idx ,batch_size)
            print('结束咯')
            feed = {input_tensor: source, targets: sparse_labels, seq_length: source_lengths,
                    keep_dropout: keep_dropout_rate}

            # 计算 avg_loss optimizer ;
            batch_cost, _ = sess.run([avg_loss, optimizer], feed_dict=feed)
            train_cost += batch_cost
            #验证模型的准确率,比较耗时,我们训练的时候全力以赴,所以这里先不跑
            # if (batch + 1) % 20 == 0:
            #     print('loop:', batch, 'Train cost: ', train_cost / (batch + 1))
            #     feed2 = {input_tensor: source, targets: sparse_labels, seq_length: source_lengths, keep_dropout: 1.0}
            #
            #     d, train_ler = sess.run([decoded[0], ler], feed_dict=feed2)
            #     dense_decoded = tf.sparse_tensor_to_dense(d, default_value=-1).eval(session=sess)
            #     dense_labels = sparse_tuple_to_texts_ch(sparse_labels, words)
            #
            #     counter = 0
            #     print('Label err rate: ', train_ler)
            #     for orig, decoded_arr in zip(dense_labels, dense_decoded):
            #         # convert to strings
            #         decoded_str = ndarray_to_text_ch(decoded_arr, words)
            #         print(' file {}'.format(counter))
            #         print('Original: {}'.format(orig))
            #         print('Decoded:  {}'.format(decoded_str))
            #         counter = counter + 1
            #         break

            #每训练100次保存一下模型
            if (batch + 1) % 100 == 0:
                saver.save(sess, savedir + "saver.cpkt", global_step=epoch)
        epoch_duration = time.time() - epoch_start

        log = 'Epoch {}/{}, train_cost: {:.3f}, train_ler: {:.3f}, time: {:.2f} sec'
        print(log.format(epoch, epochs, train_cost, train_ler, epoch_duration))


    train_duration = time.time() - train_start
    print('Training complete, total duration: {:.2f} min'.format(train_duration / 60))


