一看就懂!Springboot和Spring整合Redis 监听KEY失效事件
目录
- 一、前言
- 二、原理解释一波
- 三、Redis安装
- 四、修改redis配置
- 五、Springboot项目
- 1.引入依赖
- 2.添加配置
- 3.添加相关的类
- 4.测试
- 六、Spring项目
- 1.引入依赖
- 2.配置文件
- 3.测试一
- 4.订阅配置
- 5.测试二
- 七、总结
一、前言
redis 监听key失效回调事件是一个非常有用的监听事件。本文就来快速实现一下。下面将会介绍两种版本,一种是Springboot的版本,另一种是Spring的版本。
二、原理解释一波
原理很简单,采用了Redis自带的订阅/发布结构。当key失效之后,会向同一个库的 __keyevent@0__:expired 主题发布一个订阅信息,信息内容就是失效的key。
因此监听key失效的实现就就就就就很简单了。

还品不出来?我们订阅这个主题不就能获取到了失效事件?
三、Redis安装
四、修改redis配置
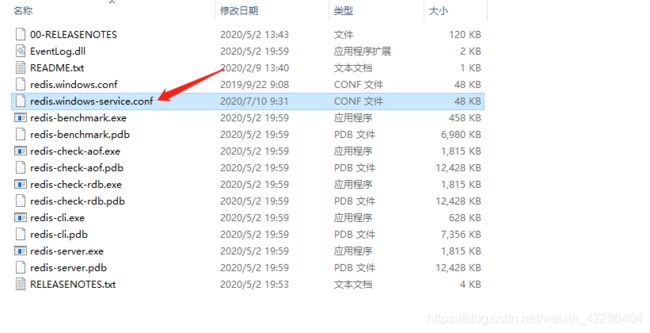
window版本,打开redis根目录下redis.windows-service.conf

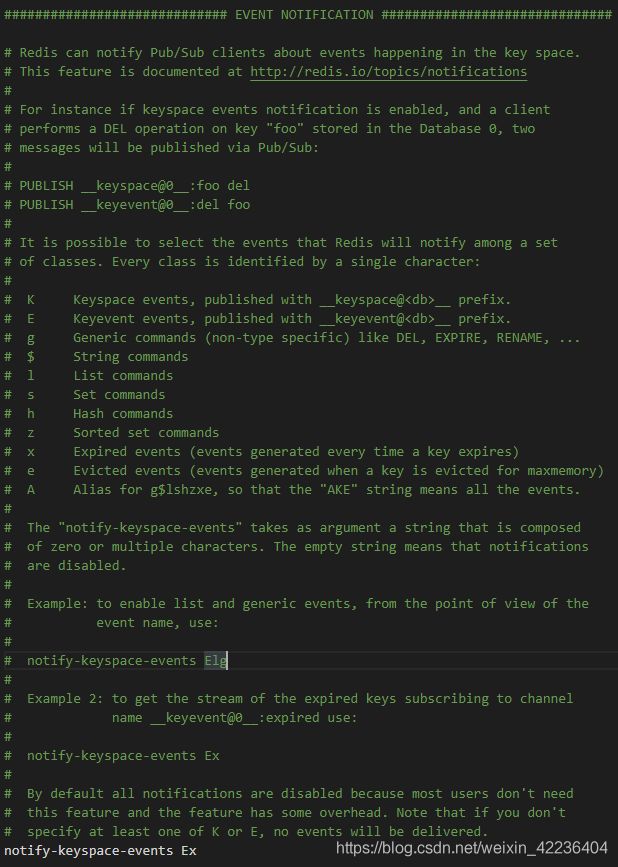
Crtl+F 搜索notify,找到892行这个notify0keyspace-events 后面修改为Ex,如图。

解释丢在这里。不会吧不会吧,不会还有人读不懂英文吧?


算了,我还是提一下吧。头保命
K:keyspace 事件,事件以 keyspace@ 为前缀进行发布
E:keyevent 事件,事件以 keyevent@ 为前缀进行发布
g:一般性的,非特定类型的命令,比如del,expire,rename等
$:字符串特定命令
l:列表特定命令
s:集合特定命令
h:哈希特定命令
z:有序集合特定命令
x:过期事件,当某个键过期并删除时会产生该事件
e:驱逐事件,当某个键因 maxmemore 策略而被删除时,产生该事件
A:g$lshzxe的别名,因此”AKE”意味着所有事件
linux版本同理,修改redis.conf配置文件
小提一下,重要: docker镜像redis 默认无配置文件,需要自己挂载。我这里也是没有挂载。所以不演示了。
重要的事情说三遍,重启Redis!重启Redis!重启Redis!
五、Springboot项目
1.引入依赖
修改pom.xml
            org.springframework.boot
            spring-boot-starter-data-redis
2.添加配置
修改application.properties
spring.redis.port=6379 # 端口
spring.redis.host=127.0.0.1 # 主机地址
spring.redis.database=0 # 选择库
3.添加相关的类
简易配置redis。
@Configuration
public class RedisConfiguration {

    @Autowired
    private RedisConnectionFactory redisConnectionFactory;

    @Bean
    public RedisMessageListenerContainer redisMessageListenerContainer() {
        RedisMessageListenerContainer redisMessageListenerContainer = new RedisMessageListenerContainer();
        redisMessageListenerContainer.setConnectionFactory(redisConnectionFactory);
        return redisMessageListenerContainer;
    }
}
写一个监听器。
@Component
public class KeyExpiredListener extends KeyExpirationEventMessageListener {
    private static Logger logger = LoggerFactory.getLogger(TestRecall.class);

    public KeyExpiredListener(RedisMessageListenerContainer listenerContainer) {
        super(listenerContainer);
    }
   @Bean
    public ChannelTopic expiredTopic() {
        return new ChannelTopic("__keyevent@0__:expired");  // 选择0号数据库
    }
    //这里是回调函数失效的时候回调用这个函数
    @Override
    public void onMessage(Message message, byte[] pattern) {
        logger.info("key 失效回调事件触发");

        System.out.println(new String(message.getBody()));
        System.out.println(new String(message.getChannel()));
        System.out.println(new String(pattern));
        super.onMessage(message, pattern);

    }
}
4.测试
写一个测试类。
/**
 * 实现ApplicationRunner接口
 * 在springboot启动时会自动开启一个线程执行此run方法
 */
@Component
public class TestRecall implements ApplicationRunner {

    private static Logger logger = LoggerFactory.getLogger(TestRecall.class);

    @Autowired
    private StringRedisTemplate redisTemplate;

    @Override
    public void run(ApplicationArguments args) throws Exception {
        // 设置一个缓存,3秒后过期
        redisTemplate.opsForValue().set("key", "大誌", 3, TimeUnit.SECONDS);
        logger.info("设置缓存成功");
    }
}
启动项目,三秒后可以看到控制台打印信息。

正式开发中,在监听器处理业务逻辑即可。
六、Spring项目
百度一搜,全部都是上面Springboot+Redis。Spring整合起来实在是 太累了。下面的步骤其实你应该已经配置好了,本来不想写的,还是把他们贴上。如果你已经可以对redis进行操作了,可以直接跳过配进入第五点订阅配置。
1.引入依赖
这里引入2020年7月10日能获取到的最新版本。为了方便测试,我导入了mvc,进行web测试。
当然可以不用,我们细看原理,归根结底都是redis的操作。手动往redis里加个3秒过期的缓存其实是一样的。
        <!-- https://mvnrepository.com/artifact/org.springframework/spring-core -->
        <dependency>
            <groupId>org.springframework</groupId>
            <artifactId>spring-core</artifactId>
            <version>5.2.7.RELEASE</version>
        </dependency>

        <!-- https://mvnrepository.com/artifact/redis.clients/jedis -->
        <dependency>
            <groupId>redis.clients</groupId>
            <artifactId>jedis</artifactId>
            <version>3.3.0</version>
        </dependency>

        <!-- https://mvnrepository.com/artifact/org.springframework.data/spring-data-redis -->
        <dependency>
            <groupId>org.springframework.data</groupId>
            <artifactId>spring-data-redis</artifactId>
            <version>2.3.1.RELEASE</version>
        </dependency>

        <!-- https://mvnrepository.com/artifact/org.springframework/spring-webmvc -->
        <dependency>
            <groupId>org.springframework</groupId>
            <artifactId>spring-webmvc</artifactId>
            <version>5.2.7.RELEASE</version>
        </dependency>
2.配置文件
新建applicationContext.xml。先上redis的基础配置,这里就不解释了哈,大同小异。
<?xml version="1.0" encoding="UTF-8"?>
<beans xmlns="http://www.springframework.org/schema/beans"
       xmlns:xsi="http://www.w3.org/2001/XMLSchema-instance" xmlns:p="http://www.springframework.org/schema/p"
       xmlns:redis="http://www.springframework.org/schema/redis"
       xsi:schemaLocation="http://www.springframework.org/schema/beans http://www.springframework.org/schema/beans/spring-beans.xsd http://www.springframework.org/schema/redis http://www.springframework.org/schema/redis/spring-redis.xsd">
    <bean id="annotationPropertyConfigurerRedis"
          class="org.springframework.beans.factory.config.PropertyPlaceholderConfigurer">
        <property name="order" value="1"/>
        <property name="ignoreUnresolvablePlaceholders" value="true"/>
        <property name="locations">
            <list>
                <value>classpath:redis.properties</value>
            </list>
        </property>
    </bean>

    <!-- redis数据源 -->
    <bean id="poolConfig" class="redis.clients.jedis.JedisPoolConfig">
        <!-- 最大空闲数 -->
        <property name="maxIdle" value="${redis.maxIdle}"/>
        <!-- 最大空连接数 -->
        <property name="maxTotal" value="${redis.maxTotal}"/>
        <!-- 最大等待时间 -->
        <property name="maxWaitMillis" value="${redis.maxWaitMillis}"/>
        <!-- 返回连接时,检测连接是否成功 -->
        <property name="testOnBorrow" value="${redis.testOnBorrow}"/>
    </bean>

    <bean id="jedisConnectionFactory"
          class="org.springframework.data.redis.connection.jedis.JedisConnectionFactory"
          p:use-pool="true"/>

    <!-- Spring-redis连接池管理工厂 -->
    <bean id="redisStandaloneConfiguration"
          class="org.springframework.data.redis.connection.RedisStandaloneConfiguration">
        <!-- IP地址 -->
        <property name="hostName" value="${redis.host}"/>
        <!-- 端口号 -->
        <property name="port" value="${redis.port}"/>

        <property name="database" value="${redis.database}"/>
    </bean>

    <!-- redis template definition -->
    <bean id="redisTemplate" class="org.springframework.data.redis.core.RedisTemplate"
          p:connection-factory-ref="jedisConnectionFactory">
        <property name="keySerializer">
            <bean class="org.springframework.data.redis.serializer.StringRedisSerializer"/>
        </property>
        <property name="valueSerializer">
            <bean class="org.springframework.data.redis.serializer.JdkSerializationRedisSerializer"/>
        </property>
        <property name="hashKeySerializer">
            <bean class="org.springframework.data.redis.serializer.StringRedisSerializer"/>
        </property>
        <property name="hashValueSerializer">
            <bean class="org.springframework.data.redis.serializer.JdkSerializationRedisSerializer"/>
        </property>
        <!--开启事务  -->
        <property name="enableTransactionSupport" value="true"/>
    </bean>
</beans>
配置mvc
<?xml version="1.0" encoding="UTF-8"?>
<beans xmlns="http://www.springframework.org/schema/beans"
       xmlns:xsi="http://www.w3.org/2001/XMLSchema-instance"
       xmlns:context="http://www.springframework.org/schema/context"
       xmlns:mvc="http://www.springframework.org/schema/mvc"
       xsi:schemaLocation="http://www.springframework.org/schema/mvc http://www.springframework.org/schema/mvc/spring-mvc-4.3.xsd
		http://www.springframework.org/schema/beans http://www.springframework.org/schema/beans/spring-beans-3.2.xsd
		http://www.springframework.org/schema/context http://www.springframework.org/schema/context/spring-context-4.3.xsd">

    <!--SpringMVC的配置文件,包含网站跳转逻辑的控制,配置  -->
    <context:component-scan base-package="com.dazhi" use-default-filters="false">
        <!--只扫描控制器。  -->
        <context:include-filter type="annotation" expression="org.springframework.stereotype.Controller" />
        <context:include-filter type="annotation" expression="org.springframework.web.bind.annotation.ControllerAdvice" />
    </context:component-scan>


    <!--两个标准配置  -->
    <!-- 将springmvc不能处理的请求交给tomcat -->
    <mvc:default-servlet-handler/>
    <!-- 能支持springmvc更高级的一些功能,JSR303校验,快捷的ajax...映射动态请求 -->
    <mvc:annotation-driven/>
</beans>
当然还有web.xml
<?xml version="1.0" encoding="UTF-8"?>
<web-app xmlns:xsi="http://www.w3.org/2001/XMLSchema-instance"
         xmlns="http://java.sun.com/xml/ns/javaee"
         xsi:schemaLocation="http://java.sun.com/xml/ns/javaee http://java.sun.com/xml/ns/javaee/web-app_2_5.xsd"
         id="WebApp_ID" version="2.5">

    <!--1、启动Spring的容器  -->
    <!-- needed for ContextLoaderListener -->
    <context-param>
        <param-name>contextConfigLocation</param-name>
        <param-value>classpath:applicationContext.xml</param-value>
    </context-param>

    <!-- Bootstraps the root web application context before servlet initialization -->
    <listener>
        <listener-class>org.springframework.web.context.ContextLoaderListener</listener-class>
    </listener>

    <!--2、springmvc的前端控制器,拦截所有请求  -->
    <!-- The front controller of this Spring Web application, responsible for handling all application requests -->
    <servlet>
        <servlet-name>dispatcherServlet</servlet-name>
        <servlet-class>org.springframework.web.servlet.DispatcherServlet</servlet-class>
        <init-param>
            <param-name>contextConfigLocation</param-name>
            <param-value>classpath:dispatcherServlet-servlet.xml</param-value>
        </init-param>
        <load-on-startup>1</load-on-startup>
    </servlet>

    <!-- Map all requests to the DispatcherServlet for handling -->
    <servlet-mapping>
        <servlet-name>dispatcherServlet</servlet-name>
        <url-pattern>/</url-pattern>
    </servlet-mapping>


</web-app>
3.测试一
完成上面的配置,确保项目可以对redis进行设置和获取缓存。
写一个测试类
@RestController
@RequestMapping("/test")
public class TestController {

    @Resource
    private RedisTemplate<String, Object> redisTemplate;

    @GetMapping("/set")
    public String setValue() {
        System.out.println("进入set方法");
        redisTemplate.opsForValue().set("key", "大誌", 3, TimeUnit.SECONDS);
        String key = (String) redisTemplate.opsForValue().get("key");
        System.out.println(key);
        return "ok";
    }
}
4.订阅配置
接下来就是订阅主题配置了。最简单的方法!查看官网Spring Data Redis这里面就有步骤。
下面一步步来
1.新增redis配置,这里是有两种配置形式,都可以取。不过用其中一种就可以了。
形式一
    <!-- the default ConnectionFactory -->
    <redis:listener-container connection-factory="jedisConnectionFactory">
        <!-- the method attribute can be skipped as the default method name is "handleMessage" -->
        <redis:listener ref="listener" method="handleMessage" topic="__keyevent@0__:expired"/>
    </redis:listener-container>

    <bean id="listener" class="com.dazhi.MyMessageDelegate"/>
形式二
        <bean id="messageListener" class="org.springframework.data.redis.listener.adapter.MessageListenerAdapter">
            <constructor-arg name="delegate">
                <bean class="com.dazhi.MyMessageDelegate"/>
            </constructor-arg>
            <constructor-arg name="defaultListenerMethod" value="handleMessage">
            </constructor-arg>
        </bean>

        <bean id="redisContainer" class="org.springframework.data.redis.listener.RedisMessageListenerContainer">
            <property name="connectionFactory" ref="jedisConnectionFactory"/>
            <property name="messageListeners">
                <map>
                    <entry key-ref="messageListener">
                        <bean class="org.springframework.data.redis.listener.ChannelTopic">
                            <!--    选择监听0号库的事件-->
                            <constructor-arg value="__keyevent@0__:expired"/>
                        </bean>
                    </entry>
                </map>
            </property>
        </bean>
2.新建处理订阅接口
public interface MessageDelegate {
    void handleMessage(String message);

    void handleMessage(Map message);

    void handleMessage(byte[] message);

    void handleMessage(Serializable message);

    // pass the channel/pattern as well
    void handleMessage(Serializable message, String channel);
}
3.实现该接口
u1s1,在这里我掉进了大坑。logger竟然没有打印东西,还让我一直以为我配置有问题,打上断点走了一趟才发现是进了方法的。qwq
public class MyMessageDelegate implements MessageDelegate {

    private Logger logger = LoggerFactory.getLogger(MyMessageDelegate.class);

    public void handleMessage(String message) {
    }

    public void handleMessage(Map message){
    }

    public void handleMessage(byte[] message) {
    }

    public void handleMessage(Serializable message) {
        String str = "Serializable message =>" + message;
        System.out.println(str);
        logger.info(str);
    }

    public void handleMessage(Serializable message, String channel) {
    }
}
5.测试二
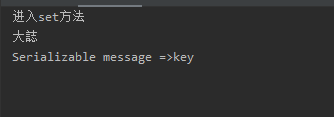
启动项目,再往redis加入新缓存。三秒之后可以看到只有正常的syso输出了,logger没有打印东西。

七、总结
总的来说,把原理搞明白了,就是订阅一个主题的事儿,不是什么难事。
有什么问题、难题先找官网总没错。
—————————————————————————————————————————————
有什么问题可以评论或者私信我,每日在线解(LIAO)疑(SAO)。


