mysql的主从复制(bin_log,gtid)
MySQL Replication介绍:
MySQL 主从复制是指数据可以从一个MySQL数据库服务器主节点复制到一个或多个从节点。MySQL 默认采用异步复制方式,这样从节点不用一直访问主服务器来更新自己的数据,数据的更新可以在远程连接上进行,从节点可以复制主数据库中的所有数据库或者特定的数据库,或者特定的表。
- MySQL 主从复制主要用途
- 读写分离
- 数据实时备份,当系统中某个节点发生故障时,可以方便的故障切换
- 高可用HA
- 架构扩展
随着系统中业务访问量的增大,如果是单机部署数据库,就会导致I/O访问频率过高。有了主从复制,增加多个数据存储节点,将负载分布在多个从节点上,降低单机磁盘I/O访问的频率,提高单个机器的I/O性能。 - MySQL 主从形式
- 一主一从
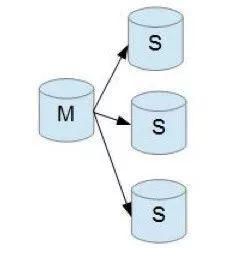
- 一主多从,提高系统的读性能
一主一从和一主多从是最常见的主从架构,实施起来简单并且有效,不仅可以实现HA,而且还能读写分离,进而提升集群的并发能力。
- 多主一从 (从5.7开始支持)
多主一从可以将多个mysql数据库备份到一台存储性能比较好的服务器上。
在这里插入图片描述
- 双主复制
双主复制,也就是互做主从复制,每个master既是master,又是另外一台服务器的slave。这样任何一方所做的变更,都会通过复制应用到另外一方的数据库中。 - 级联复制
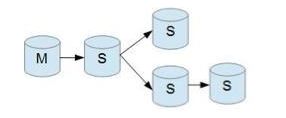
级联复制模式下,部分slave的数据同步不连接主节点,而是连接从节点。因为如果主节点有太多的从节点,就会损耗一部分性能用于replication,那么我们可以让3~5个从节点连接主节点,其它从节点作为二级或者三级与从节点连接,这样不仅可以缓解主节点的压力,并且对数据一致性没有负面影响。 - MySQL 主从复制原理
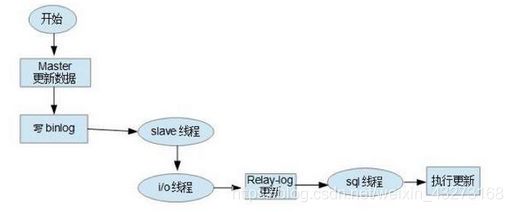
MySQL主从复制涉及到三个线程,一个运行在主节点(log dump thread),其余两个(I/O thread, SQL thread)运行在从节点,如下图所示:
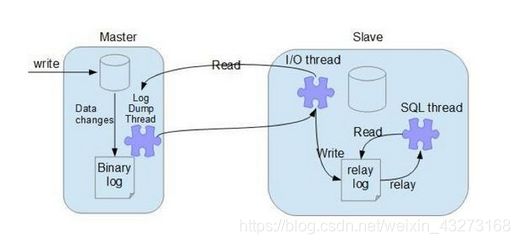
- 主节点 binary log dump 线程
当从节点连接主节点时,主节点会创建一个log dump 线程,用于发送bin-log的内容。在读取bin-log中的操作时,此线程会对主节点上的bin-log加锁,当读取完成,甚至在发动给从节点之前,锁会被释放。 - 从节点I/O线程
当从节点上执行start slave命令之后,从节点会创建一个I/O线程用来连接主节点,请求主库中更新的bin-log。I/O线程接收到主节点binlog dump 进程发来的更新之后,保存在本地relay-log中。 - 从节点SQL线程
SQL线程负责读取relay log中的内容,解析成具体的操作并执行,最终保证主从数据的一致性。
对于每一个主从连接,都需要三个进程来完成。当主节点有多个从节点时,主节点会为每一个当前连接的从节点建一个binary log dump 进程,而每个从节点都有自己的I/O进程,SQL进程。从节点用两个线程将从主库拉取更新和执行分成独立的任务,这样在执行同步数据任务的时候,不会降低读操作的性能。比如,如果从节点没有运行,此时I/O进程可以很快从主节点获取更新,尽管SQL进程还没有执行。如果在SQL进程执行之前从节点服务停止,至少I/O进程已经从主节点拉取到了最新的变更并且保存在本地relay日志中,当服务再次起来之后,就可以完成数据的同步。
- 复制的基本过程如下:
- 从节点上的I/O 进程连接主节点,并请求从指定日志文件的指定位置(或者从最开始的日志)之后的日志内容;
- 主节点接收到来自从节点的I/O请求后,通过负责复制的I/O进程根据请求信息读取指定日志指定位置之后的日志信息,返回给从节点。返回信息中除了日志所包含的信息之外,还包括本次返回的信息的bin-log file 的以及bin-log position;-
- 从节点的I/O进程接收到内容后,将接收到的日志内容更新到本机的relay log中,并将读取到的binary log文件名和位置保存到master-info 文件中,以便在下一次读取的时候能够清楚的告诉Master“我需要从某个bin-log 的哪个位置开始往后的日志内容,请发给我”;Slave 的 SQL线程检测到relay-log 中新增加了内容后,会将relay-log的内容解析成在祝节点上实际执行过的操作,并在本数据库中执行。
异步复制:
实验环境:主库server1 从库server2
bin_log复制
缺点:可能会导致事件的不完整性。
- 配置
- 安装数据库(从库,主库)
[root@server1 ~]# yum install mysql-community-client-5.7.24-1.el7.x86_64.rpm mysql-community-common-5.7.24-1.el7.x86_64.rpm mysql-community-libs-5.7.24-1.el7.x86_64.rpm mysql-community-libs-compat-5.7.24-1.el7.x86_64.rpm mysql-community-server-5.7.24-1.el7.x86_64.rpm -y - 打开数据库
[root@server1 ~]# systemctl start mysqld - 进行初始化,修改密码否则进入数据库也无法操作
注意:密码需要有数字 大小写字母 特殊字符 三者构成 缺一不可! 密码位数大于8
[root@server1 ~]# grep password /var/log/mysqld.log
2019-05-06T14:03:28.533321Z 1 [Note] A temporary password is generated for root@localhost: -lfm1q5>&BK>
[root@server1 ~]# mysql_secure_installation
Securing the MySQL server deployment.
Enter password for user root:
The existing password for the user account root has expired. Please set a new password.
New password:
Re-enter new password:
The ‘validate_password’ plugin is installed on the server.
The subsequent steps will run with the existing configuration
of the plugin.
Using existing password for root.
Estimated strength of the password: 100
Change the password for root ? ((Press y|Y for Yes, any other key for No) : n
… skipping.
By default, a MySQL installation has an anonymous user,
allowing anyone to log into MySQL without having to have
a user account created for them. This is intended only for
testing, and to make the installation go a bit smoother.
You should remove them before moving into a production
environment.
Remove anonymous users? (Press y|Y for Yes, any other key for No) : y
Success.
Normally, root should only be allowed to connect from
‘localhost’. This ensures that someone cannot guess at
the root password from the network.
Disallow root login remotely? (Press y|Y for Yes, any other key for No) : y
Success.
By default, MySQL comes with a database named ‘test’ that
anyone can access. This is also intended only for testing,
and should be removed before moving into a production
environment.
Remove test database and access to it? (Press y|Y for Yes, any other key for No) : y
-
Dropping test database…
Success. -
Removing privileges on test database…
Success.
Reloading the privilege tables will ensure that all changes
made so far will take effect immediately.
Reload privilege tables now? (Press y|Y for Yes, any other key for No) : y
Success.
All done!
- 编辑主库配置文件
[root@server1 ~]# vim /etc/my.cnf
server-id=1 # 数据库中的id号,唯一
log-bin=mysql-bin # 允许slave同步自己的二进制文件 - 修改从库mysql数据库的配置文件:
[root@server2 ~]# vim /etc/my.cnf
server-id=2 - 重启数据库
[root@server1 ~]# systemctl restart mysqld
[root@serve21 ~]# systemctl restart mysqld
-在主库mysql数据库中对从库授权用户同步用户repl
[root@server1 ~]# mysql -p
Enter password:
Welcome to the MySQL monitor. Commands end with ; or \g.
Your MySQL connection id is 2
Server version: 5.7.24-log MySQL Community Server (GPL)
Copyright © 2000, 2018, Oracle and/or its affiliates. All rights reserved.
Oracle is a registered trademark of Oracle Corporation and/or its
affiliates. Other names may be trademarks of their respective
owners.
Type ‘help;’ or ‘\h’ for help. Type ‘\c’ to clear the current input statement.
mysql> GRANT REPLICATION SLAVE ON . TO repl@‘172.25.254.%’ IDENTIFIED BY ‘Wsp+123ld’;
Query OK, 0 rows affected, 1 warning (0.10 sec)
mysql> SHOW MASTER STATUS; #查看master的状态
±-----------------±---------±-------------±-----------------±------------------+
| File | Position | Binlog_Do_DB | Binlog_Ignore_DB | Executed_Gtid_Set |
±-----------------±---------±-------------±-----------------±------------------+
| mysql-bin.000001 | 448 | | | |
±-----------------±---------±-------------±-----------------±------------------+
1 row in set (0.00 sec)
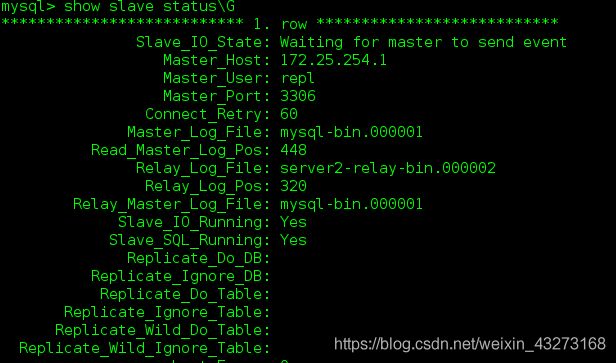
- 从库,将slave与master建立连接,开启slave,并查看两个线程(io_thread sql_thread)的状态是否为Yes
mysql> CHANGE MASTER TO MASTER_HOST=‘172.25.254.1’,
-> MASTER_USER=‘repl’,
-> MASTER_PASSWORD=‘Wsp+123ld’,
-> MASTER_LOG_FILE=‘mysql-bin.000001’,
-> MASTER_LOG_POS=448;
Query OK, 0 rows affected, 2 warnings (0.58 sec)
mysql> start slave;
Query OK, 0 rows affected (0.03 sec)
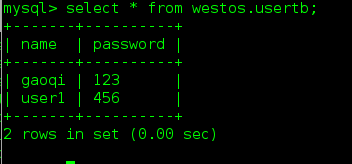
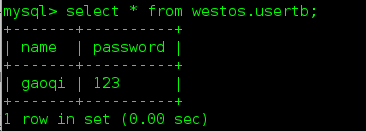
- 测试
- 主库写入
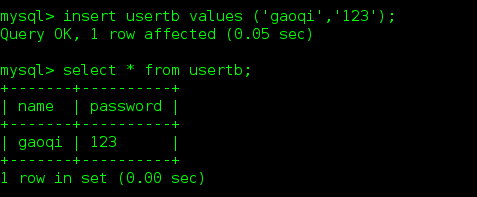
- 从库查看
gtig复制
-
原理:
-
主节点更新数据时,会在事务前产生GTID,一起记录到binlog日志中。
-
从节点的I/O线程将变更的bin log,写入到本地的relay log中。
-
SQL线程从relay log中获取GTID,然后对比本地binlog是否有记录(所以MySQL从节点必须要开启binary log)。如果有记录,说明该GTID的事务已经执行,从节点会忽略。如果没有记录,从节点就会从relay log中执行该GTID的事务,并记录到bin log。在解析过程中会判断是否有主键,如果没有就用二级索引,如果有就用全部扫描。
-
配置
-
修改主库和从和库的配置文件,重启数据库。
[root@server1 ~]# vim /etc/my.cnf
gtid_mode=ON
enforce-gtid-consistency=true
[root@server1 ~]# systemctl restart mysqld -
从库停掉slave,重新建立连接,并查看线程状态
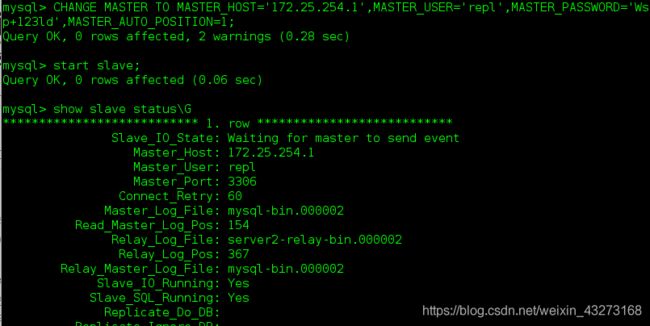
-
测试
-
主库写入
mysql> insert usertb values (‘user1’,‘456’);
Query OK, 1 row affected (0.07 sec) -
从库查看