SpringCloud简单实例
SpringCloud简单实例
SpringCloud是基于SpringBoot,需要先了解SpringBoot的相关知识。
这里只是一个非常简单的包含注册表、服务提供者、服务消费者三者的例子。
源码见:
https://github.com/mengyuxiaofeng/SpringCloud
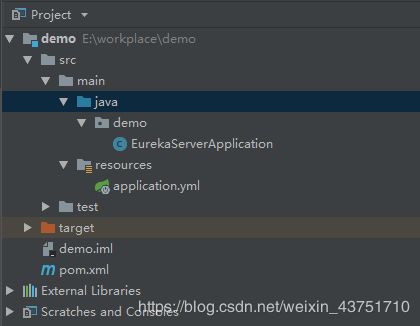
启动类
package demo;

import org.springframework.boot.SpringApplication;
import org.springframework.boot.autoconfigure.SpringBootApplication;
import org.springframework.cloud.netflix.eureka.server.EnableEurekaServer;

@SpringBootApplication
@EnableEurekaServer    //声明这是一个Eureka服务器
public class EurekaServerApplication {
	public static void main(String[] args)
	{
		SpringApplication.run(EurekaServerApplication.class, args);//后面是直接设置端口号
	}
}
它的application.yml配置文件如下:(在resource文件下)
server:
  port: 8761    #声明端口号
eureka:
  client:
    register-with-eureka: false    #默认是true,将自己注册到eureka上
    fetch-registry: false      #是否从eureka上获取信息,由于本案例是单机,无需从别的eureka上获取注册信息
    service-url:
      defaultZone: http://localhost:8761/eureka    #设置与eureka交互的地址,查询服务和注册服务都需要依赖这个地址,默认是:http://localhost:8761/eureka
它的pom.xml如下:
  4.0.0
  com.huoli.SpringCloudDemo
  demo
  0.0.1-SNAPSHOT


		org.springframework.boot
		spring-boot-starter-parent
		1.5.6.RELEASE


            org.springframework.cloud
            spring-cloud-dependencies
            Dalston.SR3
            pom
            import


      org.springframework.boot
      spring-boot-starter-jetty


      org.springframework.boot
      spring-boot-starter-test
      test


        org.springframework.cloud
        spring-cloud-starter-eureka


        org.springframework.cloud
        spring-cloud-starter-eureka-server


        javax.servlet
        javax.servlet-api


        maven-compiler-plugin

          1.8
          1.8
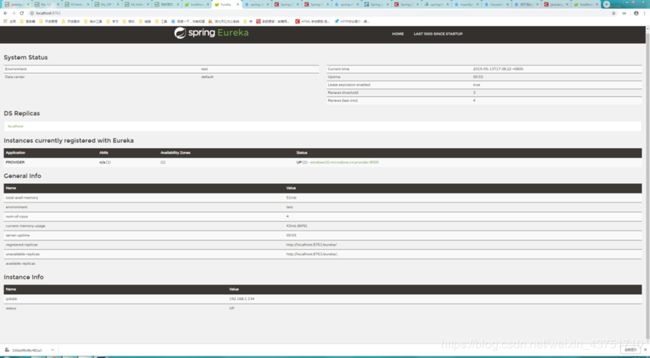
启动刚开始的类EurekaServerApplication,在浏览器中有如下显示(刚开始是没有服务提供者的,这里是当服务提供者已经启动了才出现的)

启动类
package demo;

import org.springframework.boot.SpringApplication;
import org.springframework.boot.autoconfigure.SpringBootApplication;
import org.springframework.cloud.client.discovery.EnableDiscoveryClient;

@SpringBootApplication
@EnableDiscoveryClient   //也可以用EnableDiscoveryClient代替,前者兼容性更大,后者仅能兼容Eureka
public class ServerProvider {
	public static void main(String[] args) {
        SpringApplication.run(ServerProvider.class, args);
    }
}
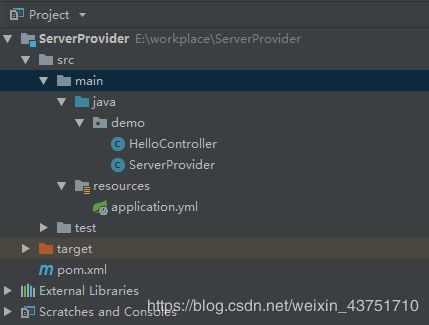
controller类(注意和启动类的位置)
package demo;

import org.springframework.web.bind.annotation.RequestMapping;
import org.springframework.web.bind.annotation.RestController;

@RestController
public class HelloController {
    @RequestMapping("hello")
    public String index() {
        System.out.println("index is called");
        return "Hello World";
    }
}
application.yml文件
server:
  port: 8000

spring:
  application:
    name: provider   #注册到Eureka Server上的应用名称
eureka:
  client:
    service-url:
      defaultZone: http://localhost:8761/eureka    #注册的位置
  instance:
    prefer-ip-address: true  #将自己的ip注册到EuekaServer上
pom.xml文件和注册表的一样
启动后,注册表的页面会有如下变化
![]()
启动类
package demo;

import org.springframework.boot.SpringApplication;
import org.springframework.boot.autoconfigure.SpringBootApplication;
import org.springframework.context.annotation.Bean;
import org.springframework.web.client.RestTemplate;

@SpringBootApplication
public class ServerConsumer {

    @Bean
    public RestTemplate restTemplate() {
        return new RestTemplate();
    }
    public static void main(String[] args) {
        SpringApplication.run(ServerConsumer.class, args);
    }
}
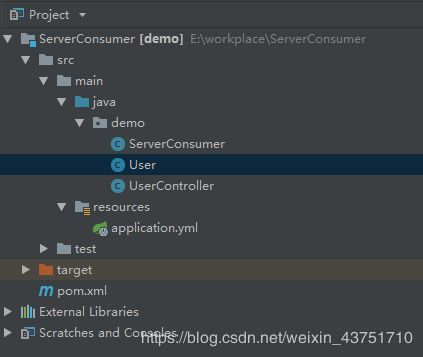
controller类(这也是我们需要在浏览器访问的)
package demo;

import org.springframework.beans.factory.annotation.Autowired;
import org.springframework.web.bind.annotation.GetMapping;
import org.springframework.web.bind.annotation.RestController;
import org.springframework.web.client.RestTemplate;
import demo.User;

@RestController
public class UserController {

    @Autowired
    private RestTemplate restTemplate;

    @GetMapping("/hello")
    public String getUser() {
        return this.restTemplate.getForObject("http://localhost:8000/hello", String.class);
    }
}
pom.xml还是和注册表的一样(但是都要写)
启动服务消费者,在浏览器中查看如下:


