使用Helm优化Kubernetes下的研发体验:实现持续交付流水线
接着上一篇《 使用Helm优化Kubernetes下的研发体验:基础设施即代码》中笔者介绍了如何在项目中使用Helm,在项目源码中,我们通过Dockerfile定义了项目是如何构建的,使用Helm定义了项目是如何部署的。 团队中的任何人员(角色)在获取源码的同时就已经具备了一键构建,一键部署的能力。
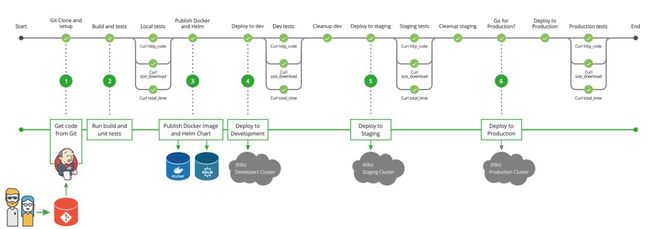
整体目标
![]()
开发: 持续提交代码并能够通过持续集成(CI)过程快速获取反馈,在通过CI验证后,能够自动化部署到开发环境,以便后续的进一步功能测试(手动/自动自动化测试)等;
测试: 在需要对项目功能进行验证时,可以一键部署测试环境,并且在此环境基础上可以完成功能验收(手动),以及全量的自动化验收测试等;
运维:一键部署生产环境,同时发布创建版本,以便在发布异常时能够快速回归。
 资料来源: https://dzone.com/articles/easily-automate-your-cicd-pipeline-with-jenkins-he
示例项目的代码可以从GitHub[1]下载,示例项目为containerization-spring-with-helm。接下来,我们将分阶段介绍如何通过Jenkinsfile定义整个过程。

项目构建阶段
![]()
    stage('Build And Test') {
        steps {

            dir('containerization-spring-with-helm') {
                sh 'docker build -t yunlzheng/spring-sample:$GIT_COMMIT .'
            }

        }
    }

发布镜像和Helm阶段
![]()
    stage('Publish Docker And Helm') {
      steps {

        withDockerRegistry([credentialsId: 'dockerhub', url: '']) {
          sh 'docker push yunlzheng/spring-sample:$GIT_COMMIT'
        }

        script {
          def filename = 'containerization-spring-with-helm/chart/values.yaml'
          def data = readYaml file: filename
          data.image.tag = env.GIT_COMMIT
          sh "rm $filename"
          writeYaml file: filename, data: data
        }

        script {
          def filename = 'containerization-spring-with-helm/chart/Chart.yaml'
          def data = readYaml file: filename
          data.version = env.GIT_COMMIT
          sh "rm $filename"
          writeYaml file: filename, data: data
        }

        dir('containerization-spring-with-helm') {
          sh 'helm push chart https://repomanage.rdc.aliyun.com/helm_repositories/26125-play-helm --username=$HELM_USERNAME --password=$HELM_PASSWORD  --version=$GIT_COMMIT'
        }

      }
    }
Push镜像
通过withDockerRegistry的上下文,Jenkins会确保docker client首先通过credentials dockerhub中定义的用户名和密码完成登录后,再运行docker push任务。这里我们使用当前代码版本的COMMIT_ID作为镜像的Tag,从而将Docker镜像版本与源码版本进行一一对应;
重写Chart镜像版本
通过readYaml读取chart的values.yaml内容到变量data后,通过writeYaml重写values.yaml中的镜像tag版本与当前构建镜像版本一致。
重写Chart版本
与镜像一样,我们希望Chart的版本与源码版本能够一一对应。
上传Chart
这里我们直接使用阿里云效提供的Helm仓库服务,点击开通私有仓库服务。通过Helm Push插件发布Chart到Helm仓库。
其中环境变量$HELM_USERNAME和$HELM_PASSWORD是通过jenkins的Credentials加载到环境变量中:
  environment {
        HELM_USERNAME = credentials('HELM_USERNAME')
        HELM_PASSWORD = credentials('HELM_PASSWORD')
} 
部署到开发/测试环境阶段
![]()
    stage('Deploy To Dev') {
      steps {
        dir('containerization-spring-with-helm') {
          dir('chart') {
            sh 'helm upgrade spring-app-dev --install --namespace=dev --set ingress.host=dev.spring-example.local .'
          }
        }
      }
    }

    stage('Deploy To Stageing') {
      steps {
        input 'Do you approve staging?'
        dir('containerization-spring-with-helm') {
          dir('chart') {
            sh 'helm upgrade spring-app-staging --install --namespace=staging --set ingress.host=staging.spring-example.local .'
          }
        }
      }
    }
使用helm upgrade命令可以在特定命名空间下部署或者升级已有的Chart:
helm upgrade spring-app-staging --install --namespace=staging --set ingress.host=staging.spring-example.local .
部署到生产环境阶段
![]()
    stage('Deploy To Production') {
      steps {
        input 'Do you approve production?'

        script {
            env.RELEASE = input message: 'Please input the release version',
            ok: 'Deploy',
            parameters: [
              [$class: 'TextParameterDefinition', defaultValue: '0.0.1', description: 'Cureent release version', name: 'release']
            ]
        }

        echo 'Deploy and release: $RELEASE'

        script {
          def filename = 'containerization-spring-with-helm/chart/Chart.yaml'
          def data = readYaml file: filename
          data.version = env.RELEASE
          sh "rm $filename"
          writeYaml file: filename, data: data
        }

        dir('containerization-spring-with-helm') {
          dir('chart') {
            sh 'helm lint'
            sh 'helm upgrade spring-app-prod --install --namespace=production --set ingress.host=production.spring-example.local .'
          }
          sh 'helm push chart https://repomanage.rdc.aliyun.com/helm_repositories/26125-play-helm --username=$HELM_USERNAME --password=$HELM_PASSWORD  --version=$RELEASE'
        }

      }
    }

这里,我们需要确保当前定义的版本是符合Sem规范的,因此这里使用了helm lint对Chart定义进行校验。
小结
![]()
回到我们的总体目标而言,通过基础设施及代码的方式,我们定义了一个相对完备且自描述的应用。通过流水线即代码的方式,定义了应用的端到端交付过程。通过Docker定义项目的构建过程,通过Helm实现Kubernetes下应用的发布管理,通过Jenkinsfile定义了软件的整个交付过程,并且不同职能的团队成员,可以方便的在此基础上实现协作。最后借用《持续交付》的话“提前并频繁地做让你感到痛苦的事!“希望大家都能够Happy Coding。
相关链接:
https://github.com/yunlzheng/project-samples
![]()
![]()
